Chapter 4. Going Mobile: Developing for Gear VR
In this chapter, we will learn to develop virtual reality applications for the flagship mobile device on the market today, Samsung’s Gear VR. The ideas we covered in the previous chapter on desktop VR translate directly into programming for mobile, but there are also unique concerns relating to the Android platform used to develop for the Gear VR. Once again, we will use the Unity3D engine to build our examples. But before we get into the details of coding, let’s explore this revolutionary new device.
In partnership with Oculus, Samsung has created a mobile VR solution that combines Oculus optics (the barrel distortion lenses) with new head-tracking technology, placed in a custom headset that houses a smartphone with a high-resolution display. Samsung released an “Innovator Edition” of the Gear VR in late 2014 for the Galaxy Note 4 phone, and another in early 2015 for the S6 line before rolling out a consumer release for S6/S7/Note 5. The Gear VR unit costs US$99.99 and can be purchased through Samsung’s online store. It only works with those phones, so this is not only a potentially pricey option (the phones can cost from US$600–$800 without a two-year plan), but also a restrictive one—at least for now. Still, the Gear VR is the highest-quality mobile VR on the market and provides a wonderful experience.
The Gear VR for S7 phones is depicted in Figure 4-1.
The Gear VR features high-resolution graphics, with a display resolution of 2560 × 1440 pixels (1280 × 1440 per eye). The headset contains a custom IMU based on Oculus technology that tracks much faster and with less latency than the IMU built into the phone.
The Gear VR housing has several intuitive input controls, including an eye adjustment wheel (for matching the device’s interpupillary distance to your own), and several controls that let you access the phone within: a volume control, a headphone jack, and, most importantly, a trackpad for touch input, known as the touchpad.
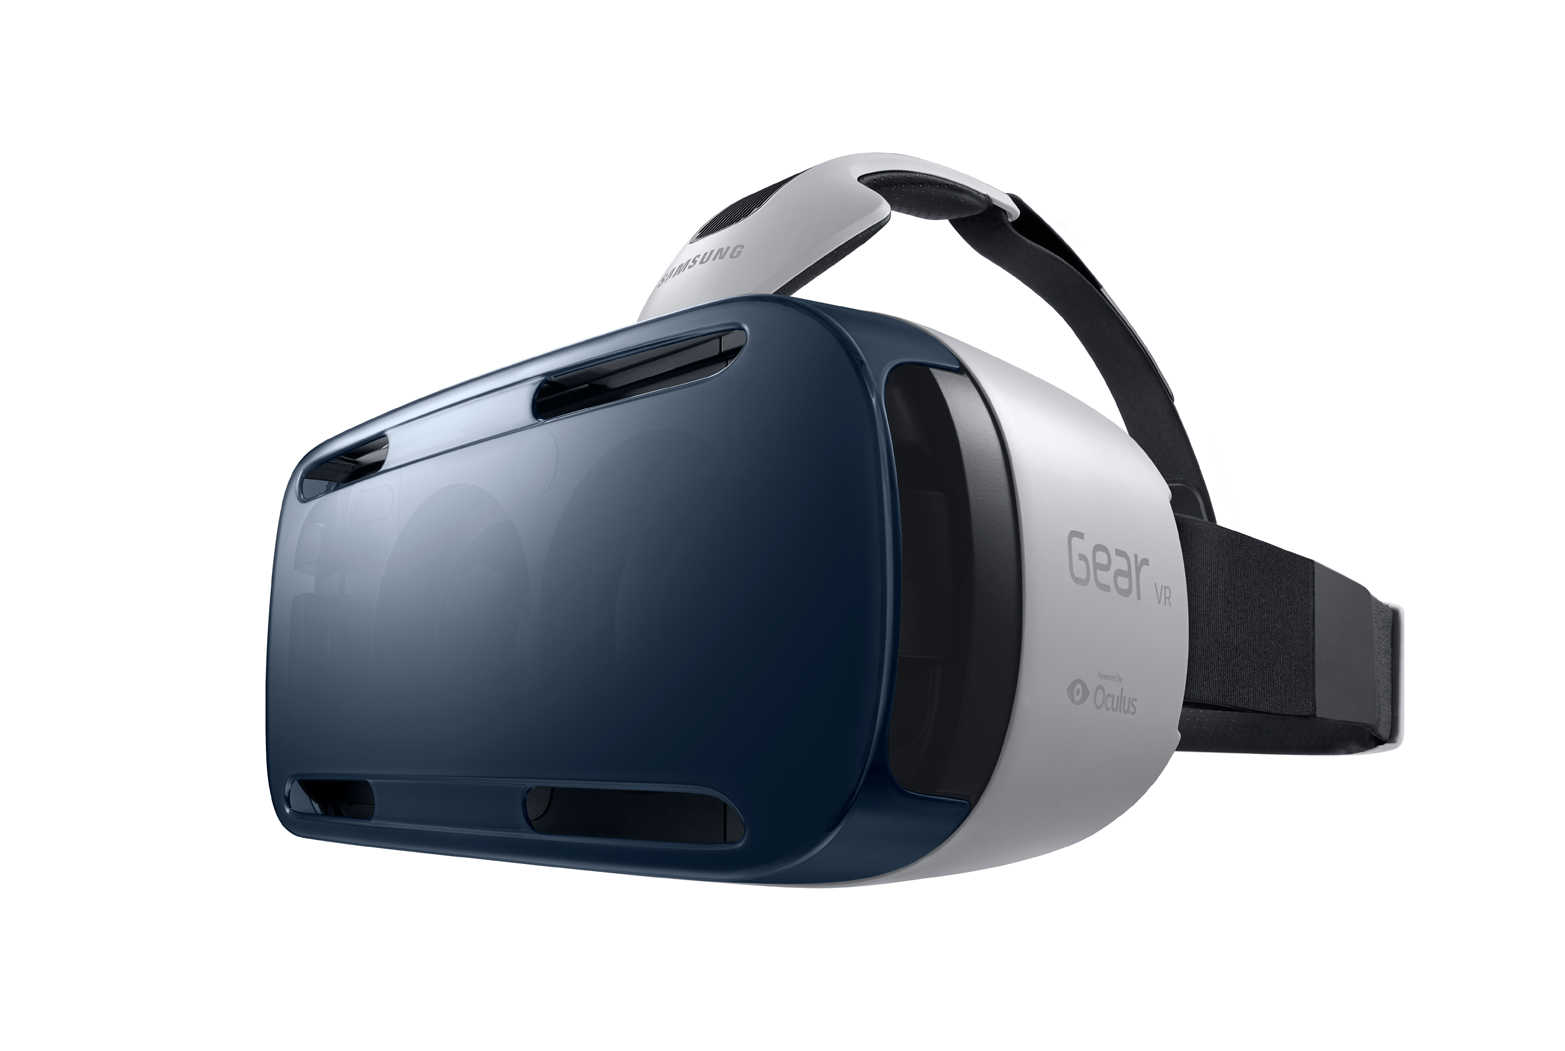
Figure 4-1. Samsung Gear VR
The Gear VR User Interface and Oculus Home
Beyond the big breakthroughs in ergonomics and resolution, the Gear VR features an innovative user interface for discovering, launching, and installing mobile VR applications called Oculus Home. Oculus Home is an app, but it is also a set of improvements to Samsung’s mobile operating system.
Oculus Home provides a completely immersive interface for browsing VR applications, so that you don’t have to remove the headset to launch a new app. While inside the store interface, you can also see system alerts for new emails, text messages, notifications, and so on. The net result is that you can have an uninterrupted VR experience, moving between applications and staying in there as long as you like, all while not being cut off from the other important goings-on of your phone.
A screenshot of Oculus Home is shown in Figure 4-2, with the Store interface selected, allowing you to browse for new apps to install.
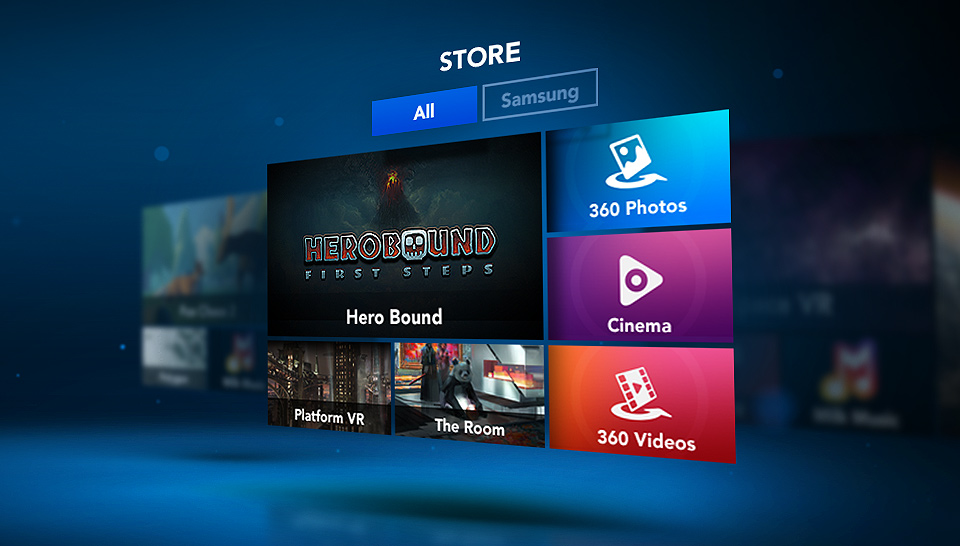
Figure 4-2. Oculus Home for Gear VR
Using the Oculus Mobile SDK
Developing applications for the Gear VR’s Android-based operating system requires the Oculus Mobile SDK, which is available on the Oculus developer website.
If you don’t have an account, sign up; it’s free. Once you are logged in to the site, do the following:
- Select Downloads from the top navigation bar.
- Under the SDK Runtime section, click the Details button to the right of Oculus Mobile SDK V1.0.0.1. Agree to the terms of the EULA and click Download.
- Unzip the SDK to your hard drive, in a location of your choice. I put mine in the /Applications folder on my MacBook.
- While you’re here, grab the Unity package for Oculus. Under the Engine Integration section, download Oculus Utilities for Unity 5 V1.3.2 by clicking the Details button, agreeing to the EULA, and clicking Download.
- Unzip the Oculus Utilities package to your hard drive, in a location of your choice. Again, I unzipped mine to my /Applications folder.
Setting Up the Android SDK
To develop applications that will work on the Gear VR, you need to use the Android SDK in conjunction with the Oculus Mobile SDK. To set up the Android SDK, go to http://bit.ly/install-android-sdk.
You can install the standalone SDK Tools, or you can get Android Studio. This is your choice. We will be using Android Studio for our Java work in Chapter 6, but you can always set that up later and just go with the standalone SDK Tools for now.
You will also want to learn about the Android debugging tools, because you may need to use them on the command line. There is a good write-up on these tools at http://bit.ly/android-debugging.
Generating an Oculus Signature File
You will need a signature file to run applications on your device. Applications that access the VR functionality of the Oculus Mobile SDK must be built with a unique signature in order to access low-level device functions through APIs provided by the SDK. This is not how you will deploy applications in practice—only properly signed Android package files (APKs) are needed as part of the Oculus Store deployment process—but it is required for deploying on your development devices during testing.
An online signature file generating tool is available at http://bit.ly/oculus-osig. It contains detailed instructions for how to obtain your device ID and use that to generate a signature file. Essentially, you have to run the following command in a terminal (shell) window:
adb devices
This command will print a unique ID for your device. Copy that ID and enter it into the field at the top of the signature tool page, and you will get a file to download. Once you have downloaded that file, squirrel it away in a safe place on your computer; you will need it for all Gear VR development, regardless of which development tool you decide to use.
Setting Up Your Device for USB Debugging
You will also need to set up USB debugging on your device in order to build and deploy applications to it. There’s a trick to it, essentially an Easter egg in the Note 4 or S6 phone’s settings: go to Settings → General → About Device, and tap on your build number seven times (for further details, see http://bit.ly/enable-dev-mode).
Once you have done all the above steps outlined here, you’re ready to use the Oculus Mobile SDK to develop Gear VR applications. Please be patient; Android setup can be tricky, and the Oculus Mobile SDK adds a few extra wrinkles.
Developing for Gear VR Using Unity3D
In the last chapter we learned about creating desktop Oculus Rift applications using Unity3D, the powerful, affordable game engine from Unity Technologies. We can also use Unity3D to create applications for Gear VR, using the Oculus Mobile SDK.
Do I Have to Use Unity?
You may be wondering if Unity3D is the only way to build for Gear VR. The short answer is, “no.” Gear VR development is, ultimately, Android development. Unity has several features that make Android development easier, especially for creating games and virtual reality. But if you are not a Unity developer, or if you prefer writing native Android code over using middleware, you have other options. One such option is GearVRf, a native Java framework created by Samsung and recently released as an open source library.
Setting Up Your Unity3D Environment
Now that you have downloaded the Oculus Mobile SDK, set up your Android environment, and created a signature file, you are ready to start using the Oculus Utilities for Unity package. (If you have not already done so, please download the package from the Oculus developer site, as described in the previous section.) You do this by importing the package into a Unity project. Let’s start by creating an empty Unity project. Launch Unity3D, or if it is already running, select File → New Project.
Name your new project UnityGearVRTest. Now that the project has been created, we will import the SDK into it and build a simple application.
Figure 4-3 shows a screenshot of the package importing process. To import the Oculus Utilities package into the new project, follow these steps:
- Find the Assets pane of the Project tab in the Unity IDE. Choose Assets → Import Package → Custom Package.
- You should see a file dialog box. Use it to navigate to the location of the downloaded Oculus Utilities package (on my MacBook it’s Applications/ovr_unity_utilities_1.3.2/).
- Select the file OculusUtilities.unitypackage.
- Once you have clicked Open, Unity will scan the file and present you with a list of package contents to import. For now, let’s just bring them all into the project: make sure that all of the objects in the list are checked, and click the Import button. You will now see assets present in the Assets pane, where there were none before. In particular, you should see folders named OVR and Plugins.
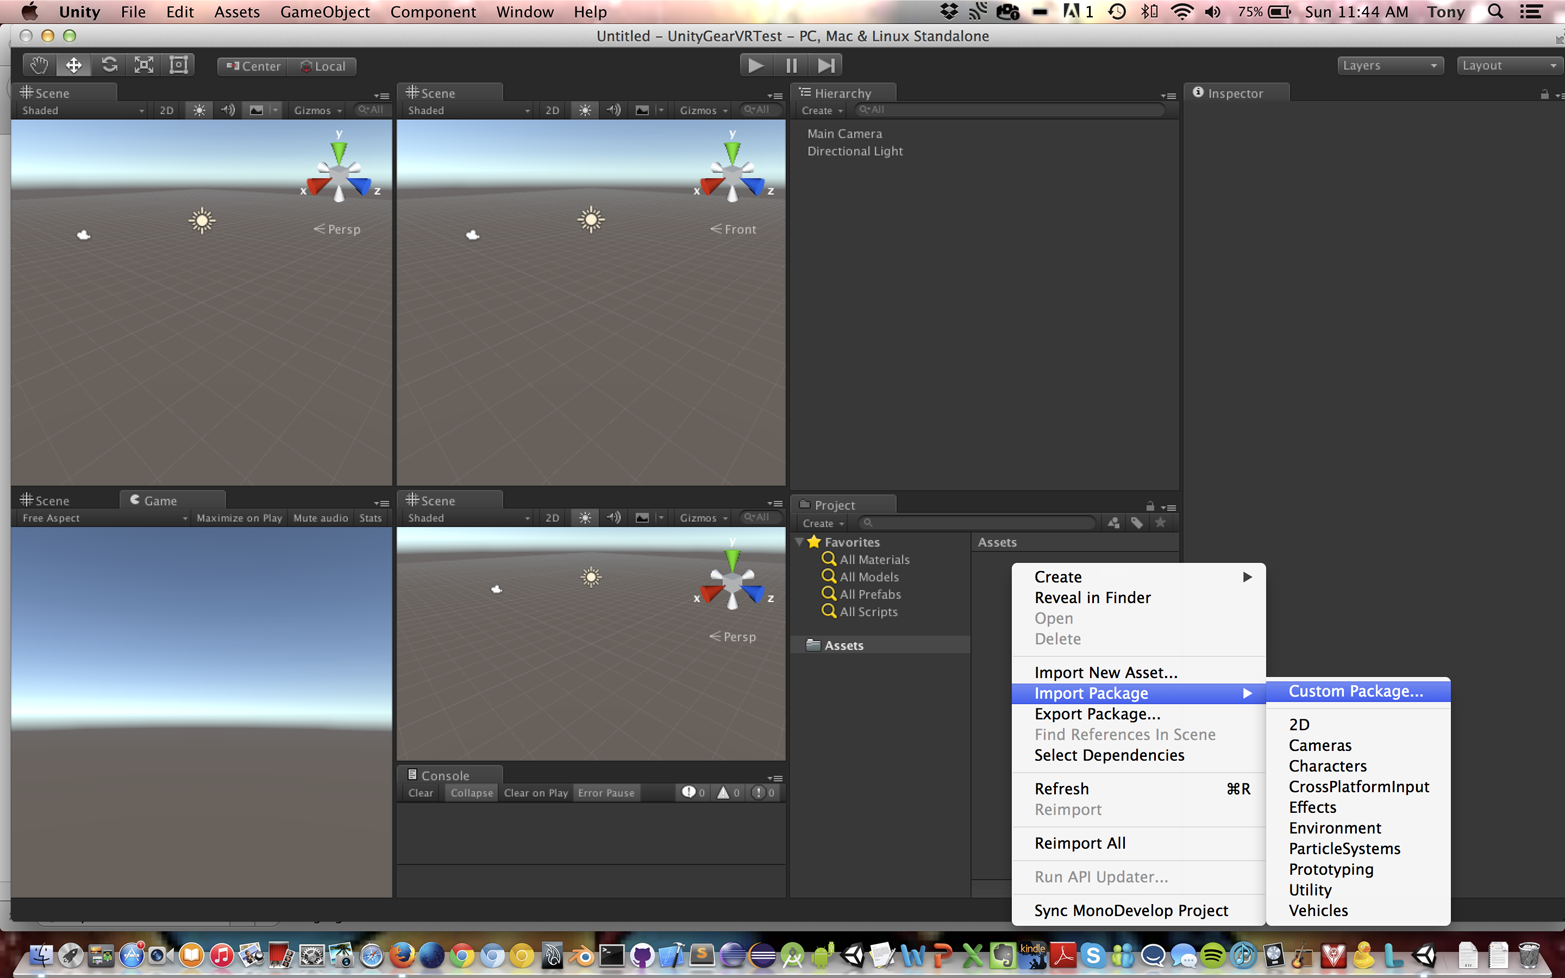
Figure 4-3. Importing the Oculus Utilities package into a Unity project
You’re good to go! You can now build Gear VR applications using Unity.
A Simple Unity3D Sample
Once you have imported the Oculus Utilities package into your project, you are ready to build your first Gear VR sample. The package comes with example content, which will be included in your project. In just a few steps you can have it running on your phone. The demo we are going to build is pictured in Figure 4-4, a screenshot from my Note 4 phone before inserting it into the Gear VR headset.
To add the assets for the Cubes World application to your new project, select the folder Assets/OVR/Scenes in the Project pane of the Unity interface. In the detail pane you will see an icon for a Unity scene named Cubes; double-click that icon. You should now see the scene in the main editor view. You can hit the Play button at the top of the Unity window to get a preview on your computer.
Now, to build the app for your phone, you will need to adjust some settings. First, open the Build Settings dialog by selecting File → Build Settings from the main menu. You will see a dialog that resembles the screenshot in Figure 4-5.
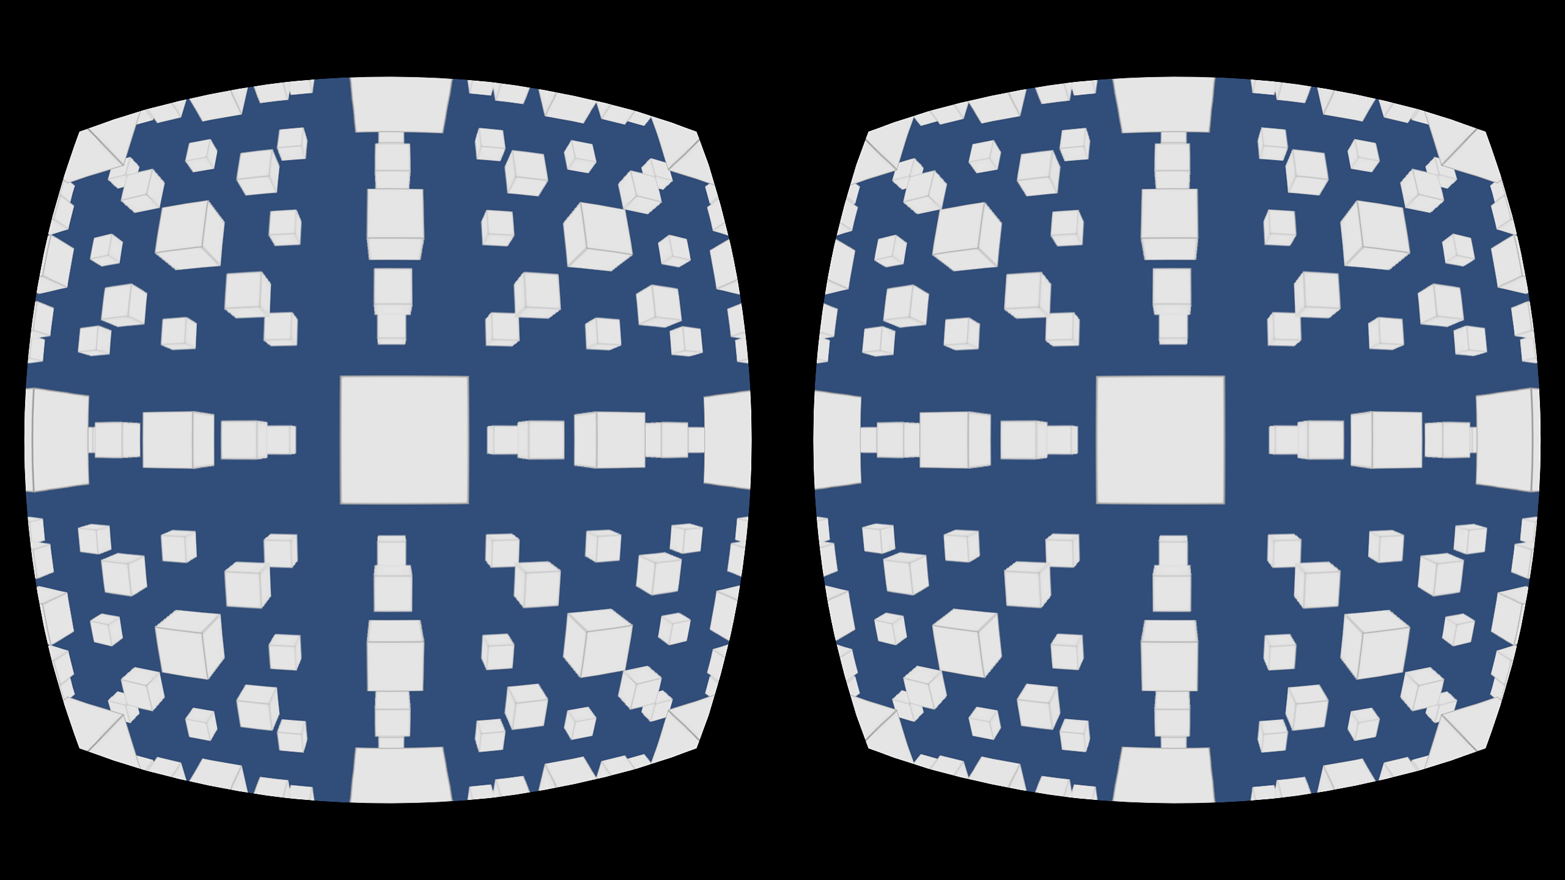
Figure 4-4. Cubes World: a simple Gear VR application built with Unity3D
Now perform the following steps (making sure to remember these steps for setting up subsequent Unity Gear VR projects):
- Select Android in the list of platforms on the left, then click the Switch Platform button.
- Add the demo scene to your build. The Scenes In Build list at the top will be empty to start; you need to add the current scene. You should already be viewing it in the editor view; clicking the Add Open Scenes button will add it to the list, and you will see a checked item named OVR/Scenes/Cubes.
- Click the Player Settings button on the bottom left. This will bring up a variety of settings in the Inspector pane. Select the Other Settings subpane at the bottom, and check the box labeled Virtual Reality Supported. This turns on Unity’s built-in VR support, which, combined with the capabilities of the Oculus Utilities package, gives you everything you need to run Gear VR applications in Unity.
- In Player Settings, find the Bundle Identifier setting, and change its value to a reasonable Android package name. Make sure to change it from the default value, or Unity will complain during the build step. I used the value vr.GearVR.UnityGearVRTest.
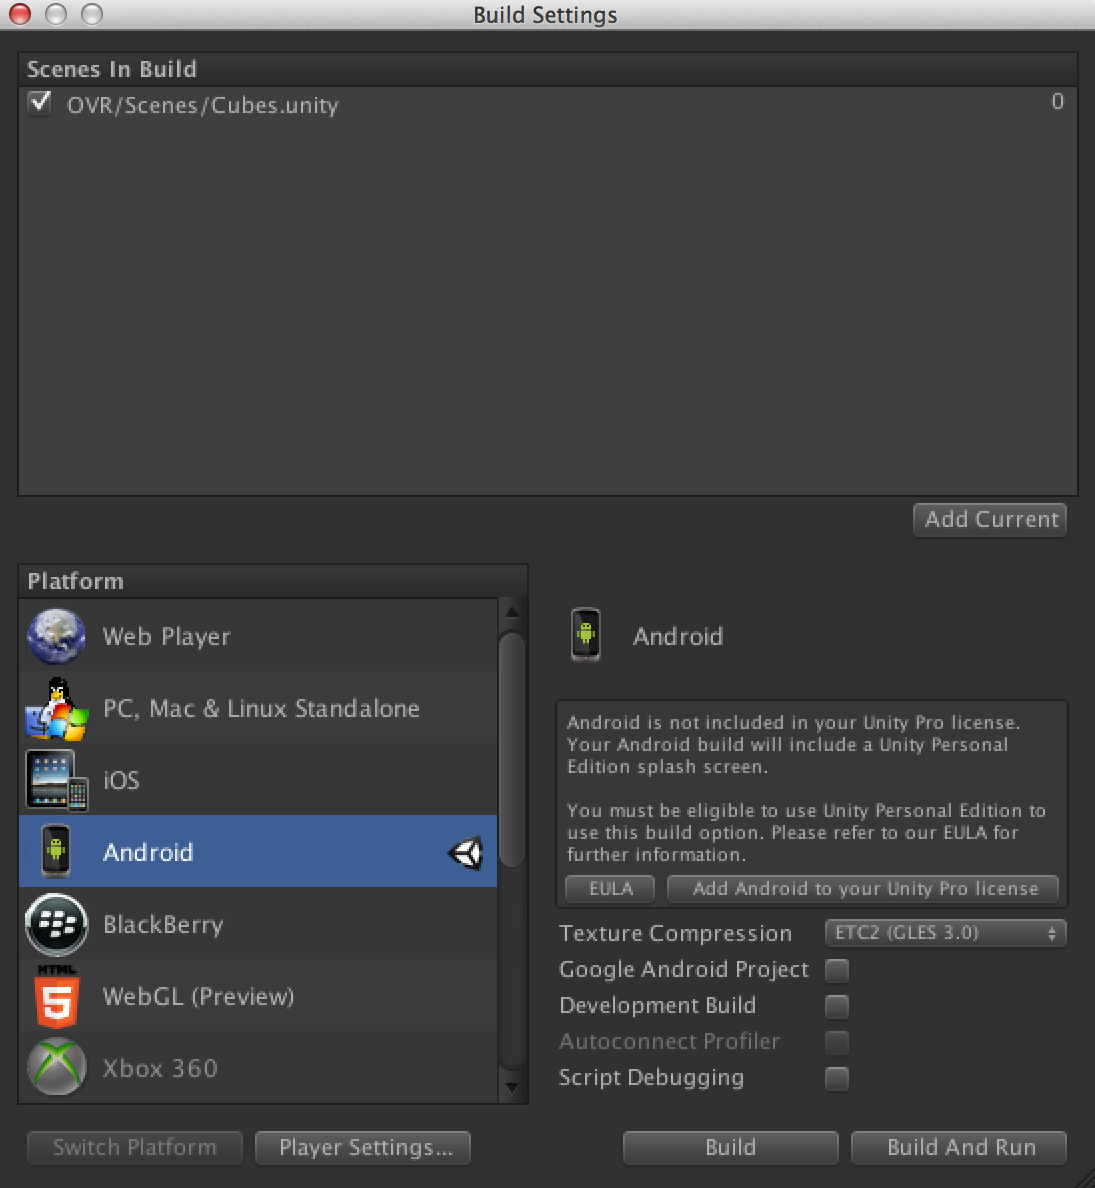
Figure 4-5. Build settings for the Cubes World Android app
There is one final thing you need to do so that you can run the project on your phone. To run Gear VR applications built with the Oculus SDK, you will need a signature file. If you haven’t already, follow the instructions given earlier in the chapter and generate a signature file for your device. Once you have that, squirrel it away in a safe place; you will need it for all Gear VR development.
Each Unity3D project needs a copy of the signature file put in a known place in the build: specifically, Assets/Plugins/Android/assets (note the lowercase “a” in that last folder name). You can either drag and drop the file from your desktop folder into the folder in the Project pane within the Unity interface, or copy the file using your operating system interface, locate the folder where your Unity project is stored, and paste it there. (On my MacBook, that is the path <username>/Unity Projects/UnityGearVRTest/Assets/Plugins/Android/assets.)
A Note About Unity and Oculus Mobile SDK Versions
Mileage may vary, and depending on which versions of the various tools you’re using you may have to change more, or fewer, options than described here. I used Unity 5 (build 5.3.5f1) on my MacBook running OS X, version 1.0.0.1 of the Oculus Mobile SDK, and version 1.3.2 of the Oculus Utilities.
OK! If you got through all that, you should be ready to build and run the app for your phone. Make sure to connect your computer to your device with a USB cable, and that the device is set up for USB debugging (as described earlier in the chapter). Now, hit Build And Run in the Build Settings dialog. You will be prompted for a filename under which to save the .apk (Android package) file. I chose the name UnityGearVRTest.apk. Hit Save to save the .apk. The app should now launch, showing the split-screen Oculus distortion view from Figure 4-4. Disconnect the cable, pop the phone into your Gear VR headset, and go. You should be inside a world of cubes, and when you move your head, you will be looking around the scene. Welcome to mobile virtual reality!
Gear VR Developer Mode
When you launched your application, you may have seen an alert pop up on your phone prompting you to insert the device into your Gear VR. By default, the Gear VR Service—that is, the software that interfaces between your Android phone and the Gear VR hardware—is set up to force you to insert the phone into the Gear VR. You can turn this off by going to your phone’s settings. Launch the settings, then choose Applications/Application Manager/Gear VR Service. You will see a button labeled Manage Storage; press that and click on VR Service Version several times until the Developer Mode toggle shows up. Set the Developer Mode toggle to On. Now, when you launch a Gear VR application from your phone’s home screen, it will run in stereo split screen mode as depicted in Figure 4-4.
Now it’s time to explore the inner workings of the Oculus Utilities package for Gear VR. The Oculus team has managed to create a single code base that runs on both desktop platforms and the Gear VR, so this is exactly the same code as in the desktop example from Chapter 3, with just a few small differences for running on the Gear VR.
First, let’s see how the Unity scene is set up. The Oculus Utilities package comes with a camera rig prefab. This prefab provides the Oculus stereo rendering and head tracking required for Gear VR support. Let’s take a look at how it is constructed.
In the Hierarchy pane, locate the OVRCameraRig object, and expand it by clicking the down arrow icon to the left of the name. The camera rig contains a child object, TrackingSpace. Expand that, and you’ll see four children: LeftEyeAnchor, CenterEyeAnchor, RightEyeAnchor, and TrackerAnchor. The center anchor is the key: it contains the camera setup for the application, which is used by the built-in Unity VR support to render the view from the left and right eyes, respectively. The Unity engine copies the camera parameters from the center anchor’s camera to the left and right cameras it uses internally to render the scene. You can see in the Inspector pane by selecting CenterEyeAnchor that it contains a camera component with values for projection, field of view, background (used to paint the scene’s background color for each render cycle), and so on.
The TrackerAnchor is there so that the application can always know the current position and orientation of the camera. This is useful in a variety of scenarios. Perhaps we want to have objects that are always placed relative to the camera at a certain distance; in this way we can properly place them whenever the camera moves. Or maybe we are creating a networked multiplayer game. For that, it is crucial to know where each player is and in which direction he is looking. The left and right anchors are there for completeness, so that we always have the individual position and orientation of the left and right cameras if we need that information (more on this momentarily).
To get a feel for how the anchor objects are implemented, let’s look at some Unity script code. In the Hierarchy pane, select the object OVRCameraRig again. You will see that it contains a few script components. We want to look at the properties for the component labeled OVR Camera Rig (Script). Its Script property has the value OVRCameraRig. Double-click on that value and Visual Studio, Unity’s code editor for C# programmers, will open the source file OVRCameraRig.cs from the project sources (Visual Studio is the default IDE bundled with Unity for Windows; Monodevelop is the original Unity editor and is still bundled with Linux and OS X).
In the IDE source code window, scroll through or search until you find the definition of the method Update(), shown here:
private void Update()
{
    EnsureGameObjectIntegrity();

    if (!Application.isPlaying)
      return;

    UpdateAnchors();

#if UNITY_ANDROID && !UNITY_EDITOR

   if (!correctedTrackingSpace)
   {
     //HACK: Unity 5.1.1p3 double-counts the head model on
        //Android. Subtract it off in the reference frame.

     var headModel = new Vector3(0f,
            OVRManager.profile.eyeHeight - OVRManager.profile.neckHeight,
            OVRManager.profile.eyeDepth);
     var eyePos = -headModel + centerEyeAnchor.localRotation * headModel;

     if ((eyePos - centerEyeAnchor.localPosition).magnitude > 0.01f)
     {
       trackingSpace.localPosition =
                trackingSpace.localPosition -
                2f * (trackingSpace.localRotation * headModel);
       correctedTrackingSpace = true;
     }
   }
#endif
}
The first few lines of this method behave exactly as described in Chapter 3. For a fully detailed description of that code, please refer back to “Walking Through the Code”.
The basic steps are:
- The camera rig’s
Update()method first calls a helper,EnsureGameObjectIntegrity(), to make sure that the scene contains all of the required objects, that is the objects defined in the OVRCameraRig prefab. - After a check to see whether the application is actually running—it may not be, either because it hasn’t been set into run mode yet or because the object is being viewed in the Unity editor and not in play mode—we do some real work.
- We need to position and orient the anchor objects based on where the Oculus Rift HMD is looking. This is done in the method
UpdateAnchors(). - After the basic update logic, there is conditional code to handle Android-specific behavior in the Unity runtime; it’s essentially a workaround to a bug in the Unity engine for Android.
Handling Touchpad Events
Virtual reality isn’t only about rendering and camera tracking. We also need to process user input. The Gear VR comes with the touchpad, a great input device built into the side of the HMD. This is going to be our main source of input. Let’s get a feel for how to use it.
Create a new Unity project, and call it UnityGearVRInput. As you did for the first example, import the Oculus Utilities package into the new project. In the Project pane, open the folder Assets/OVR/Scenes and double-click the scene named Room.
This loads a very simple scene, just a gray box that will be the inside of the room. This example uses the touchpad to rotate the camera within the room. You should be able to see it in the Game view, located at the bottom left of the Unity interface, as highlighted by the red circle in Figure 4-6.
In the Hierarchy pane you should see several objects: an object named OVRPlayerController, six cubes, and a directional light. OVRPlayerController is another SDK prefab; this one contains a camera rig, like the previous example, but it uses touchpad input instead of head tracking to move the camera. If you expand the prefab by clicking on the down arrow icon you will see the object’s contents, including the camera rig and several script components, in the Inspector pane.
Now let’s run the example. As before, you need to set up your build settings. Select Android in the platforms list and then press the Switch Platform button. Click Add Current to add the room sample to the build. Configure your other settings as you did earlier—then click the Player Settings, then click the Virtual Reality Supported, Bundle Identifier, and Minimum API Level settings. Also, remember to copy the signature file for your device. Once this is all done, you should be able to build and run the sample.
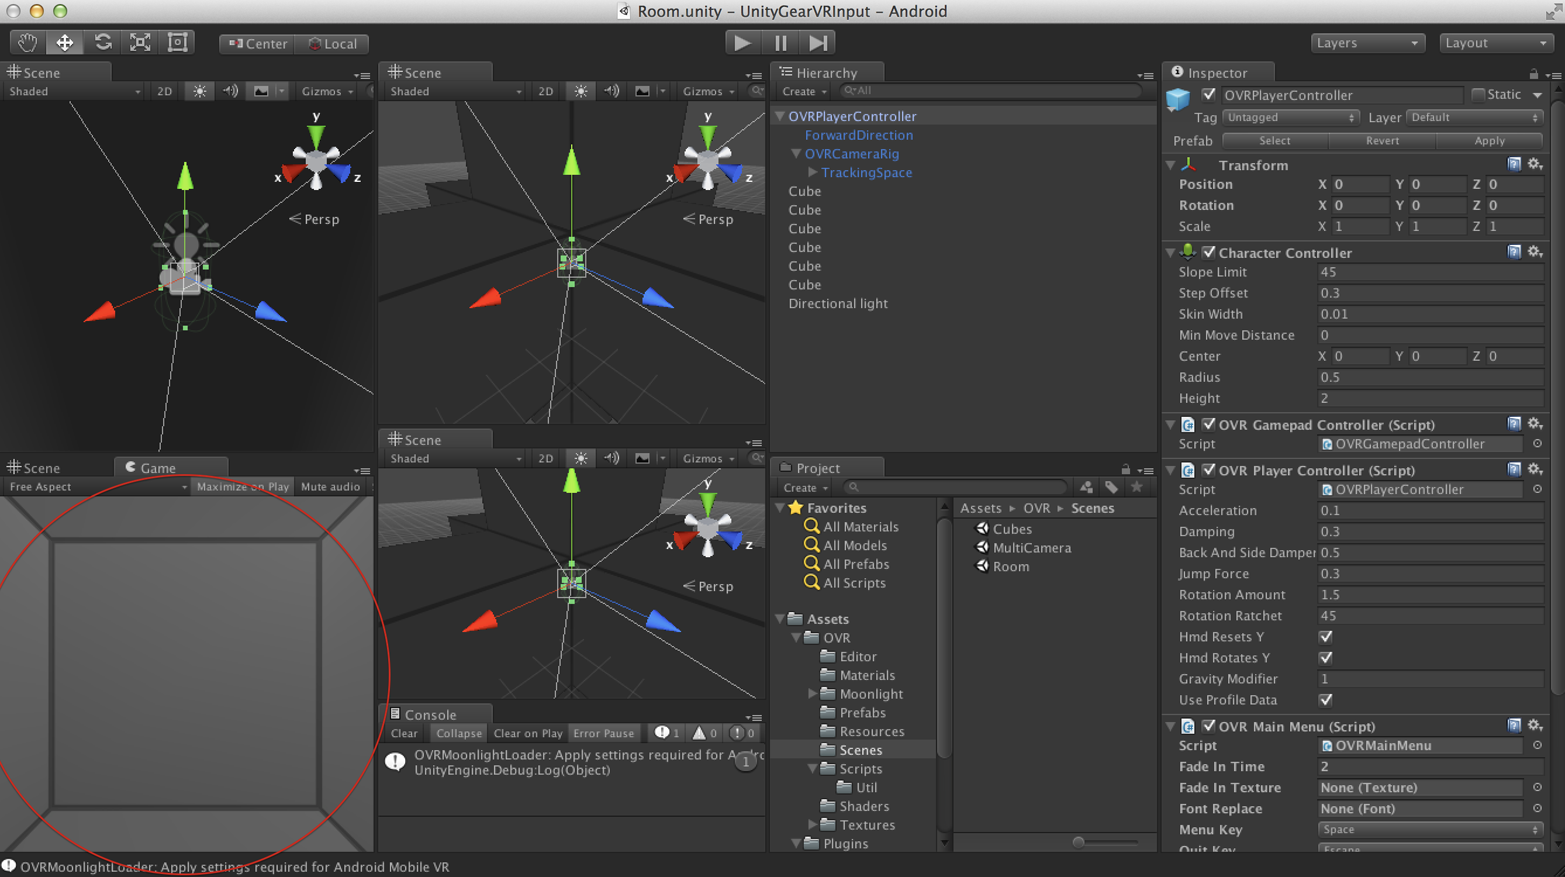
Figure 4-6. Room scene Game view—Gear VR input example
Assuming you were successful, you will be inside a gray box. Swipe the touchpad to rotate your view within the box. Now let’s look at the code. Select the object OVRPlayerController in the Hierarchy pane. You’ll see its properties in the Inspector pane, including several scripts. Find the script named OVR Player Controller (Script), and double-click the value for its Script property. This will open the source file OVRPlayerController.cs in the IDE.
The script’s Update() method is quite involved. We are mostly concerned with a helper method, UpdateMovement(). This method, which also works on the desktop, uses the current mouse X position to calculate a rotation about the Y (up) axis for the camera. Scroll to or search for that method and, within it, the lines of code that check for mouse input (at or near line 296):
//#if !UNITY_ANDROID || UNITY_EDITOR
        if (!SkipMouseRotation)
            euler.y += Input.GetAxis("Mouse X") * rotateInfluence * 3.25f;
//#endif
We can use the same mouse-based approach to handle touchpad input, because the Oculus Utilities package automatically converts touchpad input to mouse input:
- Forward/back swipes on the touchpad are converted to mouse movement in X.
- Up/down swipes are converted to mouse movement in Y.
- Taps on the touchpad are converted to mouse button presses, with mouse button code 0.
- Taps on the back button next to the touchpad are converted to mouse button presses, with mouse button code 1.
Trackpad Hack
Note the lines in italics in the preceding code fragment. I had to hack the source to comment out the #ifdef and #endif statements to get the trackpad to work on the Gear VR, as for some unknown reason Android mouse handling was disabled. This hack does the trick.
The mouse X and Y values are obtained by calling Input.GetAxis(), a function that is built into the Unity input system. The variable euler is a euler angle; that is, an x,y,z triple that represents rotation about each individual axis. The method continues for a while, potentially also getting input from a gamepad controller, but we are not using one in this example. The last line in the method converts the computed euler value to a quaternion and saves it into the player controller’s transform, thereby rotating the controller, which ultimately results in the rotation of its descendant camera rig:
transform.rotation=Quaternion.Euler(euler);
Deploying Applications for Gear VR
So, you’ve developed and tested your application, and it’s working. Now you want to publish it to the Oculus Store for the world to experience. How do you do that?
A full treatment of the topic is out of scope for this book, but we’ll go through the basics. First, you need to sign your application. You must replace the temporary Oculus signature file used in development with a valid Android application signature file. The Android SDK contains information on how to do this. Unity has integrated support for signing your application, which can be found at Edit → Project Settings → Player → Publishing Options. Use that interface to insert a newly created Android keystore generated by the Android SDK.
Once you have generated an Android package file .apk with a valid signature, you can submit it to the Oculus Store. This is a bit of a process, involving packaging image files in known directories, writing application manifests, exchanging files and emailing back and forth with the Oculus Store online service and, presumably, humans on the other end making the final approvals.
Full instructions for publishing to the Oculus Store can be found online.
Chapter Summary
In this chapter, we learned how to develop applications for the Gear VR, Samsung’s revolutionary mobile VR headset powered by Oculus technology. We explored the current editions of the hardware and supported phones, and took a quick look at the wonderfully designed user interface known as the Oculus Store.
Unity3D comes with excellent support for developing Gear VR applications. We created sample projects to render in stereo, track HMD motion, and use the touchpad for input.
This chapter also took a quick look at the full cycle of developing, testing, debugging, and deploying for Gear VR, including using the Android SDK, the Oculus Mobile SDK, the Oculus Utilities for Unity package, and the Oculus code signing tool, and submitting applications to the Oculus Store.
While the material covered in this chapter is simple in concept, the devil is in the details. Developing for Android is no picnic. Unity3D is powerful but takes some getting used to, and the additional quirks in dealing with Gear VR and Oculus Store deployment make everything that much more...interesting. But hopefully you will find that it’s worth the trouble. The Gear VR is a great device, and a major step on the road to consumer-grade, mass-market virtual reality.
Get Learning Virtual Reality now with the O’Reilly learning platform.
O’Reilly members experience books, live events, courses curated by job role, and more from O’Reilly and nearly 200 top publishers.

