
Adding Standard Effects
The procedure for adding a standard effect
(or filter) to a clip is nearly self-explanatory:
You simply drag a filter from the Effects and
Transitions panel directly to a compatible
(video or audio) clip in the timeline. Clips
with effects applied appear with a thin col-
ored line under the clip’s name.
On the Effects and Transitions panel, video
and
audio are contained in separate folders and
are further organized into categorized sub-
folders. (You already learned how to organize
and find items on the Effects and Transitions
panel in Chapter 7, “Adding Transitions,” so
that information won’t be repeated here.)
Nearly all filters have one or more properties
that you can adjust either by using a value
graph in the Timeline panel or by using
the Properties panel. But as explained in
“Choosing a Keyframing Method” earlier in
this chapter, using the Properties panel is the
most appropriate method for most filters.
Some filters also include a Settings dialog
box that opens automatically when you
apply the filter. You can also reopen the dia-
log box from the Properties panel.
This task summarizes the basic process of
adding an effect to a clip. You’ll discover that
each effect has a unique set of parameters, or
properties, that you can customize.
In the following sections, you’ll first learn
how to apply an effect and specify global
property values—a single set of property
values for the duration of the clip. Then
you’ll learn how to animate any effect—
fixed or standard—using the Properties
panel.
319
Adding Effects
Adding Standard Effects
To add an effect to a clip:
1.
In the Effects and Transitions panel,
locate the video or audio effect you want
to apply.
For more about organizing and locating
effects, see Chapter 7.
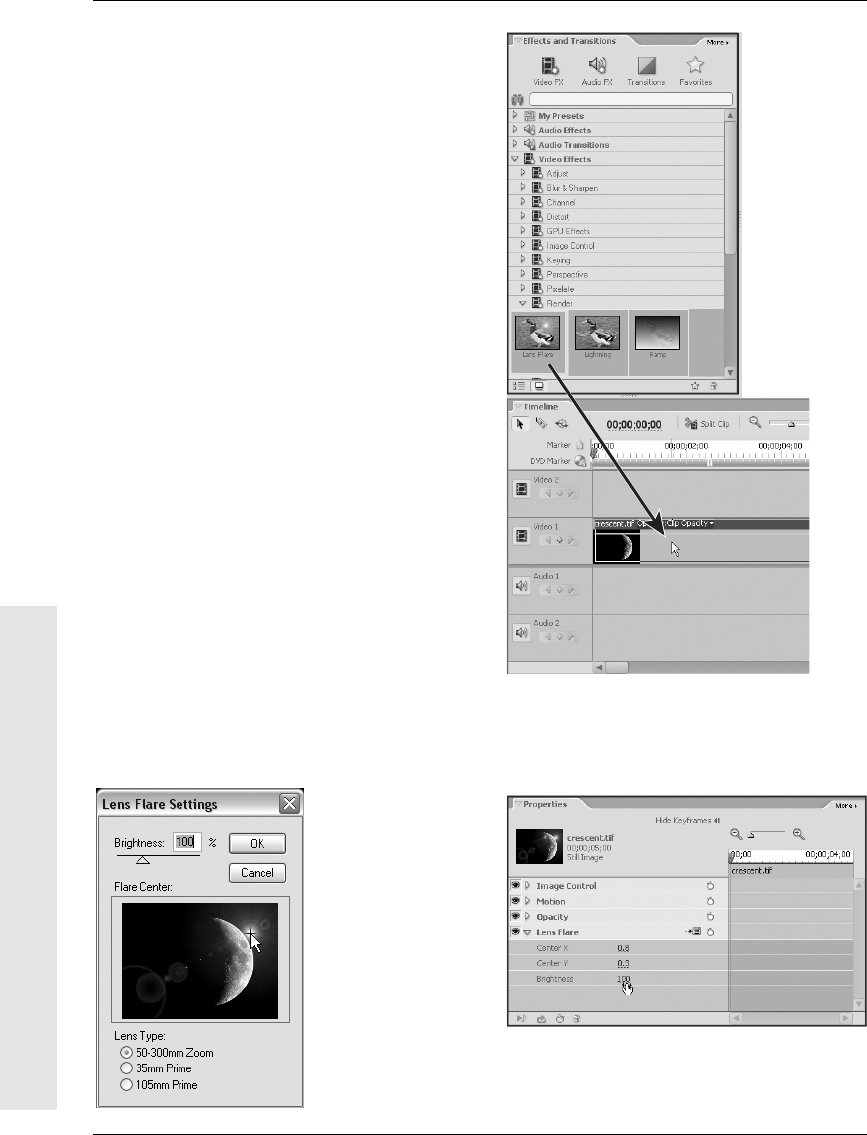
2.
Drag the effect to the appropriate clip in
the Timeline panel (Figure 10.26).
The effect is applied to the clip, indicated
by a thin colored line under the clip’s
name. When the clip is selected, it’s listed
in the Properties panel (when open).
3.
To adjust the effect’s settings, do one of
the following (depending on the particular
effect):
▲
If a Settings dialog box appears auto-
matically, specify values for the
effect’s parameters, and click OK
(Figure 10.27).
▲
Select the clip in the timeline, and
adjust its effect properties in the
Properties panel (Figure 10.28).
4.
To vary effect properties over time,
specify keyframes as explained in the
task “To set keyframes in the Properties
panel,” later in this chapter.
Figure 10.27 If a
Settings dialog
box appears auto-
matically, specify
values for the
effect’s parameters
and click OK…
Figure 10.28 …otherwise, select the clip and adjust
the effect’s property values in the Properties panel.
Property values are global (the same throughout the
clip) unless you keyframe the effect.
Figure 10.26 Drag an effect from the Effects and
Transitions panel to the appropriate clip in the
Timeline panel.
320
Chapter 10
Adding Standard Effects
Get Premiere Elements 2 for Windows: Visual QuickStart Guide now with the O’Reilly learning platform.
O’Reilly members experience books, live events, courses curated by job role, and more from O’Reilly and nearly 200 top publishers.

