Chapter 4. Container Storage
While Kubernetes cut its teeth in the world of stateless workloads, running stateful services has become increasingly common. Even complex stateful workloads such as databases and message queues are finding their way to Kubernetes clusters. To support these workloads, Kubernetes needs to provide storage capabilities beyond ephemeral options. Namely, systems that can provide increased resilience and availability in the face of various events such as an application crashing or a workload being rescheduled to a different host.
In this chapter we are going to explore how our platform can offer storage services to applications. We’ll start by covering key concerns of application persistence and storage system expectations before moving on to address the storage primitives available in Kubernetes. As we get into more advanced storage needs, we will look to the Container Storage Interface (CSI), which enables our integration with various storage providers. Lastly, we’ll explore using a CSI plug-in to provide self-service storage to our applications.
Note
Storage is a vast subject in itself. Our intentions are to give you just enough detail to make informed decisions about the storage you may offer to workloads. If storage is not your background, we highly recommend going over these concepts with your infrastructure/storage team. Kubernetes does not negate the need for storage expertise in your organization!
Storage Considerations
Before getting into Kubernetes storage patterns and options, we should take a step back and analyze some key considerations around potential storage needs. At an infrastructure and application level, it is important to think through the following requirements.
-
Access modes
-
Volume expansion
-
Dynamic provisioning
-
Backup and recovery
-
Block, file, and object storage
-
Ephemeral data
-
Choosing a provider
Access Modes
There are three access modes that can be supported for applications:
- ReadWriteOnce (RWO)
-
A single Pod can read and write to the volume.
- ReadOnlyMany (ROX)
-
Multiple Pods can read the volume.
- ReadWriteMany (RWX)
-
Multiple Pods can read and write to the volume.
For cloud native applications, RWO is by far the most common pattern. When leveraging common providers such Amazon Elastic Block Storage (EBS) or Azure Disk Storage, you are limited to RWO because the disk may only be attached to one node. While this limitation may seem problematic, most cloud native applications work best with this kind of storage, where the volume is exclusively theirs and offers high-performance read/write.
Many times, we find legacy applications that have a requirement for RWX. Often, they are built to assume access to a network file system (NFS). When services need to share state, there are often more elegant solutions than sharing data over NFS; for example, the use of message queues or databases. Additionally, should an application wish to share data, it’s typically best to expose this over an API, rather than grant access to its file system. This makes many use cases for RWX, at times, questionable. Unless NFS is the correct design choice, platform teams may be confronted with the tough choice of whether to offer RWX-compatible storage or request their developers re-architect applications. Should the call be made that supporting ROX or RWX is required, there are several providers that can be integrated with, such as Amazon Elastic File System (EFS) and Azure File Share.
Volume Expansion
Over time, an application may begin to fill up its volume. This can pose a challenge since replacing the volume with a larger one would require migration of data. One solution to this is supporting volume expansion. From the perspective of a container orchestrator such as Kubernetes, this involves a few steps:
-
Request additional storage from the orchestrator (e.g., via a PersistentVolumeClaim).
-
Expand the size of the volume via the storage provider.
-
Expand the filesystem to make use of the larger volume.
Once complete, the Pod will have access to the additional space. This feature is contingent on our choice of storage backend and whether the integration in Kubernetes can facilitate the preceding steps. We will explore an example of volume expansion later in this chapter.
Volume Provisioning
There are two provisioning models available to you: dynamic and static provisioning. Static provisioning assumes volumes are created on nodes for Kubernetes to consume. Dynamic provisioning is when a driver runs within the cluster and can satisfy storage requests of workloads by talking to a storage provider. Out of these two models, dynamic provisioning, when possible, is preferred. Often, the choice between the two is a matter of whether your underlying storage system has a compatible driver for Kubernetes. We’ll dive into these drivers later in the chapter.
Backup and Recovery
Backup is one of the most complex aspects of storage, especially when automated restores are a requirement. In general terms, a backup is a copy of data that is stored for use in case of data loss. Typically, we balance backup strategies with the availability guarantees of our storage systems. For example, while backups are always important, they are less critical when our storage system has a replication guarantee where loss of hardware will not result in loss of data. Another consideration is that applications may require different procedures to facilitate backup and restores. The idea that we can take a backup of an entire cluster and restore it at any time is typically a naive outlook, or at minimum, one that requires mountains of engineering effort to achieve.
Deciding who should be responsible for backup and recovery of applications can be one of the most challenging debates within an organization. Arguably, offering restore features as a platform service can be a “nice to have.” However, it can tear at the seams when we get into application-specific complexity—for example, when an app cannot restart and needs actions to take place that are known only to developers.
One of the most popular backup solutions for both Kubernetes state and application state is Project Velero. Velero can back up Kubernetes objects should you have a desire to migrate or restore them across clusters. Additionally, Velero supports the scheduling of volume snapshots. As we dive deeper into volume snapshotting in this chapter, we’ll learn that the ability to schedule and manage snapshots is not taken care of for us. More so, we are often given the snapshotting primitives but need to define an orchestration flow around them. Lastly, Velero supports backup and restore hooks. These enable us to run commands in the container before performing backup or recovery. For example, some applications may require stopping traffic or triggering a flush before a backup should be taken. This is made possible using hooks in Velero.
Block Devices and File and Object Storage
The storage types our applications expect are key to selecting the appropriate underlying storage and Kubernetes integration. The most common storage type used by applications is file storage. File storage is a block device with a filesystem on top. This enables applications to write to files in the way we are familiar with on any operating system.
Underlying a filesystem is a block device. Rather than establishing a filesystem on top, we can offer the device such that applications may communicate directly with raw block. Filesystems inherently add overhead to writing data. In modern software development, it’s pretty rare to be concerned about filesystem overhead. However, if your use case warrants direct interaction with raw block devices, this is something certain storage systems can support.
The final storage type is object storage. Object storage deviates from files in the sense that there is not the conventional hierarchy. Object storage enables developers to take unstructured data, give it a unique identifier, add some metadata around it, and store it. Cloud-provider object stores such as Amazon S3 have become popular locations for organizations to host images, binaries, and more. This popularity has been accelerated by its fully featured web API and access control. Object stores are most commonly interacted with from the application itself, where the application uses a library to authenticate and interact with the provider. Since there is less standardization around interfaces for interaction with object stores, it is less common to see them integrated as platform services that applications can interact with transparently.
Ephemeral Data
While storage may imply a level of persistence that is beyond the life cycle of a Pod, there are valid use cases for supporting ephemeral data usage. By default, containers that write to their own filesystem will utilize ephemeral storage. If the container were to restart, this storage would be lost. The emptyDir volume type is available for ephemeral storage that is resilient to restarts. Not only is this resilient to container restarts, but it can be used to share files between containers in the same Pod.
The biggest risk with ephemeral data is ensuring your Pods don’t consume too much of the host’s storage capacity. While numbers like 4Gi per Pod might not seem like much, consider a node can run hundreds, in some cases thousands, of Pods. Kubernetes supports the ability to limit the cumulative amount of ephemeral storage available to Pods in a Namespace. Configuration of these concerns are covered in Chapter 12.
Choosing a Storage Provider
There is no shortage of storage providers available to you. Options span from storage solutions you might manage yourself such as Ceph to fully managed systems like Google Persistent Disk or Amazon Elastic Block Store. The variance in options is far beyond the scope of this book. However, we do recommend understanding the capabilities of storage systems along with which of those capabilities are easily integrated with Kubernetes. This will surface perspective on how well one solution may satisfy your application requirements relative to another. Additionally, in the case you may be managing your own storage system, consider using something you have operational experience with when possible. Introducing Kubernetes alongside a new storage system adds a lot of new operational complexity to your organization.
Kubernetes Storage Primitives
Out of the box, Kubernetes provides multiple primitives to support workload storage. These primitives provide the building blocks we will utilize to offer sophisticated storage solutions. In this section, we are going to cover PersistentVolumes, PersistentVolumeClaims, and StorageClasses using an example of allocating fast pre-provisioned storage to containers.
Persistent Volumes and Claims
Volumes and claims live at the foundation of storage in Kubernetes. These are exposed using the PersistentVolume and PersistentVolumeClaim APIs. The PersistentVolume resource represents a storage volume known to Kubernetes. Let’s assume an administrator has prepared a node to offer 30Gi of fast, on-host, storage. Let’s also assume the administrator has provisioned this storage at /mnt/fast-disk/pod-0. To represent this volume in Kubernetes, the administrator can then create a PersistentVolume object:
apiVersion:v1kind:PersistentVolumemetadata:name:pv0spec:capacity:storage:30GivolumeMode:FilesystemaccessModes:-ReadWriteOncestorageClassName:local-storagelocal:path:/mnt/fast-disk/pod-0nodeAffinity:required:nodeSelectorTerms:-matchExpressions:-key:kubernetes.io/hostnameoperator:Invalues:-test-w

The amount of storage available in this volume. Used to determine whether a claim can bind to this volume.

Specifies whether the volume is a block device or filesystem.

Specifies the access mode of the volume. Includes
ReadWriteOnce,ReadMany, andReadWriteMany.
Associates this volume with a storage class. Used to pair an eventual claim to this volume.

Identifies which node this volume should be associated with.
As you can see, the PersistentVolume contains details around the implementation of the volume. To provide one more layer of abstraction, a PersistentVolumeClaim is introduced, which binds to an appropriate volume based on its request. Most commonly, this will be defined by the application team, added to their Namespace, and referenced from their Pod:
apiVersion:v1kind:PersistentVolumeClaimmetadata:name:pvc0spec:storageClassName:local-storageaccessModes:-ReadWriteOnceresources:requests:storage:30Gi---apiVersion:v1kind:Podmetadata:name:task-pv-podspec:volumes:-name:fast-diskpersistentVolumeClaim:claimName:pvc0containers:-name:ml-processerimage:ml-processer-imagevolumeMounts:-mountPath:"/var/lib/db"name:fast-disk
Checks for a volume that is of the class
local-storagewith the access modeReadWriteOnce.Binds to a volume with >=
30Giof storage.Declares this Pod a consumer of the PersistentVolumeClaim.
Based on the PersistentVolume’s nodeAffinity settings, the Pod will be automatically scheduled on the host where this volume is available. There is no additional affinity configuration required from the developer.
This process has demonstrated a very manual flow for how administrators could make this storage available to developers. We refer to this as static provisioning. With proper automation this could be a viable way to expose fast disk on hosts to Pods. For example, the Local Persistence Volume Static Provisioner can be deployed to the cluster to detect preallocated storage and expose it, automatically, as PersistentVolumes. It also provides some life cycle management capabilities such as deleting data upon destruction of the PersistentVolumeClaim.
Warning
There are multiple ways to achieve local storage that can lead you into a bad practice. For example, it can seem compelling to allow developers to use hostPath rather than needing to preprovision a local storage. hostPath enables you to specify a path on the host to bind to rather than having to use a PersistentVolume and PersistentVolumeClaim. This can be a huge security risk as it enables developers to bind to directories on the host, which can have a negative impact on the host and other Pods. If you desire to provide developers ephemeral storage that can withstand a Pod restart but not the Pod being deleted or moved to a different node, you can use EmptyDir. This will allocate storage in the filesystem managed by Kube and be transparent to the Pod.
Storage Classes
In many environments, expecting nodes to be prepared ahead of time with disks and volumes is unrealistic. These cases often warrant dynamic provisioning, where volumes can be made available based on the needs of our claims. To facilitate this model, we can make classes of storage available to our developers. These are defined using the StorageClass API. Assuming your cluster runs in AWS and you want to offer EBS volumes to Pods dynamically, the following StorageClass can be added:
apiVersion:storage.k8s.io/v1kind:StorageClassmetadata:name:ebs-standardannotations:storageclass.kubernetes.io/is-default-class:trueprovisioner:kubernetes.io/aws-ebsparameters:type:io2iopsPerGB:"17"fsType:ext4
The name of the StorageClass that can be referenced from claims.
Sets this StorageClass as the default. If a claim does not specify a class, this will be used.
Uses the
aws-ebsprovisioner to create the volumes based on claims.Provider-specific configuration for how to provision volumes.
You can offer a variety of storage options to developers by making multiple StorageClasses available. This includes supporting more than one provider in a single cluster—for example, running Ceph alongside VMware vSAN. Alternatively, you may offer different tiers of storage via the same provider. An example would be offering cheaper storage alongside more expensive options. Unfortunately, Kubernetes lacks granular controls to limit what classes developers can request. Control can be implemented as validating admission control, which is covered in Chapter 8.
Kubernetes offers a wide variety of providers including AWS EBS, Glusterfs, GCE PD, Ceph RBD, and many more. Historically, these providers were implemented in-tree. This means storage providers needed to implement their logic in the core Kubernetes project. This code would then get shipped in the relevant Kubernetes control plane components.
There were several downsides to this model. For one, the storage provider could not be managed out of band. All changes to the provider needed to be tied to a Kubernetes release. Also, every Kubernetes deployment shipped with unnecessary code. For example, clusters running AWS still had the provider code for interacting with GCE PDs. It quickly became apparent there was high value in externalizing these provider integrations and deprecating the in-tree functionality. FlexVolume drivers were an out-of-tree implementation specification that initially aimed to solve this problem. However, FlexVolumes have been put into maintenance mode in favor of our next topic, the Container Storage Interface (CSI).
The Container Storage Interface (CSI)
The Container Storage Interface is the answer to how we provide block and file storage to our workloads. The implementations of CSI are referred to as drivers, which have the operational knowledge for talking to storage providers. These providers span from cloud systems such as Google Persistent Disks to storage systems (such as Ceph) deployed and managed by you. The drivers are implemented by storage providers in projects that live out-of-tree. They can be entirely managed out of band from the cluster they are deployed within.
At a high level, CSI implementations feature a controller plug-in and a node plug-in. CSI driver developers have a lot of flexibility in how they implement these components. Typically, implementations bundle the controller and node plug-ins in the same binary and enable either mode via an environment variable such as X_CSI_MODE. The only expectations are that the driver registers with the kubelet and the endpoints in the CSI specification are implemented.
The controller service is responsible for managing the creation and deletion of volumes in the storage provider. This functionality extends into (optional) features such as taking volume snapshots and expanding volumes. The node service is responsible for preparing volumes to be consumed by Pods on the node. Often this means setting up the mounts and reporting information about volumes on the node. Both the node and controller service also implement identity services that report plug-in info, capabilities, and whether the plug-in is healthy. With this in mind, Figure 4-1 represents a cluster architecture with these components deployed.
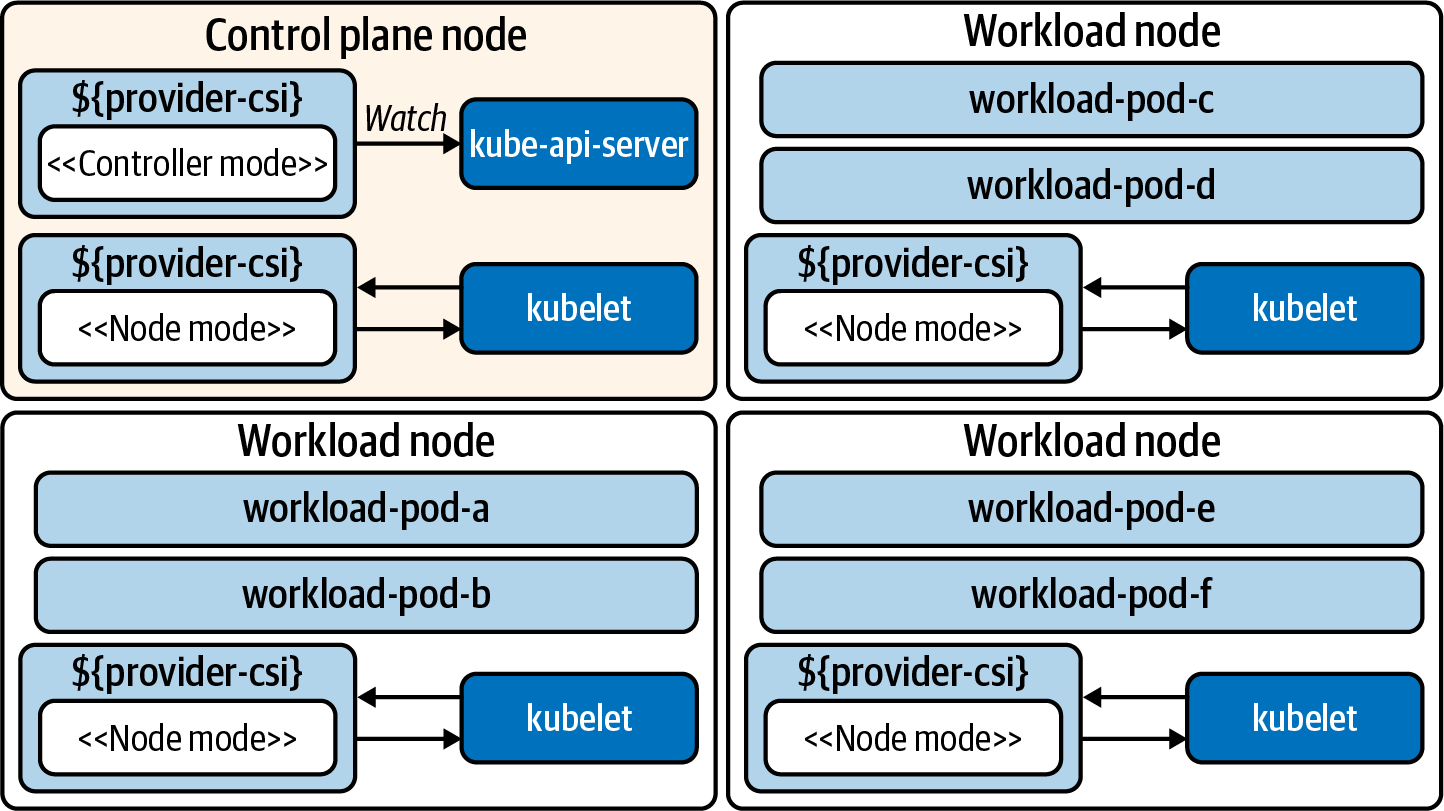
Figure 4-1. Cluster running a CSI plug-in. The driver runs in a node and controller mode. The controller is typically run as a Deployment. The node service is deployed as a DaemonSet, which places a Pod on each host.
Let’s take a deeper look at these two components, the controller and the node.
CSI Controller
The CSI Controller service provides APIs for managing volumes in a persistent storage system. The Kubernetes control plane does not interact with the CSI Controller service directly. Instead, controllers maintained by the Kubernetes storage community react to Kubernetes events and translate them into CSI instructions, such as CreateVolumeRequest when a new PersistentVolumeClaim is created. Because the CSI Controller service exposes its APIs over UNIX sockets, the controllers are usually deployed as sidecars alongside the CSI Controller service. There are multiple external controllers, each with different behavior:
- external-provisioner
-
When PersistentVolumeClaims are created, this requests a volume be created from the CSI driver. Once the volume is created in the storage provider, this provisioner creates a PersistentVolume object in Kubernetes.
- external-attacher
-
Watches the VolumeAttachment objects, which declare that a volume should be attached or detached from a node. Sends the attach or detach request to the CSI driver.
- external-resizer
-
Detects storage-size changes in PersistentVolumeClaims. Sends requests for expansion to the CSI driver.
- external-snapshotter
-
When VolumeSnapshotContent objects are created, snapshot requests are sent to the driver.
Note
When implementing CSI plug-ins, developers are not required to use the aforementioned controllers. However, their use is encouraged to prevent duplication of logic in every CSI plug-in.
CSI Node
The Node plug-in typically runs the same driver code as the controller plug-in. However, running in the “node mode” means it is focused on tasks such as mounting attached volumes, establishing their filesystem, and mounting volumes to Pods. Requests for these behaviors is done via the kubelet. Along with the driver, the following sidecars are often included in the Pod:
- node-driver-registrar
-
Sends a registration request to the kubelet to make it aware of the CSI driver.
- liveness-probe
Implementing Storage as a Service
We have now covered key considerations for application storage, storage primitives available in Kubernetes, and driver integration using the CSI. Now it’s time to bring these ideas together and look at an implementation that offers developers storage as a service. We want to provide a declarative way to request storage and make it available to workloads. We also prefer to do this dynamically, not requiring an administrator to preprovision and attach volumes. Rather, we’d like to achieve this on demand based on the needs of workloads.
In order to get started with this implementation, we’ll use Amazon Web Services (AWS). This example integrates with AWS’s elastic block storage system. If your choice in provider differs, the majority of this content will still be relevant! We are simply using this provider as a concrete example of how all the pieces fit together.
Next we are going to dive into installation of the integration/driver, exposing storage options to developers, consuming the storage with workloads, resizing volumes, and taking volume snapshots.
Installation
Installation is a fairly straightforward process consisting of two key steps:
-
Configure access to the provider.
-
Deploy the driver components to the cluster.
The provider, in this case AWS, will require the driver to identify itself, ensuring it has appropriate access. In this case, we have three options available to us. One is to update the instance profile of the Kubernetes nodes. This will prevent us from worrying about credentials at the Kubernetes level but will provide universal privileges to workloads that can reach the AWS API. The second and likely most secure option is to introduce an identity service that can provide IAM permissions to specific workloads. A project that is an example of this is kiam. This approach is covered in Chapter 10. Lastly, you can add credentials in a secret that gets mounted into the CSI driver. In this model, the secret would look as follows:
apiVersion:v1kind:Secretmetadata:name:aws-secretnamespace:kube-systemstringData:key_id:"AKIAWJQHICPELCJVKYNU"access_key:"jqWi1ut4KyrAHADIOrhH2Pd/vXpgqA9OZ3bCZ"
Warning
This account will have access to manipulating an underlying storage system. Access to this secret should be carefully managed. See Chapter 7 for more information.
With this configuration in place, the CSI components may be installed. First, the controller is installed as a Deployment. When running multiple replicas, it will use leader-election to determine which instance should be active. Then, the node plug-in is installed, which comes in the form of a DaemonSet running a Pod on every node. Once initialized, the instances of the node plug-in will register with their kubelets. The kubelet will then report the CSI-enabled node by creating a CSINode object for every Kubernetes node. The output of a three-node cluster is as follows:
$kubectl get csinode NAME DRIVERS AGE ip-10-0-0-205.us-west-2.compute.internal197m ip-10-0-0-224.us-west-2.compute.internal179m ip-10-0-0-236.us-west-2.compute.internal198m
As we can see, there are three nodes listed with one driver registered on each node. Examining the YAML of one CSINode exposes the following:
apiVersion:storage.k8s.io/v1kind:CSINodemetadata:name:ip-10-0-0-205.us-west-2.compute.internalspec:drivers:-allocatable:count:25name:ebs.csi.aws.comnodeID:i-0284ac0df4da1d584topologyKeys:-topology.ebs.csi.aws.com/zone
The maximum number of volumes allowed on this node.
When a node is picked for a workload, this value will be passed in the CreateVolumeRequest so that the driver knows where to create the volume. This is important for storage systems where nodes in the cluster won’t have access to the same storage. For example, in AWS, when a Pod is scheduled in an availability zone, the Volume must be created in the same zone.
Additionally, the driver is officially registered with the cluster. The details can be found in the CSIDriver object:
apiVersion:storage.k8s.io/v1kind:CSIDrivermetadata:name:aws-ebs-csi-driverlabels:app.kubernetes.io/name:aws-ebs-csi-driverspec:attachRequired:truepodInfoOnMount:falsevolumeLifecycleModes:-Persistent
The name of the provider representing this driver. This name will be bound to class(es) of storage we offer to platform users.
Specifies that an attach operation must be completed before volumes are mounted.
Does not need to pass Pod metadata in as context when setting up a mount.
The default model for provisioning persistent volumes. Inline support can be enabled by setting this option to
Ephemeral. In the ephemeral mode, the storage is expected to last only as long as the Pod.
The settings and objects we have explored so far are artifacts of our bootstrapping process. The CSIDriver object makes for easier discovery of driver details and was included in the driver’s deployment bundle. The CSINode objects are managed by the kubelet. A generic registrar sidecar is included in the node plug-in Pod and gets details from the CSI driver and registers the driver with the kubelet. The kubelet then reports up the quantity of CSI drivers available on each host. Figure 4-2 demonstrates this bootstrapping process.
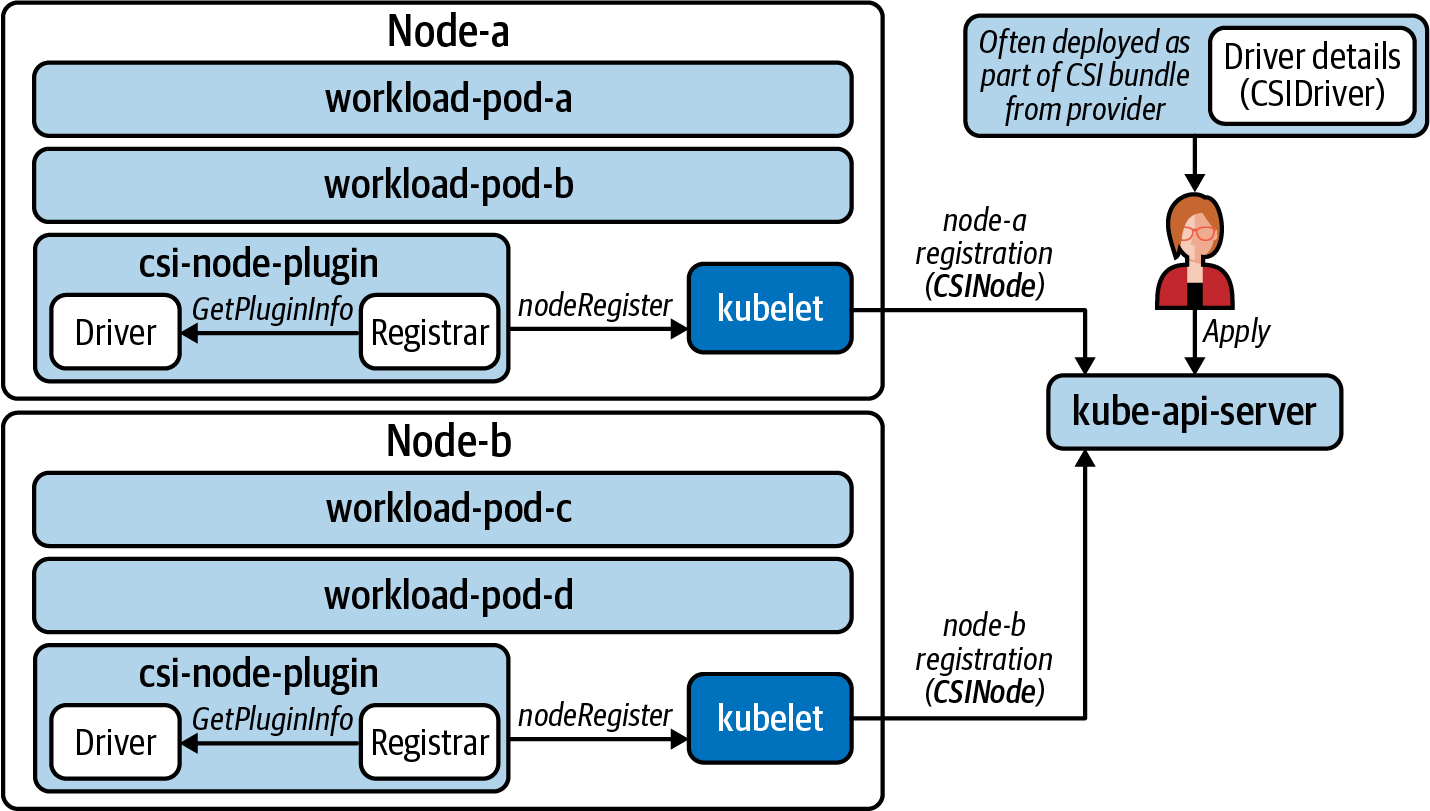
Figure 4-2. CSIDriver object is deployed and part of the bundle while the node plug-in registers with the kubelet. This in turn creates/manages the CSINode objects.
Exposing Storage Options
In order to provide storage options to developers, we need to create StorageClasses. For this scenario we’ll assume there are two types of storage we’d like to expose.The first option is to expose cheap disk that can be used for workload persistence needs. Many times, applications don’t need an SSD as they are just persisting some files that do not require quick read/write. As such, the cheap disk (HDD) will be the default option. Then we’d like to offer faster SSD with a custom IOPS per gigabyte configured. Table 4-1 shows our offerings; prices reflect AWS costs at the time of this writing.
| Offering name | Storage type | Max throughput per volume | AWS cost |
|---|---|---|---|
default-block |
HDD (optimized) |
40–90 MB/s |
$0.045 per GB per month |
performance-block |
SSD (io1) |
~1000 MB/s |
$0.125 per GB per month + $0.065 per provisioned IOPS per month |
In order to create these offerings, we’ll create a storage class for each. Inside each storage class is a parameters field. This is where we can configure settings that satisfy the features in Table 4-1.
kind:StorageClassapiVersion:storage.k8s.io/v1metadata:name:default-blockannotations:storageclass.kubernetes.io/is-default-class:"true"provisioner:ebs.csi.aws.comallowVolumeExpansion:truevolumeBindingMode:WaitForFirstConsumerparameters:type:st1---kind:StorageClassapiVersion:storage.k8s.io/v1metadata:name:performance-blockprovisioner:ebs.csi.aws.comparameters:type:io1iopsPerGB:"20"
This is the name of the storage offering we are providing to platform users. It will be referenced from PeristentVolumeClaims.
This sets the offering as the default. If a PersistentVolumeClaim is created without a StorageClass specified,
default-blockwill be used.Mapping to which CSI driver should be executed.
Allow expansion of the volume size via changes to a PersistentVolumeClaim.
Do not provision the volume until a Pod consumes the PersistentVolumeClaim. This will ensure the volume is created in the appropriate availability zone of the scheduled Pod. It also prevents orphaned PVCs from creating volumes in AWS, which you will be billed for.

Specifies what type of storage the driver should acquire to satisfy claims.

Consuming Storage
With the preceding pieces in place, we are now ready for users to consume these different classes of storage. We will start by looking at the developer experience of requesting storage. Then we’ll walk through the internals of how it is satisfied. To start off, let’s see what a developer gets when listing available StorageClasses:
$kubectl get storageclasses.storage.k8s.io NAME PROVISIONER RECLAIMPOLICY VOLUMEBINDINGMODE default-block(default)ebs.csi.aws.com Delete Immediate performance-block ebs.csi.aws.com Delete WaitForFirstConsumer ALLOWVOLUMEEXPANSIONtruetrue
Warning
By enabling developers to create PVCs, we will be allowing them to reference any StorageClass. If this is problematic, you may wish to consider implementing Validating Admission control to assess whether requests are appropriate. This topic is covered in Chapter 8.
Let’s assume the developer wants to make a cheaper HDD and more performant SSD available for an application. In this case, two PersistentVolumeClaims are created. We’ll refer to these as pvc0 and pvc1, respectively:
apiVersion:v1kind:PersistentVolumeClaimmetadata:name:pvc0spec:resources:requests:storage:11Gi---apiVersion:v1kind:PersistentVolumeClaimmetadata:name:pvc1spec:resources:requests:storage:14GistorageClassName:performance-block
This will use the default storage class (
default-block) and assume other defaults such as RWO and filesystem storage type.Ensure
performance-blockis requested to the driver rather thandefault-block.
Based on the StorageClass settings, these two will exhibit different provisioning behaviors. The performant storage (from pvc1) is created as an unattached volume in AWS. This volume can be attached quickly and is ready to use. The default storage (from pv0) will sit in a Pending state where the cluster waits until a Pod consumes the PVC to provision storage in AWS. While this will require more work to provision when a Pod finally consumes the claim, you will not be billed for the unused storage! The relationship between the claim in Kubernetes and volume in AWS can be seen in Figure 4-3.
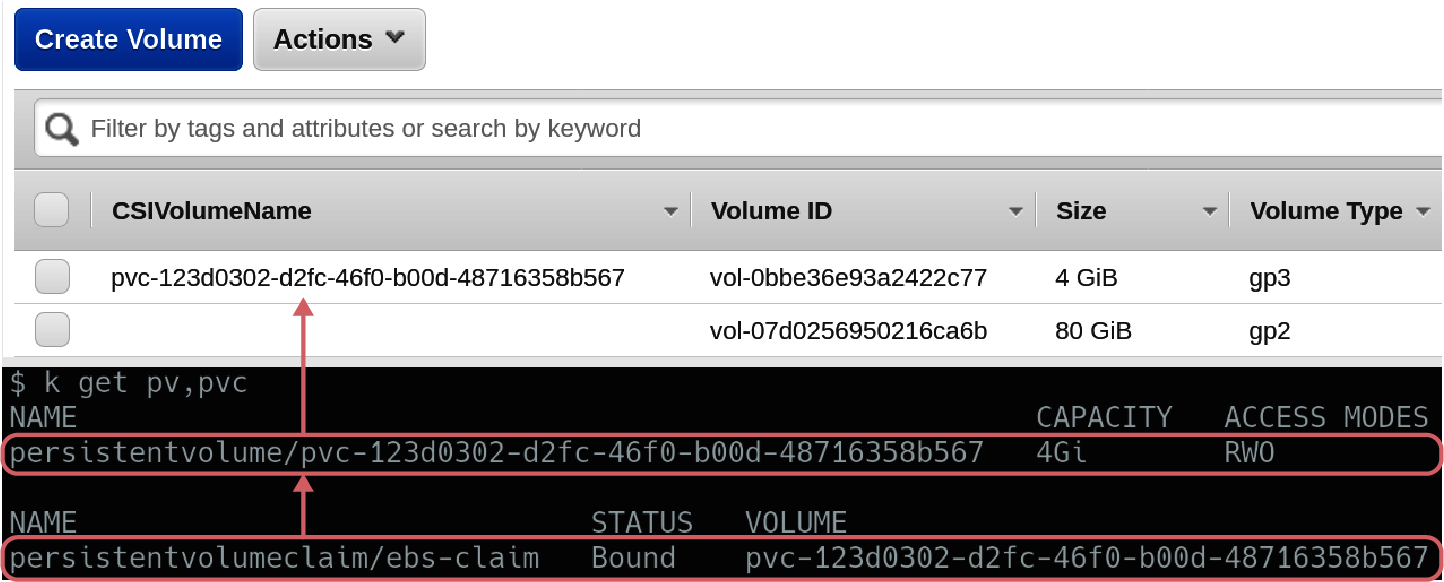
Figure 4-3. pv1 is provisioned as a volume in AWS, and the CSIVolumeName is propagated for ease of correlation. pv0 will not have a respective volume created until a Pod references it.
Now let’s assume the developer creates two Pods. One Pod references pv0 while the other references pv1. Once each Pod is scheduled on a Node, the volume will be attached to that node for consumption. For pv0, before this can occur the volume will also be created in AWS. With the Pods scheduled and volumes attached, a filesystem is established and the storage is mounted into the container. Because these are persistent volumes, we have now introduced a model where even if the Pod is rescheduled to another node, the volume can come with it. The end-to-end flow for how we’ve satisfied the self-service storage request is shown in Figure 4-4.
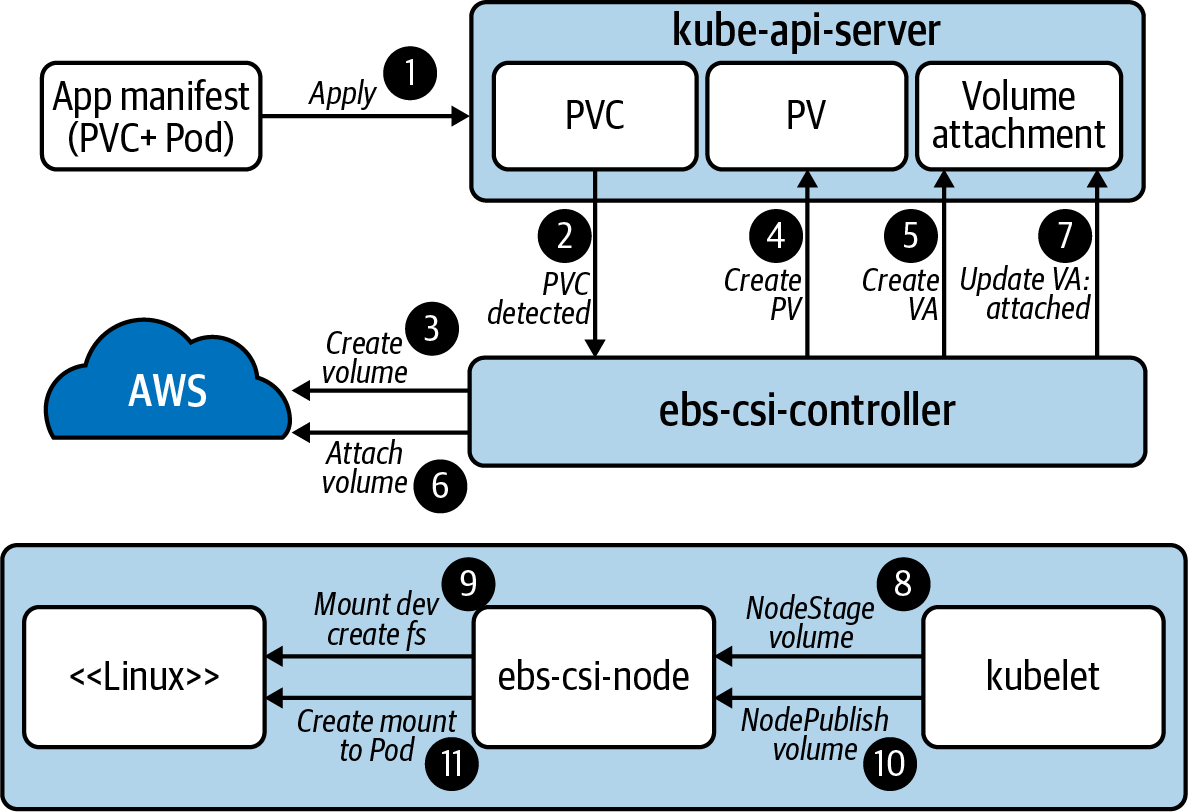
Figure 4-4. End-to-end flow of the driver and Kubernetes working together to satisfy the storage request.
Note
Events are particularly helpful in debugging storage interaction with CSI. Because provisioning, attaching, and mounting are all happening in order to satisfy a PVC, you should view events on these objects as different components report what they have done. kubectl describe -n $NAMESPACE pvc $PVC_NAME is an easy way to view these events.
Resizing
Resizing is a supported feature in the aws-ebs-csi-driver. In most CSI implementations, the external-resizer controller is used to detect changes in PersistentVolumeClaim objects. When a size change is detected, it is forwarded to the driver, which will expand the volume. In this case, the driver running in the controller plug-in will facilitate expansion with the AWS EBS API.
Once the volume is expanded in EBS, the new space is not immediately usable to the container. This is because the filesystem still occupies only the original space. In order for the filesystem to expand, we’ll need to wait for the node plug-in’s driver instance to expand the filesystem. This can all be done without terminating the Pod. The filesystem expansion can be seen in the following logs from the node plug-in’s CSI driver:
mount_linux.go: Attempting to determine if disk "/dev/nvme1n1" is formatted
using blkid with args: ([-p -s TYPE -s PTTYPE -o export /dev/nvme1n1])

mount_linux.go: Output: "DEVNAME=/dev/nvme1n1\nTYPE=ext4\n", err: <nil>

resizefs_linux.go: ResizeFS.Resize - Expanding mounted volume /dev/nvme1n1

resizefs_linux.go: Device /dev/nvme1n1 resized successfully
Warning
Kubernetes does not support downsizing a PVC’s size field. Unless the CSI-driver provides a workaround for this, you may not be able to downsize without re-creating a volume. Keep this in mind when growing volumes.
Snapshots
To facilitate periodic backups of volume data used by containers, snapshot functionality is available. The functionality is often broken into two controllers, which are responsible for two different CRDs. The CRDs include VolumeSnapshot and VolumeContentSnapshot. At a high-level, the VolumeSnapshot is responsible for the life cycle of volumes. Based on these objects, VolumeContentSnapshots are managed by the external-snapshotter controller. This controller is typically run as a sidecar in the CSI’s controller plug-in and forwards requests to the driver.
Note
At the time of this writing, these objects are implemented as CRDs and not core Kubernetes API objects. This requires the CSI driver or Kubernetes distribution to deploy the CRD definitions ahead of time.
Similar to offering storage via StorageClasses, snapshotting is offered by introducing a Snapshot class. The following YAML represents this class:
apiVersion:snapshot.storage.k8s.io/v1beta1kind:VolumeSnapshotClassmetadata:name:default-snapshotsdriver:ebs.csi.aws.comdeletionPolicy:Delete
Which driver to delegate snapshot request to.
Whether the VolumeSnapshotContent should be deleted when the VolumeSnapshot is deleted. In effect, the actual volume could be deleted (depending on support from the provider).
In the Namespace of the application and PersistentVolumeClaim, a VolumeSnapshot may be created. An example is as follows:
apiVersion:snapshot.storage.k8s.io/v1beta1kind:VolumeSnapshotmetadata:name:snap1spec:volumeSnapshotClassName:default-snapshotssource:persistentVolumeClaimName:pvc0
Specifies the class, which informs the driver to use.
Specifies the volume claim, which informs the volume to snapshot.
The existence of this object will inform the need to create a VolumeSnapshotContent object. This object has a scope of cluster-wide. The detection of a VolumeSnapshotContent object will cause a request to create a snapshot and the driver will satisfy this by communicating with AWS EBS. Once satisfied, the VolumeSnapshot will report ReadyToUse. Figure 4-5 demonstrates the relationship between the various objects.
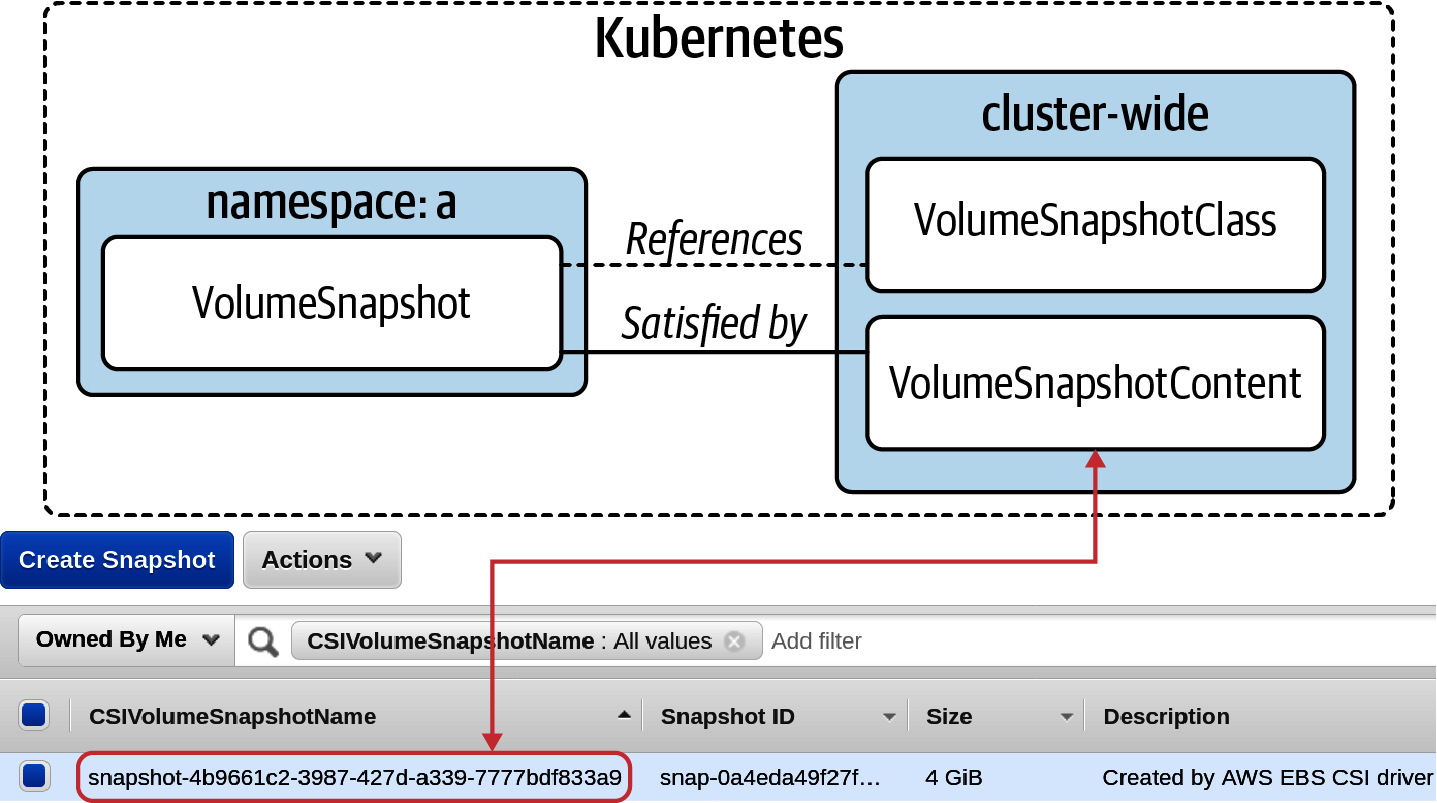
Figure 4-5. The various objects and their relations that make up the snapshot flow.
With a snapshot in place, we can explore a scenario of data loss. Whether the original volume was accidentally deleted, had a failure, or was removed due to an accidental deletion of a PersistentVolumeClaim, we can reestablish the data. To do this, a new PersistentVolumeClaim is created with the spec.dataSource specified. dataSource supports referencing a VolumeSnapshot that can populate data into the new claim. The following manifest recovers from the previously created snapshot:
apiVersion:v1kind:PersistentVolumeClaimmetadata:name:pvc-reclaimspec:accessModes:-ReadWriteOncestorageClassName:default-blockresources:requests:storage:600GidataSource:name:snap1kind:VolumeSnapshotapiGroup:snapshot.storage.k8s.io
The VolumeSnapshot instance that references the EBS snapshot to replenish the new PVC.
Once the Pod is re-created to reference this new claim, the last snapshotted state will return to the container! Now we have access to all the primitives for creating a robust backup and recovery solution. Solutions could range from scheduling snapshots via a CronJob, writing a custom controller, or using tools such as Velero to back up Kubernetes objects along with data volumes on a schedule.
Summary
In this chapter, we’ve explored a variety of container storage topics. First, we want to have a deep understanding of application requirements to best inform our technical decision. Then we want to ensure that our underlying storage provider can satisfy these needs and that we have the operational expertise (when required) to operate them. Lastly, we should establish an integration between the orchestrator and the storage system, ensuring developers can get the storage they need without being proficient in an underlying storage system.
Get Production Kubernetes now with the O’Reilly learning platform.
O’Reilly members experience books, live events, courses curated by job role, and more from O’Reilly and nearly 200 top publishers.

