Chapter 4. Operating AWS Lambda Functions
This chapter will introduce a more advanced method of building and packaging Java-based AWS Lambda functions. We’ll also go into more detail on the serverless-oriented version of AWS’s infrastructure-as-code tool, SAM, which you first used in Chapter 2. Finally, we’ll go over how Lambda functions and serverless applications are affected by AWS’s security model and how to use SAM to automatically enforce a least-privilege security model for our serverless application.
Before proceeding, we recommend that if you haven’t done so already that you download this book’s code examples.
Build and Package
The Lambda platform expects all user-provided code to be in the form of a ZIP archive file. Depending on which runtime you’re using and your actual business logic, that ZIP file may consist of source code, or code and libraries, or, in the case of Java, compiled byte code (class files) and libraries.
In the Java ecosystem, we often package our code into JAR (Java ARchive) files, to be run via the java -jar command, or to be used as libraries by other applications.
It turns out that a JAR file is simply a ZIP file with some additional metadata.
The Lambda platform doesn’t perform any special handling of JAR files—it treats them as ZIP files, just as it does for the other Lambda language runtimes.
Using a tool like Maven, we can specify the other libraries that our code depends on and have Maven download the right versions of those libraries (and any transitive dependencies that they might have), compile our code into Java class files, and package everything up into a single JAR file (often called an uberjar).
Uberjars
Despite using the uberjar approach in Chapters 2 and 3, there are a few problems with it that are worth calling out before we go any further.
First, the uberjar approach unpacks and then overlays libraries on top of each other in the target uberjar file. In the following example, Library A contains a class file and a properties file. Library B contains a different class file and a properties file with the same name as the properties file from Library A.
$ jar tf LibraryA.jar
book/
book/important.properties
book/A.class

$ jar tf LibraryB.jar
book/
book/important.properties
book/B.class
If these JAR files were used to create an uberjar (as we did in prior chapters), the result would contain two class files and one properties file—but the properties file from which source JAR?
$ jar tf uberjar.jar
book/
book/important.properties # Which properties file is this?
book/A.class
book/B.class
Because the JAR files are unpacked and overlaid, only one of those properties files will make it into the final uberjar, and it can be difficult to know which one will win without delving into the dark arts of Maven resource transformers.
The second major issue with the uberjar approach is oriented around creating a JAR file—the fact that JAR files are also ZIP files that can be used by the Lambda runtime is incidental from the perspective of the Maven build process.
Two specific issues arise from this JAR versus ZIP situation.
One is that any JAR-specific metadata is unused (and in fact, ignored) by the Lambda runtime.
Things like a Main-Class attribute in a MANIFEST.MF file—a piece of metadata common to JAR files—are meaningless in the context of a Lambda function.
Furthermore, the JAR creation process itself introduces a certain amount of non-determinism into the build process. For example, tool versions and build timestamps are recorded in MANIFEST.MF and pom.properties files—and that makes it impossible to reproducibly build the same JAR file from the same source code every time. This nonreproducibility wreaks havoc on downstream caching, deployment, and security processes, so we want to avoid it when possible.
Since we’re not actually interested in the JAR-ness of an uberjar file, it makes sense for us to consider not using the uberjar process at all. Of course, the uberjar process itself isn’t necessarily the only source of nondeterminism in our build process, but we’ll deal with the rest of it later.
Despite these drawbacks, the uberjar process is simpler to configure and use for simple cases, especially when a Lambda function has few (or no) third-party dependencies. This was the case in the examples in Chapters 2 and 3, which is why we used the uberjar technique up until this point, but for any real-world use of Java and Lambda of any significant scale, we recommend the ZIP file approach that we describe next.
Assembling a ZIP File
So, in the Java world, our alternative to using an uberjar file is to fall back to a trusty old ZIP file. In this scenario, the archive layout is going to be a little different, but we’ll see how a careful approach can avoid the issues with the uberjar and give us an artifact that the Lambda platform can use. We’ll discuss how to achieve this using Maven, but of course you should feel free to translate this method to your preferred build tool—the outcome is more important than the process itself.
To make a more interesting example, first we’ll add a dependency on the AWS SDK for DynamoDB to our Maven build for the Lambda function from “Lambda Hello World (the Proper Way)”.
Add a dependencies section to the pom.xml file:
<dependencies><dependency><groupId>com.amazonaws</groupId><artifactId>aws-java-sdk-dynamodb</artifactId><version>1.11.319</version></dependency></dependencies>
With that dependency added, here’s what the desired ZIP file layout looks like for our simple Lambda function and dependencies:
$ zipinfo -1 target/lambda.zip
META-INF/
book/
book/HelloWorld.class
lib/
lib/aws-java-sdk-core-1.11.319.jar
lib/aws-java-sdk-dynamodb-1.11.319.jar
lib/aws-java-sdk-kms-1.11.319.jar
lib/aws-java-sdk-s3-1.11.319.jar
lib/commons-codec-1.10.jar
lib/commons-logging-1.1.3.jar
lib/httpclient-4.5.5.jar
lib/httpcore-4.4.9.jar
lib/ion-java-1.0.2.jar
lib/jackson-annotations-2.6.0.jar
lib/jackson-core-2.6.7.jar
lib/jackson-databind-2.6.7.1.jar
lib/jackson-dataformat-cbor-2.6.7.jar
lib/jmespath-java-1.11.319.jar
lib/joda-time-2.8.1.jar
In addition to our application code (book/HelloWorld.class), we see a lib directory full of JAR files, one for the AWS DynamoDB SDK, and one for each of its transitive dependencies.
We can build that ZIP output using the Maven Assembly plug-in.
This plug-in allows us to add some special behavior to a specific part of the Maven build (in this case, the package phase where the results of the Java compilation process are packaged up alongside other resources into a set of output files).
First, we’ve configured the Maven Assembly plug-in in the pom.xml file for the project, in the build section:
<build><plugins><plugin><artifactId>maven-assembly-plugin</artifactId><version>3.1.1</version><executions><execution><phase>package</phase><goals><goal>single</goal></goals></execution></executions><configuration><appendAssemblyId>false</appendAssemblyId><descriptors><descriptor>src/assembly/lambda-zip.xml</descriptor></descriptors><finalName>lambda</finalName></configuration></plugin></plugins></build>
The two most important parts of this configuration are the assembly descriptor, which is a path to another XML file in our project, and the finalName, which instructs the plug-in to name our output file lambda.zip instead of something else.
We’ll see later how picking a simple finalName will aid in rapid iteration of our project, especially after we start using Maven submodules.
Most of the configuration for our ZIP file is actually located in the assembly descriptor file, which was referenced in the pom.xml file earlier.
This assembly configuration is a description of exactly which contents to include in our output file:
<assembly><id>lambda-zip</id><formats><format>zip</format></formats><includeBaseDirectory>false</includeBaseDirectory><dependencySets><dependencySet><includes><include>${project.groupId}:${project.artifactId}</include></includes><unpack>true</unpack><unpackOptions><excludes><exclude>META-INF/MANIFEST.MF</exclude><exclude>META-INF/maven/**</exclude></excludes></unpackOptions></dependencySet><dependencySet><useProjectArtifact>false</useProjectArtifact><unpack>false</unpack><scope>runtime</scope><outputDirectory>lib</outputDirectory></dependencySet></dependencySets></assembly>

We’ve given the assembly a unique name,
lambda-zip.
The output format itself will be of type
zip.
The output file will not have a base directory—this means that when extracted, our ZIP file’s contents will be unpacked into the current directory rather than into a new subdirectory.

The first
dependencySetsection explicitly includes our application code, by referencing the project’sgroupIdandartifactIdproperties. When we start using Maven submodules, this will need to be altered. Our application code will be “unpacked.” That is, it won’t be contained in a JAR file; rather, it will just be a normal directory structure and Java .class files. We’ve also explicitly excluded the unnecessary META-INF directory.
The second
dependencySetsection handles our application’s dependencies. We exclude the project’s artifact (as it was handled in the firstdependencySetsection). We only include dependencies that are in theruntimescope. We don’t unpack the dependencies; rather, we just leave them packaged as JAR files.
Finally, instead of including all of the JAR files in the root of our output file, we’ll put them all into a lib directory.
So how does this complicated new Maven configuration help us avoid the issues with uberjars?
First, we’ve stripped out some of the unnecessary META-INF information. You’ll notice we’ve been a bit selective—there are some cases where having META-INF information (like “services”) is still valuable, so we don’t want to get rid of it completely.
Second, we’ve included all of our dependencies, but as individual JAR files in a lib directory. This avoids the file and path overwriting issue completely. Each dependency JAR remains self-contained. According to the AWS Lambda best practices documentation, this approach also pays some performance dividends in that it’s faster for the Lambda platform to unpack a ZIP file and faster for the JVM to load classes from JAR files.
Reproducible Builds
When our source code or dependencies change, we expect the contents of the deployment package (the uberjar or ZIP file) to change too (after running our build and packaging process). However, when our source code and dependencies don’t change, the contents of the deployment package should remain the same even if the build and packaging process is executed again. The output of the build should be reproducible (e.g., deterministic). This is important because downstream processes (like deployment pipelines) are often triggered based on whether a deployment package has changed as indicated by the MD5 hash of the contents, and we want to avoid triggering those processes unnecessarily.
Even though we’ve eliminated the autogenerated MANIFEST.MF and pom.properties files using the lambda-zip assembly descriptor, we still haven’t removed all of the potential sources of nondeterminism in the build process.
For example, when we build our application code (e.g., HelloWorld), the timestamp on the compiled Java class files may change.
These altered timestamps are propagated into the ZIP file, and then the hash of the ZIP file’s contents changes even though the source code didn’t.
Fortunately, a simple Maven plug-in exists to strip these sources of nondeterminism from our build process.
The reproducible-build-maven-plugin can be executed during the build process and will render our output ZIP file completely deterministic.
It can be configured as a plugin in the build section of our pom.xml file:
<plugin><groupId>io.github.zlika</groupId><artifactId>reproducible-build-maven-plugin</artifactId><version>0.10</version><executions><execution><phase>package</phase><goals><goal>strip-jar</goal></goals></execution></executions></plugin>
Now, when we rebuild our deployment packages multiple times using the same unchanged source code, the hash is always the same. You’ll see how this affects the deployment process in the next section.
Deploy
There are many options for deploying Lambda code. Before we dive in, however, it’s worth clarifying what we mean by deploy. In this case, we’re simply talking about updating the code or configuration for a particular Lambda function, or a group of Lambda functions and related AWS resources, through the use of APIs or other services. We’re not extending the definition to include deployment orchestration (like AWS CodeDeploy).
In no particular order, the methods of deploying Lambda code are as follows:
-
AWS Lambda web console
-
AWS CloudFormation/Serverless Application Model (SAM)
-
AWS CLI (which uses the AWS API)
-
AWS Cloud Development Kit (CDK)
-
Other AWS-developed frameworks, like Amplify and Chalice
-
Third-party frameworks targeting serverless components that build primarily on top of CloudFormation, like the Serverless Framework
-
Third-party tools and frameworks targeting serverless components that build primarily on top of the AWS API, like Claudia.js and
lambda-maven-pluginfrom Maven -
General-purpose third-party infrastructure tools, like Ansible or Terraform
In this book, we’ll address the first two (and indeed have already touched upon the AWS Lambda web console and SAM in Chapters 2 and 3). We also use the AWS CLI, although not as a deployment tool. With a solid understanding of those methods, you should be able to evaluate the other options and decide whether one of them is a better fit for your environment and use case.
Infrastructure as Code
When we interact with AWS via the web console or the CLI, we’re creating, updating, and destroying infrastructure manually. For example, if we create a Lambda function using the AWS Web Console, the next time we want to create a Lambda function with the same parameters, we still have to perform the same manual actions via the web console. This same characteristic applies to the CLI as well.
For initial development and experimentation, this is a reasonable approach. However, when our projects begin building momentum, this manual approach to infrastructure management will turn into a roadblock. A well-proven way to address this issue is called infrastructure as code.
Rather than manually interacting with AWS via the web console or CLI, we can declaratively specify our desired infrastructure in a JSON or YAML file and submit that file to AWS’s infrastructure-as-code service: CloudFormation. The CloudFormation service takes our input file and makes the necessary changes to AWS infrastructure on our behalf, taking into account resource dependencies, the current state of previously deployed versions of our app, and the idiosyncrasies and specific requirements of the various AWS services. A set of AWS resources created from a CloudFormation template file is called a stack.
CloudFormation is AWS’s proprietary infrastructure-as-code service, but it’s not the only option in this area. Other popular choices that work with AWS are Terraform, Ansible, and Chef. Each service has its own configuration languages and patterns, but all achieve essentially the same outcome—cloud infrastructure provisioned from configuration files.
A key benefit of using configuration files (rather than pointing and clicking in the console) is that those files, which represent our application infrastructure, can be version-controlled alongside our application source code. We can see a complete timeline of changes to our infrastructure, using the same version-control tools we use for the other pieces of our application. Furthermore, we can incorporate those configuration files into our continuous deployment pipelines, so when we make changes to our application infrastructure, those changes can be rolled out safely using industry-standard tools, alongside our application code.
CloudFormation and the Serverless Application Model
While there are obvious benefits to an infrastructure-as-code approach, CloudFormation itself has a reputation for being verbose, unwieldy, and inflexible. Configuration files for even the simplest application architectures can easily run into the hundreds or thousands of lines of JSON or YAML. When dealing with an existing CloudFormation stack of that size, there’s an understandable temptation to fall back to using the AWS Web Console or CLI.
Fortunately, as AWS serverless developers, we have the good fortune to be able to use a different “flavor” of CloudFormation called the Serverless Application Model (SAM), which we used in Chapters 2 and 3. This is essentially a superset of CloudFormation, which allows us to use some special resource types and shortcuts to represent common serverless components and application architectures. It also includes some special CLI commands to ease development, testing, and deployment.
Here’s the SAM template we first used in “Creating the Lambda Function”, updated to use our new ZIP deployment package (note that the CodeUri suffix has changed from .jar to .zip):
AWSTemplateFormatVersion:2010-09-09Transform:AWS::Serverless-2016-10-31Description:Chapter 4Resources:HelloWorldLambda:Type:AWS::Serverless::FunctionProperties:Runtime:java8MemorySize:512Handler:book.HelloWorld::handlerCodeUri:target/lambda.zip
We can deploy the new ZIP-based Lambda function using the same SAM command you learned in Chapter 2:
$sam deploy\--s3-bucket$CF_BUCKET\--stack-name chapter4-sam\--capabilities CAPABILITY_IAM
sam deploy starts by uploading our deployment package to S3, but only if the contents of that package have changed.
Earlier in the chapter, we spent some time setting up a reproducible build so that operations like this upload process don’t have to execute if nothing has actually changed.
Behind the scenes sam deploy also creates a modified version of our template (also stored in S3) to reference the newly uploaded S3 locations of our artifact(s), rather than the local ones.
This step is necessary because CloudFormation requires any referenced artifacts within a template to be available in S3 at deployment time.
Tip
The files that s3 deploy stores in S3 should be considered merely staging versions as part of a deployment process, rather than application artifacts to be kept. Because of this, we recommend that you set a “Lifecycle Policy” on your SAM S3 bucket, if it isn’t being used for anything else, that will automatically delete the deployment artifacts after a period of time—we usually set it to a week.
After the upload step, the sam deploy command creates a new CloudFormation stack if one doesn’t already exist with the provided name in this AWS account and region.
If the stack already exists, the sam deploy command will create a CloudFormation change set, which lists which resources will be created, updated, or deleted before taking action.
The sam deploy command will then apply the change set to update the CloudFormation stack.
Listing the stack resources, we can see that not only did CloudFormation create our Lambda function, but it also created the supporting IAM roles and policies (which we’ll explore later) without our having to specify them explicitly:
$aws cloudformation list-stack-resources --stack-name chapter4-sam{"StackResourceSummaries":[{"LogicalResourceId":"HelloWorldLambda","PhysicalResourceId":"chapter4-sam-HelloWorldLambda-1HP15K6524D2E","ResourceType":"AWS::Lambda::Function","LastUpdatedTimestamp":"2019-07-26T19:16:34.424Z","ResourceStatus":"CREATE_COMPLETE","DriftInformation":{"StackResourceDriftStatus":"NOT_CHECKED"}},{"LogicalResourceId":"HelloWorldLambdaRole","PhysicalResourceId":"chapter4-sam-HelloWorldLambdaRole-1KV86CI9RCXY0","ResourceType":"AWS::IAM::Role","LastUpdatedTimestamp":"2019-07-26T19:16:30.287Z","ResourceStatus":"CREATE_COMPLETE","DriftInformation":{"StackResourceDriftStatus":"NOT_CHECKED"}}]}
In addition to Lambda functions, SAM includes resource types for DynamoDB tables (AWS::Serverless::SimpleTable) and API Gateways (AWS::Serverless::Api).
These resource types are focused on popular use cases and may not be usable for all application architectures.
However, because SAM is a superset of CloudFormation, we can use plain old CloudFormation resource types in our SAM templates.
That means we can mix and match serverless and “normal” AWS components in our architectures, gaining the benefits of both approaches, and the idempotent CLI semantics of SAM’s sam deploy command.
You’ll see examples of combining SAM and CloudFormation resources in one template in Chapter 5.
Security
Security permeates every aspect of AWS. As you learned in Chapter 2, we must deal with AWS’s security layer, called Identity and Access Management (IAM), from the very beginning. However, rather than gloss over the details by simply running everything with the broadest, least-secure set of IAM permissions possible, we’re going to dive a little deeper in this section and explain how access to the Lambda platform is controlled by IAM, how that affects our functions’ interactions with other AWS resources, and how SAM makes it a bit easier to build secure applications.
The Principle of Least Privilege
Unlike in a traditional monolithic application, a serverless application could potentially have hundreds of individual AWS components, each with different behavior and access to different pieces of information. If we simply applied the broadest security permissions possible, then every component would have access to every other component and piece of information in our AWS account. Every gap we leave in a security policy is an opportunity for information to leak or be lost or be altered or for our application’s behavior to be changed. And, if a single component is compromised, the entire AWS account (and any other applications deployed in it) is at risk as well.
We can address this risk by applying the principle of “least privilege” to our security model. In a nutshell, this principle states that every application and indeed every component of an application should have the least possible access it needs to perform its function. For example, let’s consider a Lambda function that reads from a DynamoDB table. The broadest possible permissions would allow that Lambda function to read, write, or otherwise interact with every other component and piece of information in the AWS account. It could read from S3 buckets, create new Lambda functions, or even launch EC2 instances. If the Lambda code had a bug or vulnerability (in parsing user input, for example), its behavior could be altered to do those things, and it wouldn’t be constrained by its IAM role.
The principle of least privilege, applied to this particular Lambda function, would lead to an IAM role that allows the function to only access the DynamoDB service. Going a step further, we might only allow the function to read data from DynamoDB and remove its ability to write data or to create or delete tables. We can go even further in this case and restrict the function’s read-only access to the single DynamoDB table it requires. Taken to the logical extreme, we can even restrict which items in the table the function can read, based on the user who has executed the function in the first place.
Having applied the principle of least privilege to our Lambda function, we’ve now limited its access to only the specific resources that it needs to perform its job. If the Lambda function was compromised or hacked in some way, its security policy would still constrain it to reading specific items from a single DynamoDB table. That said, the principle of least privilege is not only applicable to preventing compromises. It’s also an effective means of limiting the “blast radius” of bugs in your application code.
Let’s consider a situation in which our Lambda function has a bug that, for example, uses the wrong value to delete data. In a wide-open security model, that bug could result in the Lambda function deleting data for the wrong user! However, because we’ve limited the “blast radius” of bugs by applying the principle of least privilege for our Lambda function, this particular issue will result in it simply doing nothing or throwing an error.
Identity and Access Management
A working knowledge of IAM is critical to successfully building any kind of application on AWS, and as we discussed in the previous section, effectively applying the principle of least privilege is even more important when building a serverless application. IAM is a complex, multifaceted service, and we’re not going to come close to covering all of it here. Rather, in this section, we’re just going to dive into IAM from the perspective of building serverless applications. Where IAM most commonly and frequently comes into play for serverless applications is in execution roles, in the policies attached to those roles, and in policies attached to specific AWS resources.
Roles and policies
An IAM role is an identity that can be assumed by an AWS component (like a Lambda function). A role differs from an IAM user in that a role is assumable by anyone (or anything) who needs it, and a role doesn’t have long-term access credentials. With that in mind, we can define an IAM role as an assumable identity, with an attached set of permissions.
The phrase assumable identity might make it sound like anyone or anything can assume an IAM role. If that were the case, then using roles wouldn’t really provide any benefit because there would be no restrictions on assuming a role and therefore no restrictions on what actions any given user or component could undertake. Fortunately, IAM roles are not assumable by just anyone. When building a role, we must specify who (or what) can assume that role. For example, if we’re building a role for use by a Lambda function, we must explicitly grant the Lambda service (in this case the data plane) permission to assume that role, by specifying the following “trust relationship”:
{"Version":"2012-10-17","Statement":[{"Effect":"Allow","Principal":{"Service":"lambda.amazonaws.com"},"Action":"sts:AssumeRole"}]}
This statement specifies an effect (Allow), which applies to an action (sts:AssumeRole).
Most important, however, it specifies a principal, which is the identity that is allowed to assume the role.
In this case, we’re allowing the Lambda service’s data plane (lambda.amazonaws.com) to assume this role.
If we tried to use this role with a different service, like EC2 or ECS, it wouldn’t work unless we changed the principal.
Now that we’ve established who can assume the role, we need to add permissions. IAM roles don’t inherently have any permissions to access resources or perform actions. Also, IAM’s default behavior is to deny permission, unless that permission is explicitly allowed in a policy. Those permissions are contained in policies, which state permissions using the following constructs:
-
An effect (like
AlloworDeny) -
A set of actions, which are generally namespaced to a specific AWS service (like
logs:PutLogEvents) -
A set of resources, which are generally Amazon Resource Names (ARNs) that define specific AWS components. Different services support varying levels of specificity for resources. For example, DynamoDB policies can apply down to the level of a table.
Here’s an example policy that allows a set of actions against the “logs” service (aka CloudWatch Logs) and doesn’t restrict those actions to any particular “logs” resource:
{"Version":"2012-10-17","Statement":[{"Effect":"Allow","Action":["logs:CreateLogGroup","logs:CreateLogStream","logs:PutLogEvents"],"Resource":"*"}]}
We established earlier who can assume the role (the Lambda service’s data plane, as specified by the principal identifier lambda.amazonaws.com) and what permissions the role has.
By itself, however, this role isn’t used until it’s attached to a Lambda function, which we would need to explicitly configure.
That is, we need to tell the Lambda service to use this role when executing a particular Lambda function.
Lambda resource policies
As if the world of security and IAM weren’t complex enough, AWS also occasionally uses IAM policies applied to resources (rather than identities) to control actions and access. Resource policies invert control compared to an identity-based IAM policy: a resource policy states what other principals can do to the resource in question. In particular, this is useful for allowing principals in different accounts access to certain resources (like Lambda functions or S3 buckets).
A Lambda function invocation resource policy consists of a series of statements, each of which specifies a principal, a list of actions, and a list of resources. These policies are used by the Lambda data plane to determine whether to allow a caller (e.g., a principal) to successfully invoke a function. Here’s an example Lambda resource policy (also called a function policy) that allows the API Gateway service to invoke a particular function:
{"Version":"2012-10-17","Id":"default","Statement":[{"Sid":"Stmt001","Effect":"Allow","Principal":{"Service":"apigateway.amazonaws.com"},"Action":"lambda:invokeFunction","Resource":"arn:aws:lambda:us-east-1:555555555555:function:MyLambda","Condition":{"ArnLike":{"AWS:SourceArn":"arn:aws:execute-api:us-east-1:555555555555:xxx/*/GET/locations"}}}]}
In this policy, we’ve also added a condition, which more specifically limits the allowed source of the action to only API Gateway deployments with an ID of “xxx” that include the “/GET/locations” path. Conditions are service-specific and depend on what information the caller makes available.
Let’s work through the scenario in which API Gateway invokes a Lambda function, using Figure 4-1.
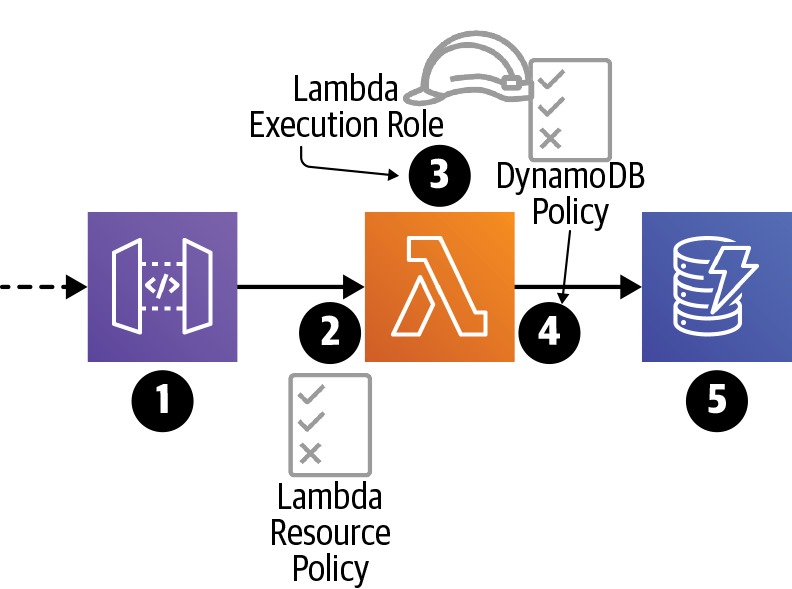
Figure 4-1. Overview of Lambda and IAM security
-
Did the caller have permission to call the API? For this scenario, we’ll assume the answer is yes. Please see the API Gateway documentation for more information.
-
The API Gateway API is attempting to invoke the Lambda function. Does the Lambda service allow this? This is controlled by a Lambda function invocation resource policy.
-
What permissions should the Lambda function code have when it executes? This is controlled by the Lambda execution role, and that role is assumed through a trust relationship with the Lambda service.
-
The Lambda code is trying to put an item into a DynamoDB table. Can it do that? This is controlled by a permission, which comes from an IAM policy attached to the Lambda execution role.
-
DynamoDB doesn’t use resource policies, so calls from anyone (including Lambda functions) are permitted, as long as their role (e.g., the Lambda execution role) permits it.
SAM IAM
Unfortunately, the complexity of IAM puts its effective use somewhat at odds with a rapid prototyping workflow. Throw a serverless application architecture into the mix, and it’s no wonder so many Lambda execution roles have completely open policies, allowing all forms of access to every resource in the AWS account. Even though it’s easy to agree that the principle of least privilege provides valuable benefits, when faced with the somewhat daunting task of implementing it using IAM for dozens or hundreds of AWS resources, many otherwise conscientious engineers choose to forgo security for simplicity.
Autogenerated execution roles and resource policies
Fortunately, the Serverless Application Model addresses this issue in a few different ways. In the simplest of cases, it will automatically create the appropriate Lambda execution roles and function policies, based on the various functions and event sources configured in the SAM infrastructure template. This neatly handles permissions for executing Lambda functions and allowing them to be invoked by other AWS services.
For example, if you configured a single Lambda function with no triggers, SAM will automatically generate a Lambda execution role for that function, which would allow it to write to CloudWatch Logs. If you then added an API Gateway trigger to that Lambda function, SAM will generate a Lambda function invocation resource policy, which allows the Lambda function to be invoked by the API Gateway platform. This will make our lives a little easier in the next chapter!
Common policy templates
Of course, if your Lambda function needs to interact with other AWS services in code (for example, to write to a DynamoDB table), it will likely require additional permissions. For these situations, SAM provides a selection of common IAM policy templates that allow us to concisely specify permissions and resources. Those templates are then expanded during the SAM deployment process and become fully specified IAM policy statements. Here we’ve added a DynamoDB table to our SAM template. We’ve used a SAM policy template to allow our Lambda function to perform create, read, update, and delete actions (aka CRUD) against that DynamoDB table.
AWSTemplateFormatVersion:2010-09-09Transform:AWS::Serverless-2016-10-31Description:Chapter4Resources:HelloWorldLambda:Type:AWS::Serverless::FunctionProperties:Runtime:java8MemorySize:512Handler:book.HelloWorld::handlerCodeUri:target/lambda.zipPolicies:— DynamoDBCrudPolicy:TableName:!RefHelloWorldTableHelloWorldTable:Type:AWS::Serverless::SimpleTable
Here we’ve used the CloudFormation Intrinsic Function
Ref, which allows us to use the logical ID of a resource (in this caseHelloWorldTable) as a placeholder for the physical ID of the resource (which would be something likestack-name-HelloWorldTable-ABC123DEF). The CloudFormation service will resolve logical IDs to physical IDs when a stack is created or updated.
Summary
In this chapter, we covered building and packaging Lambda code and dependencies in a reproducible, deterministic way. We started to use AWS’s SAM to specify our infrastructure (e.g., our Lambda function and later a DynamoDB table) as YAML code—we’ll explore this much further in Chapter 5. We then explored the two different kinds of IAM constructs that affect Lambda functions: execution roles and resource policies. Finally, using SAM instead of raw CloudFormation meant that we didn’t have to add very much additional YAML code to apply the principle of least privilege to the IAM roles and policies for our Lambda function.
We now have nearly all the basic building blocks in place to create complete applications using Lambda and associated tools. In Chapter 5 we’ll show how to tie Lambda functions to event sources and then build two example applications.
Exercises
-
Deliberately misconfigure the Lambda function in this chapter by setting the
Handlerproperty tobook.HelloWorld::foo. What happens when the function is deployed? What happens when you invoke the function? -
Read the IAM reference guide to learn which AWS services (and actions) can have granular IAM permissions.
-
If you’d like an extra challenge, replace
AWS::Serverless::FunctionwithAWS::Lambda::Functionin the template.yaml file. What other changes do you have to make for CloudFormation to deploy your function? If you get stuck, you can look at the post-transform template (for the original stack) via the CloudFormation web console.
Get Programming AWS Lambda now with the O’Reilly learning platform.
O’Reilly members experience books, live events, courses curated by job role, and more from O’Reilly and nearly 200 top publishers.

