
143
C
REATE A
B
ACKING
T
RACK
(G
ARAGE
B
AND
)
Tutorial 4: Mix and Record
With the basic elements in place, it’s time for some fit and finish. Adjusting
the panning, volume and fades, and effects of the mix will help get the exact
sound you want. At this point you can also record your own vocals or acoustic
instrument, adding them to the computer-generated tracks.
1. Adjust pan and volume: At this point, all the tracks are panned center
and mixed at exactly the same volume, so it’s hard to differentiate parts.
To adjust settings for an entire track, open the Mixer panel by clicking
the triangle next to Tracks (if it’s not open already). Adjust the pan
knob and volume until they sound right to you. To begin with, adjust
the volume fader for the strings so that they don’t overwhelm the other
parts; adjust its volume fader slightly to the left.
2. Sweeten the sound: GarageBand offers various built-in effects for
modifying your sound. Select the second of the two Drum Kit tracks
(the one with the audio drums) and click the Track Info button (the one
with the letter “i” on it). Click “Drums” in the left column and a number
of presets appear in the right column; try selecting different settings and
auditioning the sound. (These effects work in real time as your project
plays, so simply click Play and try different settings.) If you want to fine-
tune the preset or see how it was created, click Details. You can save
your own presets as Instruments. For now, let’s leave the drums with no
effects. To change the master effects through which all the tracks are
routed, select Master Track. Try the setting Rock/Pop > Live Gig.
3.
Fade out the end: So the song doesn’t end abruptly, we’ll fade out the
tracks. You could fade out the whole mix by adjusting the Master Track
(Tracks > Show Master Track), but for more subtlety we’ll adjust them
Effect ingredients:
Master Track > Rock/Pop >
Folk Rock
GarageBand tools:
Volume and pan for tracks,
volume/pan automation
Effects presets
Master track
Real instrument, software
instrument
Recording
Editing
individually. To bring up pan/volume automation for a track, click the
triangle below the track name. Click once on the blue or green filled-in
area in the Track Volume lane where you want the fade to begin. Then
click where you want the fade to end, and drag the ball down so the
volume is lowered. Repeat this process for each track. GarageBand
automatically adjusts the volume gradually between these two points
for a smooth fade. Continue to fine-tune these adjustments until your
fades sound just right. Try letting the drums just drop out, creating
gradual fades of several bars for the remaining parts.
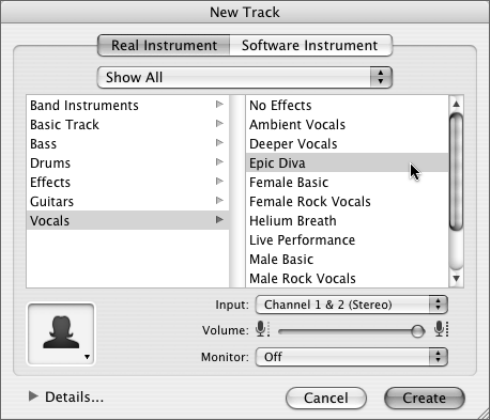
4. Add your voice or instrument: Now that the “backing” part of our
backing track is done, the rest of the music is up to you. (If you just
want to play live over the GarageBand track without recording yourself,
you can skip the remaining steps and continue to the next section.) Set
up your recording by clicking the New Track button. If you’re record-
ing your voice or instrument through an audio interface, select Real
Instrument and the setting you want. Choose the instrument preset and
appropriate input, and turn on monitoring to check the input through
GarageBand. If you’re recording via a MIDI keyboard or other con-
troller and want to use your computer to generate the sound, select
Software Instrument. (If you’re using a guitar, you can plug in directly
and take advantage of GarageBand’s built-in amp simulations, or mike
your guitar’s amp.)
144
C
HAPTER
5: Q
UICK
S
ONGS WITH
P
ATTERNS AND
L
OOPS
Get Real World Digital Audio now with the O’Reilly learning platform.
O’Reilly members experience books, live events, courses curated by job role, and more from O’Reilly and nearly 200 top publishers.

