August 2012
Intermediate to advanced
402 pages
9h 10m
English
Working with the Project Keywords Window
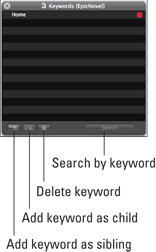
The Project Keywords window floats over the Scrivener project window and lets you easily change keyword colors or delete keywords from the entire project.
Open the Keywords window by clicking the Keywords button in the Scrivener toolbar or choosing Project⇒Show Project Keywords. You can also click the gear button in the Keywords header of the Inspector pane, and then choose Show Project Keywords from the drop-down list that appears. The Project Keywords window shows all keywords available in the project. (To close the window, click the X in the upper-left corner.)
Figure 5-14 provides an overview of the Project Keywords window.
Figure 5-14: The Project Keywords window.
Applying keywords
You can apply existing keywords to an item from the Project Keywords window easily. Just drag and drop the desired keyword from the window onto the item name in the Binder or into the Keywords pane in the Inspector.
 If you want to add the same keyword to more than one file, select all the desired items in the Binder, and then drag the keyword from the window onto any one of the selected filenames.
Finding items by keyword
Want to know which documents have a keyword applied? Follow these steps to find out:
1. In the Project Keywords window, select the ...
Read now
Unlock full access


 O’Reilly covers everything we've got, with content to help us build a world-class technology community, upgrade the capabilities and competencies of our teams, and improve overall team performance as well as their engagement.I wanted to learn C and C++, but it didn't click for me until I picked up an O'Reilly book. When I went on the O’Reilly platform, I was astonished to find all the books there, plus live events and sandboxes so you could play around with the technology.I’ve been on the O’Reilly platform for more than eight years. I use a couple of learning platforms, but I'm on O'Reilly more than anybody else. When you're there, you start learning. I'm never disappointed.I'm always learning. So when I got on to O'Reilly, I was like a kid in a candy store. There are playlists. There are answers. There's on-demand training. It's worth its weight in gold, in terms of what it allows me to do.