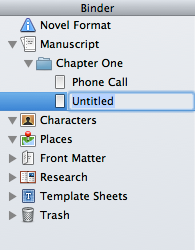
Figure 2-2: A new text document in the Chapter One folder, ready to be named.
Building Your Scrivener Project
Before you can start writing, you need a document to write in. The following sections show you how to create new documents, add folders to keep them organized, and import existing writing and documentation into your project.
Adding a text document
So, you’re sick of staring at a blank screen, and you’re ready to start writing? First, you need to add a text document to your Scrivener project (see Chapter 1 for more on creating a project). Just follow these steps:
1. In the Binder, select the folder to which you want to add the document.
The folder can be at any level, in or out of the Manuscript root folder.
 If you want the document included in the final exported manuscript, put it in the Manuscript folder.
2. Click the Add button in the toolbar.
A new file displaying the text document icon and the word Untitled appears below the folder, as shown in Figure 2-2.

3. Type the name of the document and press Return.
Your new document has been added to the selected folder.
Get Scrivener For Dummies now with the O’Reilly learning platform.
O’Reilly members experience books, live events, courses curated by job role, and more from O’Reilly and nearly 200 top publishers.


