Figure 1-4: The Scrivener workspace.
Understanding the Scrivener Interface
When Scrivener first opens your new project, you can immediately see that this program is more than a word processor. Don’t be alarmed by all the stuff that appears. Hopefully, after you understand what all these pieces and parts can do for you, you think of them merely as more to love.
The following sections provide an overview of the major elements of the Scrivener workspace, and the remaining chapters in this part and all the chapters in Part II are devoted to explaining each element in more detail.
Figure 1-4 names the major components for you. Don’t worry about what they all mean. Unless you have a photographic memory, just keep a thumb, or maybe a sticky note, tucked into this page so that you can refer to it, as needed.
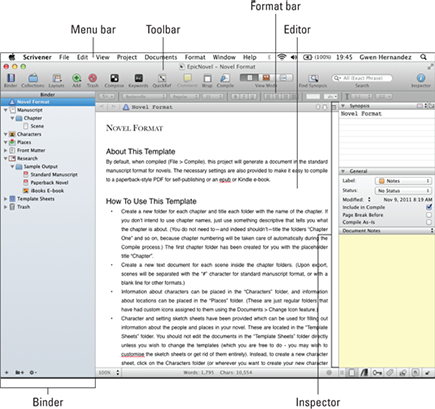
Menu bar
Across the top of your window is the menu bar. The menu bar, aptly named as it is, provides an organized menu of the program’s commands. Although many of the menu commands have shortcuts, via keyboard or button, almost anything you need to do is available in one of the menus.
 If you’re using the Windows version, the menu bar looks a bit different, but most commands are still there somewhere. And if they’re not now, they will be.
Each menu is organized into groups of menus ...
Get Scrivener For Dummies now with the O’Reilly learning platform.
O’Reilly members experience books, live events, courses curated by job role, and more from O’Reilly and nearly 200 top publishers.

