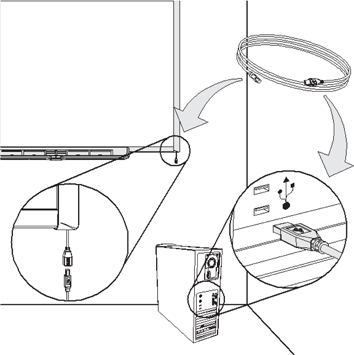
Figure 2-1: The USB connection to the interactive whiteboard.
Connecting Your Hardware
In this section, I focus on helping you connect the interactive whiteboard to your computer. You have two options: You can connect with a USB cable or with a wireless Bluetooth connection.
Using a USB cable
Your interactive whiteboard came with a high-power USB 2.0 high-speed interface and works with USB 2.0– and USB 1.1–compliant interfaces. The interactive whiteboard has a USB cable that hangs from the corner (called the flying lead cable). The flying lead cable is quite useful because if your interactive whiteboard is attached to a wall, you don’t have to move it to get to the cable — you can easily hide the cable behind the board in the box attached (see Figure 2-1).

To connect the interactive whiteboard to your computer, find the USB cable that came with the interactive whiteboard and follow these steps:
1. Connect one of the ends of the USB cable to the connector hanging from the interactive whiteboard’s bottom-right corner.
2. Connect the other end of the USB cable to a USB slot on your computer.
3. Turn on your computer to start your interactive whiteboard.
You may need to log on to your computer, and wait for the computer to completely start. You should recognize the default start screen.
The Ready light on the interactive whiteboard turns red and then flashes green, meaning ...
Get SMART Board Interactive Whiteboard For Dummies now with the O’Reilly learning platform.
O’Reilly members experience books, live events, courses curated by job role, and more from O’Reilly and nearly 200 top publishers.

