Chapter 4. How to Create Reusable Infrastructure with Terraform Modules
At the end of Chapter 3, you had deployed the architecture shown in Figure 4-1.

Figure 4-1. A load balancer, web server cluster, and database
This works great as a staging environment, but what about the production environment? You don’t want your users accessing the same environment your employees use for testing, and it’s too risky testing in production, so you typically need two environments, staging and production, as shown in Figure 4-2. Ideally, the two environments are nearly identical, though you may run slightly fewer/smaller servers in staging to save money.
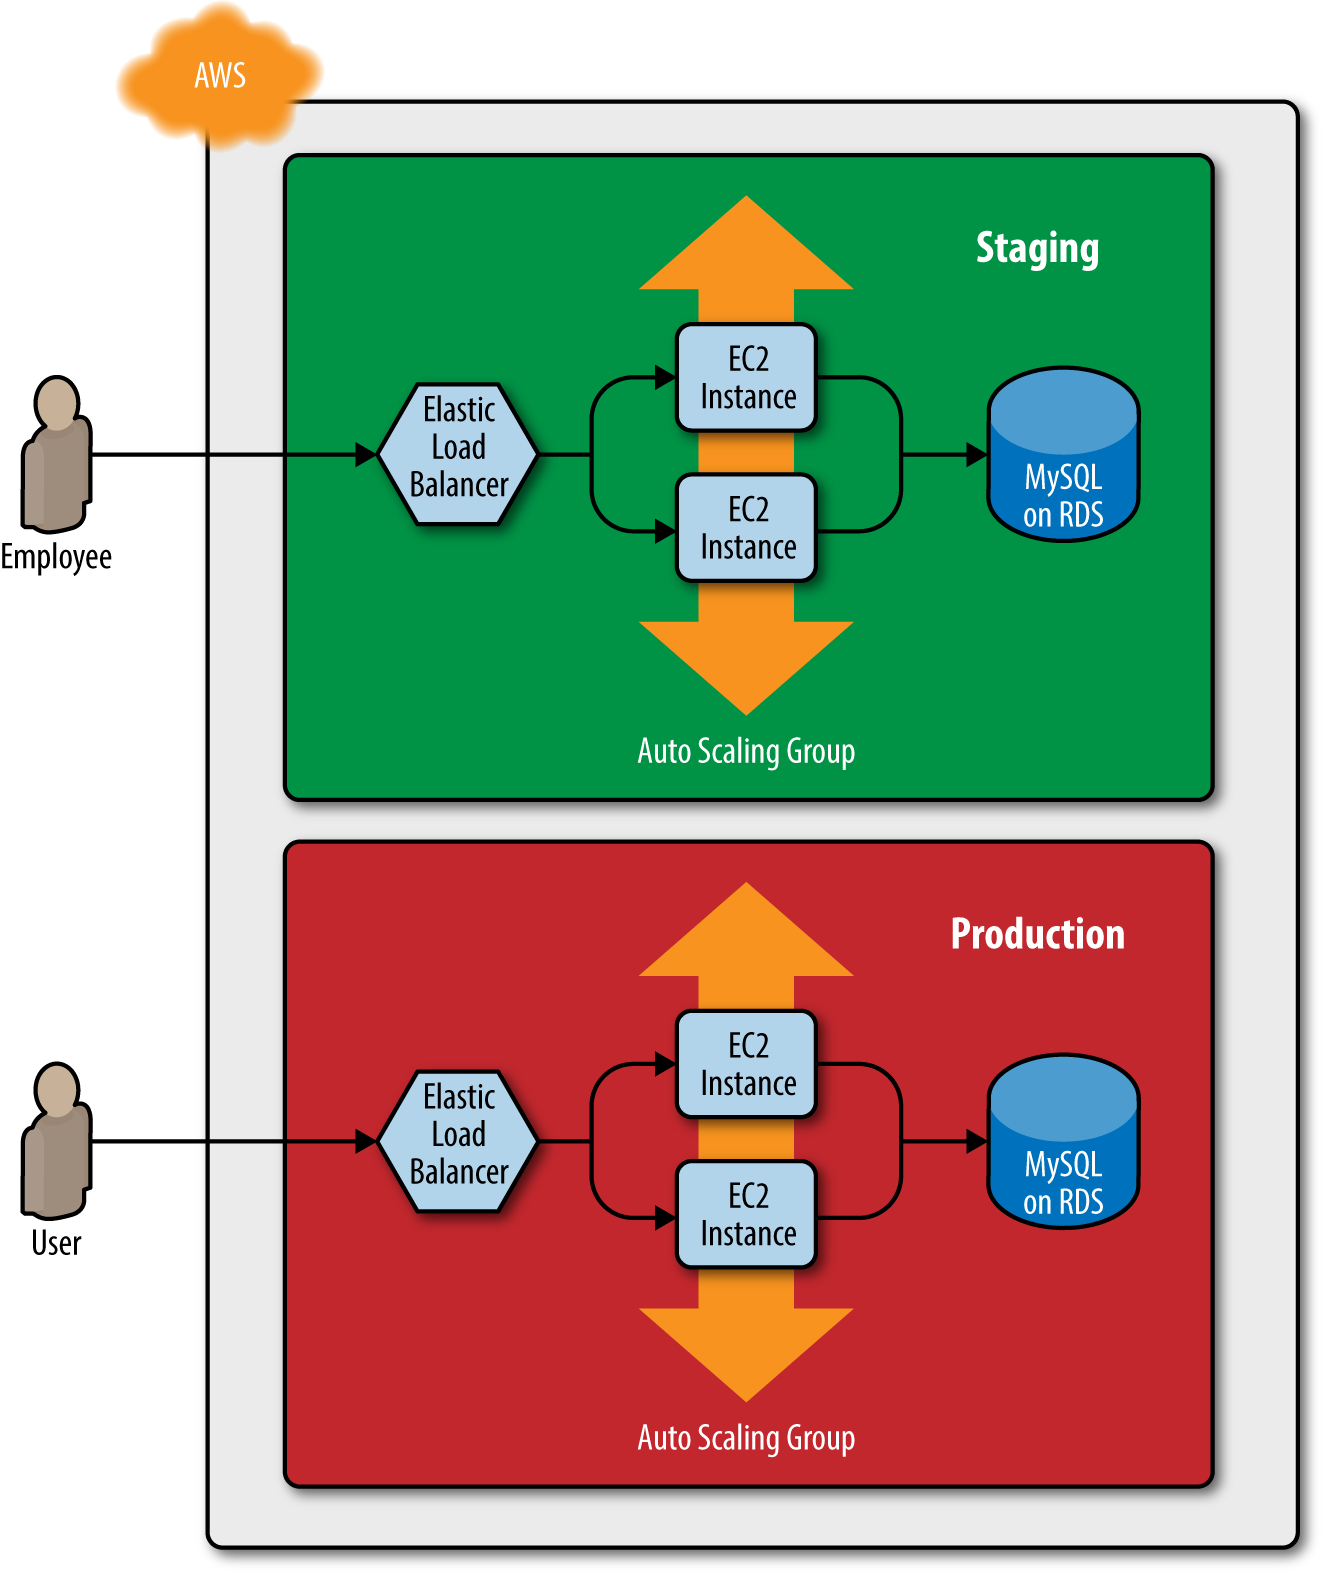
Figure 4-2. Two environments, each with its own load balancer, web server cluster, and database
With just a staging environment, the file layout for your Terraform code looked something like Figure 4-3.
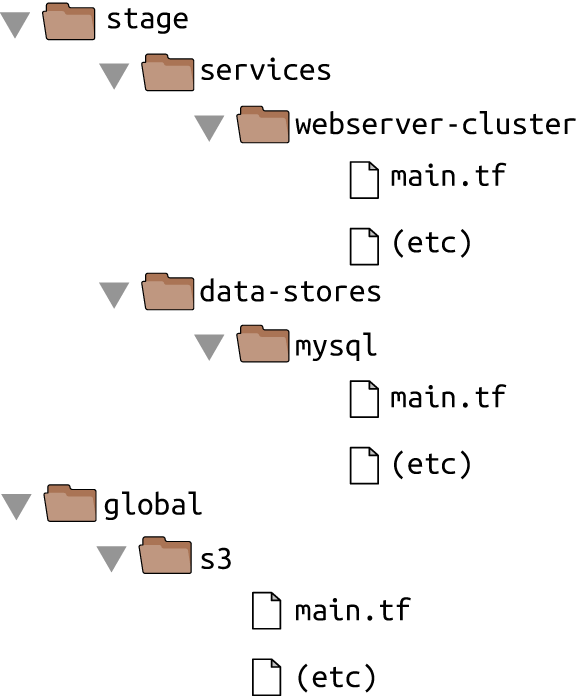
Figure 4-3. File layout with only a staging environment
If you were to add a production environment, you’d end up with the file layout in Figure 4-4.
How do you avoid duplication between the staging and production environments? How do you avoid having to copy and paste all the code in stage/services/webserver-cluster into prod/services/webserver-cluster and all the code in stage/data-stores/mysql into prod/data-stores/mysql?
In a general-purpose programming language (e.g., Ruby, Python, Java), if you had the same code copied and pasted in several places, you could put that code inside of a function and reuse that function in multiple places throughout your code:
defexample_function()puts"Hello, World"end# Other places in your codeexample_function()
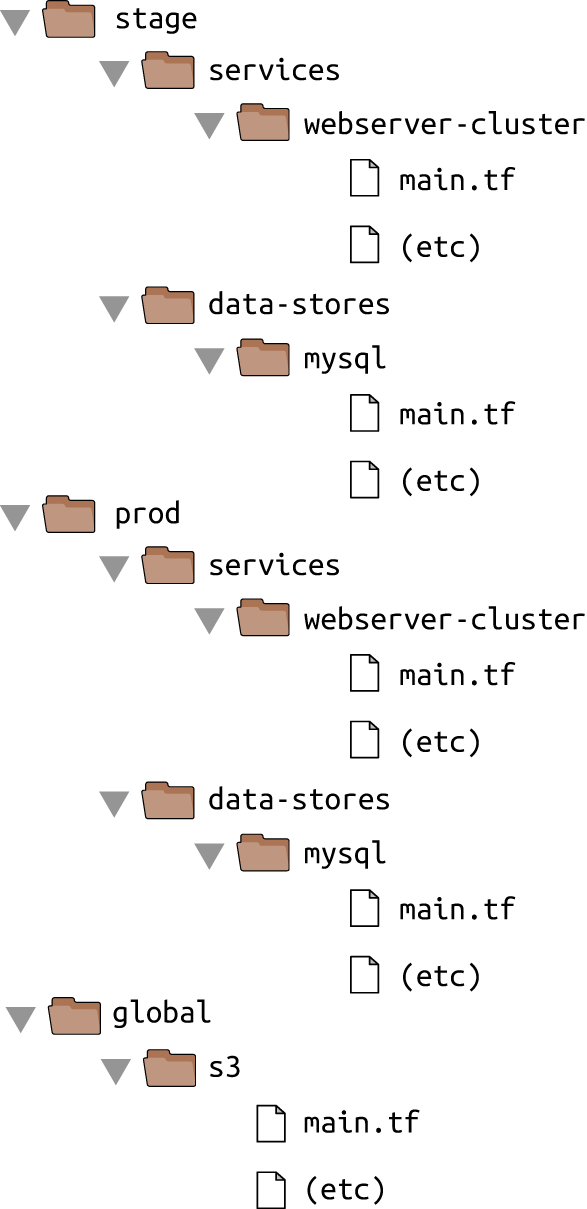
Figure 4-4. File layout with a staging and production environment
With Terraform, you can put your code inside of a Terraform module and reuse that module in multiple places throughout your code. The stage/services/webserver-cluster and prod/services/webserver-cluster configurations can both reuse code from the same module without the need to copy and paste (see Figure 4-5).
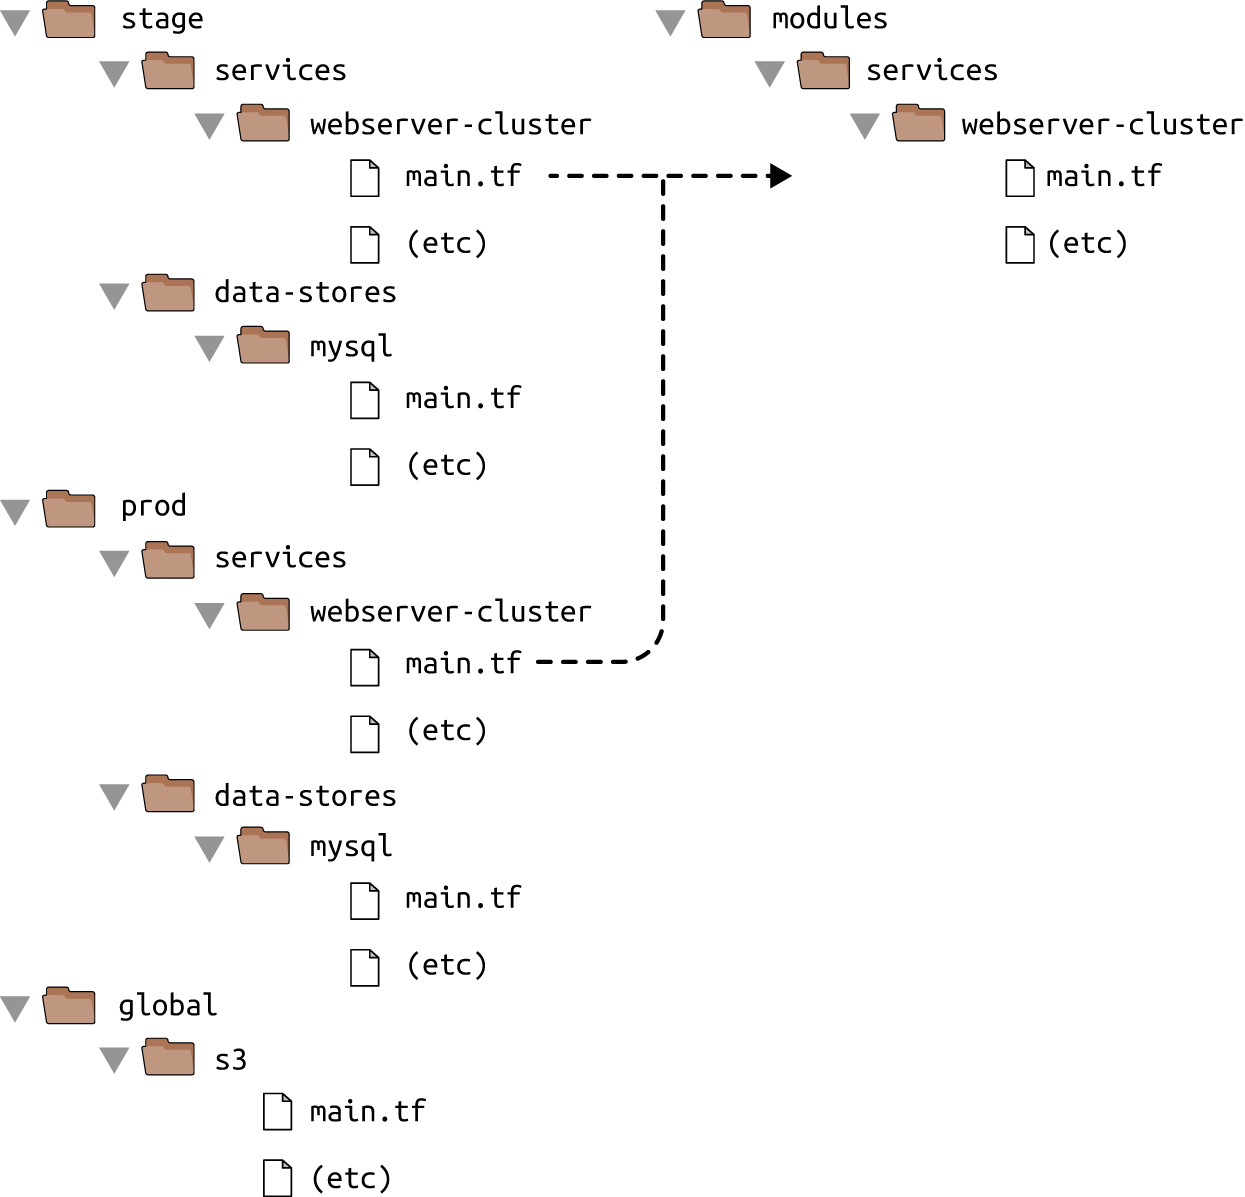
Figure 4-5. Putting code into modules allows you to reuse that code from multiple environments
In this chapter, I’ll show you how to create and use Terraform modules by covering the following topics:
-
Module basics
-
Module inputs
-
Module outputs
-
Module gotchas
-
Module versioning
Example Code
As a reminder, all of the code examples in the book can be found at the following URL: https://github.com/brikis98/terraform-up-and-running-code.
Module Basics
A Terraform module is very simple: any set of Terraform configuration files in a folder is a module. All the configurations you’ve written so far have technically been modules, although not particularly interesting ones, since you deployed them directly (the module in the current working directory is called the root module). To see what modules are really capable of, you have to use one module from another module.
As an example, let’s turn the code in stage/services/webserver-cluster, which includes an Auto Scaling Group (ASG), Elastic Load Balancer (ELB), security groups, and many other resources, into a reusable module.
As a first step, run terraform destroy in the stage/services/webserver-cluster to clean up any resources you
created earlier. Next, create a new top-level folder called modules and move all the files from
stage/services/webserver-cluster to modules/services/webserver-cluster. You should end up with a folder structure
that looks something like Figure 4-6.
Open up the main.tf file in modules/services/webserver-cluster and remove the provider definition. This should
be defined by the user of the module and not in the module itself.
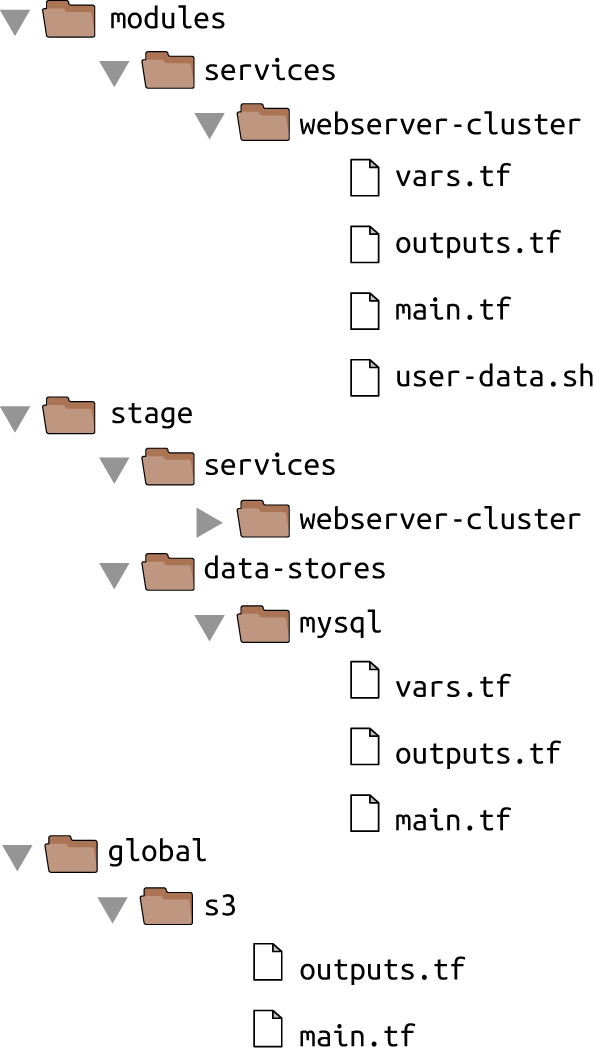
Figure 4-6. The folder structure with a module and a staging environment
You can now make use of this module in the stage environment. The syntax for using a module is:
module"NAME"{source="SOURCE"[CONFIG...]}
Within the module definition, the source parameter specifies the folder where the module’s code can be found. For
example, you can create a new file in stage/services/webserver-cluster/main.tf and use the webserver-cluster module
in it as follows:
provider"aws"{region="us-east-1"}module"webserver_cluster"{source="../../../modules/services/webserver-cluster"}
You can then reuse the exact same module in the production environment by creating a new prod/services/webserver-cluster/main.tf file with the following contents:
provider"aws"{region="us-east-1"}module"webserver_cluster"{source="../../../modules/services/webserver-cluster"}
And there you have it: code reuse in multiple environments without any copy/paste! Note that whenever you add a
module to your Terraform configurations or modify the source parameter of a module, you need to run the get command
before you run plan or apply:
> terraform get
Get: /modules/frontend-app

> terraform plan

(...)
Before you run the apply command, you should note that there is a problem with the webserver-cluster module: all
the names are hard-coded. That is, the name of the security groups, ELB, and other resources are all
hard-coded, so if you use this module more than once, you’ll get name conflict errors. Even the database details are
hard-coded because the main.tf file you copied into modules/services/webserver-cluster is using a
terraform_remote_state data source to figure out the database address and port, and that terraform_remote_state is
hard-coded to look at the staging environment.
To fix these issues, you need to add configurable inputs to the webserver-cluster module so it can behave differently
in different environments.
Module Inputs
To make a function configurable in a general-purpose programming language, you can add input parameters to that function:
defexample_function(param1,param2)puts"Hello,#{param1}#{param2}"end# Other places in your codeexample_function("foo","bar")
In Terraform, modules can have input parameters, too. To define them, you use a mechanism you’re already familiar with: input variables. Open up modules/services/webserver-cluster/vars.tf and add three new input variables:
variable"cluster_name"{description="The name to use for all the cluster resources"}variable"db_remote_state_bucket"{description="The name of the S3 bucket for the database's remote state"}variable"db_remote_state_key"{description="The path for the database's remote state in S3"}
Next, go through modules/services/webserver-cluster/main.tf and use var.cluster_name instead of the hard-coded
names (e.g., instead of "terraform-asg-example"). For example, here is how you do it for the ELB security group:
resource"aws_security_group" "elb"{name="${var.cluster_name}-elb"ingress{from_port=80to_port=80protocol="tcp"cidr_blocks=["0.0.0.0/0"]}egress{from_port=0to_port=0protocol="-1"cidr_blocks=["0.0.0.0/0"]}}
Notice how the name parameter is set to "${var.cluster_name}". You’ll need to make a similar change to the other
aws_security_group resource (e.g., give it the name "${var.cluster_name}-instance"), the aws_elb resource, and
the tag section of the aws_autoscaling_group resource.
You should also update the terraform_remote_state data source to use the db_remote_state_bucket and
db_remote_state_key as its bucket and key parameter, respectively, to ensure you’re reading data from the right
database:
data"terraform_remote_state" "db"{backend="s3"config{bucket="${var.db_remote_state_bucket}"key="${var.db_remote_state_key}"region="us-east-1"}}
Now, in the staging environment, you can set these new input variables accordingly:
module"webserver_cluster"{source="../../../modules/services/webserver-cluster"cluster_name="webservers-stage"db_remote_state_bucket="(YOUR_BUCKET_NAME)"db_remote_state_key="stage/data-stores/mysql/terraform.tfstate"}
You should do the same in the production environment:
module"webserver_cluster"{source="../../../modules/services/webserver-cluster"cluster_name="webservers-prod"db_remote_state_bucket="(YOUR_BUCKET_NAME)"db_remote_state_key="prod/data-stores/mysql/terraform.tfstate"}
Note: the production database doesn’t actually exist yet. As an exercise, I leave it up to you to figure out how to deploy MySQL in both staging and production.
As you can see, you set input variables for a module using the same syntax as setting input parameters for a resource. The input variables are the API of the module, controlling how it will behave in different environments. This example uses different names in different environments, but you may want to make other parameters configurable, too. For example, in staging, you might want to run a small web server cluster to save money, but in production, you might want to run a larger cluster to handle lots of traffic. To do that, you can add three more input variables to modules/services/webserver-cluster/vars.tf:
variable"instance_type"{description="The type of EC2 Instances to run (e.g. t2.micro)"}variable"min_size"{description="The minimum number of EC2 Instances in the ASG"}variable"max_size"{description="The maximum number of EC2 Instances in the ASG"}
Next, update the launch configuration in modules/services/webserver-cluster/main.tf to set its instance_type
parameter to the new var.instance_type input variable:
resource"aws_launch_configuration" "example"{image_id="ami-40d28157"instance_type="${var.instance_type}"security_groups=["${aws_security_group.instance.id}"]user_data="${data.template_file.user_data.rendered}"lifecycle{create_before_destroy=true}}
Similarly, you should update the ASG definition in the same file to set its min_size and max_size parameters to the
new var.min_size and var.max_size input variables:
resource"aws_autoscaling_group" "example"{launch_configuration="${aws_launch_configuration.example.id}"availability_zones=["${data.aws_availability_zones.all.names}"]load_balancers=["${aws_elb.example.name}"]health_check_type="ELB"min_size="${var.min_size}"max_size="${var.max_size}"tag{key="Name"value="${var.cluster_name}"propagate_at_launch=true}}
Now, in the staging environment (stage/services/webserver-cluster/main.tf), you can keep the cluster small and
inexpensive by setting instance_type to "t2.micro" and min_size and max_size to 2:
module"webserver_cluster"{source="../../../modules/services/webserver-cluster"cluster_name="webservers-stage"db_remote_state_bucket="(YOUR_BUCKET_NAME)"db_remote_state_key="stage/data-stores/mysql/terraform.tfstate"instance_type="t2.micro"min_size=2max_size=2}
On the other hand, in the production environment, you can use a larger instance_type with more CPU and memory, such
as m4.large (note: this instance type is not part of the AWS free tier, so if you’re just using this for learning and
don’t want to be charged, use "t2.micro" for the instance_type), and you can set max_size to 10 to allow the
cluster to shrink or grow depending on the load (don’t worry, the cluster will launch with two Instances initially):
module"webserver_cluster"{source="../../../modules/services/webserver-cluster"cluster_name="webservers-prod"db_remote_state_bucket="(YOUR_BUCKET_NAME)"db_remote_state_key="prod/data-stores/mysql/terraform.tfstate"instance_type="m4.large"min_size=2max_size=10}
How do you make the cluster shrink or grow in response to load? One option is to use an auto scaling schedule, which can change the size of the cluster at a scheduled time during the day. For example, if traffic to your cluster is much higher during normal business hours, you can use an auto scaling schedule to increase the number of servers at 9 a.m. and decrease it at 5 p.m.
If you define the auto scaling schedule in the webserver-cluster module, it would apply to both staging and
production. Since you don’t need to do this sort of scaling in your staging environment, for the time being, you can
define the auto scaling schedule directly in the production configurations (in Chapter 5, you’ll see
how to conditionally define resources, which will allow you to move the auto scaling policy into the
webserver-cluster module). And to make that work, you’re going to have to learn about module outputs.
Module Outputs
To define an auto scaling schedule, add the following two aws_autoscaling_schedule resources to prod/services/webserver-cluster/main.tf:
resource"aws_autoscaling_schedule" "scale_out_during_business_hours"{scheduled_action_name="scale-out-during-business-hours"min_size=2max_size=10desired_capacity=10recurrence="0 9 * * *"}resource"aws_autoscaling_schedule" "scale_in_at_night"{scheduled_action_name="scale-in-at-night"min_size=2max_size=10desired_capacity=2recurrence="0 17 * * *"}
This code uses one aws_autoscaling_schedule resource to increase the number of servers to 10 during the morning
hours (the recurrence parameter uses cron syntax, so "0 9 * * *" means “9 a.m. every day”) and a second
aws_autoscaling_schedule resource to decrease the number of servers at night ("0 17 * * *" means “5 p.m. every day”).
However, both usages of aws_autoscaling_schedule are missing a required parameter, autoscaling_group_name,
which specifies the name of the ASG. The ASG itself is defined within the webserver-cluster module, so how do you
access its name? In a general-purpose programming language, functions can return values:
defexample_function(param1,param2)return"Hello,#{param1}#{param2}"end# Other places in your codereturn_value=example_function("foo","bar")
In Terraform, a module can also return values. Again, this is done using a mechanism you already know: output variables. You can add the ASG name as an output variable in /modules/services/webserver-cluster/outputs.tf as follows:
output"asg_name"{value="${aws_autoscaling_group.example.name}"}
You can access module output variables the same way as resource output attributes. The syntax is:
"${module.MODULE_NAME.OUTPUT_NAME}"For example:
"${module.frontend.asg_name}"In prod/services/webserver-cluster/main.tf, you can use this syntax to set the autoscaling_group_name
parameter in each of the aws_autoscaling_schedule resources:
resource"aws_autoscaling_schedule" "scale_out_during_business_hours"{scheduled_action_name="scale-out-during-business-hours"min_size=2max_size=10desired_capacity=10recurrence="0 9 * * *"autoscaling_group_name="${module.webserver_cluster.asg_name}"}resource"aws_autoscaling_schedule" "scale_in_at_night"{scheduled_action_name="scale-in-at-night"min_size=2max_size=10desired_capacity=2recurrence="0 17 * * *"autoscaling_group_name="${module.webserver_cluster.asg_name}"}
You may want to expose one other output in the webserver-cluster module: the DNS name of the ELB, so you know what
URL to test when the cluster is deployed. To do that, you again add an output variable in
/modules/services/webserver-cluster/outputs.tf:
output"elb_dns_name"{value="${aws_elb.example.dns_name}"}
You can then “pass through” this output in stage/services/webserver-cluster/outputs.tf and prod/services/webserver-cluster/outputs.tf as follows:
output"elb_dns_name"{value="${module.webserver_cluster.elb_dns_name}"}
Your web server cluster is almost ready to deploy. The only thing left is to take a few gotchas into account.
Module Gotchas
When creating modules, watch out for these gotchas:
-
File paths
-
Inline blocks
File Paths
In Chapter 3, you moved the User Data script for the web server cluster into an external file,
user-data.sh, and used the file interpolation function to read this file from disk. The catch with the file
function is that the file path you use has to be relative (since you could run Terraform on many different
computers)—but what is it relative to?
By default, Terraform interprets the path relative to the current working directory. That works if you’re using the
file function in a Terraform configuration file that’s in the same directory as where you’re running
terraform apply (that is, if you’re using the file function in the root module), but that won’t work when you’re
using file in a module that’s defined in a separate folder.
To solve this issue, you can use path.module to convert to a path that is relative to the module folder. Here is how
the template_file data source should look in modules/services/webserver-cluster/main.tf:
data"template_file" "user_data"{template="${file("${path.module}/user-data.sh")}"vars{server_port="${var.server_port}"db_address="${data.terraform_remote_state.db.address}"db_port="${data.terraform_remote_state.db.port}"}}
Inline Blocks
The configuration for some Terraform resources can be defined either as inline blocks or as separate resources. When creating a module, you should always prefer using a separate resource.
For example, the aws_security_group resource allows you to define ingress and egress rules via inline blocks, as you
saw in the webserver-cluster module (modules/services/webserver-cluster/main.tf):
resource"aws_security_group" "elb"{name="${var.cluster_name}-elb"ingress{from_port=80to_port=80protocol="tcp"cidr_blocks=["0.0.0.0/0"]}egress{from_port=0to_port=0protocol="-1"cidr_blocks=["0.0.0.0/0"]}}
You should change this module to define the exact same ingress and egress rules by using separate
aws_security_group_rule resources (make sure to do this for both security groups in the module):
resource"aws_security_group" "elb"{name="${var.cluster_name}-elb"}resource"aws_security_group_rule" "allow_http_inbound"{type="ingress"security_group_id="${aws_security_group.elb.id}"from_port=80to_port=80protocol="tcp"cidr_blocks=["0.0.0.0/0"]}resource"aws_security_group_rule" "allow_all_outbound"{type="egress"security_group_id="${aws_security_group.elb.id}"from_port=0to_port=0protocol="-1"cidr_blocks=["0.0.0.0/0"]}
If you try to use a mix of both inline blocks and separate resources, you will get errors where routing rules conflict and overwrite each other. Therefore, you must use one or the other. Because of this limitation, when creating a module, you should always try to use a separate resource instead of the inline block. Otherwise, your module will be less flexible and configurable.
For example, if all the ingress and egress rules within the webserver-cluster module are defined as separate
aws_security_group_rule resources, you can make the module flexible enough to allow users to add custom rules from
outside of the module. To do that, simply export the ID of the aws_security_group as an output variable in
modules/services/webserver-cluster/outputs.tf:
output"elb_security_group_id"{value="${aws_security_group.elb.id}"}
Now, imagine that in the staging environment, you needed to expose an extra port just for testing. This is now easy to
do by adding an aws_security_group_rule resource to stage/services/webserver-cluster/main.tf:
resource"aws_security_group_rule" "allow_testing_inbound"{type="ingress"security_group_id="${module.webserver_cluster.elb_security_group_id}"from_port=12345to_port=12345protocol="tcp"cidr_blocks=["0.0.0.0/0"]}
Had you defined even a single ingress or egress rule as an inline block, this code would not work. Note that this same type of problem affects a number of Terraform resources, such as:
-
aws_security_groupandaws_security_group_rule -
aws_route_tableandaws_route -
aws_network_aclandaws_network_acl_rule -
aws_elbandaws_elb_attachment
At this point, you are finally ready to deploy your web server cluster in both staging and production. Run the plan
and apply commands as usual and enjoy using two separate copies of your infrastructure.
Network Isolation
The examples in this chapter create two environments that are isolated in your Terraform code, and isolated in terms of having separate load balancers, servers, and databases, but they are not isolated at the network level. To keep all the examples in this book simple, all the resources deploy into the same Virtual Private Cloud (VPC). That means a server in the staging environment can talk to a server in the production environment and vice versa.
In real-world usage, running both environments in one VPC opens you up to two risks. First, a mistake in one environment could affect the other. For example, if you’re making changes in staging and accidentally mess up the configuration of the route tables, all the routing in production may be affected too. Second, if an attacker gets access to one environment, they also have access to the other. If you’re making rapid changes in staging and accidentally leave a port exposed, any hacker that broke in would not only have access to your staging data, but also your production data.
Therefore, outside of simple examples and experiments, you should run each environment in a separate VPC. In fact, to be extra sure, you may even run each environment in totally separate AWS accounts!
Module Versioning
If both your staging and production environment are pointing to the same module folder, then as soon as you make a change in that folder, it will affect both environments on the very next deployment. This sort of coupling makes it harder to test a change in staging without any chance of affecting production. A better approach is to create versioned modules so that you can use one version in staging (e.g., v0.0.2) and a different version in production (e.g., v0.0.1), as shown in Figure 4-7.

Figure 4-7. Using different versions of a module in different environments
In all the module examples you’ve seen so far, whenever you used a module, you set the source parameter of the module
to a local file path. In addition to file paths, Terraform supports other types of module sources, such as Git URLs,
Mercurial URLs, and arbitrary HTTP URLs.1 The easiest way to create a versioned module is to put the code for
the module in a separate Git repository and to set the source parameter to that repository’s URL. That means your
Terraform code will be spread out across (at least) two repositories:
- modules
-
This repo defines reusable modules. Think of each module as a “blueprint” that defines a specific part of your infrastructure.
- live
-
This repo defines the live infrastructure you’re running in each environment (stage, prod, mgmt, etc). Think of this as the “houses” you built from the “blueprints” in the modules repo.
The updated folder structure for your Terraform code will now look something like Figure 4-8.
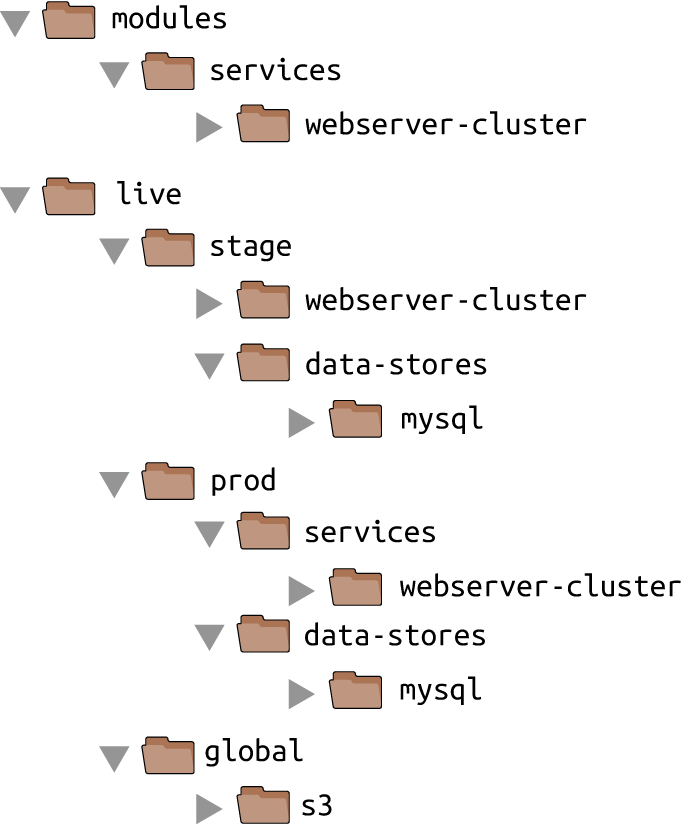
Figure 4-8. File layout with multiple repositories
To set up this folder structure, you’ll first need to move the stage, prod, and global folders into a folder called live. Next, configure the live and modules folders as separate git repositories. Here is an example of how to do that for the modules folder:
> cd modules
> git init
> git add .
> git commit -m "Initial commit of modules repo"
> git remote add origin "(URL OF REMOTE GIT REPOSITORY)"
> git push origin master
You can also add a tag to the modules repo to use as a version number. If you’re using GitHub, you can use the GitHub UI to create a release, which will create a tag under the hood. If you’re not using GitHub, you can use the Git CLI:
> git tag -a "v0.0.1" -m "First release of webserver-cluster module"
> git push --follow-tags
Now you can use this versioned module in both staging and production by specifying a Git URL in the source parameter.
Here is what that would look like in live/stage/services/webserver-cluster/main.tf if your modules repo was in
the GitHub repo github.com/foo/modules (note that the double-slash in the Git URL is required):
module"webserver_cluster"{source="git::git@github.com:foo/modules.git//webserver-cluster?ref=v0.0.1"cluster_name="webservers-stage"db_remote_state_bucket="(YOUR_BUCKET_NAME)"db_remote_state_key="stage/data-stores/mysql/terraform.tfstate"instance_type="t2.micro"min_size=2max_size=2}
If you want to try out versioned modules without messing with Git repos, you can use a module from the code examples GitHub repo for this book (I had to break up the URL to make it fit in the book, but it should all be on one line):
source = "git@github.com:brikis98/terraform-up-and-running-code.git//
  code/terraform/04-terraform-module/module-example/modules/
  services/webserver-cluster?ref=v0.0.2"
The ref parameter allows you to specify a specific Git commit via its sha1 hash, a branch name, or, as in this
example, a specific Git tag. I generally recommend using Git tags as version numbers for modules. Branch names
are not stable, as you always get the latest commit on a branch, which may change every time you run the get command,
and the sha1 hashes are not very human friendly. Git tags are as stable as a commit (in fact, a tag is just a pointer
to a commit) but they allow you to use any name you want.
A particularly useful naming scheme for tags is semantic versioning. This is a
versioning scheme of the format MAJOR.MINOR.PATCH (e.g., 1.0.4) with specific rules on when you should increment
each part of the version number. In particular, you should increment the…
-
MAJOR version when you make incompatible API changes,
-
MINOR version when you add functionality in a backward-compatible manner, and
-
PATCH version when you make backward-compatible bug fixes.
Semantic versioning gives you a way to communicate to users of your module what kind of changes you’ve made and the implications of upgrading.
Since you’ve updated your Terraform code to use a versioned module URL, you need to run terraform get -update:
> terraform get -update
Get: git::ssh://git@github.com/foo/modules.git?ref=v0.0.1

> terraform plan
(...)
This time, you can see that Terraform downloads the module code from Git rather than your local filesystem. Once the
module code has been downloaded, you can run the plan and apply commands as usual.
Private Git Repos
If your Terraform module is in a private Git repository, you will need to ensure the computer you’re using has SSH keys
configured correctly that allow Terraform to access that repository. In other words, before using the URL
ssh://git@github.com/foo/modules.git in the source parameter of your module, make sure you can git clone that URL
in your terminal:
> git clone ssh://git@github.com/foo/modules.git
If that command fails, you need to set up your SSH keys first. GitHub has excellent documentation on how to do that.
Now, imagine you made some changes to the webserver-cluster module and you wanted to test them out in staging. First,
you’d commit those changes to the modules repo:
> cd modules
> git add .
> git commit -m "Made some changes to webserver-cluster"
> git push origin master
Next, you would create a new tag in the modules repo:
> git tag -a "v0.0.2" -m "Second release of webserver-cluster"
> git push --follow-tags
And now you can update just the source URL used in the staging environment (live/stage/services/webserver-cluster/main.tf) to use this new version:
module"webserver_cluster"{source="git::git@github.com:foo/modules.git//webserver-cluster?ref=v0.0.2"cluster_name="webservers-stage"db_remote_state_bucket="(YOUR_BUCKET_NAME)"db_remote_state_key="stage/data-stores/mysql/terraform.tfstate"instance_type="t2.micro"min_size=2max_size=2}
In production (live/prod/services/webserver-cluster/main.tf), you can happily continue to run v0.0.1 unchanged:
module"webserver_cluster"{source="git::git@github.com:foo/modules.git//webserver-cluster?ref=v0.0.1"cluster_name="webservers-prod"db_remote_state_bucket="(YOUR_BUCKET_NAME)"db_remote_state_key="prod/data-stores/mysql/terraform.tfstate"instance_type="m4.large"min_size=2max_size=10}
Once v0.0.2 has been thoroughly tested and proven in staging, you can then update production, too. But if there turns out to be a bug in v0.0.2, no big deal, as it has no effect on live users. Fix the bug, release a new version, and repeat the whole process again until you have something stable enough for production.
Developing Modules
Versioned modules are great when you’re deploying to a shared environment (e.g., staging or production), but when you’re
just testing on your own computer, you’ll want to use local file paths. This allows you to iterate faster, as you’ll
be able to make a change in the module folders and rerun the plan or apply command in the live folders
immediately, rather than having to commit your code and publish a new version each time.
Since the goal of this book is to help you learn and experiment with Terraform as quickly as possible, the rest of the code examples will use local file paths for modules.
Conclusion
By defining infrastructure as code in modules, you can apply a variety of software engineering best practices to your infrastructure. You can validate each change to a module through code reviews and automated tests; you can create semantically versioned releases of each module; and you can safely try out different versions of a module in different environments and roll back to previous versions if you hit a problem.
All of this can dramatically increase your ability to build infrastructure quickly and reliably, as developers will be able to reuse entire pieces of proven, tested, documented infrastructure. For example, you could create a canonical module that defines how to deploy a single microservice—including how to run a cluster, how to scale the cluster in response to load, and how to distribute traffic requests across the cluster—and each team could use this module to manage their own microservices with just a few lines of code.
To make such a module work for multiple teams, the Terraform code in that module must be flexible and configurable. For example, one team may want to use your module to deploy a single instance of their microservice with no load balancer while another may want a dozen instances of their microservice with a load balancer to distribute traffic between those instances. How do you do conditional statements in Terraform? Is there a way to do a for-loop? Is there a way to use Terraform to roll out changes to this microservice without downtime? These advanced aspects of Terraform syntax are the topic of Chapter 5.
1 For the full details on source URLs, see https://www.terraform.io/docs/modules/sources.html.
Get Terraform: Up and Running now with the O’Reilly learning platform.
O’Reilly members experience books, live events, courses curated by job role, and more from O’Reilly and nearly 200 top publishers.

