
Lighting and Cameras
7
7.1 Lighting
7.2 Cameras
7.1 Lighting
7.1.1 Lighting Types and Settings
e default scene in Blender starts with a cube object, a camera, and a lamp. What the
camera sees is what will render as a picture or movie depending on the settings you make.
To get a simple rendered view, press the F12 key. is will open a window that displays the
rendered output of what the camera is focused on. If the picture shows the cube object as a
black silhouette, you do not have a lamp or the lamp settings or placement is incorrect. To
exit the render window, press the Esc key.
In most cases, you will need more than one lamp in order to properly illuminate your
scene. Most scenes usually require three to four lamps, but be careful not to use too many.
Instead of adding lamps, experiment with the distance and energy settings.
7.1.2 Lamp Settings
To create or add a lamp to the scene, position the 3D cursor in a desired location and press
Shi + the A key and select “Lamp” from the drop down menu. You can choose your type
of lamp (Point, Sun, Spot, Hemi, and Area) and that lamp will be placed in the scene. With
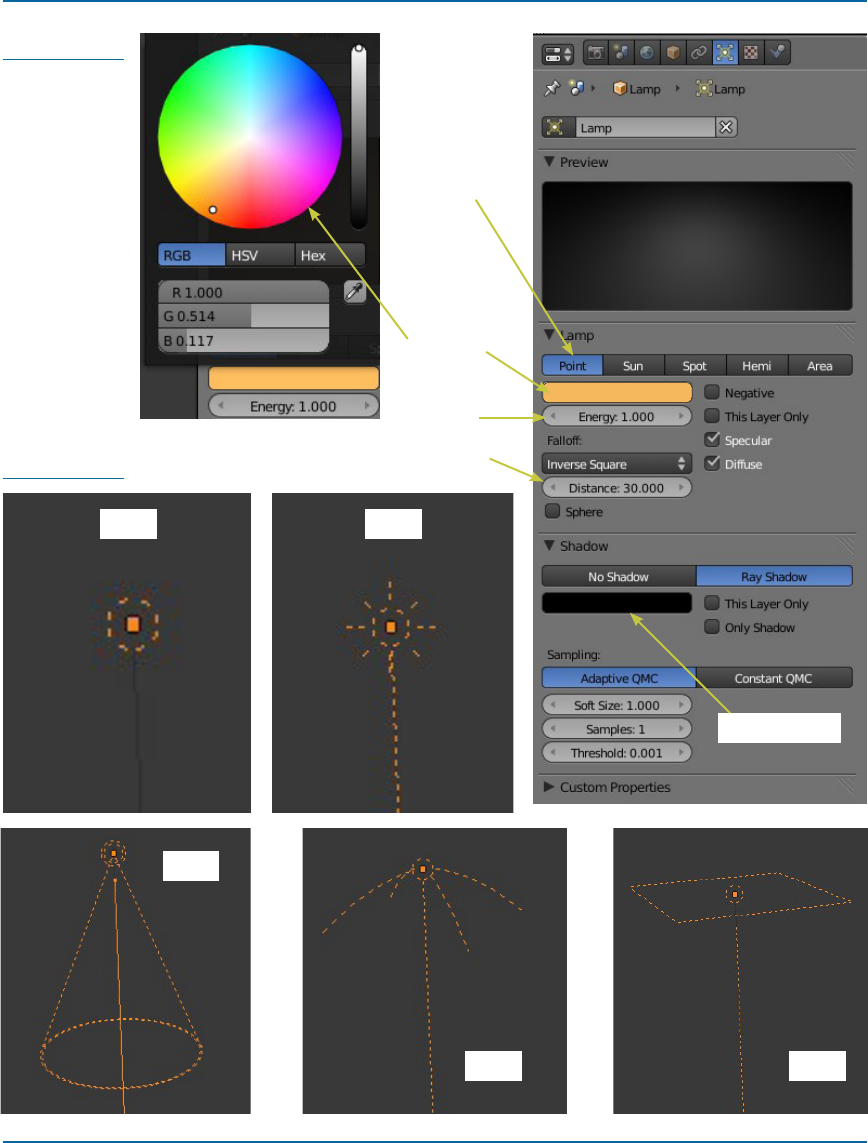
the lamp selected, go to the properties window – “Object Data” button to display the setting
options (Figure 7.1). e options displayed vary depending on what type of lamp you select.
e diagrammatic representation of the lamp in the 3D window also varies depending on
the type (Figure 7.2).
Blender Lighting
– Point Lamp,
Blender Lighting
– Sun Lamp,
Blender Lighting
– Sun Lamp – Sky
and Atmosphere,
Blender Lighting
– Hemi Lamp,
Blender Lighting
– Area Lamp,
Blender Lighting
– Spot Lamp,
Blender Lighting
– Ambient
Occlusion
Learning
Unit 7
132 7. Lighting and Cameras
Figure 7.1
Figure 7.2
Point
Brightness
Lamp type
selection
Light color
How far the light shines
Sun
Shadow color
Spot
Hemi Area
1337.1. Lighting
If you decide that the lamp you have selected is not correct for what you want to achieve,
you can change the type in the properties window. Click on the dierent lamp types in the
“Lamp” tab.
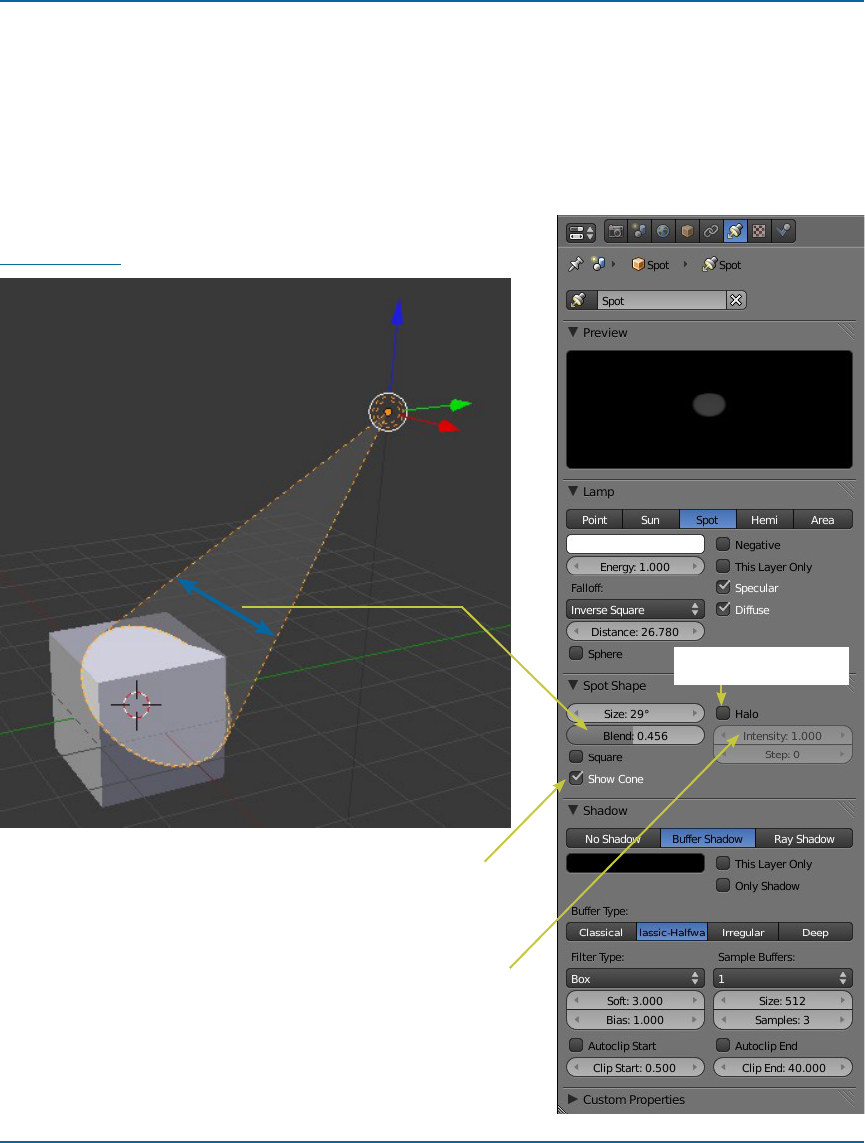
Spot lamps or spotlights are particularly useful in creating great eects. ey can be
scaled, rotated, and positioned to cast shadows and they can also be used with a halo ef-
fect to provide a simulation of a light shining through a fog (Figure 7.3). For this and other
lamps, experiment with the settings and record your results.
Figure 7.3
Spotlight with “Show
Cone” turned on
With the halo on, adjust
the intensity for a smoky
effect.
Tick for a halo effect.

134 7. Lighting and Cameras
7.2 Cameras
By default, your scene already has one camera and that is usually all
you need, but on occasion you may wish to add more cameras. You
can add more cameras by pressing Shi + the A key and selecting
“Camera.” e new camera will be located where your 3D cursor
is positioned and you will have to orientate the camera. To change
which camera is active, you need to select that camera and press Ctrl
+ number pad 0. Figure 7.4 shows the properties window – “Camera”
button.
7.2.1 Settings Options
• Perspective or Orthographic. Used to change the camera
from showing a true-life perspective view to an ortho-
graphic view.
• Focal Length. Sets up a lens length much like a real cam-
era; 35mm is a good, safe setting, but wide and tight an-
gle settings work for dierent needs.
• Shi. Pushes the camera’s view in a direction, without
changing perspective.
• Clipping Start. How close an object can get to the camera
and still be seen (Figure 7.5).
• Clipping End. How far away objects can be seen by the
camera; in very large scenes, this needs to be set higher
or things “disappear” from view (Figure 7.5).
• Depth of Field. Used with nodes to blur foreground and
background objects; working with nodes will be dis-
cussed in Chapter 18.
Figure 7.5
Clipping start
Limits
Clipping end
Figure 7.4
Get The Complete Guide to Blender Graphics now with the O’Reilly learning platform.
O’Reilly members experience books, live events, courses curated by job role, and more from O’Reilly and nearly 200 top publishers.

