October 2008
Beginner to intermediate
208 pages
4h 56m
English
Your patience is about to pay off. Now it's time to import a batch of photos. I'm going to walk you through the process step-by-step. What's absolutely wonderful about this stage of the workflow is that it's so darn easy, yet powerful.
If you don't have Photo Downloader automatically launching when you connect your camera, open the application now via the File menu in Bridge. Once Photo Downloader is open, it's time to get to work.
Photo Downloader opens with a standard dialog box that I think is rather boring. There are no images! Just dialog box stuff. Most photographers like looking at thumbnails of their pictures, and when you click on the Advanced Dialog button the Photo Downloader dialog box expands to accommodate this. Isn't that better?
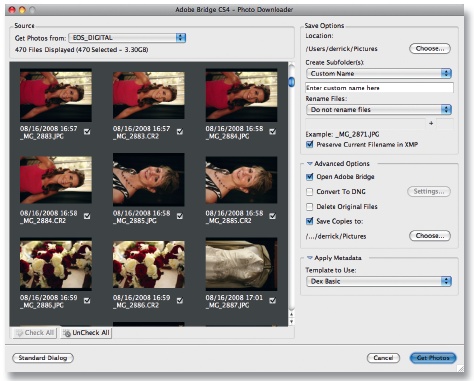
Figure 2-3. The Advanced Dialog view of Photo Downloader
Take a look at the top of the Photo Downloader interface. You'll see the Source for your images listed. This will either be your camera by name, or the name of the card in the reader. If you have more than one camera or memory card reader plugged into your computer, all of those sources will be listed in that pop-up menu. But chances are you'll see just the one device you have plugged in at that moment. Beneath the Source you'll see how many files are available, how many megabytes they amount to, and the date stamp.
Below this ...
Read now
Unlock full access


 O’Reilly covers everything we've got, with content to help us build a world-class technology community, upgrade the capabilities and competencies of our teams, and improve overall team performance as well as their engagement.I wanted to learn C and C++, but it didn't click for me until I picked up an O'Reilly book. When I went on the O’Reilly platform, I was astonished to find all the books there, plus live events and sandboxes so you could play around with the technology.I’ve been on the O’Reilly platform for more than eight years. I use a couple of learning platforms, but I'm on O'Reilly more than anybody else. When you're there, you start learning. I'm never disappointed.I'm always learning. So when I got on to O'Reilly, I was like a kid in a candy store. There are playlists. There are answers. There's on-demand training. It's worth its weight in gold, in terms of what it allows me to do.