(RAY)
(Fogra 39) Job:02-28051 Title:RP-Textile Artist Handbook
#175 DTP:225 Page:46
042-049_28051.indd 46 3/6/12 7:52 PM
(RAY)
(Fogra 39) Job:02-28051 Title:RP-Textile Artist Handbook
#175 DTP:225 Page:47
042-049_28051.indd 47 3/6/12 7:52 PM
(Text)
The TexT ile ArT isT 's sTudio hAndbook
46
Needle (Dry) Felting
Once you’ve mastered welt felting, you won’t want to
stop! When you are ready to work in more detail and
add intricacy to your patterning, coloring, and form-
ing, try needle felting.
Needle felting is based on the same principles as
wet felting but offers greater detailing control. The
felting needle is very sharp and barbed and is used
to permanently tangle surface fibers into a base fab-
ric. Use this technique to gradually build up a three
dimensional object or to add details to sheets of felt or
other fabric. Basically, you use the needle to add small
amounts of roving as a way of “drawing” on the sur-
face of a felted form or fabric. This is a wonderful way
to create facial features on dolls, as well as a way to
add color details and shading in two-dimensional art.
To create a three-dimensional figure, felt around
an armature or other object or layers of roving to cre-
ate the body and shape. Then apply roving to the outer
surface to create details and make specific shapes.
Nuno Felting
If you like how needle felting adds delicacy to felt,
you may enjoy nuno felting! It is a special technique
that uses a very fine or sheer backing fabric to sta-
bilize and structure lightweight felt. The finished felt
is sturdy enough to make into some clothing, but it
is mostly used for making shawls and scarves. The
beautiful thing about nuno felting is its softness with-
out weight. This is achieved by felting on top of a wo-
ven fabric, typically silk gauze or other open weave
fabric. You can use wet or dry or both techniques, and
the finished felt lends itself to embellishments.
You will need a base cloth (usually silk gauze) and a
rolling mat (or bubble wrap!) as a surface to help the
fibers mesh. You can completely cover the base cloth
or apply roving in a random or specific pattern. Con-
sider felting on sheer fabric with patterning or a de-
sign already printed on it so you can use the pattern
as a guide for where to add felted texture for visual
and tactile interest. Follow the techniques for wet and
dry felting on silk gauze or any fine fabric.
Fulling
If you have ever accidentally washed a wool
sweater in a washing machine, then you are
familiar with fulling. Through the same process
of applying moisture, pressure, and heat as in
wet felting, the fibers matt together, condensing
and causing the material to shrink. The differ-
ence between fulling and felting is that the
fulling process is applied to fabric or ready-made
garments rather than to loose fibers.
F elT inG
Smoother Felting
• When making an armature for felting, use
pipe cleaners instead of smooth wire. The
texture of pipe cleaners creates a convenient
gripping base for the roving to cling to and
minimizes shifting around the frame.
• Because wool roving is expensive, some-
times you can use a combination of syn-
thetic and natural fibers. If you decide to
combine fibers, make sure at least half the
fibers are natural or the material won’t felt.
tipS
(RAY)
(Fogra 39) Job:02-28051 Title:RP-Textile Artist Handbook
#175 DTP:225 Page:46
042-049_28051.indd 46 3/6/12 7:40 PM
(Text)
THE TEXT ILE ART IST 'S STUDIO HANDBOOK
Tutorial: Welt Felting in Your Studio
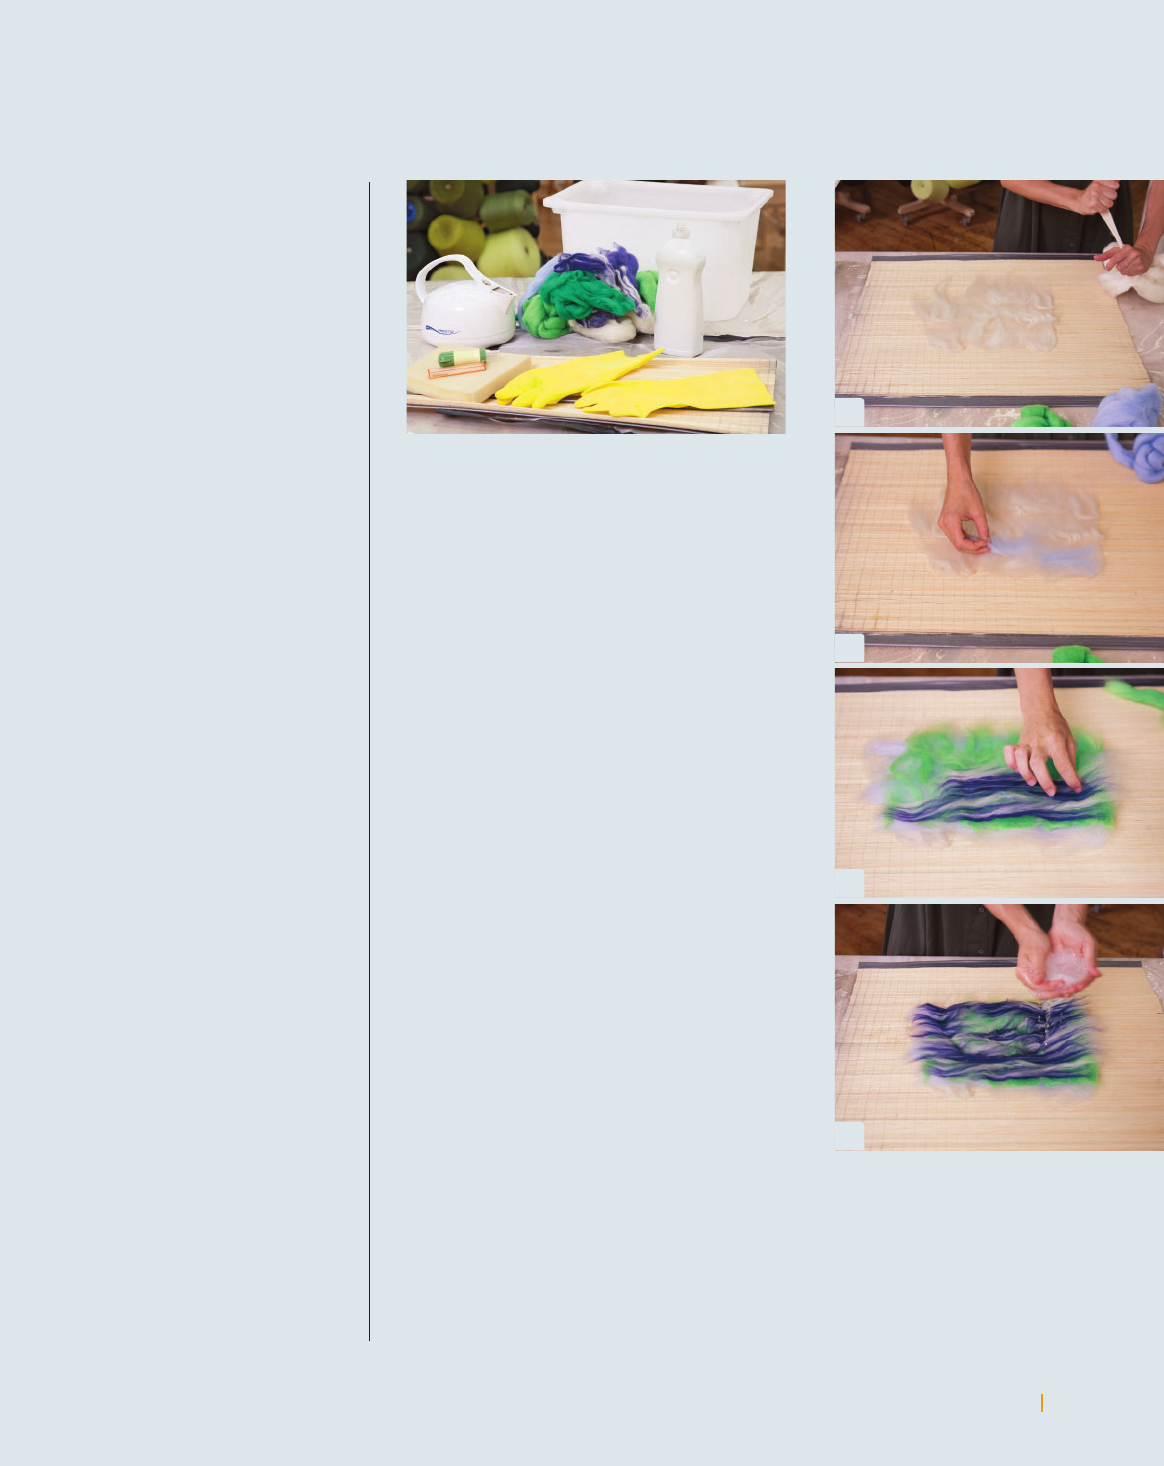
instructions:
1. Cover your table or work surface to protect
it from the water. Lay out your rolling mat
on the table, giving yourself ample room.
2. With the roving in one hand, pull a small
tuft away with the other hand until the
bers pull apart. Repeat to separate several
fiber tufts and lay them out on your work
surface. [A]
3. For the first layer, place several tufts side
by side with the fibers all in one direction
on the rolling mat. For the second layer, lay
the tufts over the first, but in the opposite
direction. This creates friction so the fibers
felt together. [B]
4. Add three or four additional layers, alter-
nating horizontally and then vertically. The
more layers you have, the stronger the felt
and the more felting time required. Five to
six layers is good for a small sturdy piece
of fabric. [C]
5. In a large bowl or sink, mix enough soap
with the hottest water you hands can stand
until the water feels slightly oily.
6. Cup the soapy water with your hands and
wet the fibers. They need to be fully wet,
but not resting in a puddle. [D]
Wet felting is a very fun
(and messy!) way to cre-
ate fabric for constructing,
embroidering, or even print-
ing on. Through friction and
heat, you bind loose fibers
together. Depending on how
many layers you use, you can
make extremely durable and
warm fabric.
tools
• Soft netting mat/mesh
• Bamboo rolling mat
• Tarp, tablecloth, plastic to
protect your work surface
materials
• Several ounces of roving in
a variety of colors
• Boiling water
• Dish or olive oil soap
(something soft on the
hands)
F ELT ING
47
A
B
C
D
(RAY)
(Fogra 39) Job:02-28051 Title:RP-Textile Artist Handbook
#175 DTP:225 Page:47
042-049_28051.indd 47 3/6/12 7:40 PM
Get The Textile Artist's Studio Handbook now with the O’Reilly learning platform.
O’Reilly members experience books, live events, courses curated by job role, and more from O’Reilly and nearly 200 top publishers.

