
Learning vi
UNIX has a number of editors that can process the contents of readable files, whether those files contain data, source code, or text. There are line editors, such as ed and ex, which display a line of the file on the screen, and there are screen editors, such as vi and emacs, which display a part of the file on your terminal screen.
The most useful standard text editor on your system is vi. Unlike emacs, it is available in nearly identical form on almost every UNIX system, thus providing a kind of text editing lingua franca. The same might be said of ed and ex, but screen editors are generally much easier to use. With a screen editor you can scroll the page, move the cursor, delete lines, insert characters, and more, while seeing the results of your edits as you make them. Screen editors are very popular because they allow you to make changes as you read a file, much as you would edit a printed copy, only faster.
To many beginners, vi looks unintuitive and cumbersome—instead of letting you type normally and use special control keys for word-processing functions, it uses all of the regular keyboard keys for issuing commands. You must be in a special insert mode before you can type. In addition, there seem to be so many commands.
You can’t learn vi by memorizing every single vi command. Begin by learning some basic commands. As you do, be aware of the patterns of usage that commands have in common. Be on the lookout for new ways to perform tasks, experimenting with new commands and combinations of commands.
As you become more familiar with vi, you will find that you need fewer keystrokes to tell vi what to do. You will learn shortcuts that transfer more and more of the editing work to the computer—where it belongs. Not as much memorization is required as first appears from a list of vi commands. Like any skill, the more editing you do, the more you know about it and the more you can accomplish.
This chapter has three sections, and each one corresponds to a set of material about vi that you should be able to tackle in a single session. After you have finished each session, put aside the book for a while and do some experimenting. When you feel comfortable with what you have learned, continue to the next session.
▪ Session 1: Basic Commands ▪
The first session contains the basic knowledge you need to operate the vi editor. After a general description of vi, you are shown some simple operations. You will learn how to
- open and close a file;
- give commands and insert text;
- move the cursor;
- edit text (change, delete, and copy).
You can use vi to edit any file that contains readable text, whether it is a report, a series of shell commands, or a program. The vi editor copies the file to be edited into a buffer (an area temporarily set aside in memory), displays as much of the buffer as possible on the screen, and lets you add, delete, and move text. When you save your edits, vi copies the buffer into a permanent file, overwriting the contents of the old file.
▪ Opening a File ▪
The syntax for the vi command is:
vi [filename]
where filename is the name of either an existing file or a new file. If you don’t specify a filename, vi will open an unnamed buffer, and ask you to name it before you can save any edits you have made. Press RETURN to execute the command.
A filename must be unique inside its directory. On AT&T (System V) UNIX systems, it cannot exceed 14 characters. (Berkeley UNIX systems allow longer filenames.) A filename can include any ASCII character except /, which is reserved as the separator between files and directories in a pathname. You can even include spaces in a filename by “escaping” them with a backslash. In practice, though, filenames consist of any combination of uppercase and lowercase letters, numbers, and the characters . (dot) and _ (underscore). Remember that UNIX is case-sensitive: lowercase filenames are distinct from uppercase filenames, and, by convention, lowercase is preferred.
If you want to open a new file called notes in the current directory, enter:
$ vi notes
The vi command clears the screen and displays a new buffer for you to begin work. Because notes is a new file, the screen displays a column of tildes (~) to indicate that there is no text in the file, not even blank lines.
If you specify the name of a file that already exists, its contents will be displayed on the screen. For example:
$ vi letter
might bring a copy of the existing file letter to the screen.
Mr. John Fust

Vice President, Research and Development

Gutenberg Galaxy Software

Waltham, Massachusetts 02154


Dear Mr. Fust:


In our conversation last Thursday, we discussed a

documentation project that would produce a user’s manual

on the Alcuin product. Yesterday, I received the product

demo and other materials that you sent me.

~

~

~

~

"letter" 11 lines, 250 characters
The prompt line at the bottom of the screen echoes the name and size of the file.
Sometimes when you invoke vi, you may get either of the following messages:
[using open mode]
or:
Visual needs addressable cursor or upline capability
In both cases, there is a problem identifying the type of terminal you are using. You can quit the editing session immediately by typing :q.
Although vi can run on almost any terminal, it must know what kind of terminal you are using. The terminal type is usually set as part of the UNIX login sequence. If you are not sure whether your terminal type is defined correctly, ask your system administrator or an experienced user to help you set up your terminal. If you know your terminal type (wy50 for instance), you can set your TERM environment variable with the following command:
TERM=wy50; export TERM
vi Commands
The vi editor has two modes: command mode and insert mode. Unlike many word processors, vi’s command mode is the initial or default mode. To insert lines of text, you must give a command to enter insert mode and then type away.
Most commands consist of one or two characters. For example:
i insertc change
Using letters as commands, you can edit a file quickly. You don’t have to memorize banks of function keys or stretch your fingers to reach awkward combinations of keys.
In general, vi commands
- are case-sensitive (uppercase and lowercase keystrokes mean different things; e.g., I is different from i);
- are not echoed on the screen;
- do not require a RETURN after the command.
There is also a special group of commands that echo on the bottom line of the screen. Bottom-line commands are indicated by special symbols. The slash (/) and the question mark (?) begin search commands, which are discussed in session 2. A colon (:) indicates an ex command. You are introduced to one ex command (to quit a file without saving edits) in this chapter, and the ex line editor is discussed in detail in Chapter 7.
To tell vi that you want to begin insert mode, press i. Nothing appears on the screen, but you can now type any text at the cursor. To tell vi to stop inserting text, press ESC and you will return to command mode.
For example, suppose that you want to insert the word introduction. If you type the keystrokes iintroduction, what appears on the screen is
introduction
Because you are starting out in command mode, vi interprets the first keystroke (i) as the insert command. All keystrokes after that result in characters placed in the file, until you press ESC. If you need to correct a mistake while in insert mode, backspace and type over the error.
While you are inserting text, press RETURN to break the lines before the right margin. An autowrap option provides a carriage return automatically after you exceed the right margin. To move the right margin in ten spaces, for example, enter :set wm=10.
Sometimes you may not know if you are in insert mode or command mode. Whenever vi does not respond as you expect, press ESC. When you hear a beep, you are in command mode.
Saving a File
You can quit working on a file at any time, save the edits, and return to the UNIX prompt. The vi command to quit and save edits is ZZ. (Note that ZZ is capitalized.)
Let’s assume that you create a file called letter to practice vi commands and that you type in 36 lines of text. To save the file, first check that you are in command mode by pressing ESC, and then give the write and save command, ZZ. Your file is saved as a regular file. The result is:
"letter" [New file] 36 lines, 1331 characters
You return to the UNIX prompt. If you check the list of files in the directory, by typing ls at the prompt, the new file is listed:
$ ls

ch01 ch02 letter
You now know enough to create a new file. As an exercise, create a file called letter and insert the text shown in Figure 3-1. When you have finished, type ZZ to save the file and return to the UNIX prompt.
▪ Moving the Cursor ▪
Only a small percentage of time in an editing session may be spent adding new text in insert mode. Much of the time, you will be editing existing text.
In command mode, you can position the cursor anywhere in the file. You start all basic edits (changing, deleting, and copying text) by placing the cursor at the text that you want to change. Thus, you want to be able to quickly move the cursor to that place.
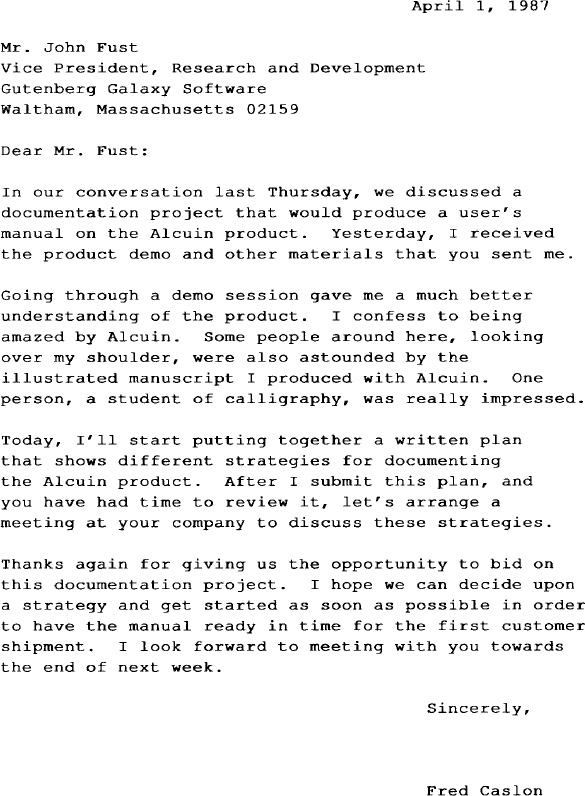
Fig. 3-1. A sample letter entered with vi
- up, down, left, or right, one character at a time;
- forward or backward by blocks of text such as words, sentences, or paragraphs;
- forward or backward through a file, one screen at a time.
To move the cursor, make sure you are in command mode by pressing ESC. Give the command for moving forward or backward in the file from the current cursor position. When you have gone as far in one direction as possible, you’ll hear a beep and the cursor stops. You cannot move the cursor past the tildes (~) at the end of the file.
Single Movements
The keys h, j, k, and l, right under your fingertips, will move the cursor:
h left one spacej down one linek up one linel right one space
You could use the cursor arrow keys (↑, ↓, →, ←) or the RETURN and BACK- SPACE keys, but they are out of the way and are not supported on all terminals.
You can also combine the h, j, k, and l keys with numeric arguments and other vi commands.
Numeric Arguments
You can precede movement commands with numbers. The command 4l moves the cursor (shown as a small box around a letter) four spaces to the right, just like typing the letter l four times (llll).

This one concept (being able to multiply commands) gives you more options (and power) for each command. Keep it in mind as you are introduced to additional commands.
Movement by Lines
When you saved the file letter, the editor displayed a message telling you how many lines were in that file. A line in the file is not necessarily the same length as a physical line (limited to 80 characters) that appears on the screen. A line is any text entered between carriage returns. If you type 200 characters before pressing RETURN, vi regards all 200 characters as a single line (even though those 200 characters look like several physical lines on the screen).
Two useful commands in line movement are:
0 <zero>      move to beginning of line

$             move to end of line
In the following file, the line numbers are shown. To get line numbers on your screen, enter :set nu.
1   With the screen editor you can scroll the page,

2   move the cursor, delete lines, and insert characters,

    while seeing the results of edits as you make them.

3   Screen editors are very popular.
The number of logical lines (3) does not correspond to the number of physical lines (4) that you see on the screen. If you enter $, with the cursor positioned on the d in the word delete, the cursor would move to the period following the word them.
1   With the screen editor you can scroll the page,

2   move the cursor, delete lines, and insert characters,
    while seeing the results of edits as you make them.

3   Screen editors are very popular.
If you enter 0 (zero), the cursor would move back to the letter t in the word the, at the beginning of the line.
1   With the screen editor you can scroll the page,

2   move the cursor, delete lines, and insert characters,

    while seeing the results of edits as you make them.

3   Screen editors are very popular.
If you do not use the automatic wraparound option (:set wm=10) in vi, you must break lines with carriage returns to keep the lines of manageable length.
Movement by Text Blocks
You can also move the cursor by blocks of text (words, sentences, or paragraphs).
The command w moves the cursor forward one word at a time, treating symbols and punctuation marks as equivalent to words. The following line shows cursor movement caused by ten successive w commands:
move the cursor, delete lines, and insert characters,
You can also move forward one word at a time, ignoring symbols and punctuation marks, using the command W (note the uppercase W). It causes the cursor to move to the first character following a blank space. Cursor movement using W looks like this:
move the cursor, delete lines, and insert characters,
To move backward one word at a time, use the command b. The B command allows you to move backward one word at a time, ignoring punctuation.
With either the w, W, b, or B commands, you can multiply the movement with numbers. For example, 2w moves forward two words; 5B moves back five words, ignoring punctuation. Practice using the cursor movement commands, combining them with numeric multipliers.
▪ Simple Edits ▪
When you enter text in your file, it is rarely perfect. You find errors or want to improve a phrase. After you enter text, you have to be able to change it.
What are the components of editing? You want to insert text (a forgotten word or a missing sentence). And you want to delete text (a stray character or an entire paragraph). You also need to change letters and words (correct misspellings or reflect a change of mind). You want to move text from one place to another part of your file. And on occasion, you want to copy text to duplicate it in another part of your file.
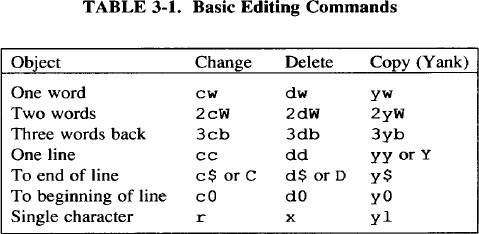
There are four basic edit commands: i for insert (which you have already seen), c for change, d for delete, d then p for move (delete and put), and y for yank (copy). Each type of edit is described in this section. Table 3-1 gives a few simple examples.
Inserting New Text
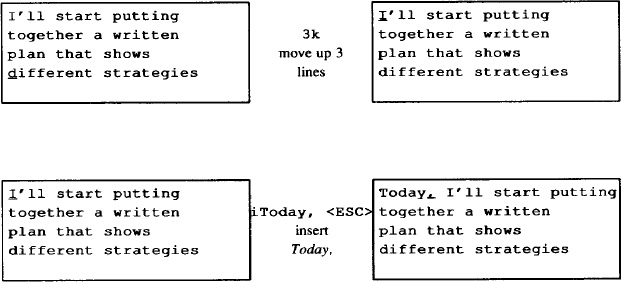
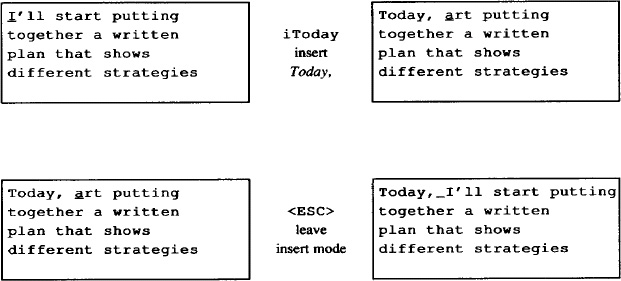
You have already used the insert command to enter text into a new file. You also use the insert command while editing existing text to add characters, words, and sentences. Suppose you have to insert Today, at the beginning of a sentence. Enter the following sequence of commands and text:
In the previous example, vi moves existing text to the right as the new text is inserted. That is because we are showing vi on an “intelligent” terminal, which can adjust the screen with each character you type. An insert on a “dumb” terminal (such as an adm3a) will look different. The terminal itself cannot update the screen for each character typed (without a tremendous sacrifice of speed), so vi doesn’t rewrite the screen until after you press ESC. Rather, when you type, the dumb terminal appears to overwrite the existing text. When you press ESC, the line is adjusted immediately so that the missing characters reappear. Thus, on a dumb terminal, the same insert would appear as follows:
Changing Text
You can replace any text in your file with the change command, c. To identify the amount of text that you want replaced, combine the change command with a movement command. For example, c can be used to change text from the cursor
cw        to the end of a word

2cb       back two words

c$        to the end of a line
Then you can replace the identified text with any amount of new text: no characters at all, one word, or hundreds of lines. The c command leaves you in insert mode until you press the ESC key.
Words
You can replace a word (cw) with a longer word, a shorter word, or any amount of text. The cw command can be thought of as “delete the word marked and insert new text until ESC is pressed.”
Suppose that you have the following lines in your file letter and want to change designing to putting together. You only need to change one word.

Note that the cw command places a $ at the last character of the word to be changed.

The cw command also works on a portion of a word. For example, to change putting to puts, position the cursor on the second t, enter cw, then type s and press ESC. By using numeric prefixes, you can change multiple words or characters immediately. For example:
3cw      change three words to the right of the cursor

5cl      change five letters to the right of the cursor
You don’t need to replace the specified number of words, characters, or lines with a like amount of text. For example:

Lines
To replace the entire current line, there is the special change command cc. This command changes an entire line, replacing that line with the text entered before an ESC. The cc command replaces the entire line of text, regardless of where the cursor is located on the line.
The C command replaces characters from the current cursor position to the end of the line. It has the same effect as combining c with the special end-of-line indicator, $ (as in c$).
Characters
One other replacement edit is performed with the r command. This command replaces a single character with another single character. One of its uses is to correct misspellings. You probably don’t want to use cw in such an instance, because you would have to retype the entire word. Use r to replace a single character at the cursor:

The r command makes only a single character replacement. You do not have to press ESC to finish the edit. Following an r command, you are automatically returned to command mode.
Deleting Text
You can also delete any text in your file with the delete command, d. Like the change command, the delete command requires an argument (the amount of text to be operated on). You can delete by word (dw), by line (dd and D), or by other movement commands that you will learn later.
With all deletions, you move to where you want the edit to take place and enter the delete command (d) followed by the amount of text to be deleted (such as a text object, w for word).
Words
Suppose that in the following text you want to delete one instance of the word start in the first line.

The dw command deletes from the cursor’s position to the end of a word. Thus, dw can be used to delete a portion of a word.

As you can see, dw deleted not only the remainder of the word, but also the space before any subsequent word on the same line. To retain the space between words, use de, which will delete only to the end of the word.

You can also delete backwards (db) or to the end or beginning of a line (d$ or d0).
Lines
The dd command deletes the entire line that the cursor is on. Using the same text as in the previous example, with the cursor positioned on the first line as shown, you can delete the first two lines:

If you are using a dumb terminal or one working at less than 1200 baud, line deletions look different. The dumb or slow terminal will not redraw the screen until you scroll past the bottom of the screen. Instead the deletion appears as:
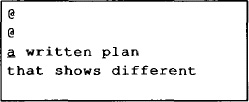
An @ symbol “holds the place” of the deleted line, until the terminal redraws the entire screen. (You can force vi to redraw the screen immediately by pressing either CTRL-L or CTRL-R, depending on the terminal you’re using.)
The D command deletes from the cursor position to the end of the line:

You cannot use numeric prefixes with the D command.
Characters
Often, while editing a file, you want to delete a single character or two. Just as r changes one character, x deletes a single character. The x command deletes any character the cursor is on. In the following line, you can delete the letter l by pressing x.

The X command deletes the character before the cursor. Prefix either of these commands with a number to delete that number of characters. For example, 5X will delete the five characters to the left of the cursor.
Moving Text
You can move text by deleting it and then placing that deleted text elsewhere in the file, like a “cut and paste.” Each time you delete a text block, that deletion is temporarily saved in a buffer. You can move to another position in the file and use the put command to place the text in a new position. Although you can move any block of text, this command sequence is more useful with lines than with words.
The put command, p, places saved or deleted text (in the buffer) after the cursor position. The uppercase version of the command, P, puts the text before the cursor. If you delete one or more lines, p puts the deleted text on a new line(s) below the cursor. If you delete a word, p puts the deleted text on the same line after the cursor.
Suppose that in your file letter you have the following lines and you want to move the fourth line of text. Using delete, you can make this edit. First delete the line in question:
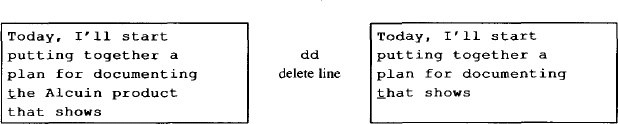
Then use p to restore the deleted line at the next line below the cursor:

You can also use xp (delete character and put after cursor) to transpose two letters. For example, in the word mvoe, the letters vo are transposed (reversed). To correct this, place the cursor on v and press x then p.
After you delete the text, you must restore it before the next change or delete command. If you make another edit that affects the buffer, your deleted text will be lost. You can repeat the put command over and over, as long as you don’t make a new edit. In the advanced vi chapter, you will learn how to retrieve text from named and numbered buffers.
Copying Text
Often, you can save editing time (and keystrokes) by copying part of your file to another place. You can copy any amount of existing text and place that copied text elsewhere in the file with the two commands y (yank) and p (put). The yank command is used to get a copy of text into the buffer without altering the original text. This copy can then be placed elsewhere in the file with the put command.
Yank can be combined with any movement command (for example, yw, y$. or 4yy). Yank is most frequently used with a line (or more) of text, because to yank and put a word generally takes longer than simply inserting the word. For example, to yank five lines of text:
To place the yanked text, move the cursor to where you want to put the text, and use the p command to insert it below the current line, or P to insert it above the current line.

The yanked text will appear on the line below the cursor. Deleting uses the same buffer as yanking. Delete and put can be used in much the same way as yank and put. Each new deletion or yank replaces the previous contents of the yank buffer. As we’ll see later, up to nine previous yanks or deletions can be recalled with put commands.
Using Your Last Command
Each command that you give is stored in a temporary buffer until you give the next command. If you insert the after a word in your file, the command used to insert the text, along with the text that you entered, is temporarily saved. Anytime you are making the same editing command repeatedly, you can save time by duplicating the command with . (dot). To duplicate a command, position the cursor anywhere on the screen, and press . to repeat your last command (such as an insertion or deletion) in the buffer. You can also use numeric arguments (as in 2.) to repeat the previous command more than once.
Suppose that you have the following lines in your file letter. Place the cursor on the line you want to delete:

In some versions of vi, the command CTRL-@ (^@) repeats the last insert (or append) command. This is in contrast to the . command, which repeats the last command that changed the text, including delete or change commands.
You can also undo your last command if you make an error. To undo a command, the cursor can be anywhere on the screen. Simply press u to undo the last command (such as an insertion or deletion).
To continue the previous example:

The uppercase version of u (U) undoes all edits on a single line, as long as the cursor remains on that line. After you move off a line, you can no longer use U.
Joining Two Lines with J
Sometimes while editing a file, you will end up with a series of short lines that are difficult to read. When you want to merge two lines, position the cursor anywhere on the first line and press J to join the two lines.

A numeric argument joins that number of consecutive lines.
Quitting without Saving Edits
When you are first learning vi, especially if you are an intrepid experimenter, there is one other command that is handy for getting out of any mess that you might create. You already know how to save your edits with ZZ, but what if you want to wipe out all the edits you have made in a session and return to the original file?
You can quit vi without saving edits with a special bottom-line command based on the ex line editor. The ex commands are explained fully in the advanced vi chapter, but for basic vi editing you should just memorize this command:
:q! <RETURN>
The q! command quits the file you are in. All edits made since the last time you saved the file are lost.
You can get by in vi using only the commands you have learned in this session. However, to harness the real power of vi (and increase your own productivity) you will want to continue to the next session.
▪ Session 2: Moving Around in a Hurry ▪
You use vi not only to create new files but also to edit existing files. You rarely open to the first line in the file and move through it line by line. You want to get to a specific place in a file and start work.
All edits begin with moving the cursor to where the edit begins (or, with ex line editor commands, identifying the line numbers to be edited). This chapter shows you how to think about movement in a variety of ways (by screens, text, patterns, or line numbers). There are many ways to move in vi, because editing speed depends on getting to your destination with only a few keystrokes.
In this session, you will learn how to move around in a file by
- screens;
- text blocks;
- searches for patterns;
- lines.
▪ Movement by Screens ▪
When you read a book you think of “places” in the book by page: the page where you stopped reading or the page number in an index. Some vi files take up only a few lines, and you can see the whole file at once. But many files have hundreds of lines.
You can think of a vi file as text on a long roll of paper. The screen is a window of (usually) 24 lines of text on that long roll. In insert mode, as you fill up the screen with text, you will end up typing on the bottom line of the screen. When you reach the end and press RETURN, the top line rolls out of sight, and a blank line for new text appears on the bottom of the screen. This is called scrolling. You can move through a file by scrolling the screen ahead or back to see any text in the file.
Scrolling the Screen
There are vi commands to scroll forward and backward through the file by full and half screens:
^F forward one screen^B backward one screen^D forward half screen^U backward half screen
(The ^ symbol represents the CTRL key. ^F means to simultaneously press the CTRL key and the F key.)
In our conversation last Thursday, we

discussed a documentation project that would

produce a user’s manual on the Alcuin product.

Yesterday, I received the product demo and

other materials that you sent me.


Going through a demo session gave me a

much better understanding of the product. I

confess to being amazed by Alcuin. Some
If you press ^F, the screen appears as follows:
better understanding of the product. I

confess to being amazed by Alcuin. Some

people around here, looking over my shoulder,

were also astounded by the illustrated

manuscript I produced with Alcuin. One

person, a student of calligraphy, was really

impressed.


Today, I’ll start putting together a written
There are also commands to scroll the screen up one line (^E) and down one line (^Y). (These commands are not available on small systems, such as the PDP-11 or Xenix for the PC-XT.)
Movement within Screen
You can also keep your current screen or view of the file and move around within the screen using:
H home—top line on screenM middle line on screenL last line on screenn
H to n lines below top linen
L to n lines above last line
The H command moves the cursor from anywhere on the screen to the first, or home, line. The M command moves to the middle line, L to the last. To move to the line below the first line, use 2H.

These screen movement commands can also be used for editing. For example, dH deletes to the top line shown on the screen.
Movement within Lines
Within the current screen there are also commands to move by line. You have already learned the line movement commands $ and 0.
^ to first character of current line+ beginning of next line- beginning of previous line

The ^ command moves to the first character of the line, ignoring any spaces or tabs. (0, by contrast, moves to the first position of the line, even if that position is blank.)
▪ Movement by Text Blocks ▪
Another way that you can think of moving through a vi file is by text blocks—words, sentences, or paragraphs. You have already learned to move forward and backward by word (w or b).
e end of wordE end of word (ignore punctuation)( beginning of previous sentence) beginning of next sentence{ beginning of previous paragraph} beginning of next paragraph
The vi program locates the end of a sentence by finding a period followed by at least two spaces, or a period as the last nonblank character on a line. If you have left only a single space following a period, the sentence won’t be recognized.
A paragraph is defined as text up to the next blank line, or up to one of the default paragraph macros (.IP, .P, .PP, or .QP) in the mm or ms macro packages. The macros that are recognized as paragraph separators can be customized with the :set command, as described in Chapter 7.

Most people find it easier to visualize moving ahead, so the forward commands are generally more useful.
Remember that you can combine numbers with movement. For example, 3) moves ahead three sentences. Also remember that you can edit using movement commands: d) deletes to the end of the current sentence, 2y} copies (yanks) two paragraphs ahead.
▪ Movement by Searches ▪
One of the most useful ways to move around quickly in a large file is by searching for text, or, more properly, for a pattern of characters. The pattern can include a “wild-card” shorthand that lets you match more than one character. For example, you can search for a misspelled word or each occurrence of a variable in a program.
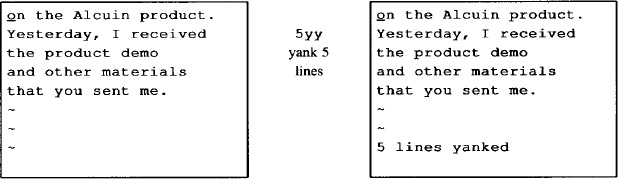
The search command is the slash character (/). When you enter a slash, it appears on the bottom line of the screen; then type in the pattern (a word or other string of characters) that you want to find:
<RETURN> search forward for text
A space before or after text will be included in the search. As with all bottom-line commands, press RETURN to finish.
The search begins at the cursor and moves forward, wrapping around to the start of the file if necessary. The cursor will move to the first occurrence of the pattern (or the message “Pattern not found” will be shown on the status line if there is no match).
If you wanted to search for the pattern shows:
The search proceeds forward from the present position in the file. You can give any combination of characters; a search does not have to be for a complete word.
You can also search backwards using the ? command:
?text<RETURN> search backward for text
The last pattern that you searched for remains available throughout your editing session. After a search, instead of repeating your original keystrokes, you can use a command to search again for the last pattern.
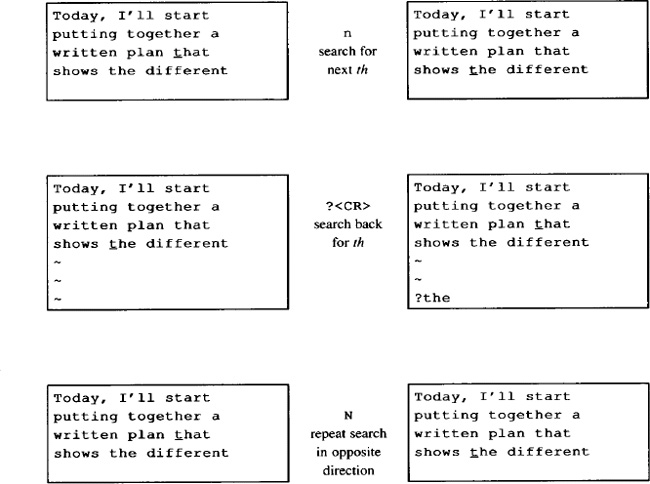
n repeat search in same directionN repeat search in opposite direction/<RETURN> repeat search in forward direction?<RETURN> repeat search in backward direction
Because the last pattern remains available, you can search for a pattern, do some work, and then search again for the pattern without retyping by using n, N, /, or ?. The direction of your search (/=forwards, ?=backwards) is displayed at the bottom left of the screen.
Continuing the previous example, the pattern th is still available to search for:
This section has given only the barest introduction to searching for patterns. Chapter 7 will teach more about pattern matching and its use in making global changes to a file.
Current Line Searches
There is also a miniature version of the search command that operates within the current line. The command f moves the cursor to the next instance of the character you name. Semicolons can then be used to repeat the “find.” Note, however, that the f command will not move the cursor to the next line.
fx find (move cursor to) next occurrence of x in the line, where x can beany character
; repeat previous find command
Suppose that you are editing on this line:

Use df’ to delete up to and including the named character (in this instance ’). This command is useful in deleting or copying partial lines.
The t command works just like f, except it positions the cursor just before the character searched for. As with f and b, a numeric prefix will locate the nth occurrence. For example:

▪ Movement by Line Numbers ▪
A file contains sequentially numbered lines, and you can move through a file by specifying line numbers. Line numbers are useful for identifying the beginning and end of large blocks of text you want to edit. Line numbers are also useful for programmers because compiler error messages refer to line numbers. Line numbers are also used by ex commands, as you will learn in Chapter 7.
If you are going to move by line numbers, you need a way to identify line numbers. Line numbers can be displayed on the screen using the :set nu option described in Chapter 7. In vi, you can also display the current line number on the bottom of the screen.
The command ^G displays the following on the bottom of your screen: the current line number, the total number of lines in the file, and what percentage of the total the present line number represents. For example, for the file letter, ^G might display:
"letter" line 10 of 40 --25%--
^G is used to display the line number to use in a command, or to orient yourself if you have been distracted from your editing session.
The G (go to) command uses a line number as a numeric argument, and moves to the first position on that line. For instance, 44G moves the cursor to the beginning of line 44. The G command without a line number moves the cursor to the last line of the file.
Two single quotes (’’) return you to the beginning of the line you were originally on. Two backquotes (‘‘) return you to your original position exactly. If you have issued a search command (/ or ?), ‘‘ will return the cursor to its position when you started the search.
The total number of lines shown with ^G can be used to give yourself a rough idea of how many lines to move. If you are on line 10 of a 1000-line file:
"ch01" line 10 of 1000 --1%--
and know that you want to begin editing near the end of that file, you could give an approximation of your destination with:
800G
Movement by line number can get you around quickly in a large file.
▪ Session 3: Beyond the Basics ▪
You have already been introduced to the basic vi editing commands, i, c, d, and y. This session expands on what you already know about editing. You will learn
- additional ways to enter
vi; - how to customize
vi; - how to combine all edits with movement commands;
- additional ways to enter insert mode;
- how to use buffers that store deletions, yanks, and your last command;
- how to mark your place in a file.
▪ Command-Line Options ▪
There are other options to the vi command that can be helpful. You can open a file directly to a specific line number or pattern. You can also open a file in read-only mode. Another option recovers all changes to a file that you were editing when the system crashes.
Advancing to a Specific Place
When you begin editing an existing file, you can load the file and then move to the first occurrence of a pattern or to a specific line number. You can also combine the open command, vi, with your first movement by search or by line number. For example:
$ vi +n letter
opens letter at line number n. The following:
$ vi + letter
opens letter at the last line. And:
$ vi +/pattern letter
opens letter at the first occurrence of pattern.
To open the file letter and advance directly to the line containing Afcuin, enter:
$ vi +/Alcuin letter
Today I’ll start putting together a

written plan that presents the different

strategies for the Alcuin

~

~

~

~

~

~

~

~

~
There can be no spaces in the pattern because characters after a space are interpreted as filenames.
If you have to leave an editing session before you are finished, you can mark your place by inserting a pattern such as ZZZ or HERE. Then when you return to the file, all you have to remember is /ZZZ or /HERE.
Read-only Mode
There will be times that you want to look at a file, but you want to protect that file from inadvertent keystrokes and changes. (You might want to call in a lengthy file to practice vi movements, or you might want to scroll through a command file or program.) If you enter a file in read-only mode, you can use all the vi movement commands, but you cannot change the file with any edits. To look at your file letter in read-only mode, you can enter either:
$ vi -R letter
or:
$ view letter
Recovering a Buffer
Occasionally, there will be a system failure while you are editing a file. Ordinarily, any edits made after your last write (save) are lost. However, there is an option, -r, which lets you recover the edited buffer at the time of a system crash. (A system program called preserve saves the buffer as the system is going down.)
When you first log in after the system is running again, you will receive a mail message stating that your buffer is saved. The first time that you call in the file, use the -r option to recover the edited buffer. For example, to recover the edited buffer of the file letter after a system crash, enter:
$ vi -r letter
If you first call in the file without using the -r option, your buffered edits are lost.
You can force the system to preserve your buffer even when there is not a crash by using the command :pre. You may find this useful if you have made edits to a file, then discover you can’t save your edits because you don’t have write permission. (You could also just write a copy of the file out under another name or in a directory where you do have write permission.)
▪ Customizing vi ▪
A number of options that you can set as part of your editing environment affect how vi operates. For example, you can set a right margin that will cause vi to wrap lines automatically, so you don’t need to insert carriage returns.
You can change options from within vi by using the :set command. In addition, vi reads an initialization file in your home directory called .exrc for further operating instructions. By placing set commands in this file, you can modify the way vi acts whenever you use it.
You can also set up .exrc files in local directories to initialize various options that you want to use in different environments. For example, you might define one set of options for editing text, but another set for editing source programs. The .exrc file in your home directory will be executed first, then the one on your current directory.
Finally, if the shell variable EXINIT is set in your environment (with the Bourne shell export command, or the C shell setenv command), any commands it contains will be executed by vi on startup. If EXINIT is set, it will be used instead of .exrc; vi will not take commands from both.
The set Command
There are two types of options that can be changed with the set command: toggle options, which are either on or off, and options that take a numeric or string value (such as the location of a margin or the name of a file).
Toggle options may be on or off by default. To turn a toggle option on, the command is:
:set option
To turn a toggle option off, the command is:
:set nooption
For example, to specify that pattern searches should ignore case, you type:
:set ic
If you want vi to return to being case-sensitive in searches, give the command:
:set noic
Some options have values. For example, the option window sets the number of lines shown in the screen “window.” You set values for these options with an equals sign (=). For example:
:set window=20
During a vi session, you can check what options are available. The command:
:set all
displays the complete list of options, including options that you have set and defaults that vi has chosen. The display will look something like this:
noautoindent        open              tabstop=8

autoprint           prompt            taglength=0

noautowrite         noreadonly        term=wy50

nobeautify          redraw            noterse

directory=/tmp      /remap            timeout

noedcompatible      report=5          ttytype=wy50

noerrorbells        scrolls=11        warn

hardtabs=8          sections=AhBhChDh window=20

noignorecase        shell=/bin/csh    wrapscan

nolisp              shiftwidth=8      wrapmargin=10

nolist              noshowmatch       nowriteany

magic               noslowopen

mesg                paragraphs=IPLPPPQP LIpplpipbb

number              tags=tags /usr/lib/tags

nooptimize
You can also ask about the setting for any individual option by name, using the command:
:set option?
The command :set shows options that you have specifically changed, or set, either in your .exrc file or during the current session. For example, the display might look like this:
number window=20 wrapmargin=10
See Appendix A for a description of what these options mean.
The .exrc File
The .exrc file that controls the vi environment for you is in your home directory. Enter into this file the set options that you want to have in effect whenever you use vi or ex.
The .exrc file can be modified with the vi editor, like any other file. A sample .exrc file might look like this:
set wrapmargin=10 window=20
Because the file is actually read by ex before it enters visual mode (vi), commands in .exrc should not have a preceding colon.
Alternate Environments
You can define alternate vi environments by saving option settings in an .exrc file that is placed in a local directory. If you enter vi from that directory, the local .exrc file will be read in. If it does not exist, the one in your home directory will be read in.
For example, you might want to have one set of options for programming:
set number lisp autoindent sw=4 tags=/usr/lib/tags terse
and another set of options for text editing:
set wrapmargin=15 ignorecase
Local .exrc files are especially useful when you define abbreviations, which are described in Chapter 7.
Some Useful Options
As you can see when you type :set all, there are many options. Most options are used internally by vi and aren’t usually changed. Others are important in certain cases, but not in others (for example, noredraw and window can be useful on a dialup line at a low baud rate). Appendix A contains a brief description of each option. We recommend that you take some time to play with option setting—if an option looks interesting, try setting it (or unsetting it) and watch what happens while you edit. You may find some surprisingly useful tools.
There is one option that is almost essential for editing nonprogram text. The wrapmargin option specifies the size of the right margin that will be used to autowrap text as you type. (This saves manually typing carriage returns.) This option is in effect if its value is set to greater than 0. A typical value is 10 or 15:
set wrapmargin=15
There are also three options that control how vi acts in conducting a search. By default, it differentiates between uppercase and lowercase (foo does not match Foo), wraps around to the beginning of the file during a search (this means you can begin your search anywhere in the file and still find all occurrences), and recognizes wildcard characters when matching patterns. The default settings that control these options are noignorcase, wrapscan, and magic, respectively. To change any of these defaults, set the opposite toggles: ignorcase, nowrapscan, and nomagic.
Another useful option is shift width. This option was designed to help programmers properly indent their programs, but it can also be useful to writers. The >> and << commands can be used to indent (or un-indent) text by shiftwidth characters. The position of the cursor on the line doesn’t matter—the entire line will be shifted. The shiftwidth option is set to 8 by default, but you can use :set to change this value.
Give the >> or << command a numeric prefix to affect more than on line. For example:
10>>
will indent the next 10 lines by shiftwidth.
▪ Edits and Movement ▪
You have learned the edit commands c, d, and y, and how to combine them with movements and numbers (such as 2cw or 4dd). Since that point, you have added many more movement commands to your repertoire. Although the fact that you can combine edit commands with movement is not a “new” concept to you, Table 3-2 gives you a feel for the many editing options you now have.
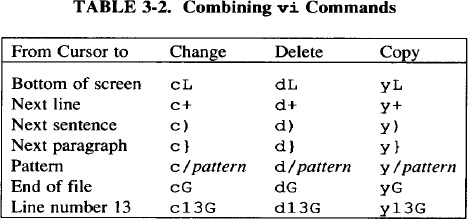
You can also combine numbers with any of the commands in Table 3-2 to multiply them. For example, 2c) changes the next two sentences. Although this table may seem forbidding, experiment with combinations and try to understand the patterns. When you find how much time and effort you can save, combinations of change and movement keys will no longer seem obscure, but will readily come to mind.
▪ More Ways to Insert Text ▪
You have inserted text before the cursor with the sequence:
itext <ESC>
There are many insert commands. The difference between them is that they insert text at different positions relative to the cursor:
a append text after cursorA append text to end of current linei insert text before cursorI insert text at beginning of lineo open new line below cursor for textO open new line above cursor for textR overstrike existing characters with new characters
All these commands leave you in insert mode. After inserting text, remember to press ESC to escape back to command mode.
The A (append) and I (insert) commands save you from having to move the cursor to the end or beginning of the line before invoking insert mode. For example, A saves one keystroke over $a. Although one keystroke might not seem like a timesaver, as you become a more adept (and impatient) editor, you’ll want to omit any unnecessary keystrokes.
There are other combinations of commands that work together naturally. For example, ea is useful for appending new text to the end of a word. (It sometimes helps to train yourself to recognize such frequent combinations so that invoking them becomes automatic.)
▪ Using Buffers ▪
While you are editing, you have seen that your last deletion (d or x) or yank (y) is saved in a buffer (a place in stored memory). You can access the contents of that buffer and put the saved text back in your file with the put command (p or P).
The last nine deletions are stored by vi in numbered buffers. You can access any of these numbered buffers to restore any (or all) of the last nine deletions. You can also place yanks (copied text) in buffers identified by fetters. You can fill up to 26 buffers (a through z) with yanked text and restore that text with a put command any time in your editing session.
The vi program also saves your last edit command (insert, change, delete, or yank) in a buffer. Your last command is available to repeat or undo with a single keystroke.
Recovering Deletions
Being able to delete large blocks of text at a single bound i s all well and good, but what if you mistakenly delete 53 lines that you need? There is a way to recover any of your past nine deletions, which are saved in numbered buffers. The last deletion is saved in buffer 1; the second-to-last in buffer 2, and so on.
To recover a deletion, type “(quotation mark), identify the buffered text by number, and then give the put command. For example, to recover your second-to-last deletion from buffer 2, type:
"2p
Sometimes it’s hard to remember what’s in the last nine buffers. Here’s a trick that can help.
The . command (repeat last command) has a special meaning when used with p and u. The p command will print the last deletion or change, but 2p will print the last two. By combining p, . (dot), and u (undo), you can step back through the numbered buffers.
The "1p command will put the last deletion, now stored in buffer 1, back into your text. If you then type u, it will go away. But when you type the . command, instead of repeating the last command ("1p), it will show the next buffer as if you’d typed "2p. You can thus step back through the buffers. For example, the sequence:
"1pu.u.u.u.u.
will show you, in sequence, the contents of the last six numbered buffers.
Yanking to Named Buffers
With unnamed buffers, you have seen that you must put (p or P) the contents of the buffer before making any other edit, or the buffer is overwritten. You can also use y with a set of 26 named buffers (a through z), which are specifically for copying and moving text. If you name a buffer to store the yanked text, you can place the contents of the named buffer at any time during your editing session.
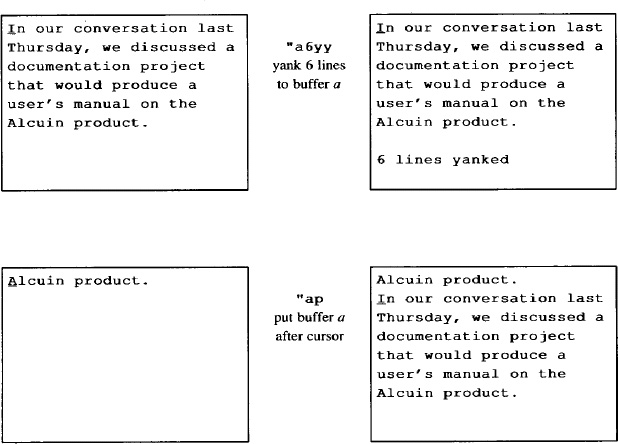
To yank into a named buffer, precede the yank command with a quotation mark (") and the character for the name of the buffer you want to load. For example:
"dyy      yank current line into buffer d

"a6yy     yank next six lines into buffer a
After loading the named buffers and moving to the new position, use p or P to put the text back.
"dP       put buffer d before cursor

"ap       put buffer a after cursor
There is no way to put part of a buffer into the text—it is all or nothing.
Named buffers allow you to make other edits before placing the buffer with p.
After you know how to travel between files without leaving vi, you can use named buffers to selectively transfer text between files.
You can also delete text into named buffers, using much the same procedure. For example:
"a5dd delete five lines into buffer a
If you specify the buffer name with a capital latter, yanked or deleted text will be appended to the current contents of the buffer. For example:
"byy yank current line into buffer b"B5dd delete five lines and append to buffer b3} move down three paragraphs"bp insert the six lines from buffer b above the cursor
When you put text from a named buffer, a copy still remains in that buffer; you can repeat the put as often as you like until you quit your editing session or replace the text in the buffer.
For example, suppose you were preparing a document with some repetitive elements, such as the skeleton for each page of the reference section in a manual. You could store the skeleton in a named buffer, put it into your file, fill in the blanks, then put the skeleton in again each time you need it.
▪ Marking Your Place ▪
During a vi session, you can mark your place in the file with an invisible “bookmark,” perform edits elsewhere, then return to your marked place. In the command mode:
"mx marks current position with x (x can be any letter)"’x moves cursor to beginning of line marked by x"‘x moves cursor to character marked by x"‘‘ returns to previous mark or context after a move
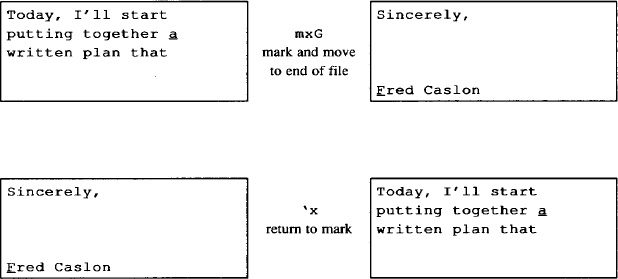
Place markers are set only during the current vi session; they are not stored in the file.
▪ Other Advanced Edits ▪
You may wonder why we haven’t discussed global changes, moving text between files, or other advanced ex topics. The reason is that, to use these tools, it helps to learn more about ex and a set of UNIX pattern-matching tools that we discuss together in Chapter 7.
Get UNIX° TEXT PROCESSING now with the O’Reilly learning platform.
O’Reilly members experience books, live events, courses curated by job role, and more from O’Reilly and nearly 200 top publishers.

