
Let the Computer Do the Dirty Work
Computers are very good at doing the same thing repeatedly, or doing a series of very similar things one after another. These are just the kinds of things that people hate to do, so it makes sense to learn how to let the computer do the dirty work.
As we discussed in Chapter 7, you can save ex commands in a script, and execute the script from within vi with the :so command. It is also possible to apply such a script to a file from the outside—without opening the file with vi. As you can imagine, when you apply the same series of edits to many different files, you can work very quickly using a script.
In addition, there is a special UNIX editor, called sed (stream editor), that only works with scripts. Although sed can be used to edit files (and we will show many useful applications in this chapter), it has a unique place in the UNIX editing pantheon not as a file editor, but as a filter that performs editing operations on the fly, while data is passed from one program to another through a pipe.
The sed editor uses an editing syntax that is similar to that used by ex, so it should not be difficult to learn the basics.
The awk program, which is discussed in the next chapter, is yet another text-processing program. It is similar to sed, in that it works from the outside and can be used as a filter, but there the resemblance ends. It is really not an editor at all, but a database manipulation program that can be turned into an editor. Its syntax goes beyond the global substitution/regular expression syntax we’ve already seen, and so awk may be the last thing that many writers learn. Nonetheless, it has some important capabilities that you may want to be familiar with.
Finally, to make best use of these tools, you need to know a bit about shell programming. In fact, because the shell provides a framework that you can use to put all these other tools together, we need to discuss it first.
If you are a programmer, and have already worked with the shell, this discussion may be too elementary; however, we are assuming that many of our readers are writers with only minimal exposure to programming. They, like us when we started working with UNIX, need encouragement to branch out into these untried waters that have so little apparent connection to the task at hand.
This chapter is different from those in the first part of the book in that it not only teaches the basics of some new programs, but also puts them to work building some useful text-processing tools. At times, material is organized according to what is needed to build the tools, rather than as a comprehensive attempt to teach the program itself. As a result, the material presented on sed, for example, is less complete than our earlier treatment of vi. We cover the most important points, but in many ways this chapter is suggestive. If you come away with a sense of possibility, it has done its job.
▪ Shell Programming ▪
A shell script, or shell program, can be no more than a sequence of stored commands, entered in a file just as you would type them yourself to the shell.
There are two shells in common use in the UNIX system, the Bourne shell (sh), championed by AT&T, and the C shell (csh), developed at the University of California at Berkeley. Although the C shell has many features that make it preferable for interactive use, the Bourne shell is much faster, so it is the tool of choice for writing shell scripts. (Even if you use the C shell, scripts written using Bourne shell syntax will be executed in the Bourne shell.)
We discuss the Bourne shell exclusively in this chapter, although we make reference to differences from the C shell on occasion. This should pose no problem to C shell users, however, because the basic method of issuing commands is identical. The differences lie in more advanced programming constructs, which we will not introduce in detail here.
Stored Commands
The .profile (or .login if you use the C shell) file in your home directory is a good example of a shell program consisting only of stored commands. A simple .profile might look like this:
stty erase '^H' echoe kill '^X' intr '^C'

PATH=/bin:/usr/bin:/usr/local/bin:.;export PATH

umask 2

date

mail
This file does some automatic housekeeping to set up your account environment every time you log in. Even if you aren’t familiar with the commands it contains, you can get the basic idea. The commands are executed one line at a time; it is a tremendous time-saving to be able to type one command instead of five.
You can probably think of many other repetitive sequences of commands that you’d rather not type one at a time. For example, let’s suppose you were accustomed to working on an MS-DOS system, and wanted to create a dir command that would print out the current directory and the names and sizes of all of your files, rather than just the names. You could save the following two commands in a file called dir:
To execute the commands saved in a file, you can simply give its name as an argument to the sh command. For example:
$ sh dir

/work/docbook/ch13

total 21

-rw-rw-r--    3  fred        doc        263 Apr 12 09:17 abbrevs

-rw-rw-r--    1  fred        doc         10 May  1 14:01 dir

-rw-rw-r--    1  fred        doc       6430 Apr 12 15:00 sect1

-rw-rw-r--    1  fred        doc      14509 Apr 15 16:29 sect2

-rw-rw-r--    1  fred        doc       1024 Apr 28 10:35 stuff

-rw-rw-r--    1  fred        doc       1758 Apr 28 10:00 tmp
Or you can make a file executable by changing its file permissions with the chmod command:
$ ls -l dir

-rw-rw-r--    1 fred        doc        10 May  1 14:01 dir

$ chmod +x dir

$ ls -l dir

-rwxrwxr-x    1 fred        doc        10 May  1 14:01 dir
After a file has executable permission, all you need to do to execute the commands it contains is to type the file’s name:
The next step is to make the shell script accessible from whatever directory you happen to be working in. The Bourne shell maintains a variable called PATH, which is set up during the login process, and contains a list of directories in which the shell should look for executable commands. This list is usually referred to as your search path.
To use the value of a variable, simply precede its name with a dollar sign ($). This makes it easy to check the value of a variable like PATH—simply use the echo command:
$ echo $PATH

/bin:/usr/bin:/usr/local/bin:.
The Bourne shell expects the list of directory names contained in the PATH variable to be separated by colons. If your search path is defined as shown, the following directories will be searched, in order, whenever you type the name of a command:
The allocation of system commands to the three bin directories is historical and somewhat arbitrary, although /usr/local/bin tends to contain commands that are local to a specific implementation of UNIX. It is sometimes called /usr/lbin or some other name.
To ensure that any shell scripts you create are automatically found whenever you type their names, you can do one of two things:
1. You can add shell scripts to one of the directories already in your search path. However, in most cases, these directories are only writable by the super-user, so this option is not available to all users.
2. You can create a special “tools” directory of your own, and add the name of that directory to your search path. This directory might be a subdirectory of your own home directory, or could be a more globally available directory used by a group of people.
For example, you could put the following line in your .profile:
PATH=/usr/fred/tools:.:/bin:/usr/bin:/usr/local/bin:
The /usr/fred/tools directory would be searched before any of the standard search directories. (This means that you can define an alternate command with the same name as an existing command. The version found first in the search path is executed, and the search is stopped at that point. You should not put local directories before the standard directories if you are concerned at all with system security, because doing so creates a loophole that can be exploited by an intruder.)
If you are using the C shell, the search path is stored in a variable called path, and has a different format; see your UNIX documentation for details. In addition, you must use the rehash command whenever you add a command to one of the search directories.
Passing Arguments to Shell Scripts
The previous example is very simple; the commands it used took no arguments. In contrast, consider a case in which you want to save a single complex command line in a file. For example, if you use tbl and eqn with nroff, your typical command line might look like this:
$ tbl file | eqn | nroff -ms col | lp
How much easier it would be to save that whole line in a single file called format, and simply type:
The question then becomes: how do you tell your format script where in the command line to insert the file argument?
Because all of the programs in the script are designed to read standard input as well as take a filename argument, we could avoid the problem by writing the script thus:
tbl | eqn | nroff -ms | col | lp
and using it like this:
$ cat file | format
or like this:
$ format < file
But this still begs the question of how to pass an argument to a shell script.
Up to nine arguments can be represented by positional notation. The first argument is represented in the shell script by the symbol $1, the second by $2, and so on.
So, for example, we could write our script:
tbl $1 | eqn | nroff -ms | col | lp
When specified as an argument to the format command:
$ format ch01
the filename would be substituted in the script for the symbol $1.
But what if you want to specify several files at once? The symbol $* means “use all arguments,” so the script:
will allow us to write:
$ format file1 file2. . .
Now consider the slightly more complex case in which you’d like to support either the ms or the mm macros. You could write the script like this:
tbl $2 | eqn | nroff $1 | col | lp
The first argument will now follow the invocation of nroff, and the second will represent the filename:
$ format -ms file
However, at this point we have lost the ability to specify “all arguments,” because the first argument is used differently than all the rest. There are several ways to handle this situation, but we need to learn a few things first.
Conditional Execution
Commands in a shell script can be executed conditionally using either the if . . . then . . . else or case command built into the shell. However, any conditional commands require the ability to test a value and make a choice based on the result. As its name might suggest, the test command does the trick.
There are different kinds of things you can test, using various options to the command. The general form of the command is:
$ test condition
Condition is constructed from one or more options; some of the most useful are listed in Table 12-1.
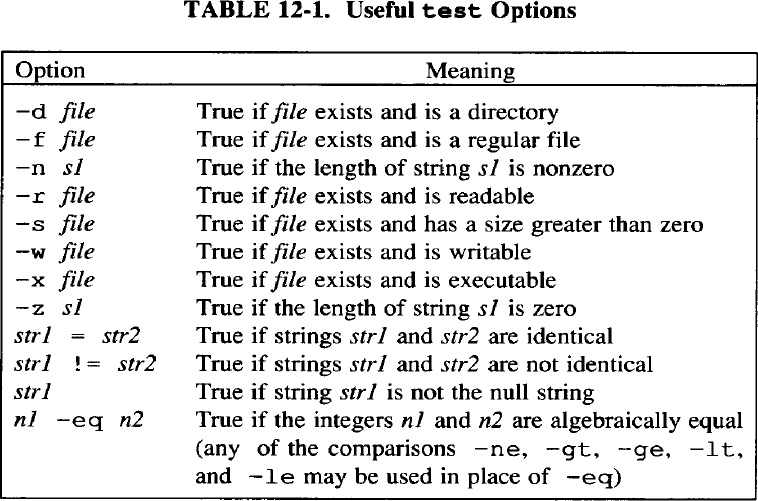
The test command has a special form just for use in shell scripts. Instead of using the word test, you can simply enclose condition in square brackets. The expression must be separated from the enclosing brackets by spaces.
So, for example, to return to our format script, we could write:
if [ "$1" = "-mm" ]

then

    tabl $2 | eqn| nroff -mm | col | lp

else

    tabl $2 | eqn| nroff -mm | col | lp

fi
We’ve simply used the test command to compare the value of two strings—the first argument, and the string "-mm"—and executed the appropriate command line as a result. If the strings are equal, the first command line is executed; if they are not equal, the second line is executed instead. (Notice that there are spaces surrounding the equals sign in the test.)
The syntax of if . . . then . . . else clauses can get confusing. One trick is to think of each keyword (if, then, and else) as a separate command that can take other commands as its argument. The else clause is optional. (That is, you can say, “if the condition is met, do this,” and give no alternatives. If the condition is not met, the script will simply go on to the next line, or exit if there is no next line.) The entire sequence is terminated with the fi keyword.
After you realize that each part of the sequence is really just a separate command, like other UNIX commands, the abbreviated form, which uses semicolons rather than newlines to separate the commands, will also make sense:
if condition; then command; fi
An if . . . then . . . else clause allows you to make a choice between at most two options. There is also an elif statement that allows you to create a sequence of if clauses to deal with more conditions. For example, suppose your system supports a third macro package—one you’ve written yourself, and called mS because it’s a superset of ms. (More on this in Chapter 17!) You could write the script like this:
if [ "$1" = "-mm" ]

then tbl $2 | eqn | nroff -mm | col | lp

elif [ "$1" = "-ms" ]

then tbl $2 | eqn | nroff -ms | col | lp

elif [ "$1" = "-mS" ]

then tbl $2 | eqn | nroff -mS | col | lp

fi
This syntax can get awkward for more than a few conditions. Fortunately, the shell provides a more compact way to handle multiple conditions: the case statement. The syntax of this statement looks complex (even in the slightly simplified form given here):
case value in

pattern)  command;;

..

pattern)  command;;

esac
In fact, the statement is quite easy to use, and is most easily shown by example. We could rewrite the previous script as follows:
case $1 in

    -mm) tbl $2 | eqn | nroff -mm | col | lp;;

    -ms) tbl $2 | eqn | nroff -ms | col | lp;;

    -mS) tbl $2 | eqn | nroff -mS | col | lp;;

esac
This form is considerably more compact, especially as the number of conditions grows. (Be sure to note the ;; at the end of each line. This is an important part of the syntax.)
Here’s how the case statement works. Each value in turn is compared (using standard shell metacharacters like * and ?, if present) against the pattern before the close parenthesis at the start of each line. If the pattern matches, the line is executed. If not, the script tries again with the next line in the case statement. After the value has been compared against each case, the process starts over with the next value (if more than one has been specified).
Discarding Used Arguments
All of the conditions we’ve tested for so far are mutually exclusive. What if you want to include more than one potentially true condition in your script? The trick to dealing with this situation requires two more shell commands: while and shift.
Consider the following example. You realize that it is inefficient to pass your files through eqn every time you use format. In addition, you sometimes use pic. You want to add options to your format shell script to handle these cases as well.
You could decree that the macro package will always be the first argument to your script, the name of the preprocessor the second, and the file to be formatted the third. To delay execution of the command until all of the options have been assembled, you can use the case statement to set shell variables, which are evaluated later to make up the actual command line. Here’s a script that makes these assumptions:
case $1 in

    -mm) macros="-mm";;

    -ms) macros="-ms";;

    -mS) macros="-mS";;

esac

case $2 in

    -E) pre="| eqn"

    -P) pre="| pic"

esac

tbl $3 $pre | nroff $macros | col | lp
But what if you don’t want either preprocessor, or want both eqn and pic? The whole system breaks down. We need a more general approach.
There are several ways to deal with this. For example, there is a program called getopt that can be used for interpreting command-line options. However, we will use another technique—discarding an argument after it is used, and shifting the remaining arguments. This is the function of the shift command.
This command finds its most elementary use when a command needs to take more than nine arguments. There is no $10, so a script to echo ten arguments might be written:
echo The first nine arguments: $1 $2 $3 $4 $5 $6 $7 $8 $9

shift

echo The tenth argument: $9
After the shift command, the old $1 has disappeared, as far as the shell is concerned, and the remaining arguments are all shifted one position to the left. (The old $2 is the current $1, and so on.) Take a moment to experiment with this if you want.
Shifting works well with conditional statements, because it allows you to test for a condition, discard the first argument, and go on to test the next argument, without requiring the arguments to be in a specific order. However, we still can’t quite get the job done, because we have to establish a loop, and repeat the case statement until all of the arguments are used up.
Repetitive Execution
As we suggested at the start of this chapter, the real secret of programming is to get the computer to do all the repetitive, boring tasks. The basic mechanism for doing this is the loop—an instruction or series of instructions that cause a program to do the same thing over and over again as long as some condition is true.
The while command is used like this:
while  condition

do

commands

done
In the script we’re trying to write, we want to repeatedly test for command-line arguments as long as there are arguments, build up a command line using shell variables, and then go ahead and issue the command. Here’s how:
while [$# -gt 0 ]

do

   case $1 in

     -E) eqn="| eqn";;

     -P) pic="| pic";;

     -*) options="$options $1";;

     *)  files="$files $1";;

   esac

   shift

done

tbl $files $eqn $pic | nroff $options | col| lp
The special shell variable $# always contains the number of arguments given to a command. What this script is saying in English is: As long as there is at least one argument
![]() test the first argument against the following list of possibilities; if there is a match, set the variable as instructed;
test the first argument against the following list of possibilities; if there is a match, set the variable as instructed;
![]() throw away the argument now that you’ve used it, and shift the remaining arguments over one place;
throw away the argument now that you’ve used it, and shift the remaining arguments over one place;
![]() decrement the shell variable
decrement the shell variable $#, which contains the number of arguments;
![]() go back to the first line following the do statement, and start over.
go back to the first line following the do statement, and start over.
The loop will continue as long as the condition specified in the while statement is met—that is, until all the arguments have been used up and shifted out of existence.
As you’ve no doubt noticed, to make this work, we had to account for all of the arguments. We couldn’t leave any to be interpreted in the command line because we had to use them all up to satisfy the while statement. That meant we needed to think about what other kinds of arguments there might be and include them in the case statement. We came up with two possibilities: additional nroff options and files.
In addition, because of the pattern-matching flexibility in the case statement, we don’t need to call out each of the macro packages separately, but can just treat them as part of a more general case. Any argument beginning with a minus sign is simply assumed to be an nroff option.
You’ll notice that we used a somewhat different syntax for assigning these last two potential groups of arguments to variables:
variable="$variable additional_value"
Or, as shown in the script:
options="$options $1"

files="$files $1"
This syntax is used to add a value to a variable. We know that we can expect at least one option to nroff, so we simply add any other options to the same variable. Similarly, there may be more than one filename argument. The *) case can be executed any number of times, each time adding one more filename to the variable.
If you want to become more familiar with how this works, you can simulate it on the command line:
$ files=sect1

$ files="$files sect2"

$ echo $files

sect1 sect2
As you’ve seen, in the script we used the standard shell metacharacter *, which means “any number of any characters,” right in the pattern-matching part of the case statement. You can use any of the shell metacharacters that you can type on the command line equally well in a shell script. However, be sure you realize that when you do this, you’re making assumptions—that any option not explicitly tested for in the case statement is an nroff option, and that any argument not beginning with a minus sign is a filename.
This last assumption may not be a safe one—for example, one of the filenames may be mistyped, or you may not be in the directory you expect, and the file will not be found. We may therefore want to do a little defensive programming, using another of the capabilities provided by the test command:
The [-f] test checks to see whether the argument is the name of an existing file. If it is not, the script prints an informative message and exits. (The exit command is used to break out of a script. After this error occurs, we don’t want to continue with the loop, or go on to execute any commands.)
This example is also instructive in that it shows how each element in the case statement’s condition list does not need to be on a single line. A line can contain a complex sequence of commands, separated by semicolons or newlines or both, and is not terminated till the concluding ;; is encountered.
Setting Default Values
We’ve considered the case where multiple values are stored in the same variable. What about the other extreme, where no value is stored?
If an option, such as -E for eqn, is not specified on the command line, the variable will not be defined. That is, the variable will have no value, and the variable substitution $eqn on the final line of the script will have no effect—it is as if it isn’t there at all.
On the other hand, it is possible to export a variable, so that it will be recognized not just in the shell that created it, but in any subshell. This means that the commands:
$ eqn="| eqn"; export eqn

$ format -ms myfile
will have the same effect as:
$ format -ms -E myfile
Although there are occasions where you might want to do this sort of thing, you don’t want it to happen unexpectedly. For this reason, it is considered good programming practice to initialize your variables—that is, to set them to a predefined value (or in many cases, a null value) to minimize random effects due to interaction with other programs.
To set a shell variable to a null value, simply equate it to a pair of quotation marks with nothing in between. For example, it would be a good idea to start off the format script with the line:
eqn="";pic="";options=""
In addition to setting arguments to null values, we can also set them to default values—that is, we can give them values that will be used unless the user explicitly requests otherwise. Let’s suppose that we want the script to invoke troff by default, but also provide an option to select nroff. We could rewrite the entire script like this:
eqn="";pic="";roff="ditroff -Tps";post="| devps"

lp="lp -dlaser"

while [ $# -gt 0 ]

do

   case $1 in

     -E) eqn="| eqn";;

     -P) pic="| pic";;

     -N) roff="nroff"; post="| col";lp="lp -dline";;

     -*) options="$options $1";;

     *)  if [ -f $1 ]; then

         files="$files $1"

         else echo "format: $1: file not found"; exit

         fi;;

   esac

   shift

done

eval "tbl $files $eqn $pic | $roff $options $post | $lp"
The troff output needs to be passed through a postprocessor before it can be sent to a printer. (We use devps, but there are almost as many different postprocessors as there are possible output devices.) The nroff output, for some printers, needs to be passed through col, which is a special filter used to remove reverse linefeeds. Likewise, the lp command will need a “destination” option. We’re assuming that the system has a printer called laser for troff output, and one called line for line-printer output from nroff. The default case (troff) for both the postprocessor and destination printer is set in the variables at the start of the file. The -N option resets them to alternate values if nroff is being used. The eval command is necessary in order for the pipes to be evaluated correctly inside a variable substitution.
What We’ve Accomplished
You might wonder if this script really saved you any time. After all, it took a while to write, and it seems almost as complex to use as just typing the appropriate command line. After all,, was it worth all that work, just so that we can type:
$ format -ma -E -P -N myfile
instead of:
$ tbl myfile | eqn | pic | nroff -ms | lp
There are two answers to that question. First, many of the programs used to format a file may take options of their own—options that are always the same, but always need to be specified—and, especially if you’re using troff, a postprocessor may also be involved. So your actual command line might work out to be something like this:
$ tbl myfile | eqn | pic -T720 -D | ditroff -ms -Tps |

> devps | lp
That’s considerably more to type! You could just save your most frequently used combinations of commands into individual shell scripts. But if you build a general tool, you’ll find that it gives you a base to build from, and opens up additional possibilities as you go on. For example, later in this book we’ll show how to incorporate some fairly complex indexing scripts into format—something that would be very difficult to do from the command line. That is the far more important second reason for taking the time to build a solid shell script when the occasion warrants.
As this chapter goes on, we’ll show you many other useful tools you can build for yourself using shell scripts. Many of them will use the features of the shell we introduced in this section, although a few will rely on additional features we’ve yet to learn.
▪ ex Scripts ▪
We’ve discussed ex already in Chapter 7. As we pointed out, any command, or sequence of commands, that you can type at ex’s colon prompt can also be saved in a file and executed with ex’ s : so command.
This section discusses a further extension of this concept—how to execute ex scripts from outside a file and on multiple files. There are certain ex commands that you might save in scripts for use from within vi that will be of no use from the outside—maps, abbreviations, and so on. For the most part, you’ll be using substitute commands in external scripts.
A very useful application of editing scripts for a writer is to ensure consistency of terminology—or even of spelling—across a document set. For the sake of example, let’s assume that you’ve run spell, and it has printed out the following list of misspellings:
$ spell sect1 sect2

chmod

ditroff

myfile

thier

writeable
As is often the case, spell has flagged a few technical terms and special cases it doesn’t recognize, but it has also identified two genuine spelling errors.
Because we checked two files at once, we don’t know which files the errors occurred in, or where in the files they are. Although there are ways to find this out, and the job wouldn’t be too hard for only two errors in two files, you can easily imagine how the job could grow time consuming for a poor speller or typist proofing many files at once.
We can write an ex script containing the following commands:
g/thier/s//their/g

g/writeable/s//writable/g

wq
Then we can edit the files as follows:
(The minus sign following the invocation of ex tells it to accept its commands from standard input.)
If the script were longer than the one in our simple example, we would already have saved a fair amount of time. However, given our earlier remarks about letting the computer do the dirty work, you might wonder if there isn’t some way to avoid repeating the process for each file to be edited. Sure enough, we can write a shell script that includes the invocation of ex, but generalizes it, so that it can be used on any number of files.
Looping in a Shell Script
One piece of shell programming we haven’t discussed yet is the for loop. This command sequence allows you to apply a sequence of commands for each argument given to the script. (And, even though we aren’t introducing it until this late in the game, it is probably the single most useful piece of shell programming for beginners. You will want to remember it even if you don’t write any other shell programs.)
Here’s the syntax of a for loop:
for variable in list

do

commands

done
For example:
for file in $ *

do

   ex - $file < exscript

done
(The command doesn’t need to be indented; we indented for clarity.) Now (assuming this shell script is saved in a file called correct), we can simply type:
$ correct sect1 sect2
The for loop in correct will assign each argument (each file in $*) to the variable file and execute the ex script on the contents of that variable.
It may be easier to grasp how the for loop works with an example whose output is more visible. Let’s look at a script to rename files:
for file in $*

do

  mv $file $fi1e.x

done
Assuming this script is in an executable file called move, here’s what we can do:
With a little creativity, you could rewrite the script to rename the files more specifically:
for nn in $ *

do

  mv ch$nn sect$nn

done
With the script written this way, you’d specify numbers instead of filenames on the command line:
$ ls

ch01    ch02    ch03    move

$ move 01 02 03

$ ls

sect01    sect02    sect03    move
The for loop need not take $* (all arguments) as the list of values to be substituted. You can specify an explicit list as well, or substitute the output of a command. For example:
for variable in a b c d
will assign variable to a, b, c, and d in turn. And:
for variable in 'grep -1 "Alcuin"'
will assign variable in turn to the name of each file in which grep finds the string Alcuin.
If no list is specified:
for variable
the variable will be assigned to each command-line argument in turn, much as it was in our initial example. This is actually not equivalent to for variable in $* but to for variable in $@, which has a slightly different meaning. The symbols $* expand to $1, $2, $3, etc., but $@ expands to "$1", "$2", "$3", etc. Quotation marks prevent further interpretation of special characters.
Let’s return to our main point, and our original script:
for file in $*

do

   ex - $file < exscript

done
It may seem a little inelegant to have to use two scripts—the shell script and the ex script. And in fact, the shell does provide a way to include an editing script directly into a shell script.
Here Documents
The operator << means to take the following lines, up to a specified string, as input to a command. (This is often called a here document.) Using this syntax, we could include our editing commands in correct like this:
for file in $*

do

ex - $file << end-of-script

g/thier/s//their/g

g/writeable/s//writable/g

wq

end-of-script

done
The string end-of-script is entirely arbitrary—it just needs to be a string that won’t otherwise appear in the input and can be used by the shell to recognize when the here document is finished. By convention, many users specify the end of a here document with the string EOF, or E-O-F, to indicate end of file.
There are advantages and disadvantages to each approach shown. If you want to make a one-time series of edits and don’t mind rewriting the script each time, the here document provides an effective way to do the job.
However, writing the editing commands in a separate file from the shell script is more general. For example, you could establish the convention that you will always put editing commands in a file called exscript. Then, you only need to write the correct script once. You can store it away in your personal “tools” directory (which you’ve added to your search path), and use it whenever you like.
ex Scripts Built by diff
A further example of the use of ex scripts is built into a program we’ve already looked at—diff. The -e option to diff produces an editing script usable with either ed or ex, instead of the usual output. This script consists of a sequence of a (add), c (change), and d (delete) commands necessary to recreate file1 from file2 (the first and second files specified on the diff command line).
Obviously, there is no need to completely recreate the first file from the second, because you could do that easily with cp. However, by editing the script produced by diff, you can come up with some desired combination of the two versions.
It might take you a moment to think of a case in which you might have use for this feature. Consider this one: two people have unknowingly made edits to different copies of a file, and you need the two versions merged. (This can happen especially easily in a networked environment, in which people copy files between machines. Poor coordination can easily result in this kind of problem.)
To make this situation concrete, let’s take a look at two versions of the same paragraph, which we want to combine:
Version 1:

The Book of Kells, now one of the treasures of the Trinity

College Library in Dublin, was found in the ancient

monastery at Ceannanus Mor, now called Kells.  It is a

beautifully illustrated manuscript of the Latin Gospels,

and also contains notes on local history.

It was written in the eighth century.

The manuscript is generally regarded as the finest example

of Celtic illumination.


Version 2:

The Book of Kells was found in the ancient

monastery at Ceannanus Mor, now called Kells.  It is a

beautifully illustrated manuscript of the Latin Gospels,

and also contains notes on local history.

It is believed to have been written in the eighth century.

The manuscript is generally regarded as the finest example

of Celtic illumination.
As you can see, there is one additional phrase in each of the two files. We would like to merge them into one file that incorporates both edits.
Typing:
$ diff -e version1 version2 > exscript
will yield the following output in the file exscript:
6c

It is believed to have been written in the eighth century.

.

1,2c

The Book of Kells was found in the ancient

.
You’ll notice that the script appears in reverse order, with the changes later in the file appearing first. This is essential whenever you’re making changes based on line numbers; otherwise, changes made earlier in the file may change the numbering, rendering the later parts of the script ineffective.
You’ll also notice that, as mentioned, this script will simply recreate version 1, which is not what we want. We want the change to line 5, but not the change to lines 1 and 2. We want to edit the script so that it looks like this:
6c

It is believed to have been written in the eighth century.

.

W
(Notice that we had to add the w command to write the results of the edit back into the file.) Now we can type:
$ ex - version1 < exscript
to get the resulting merged file:
The Book of Kells, now one of the treasures of the Trinity

College Library in Dublin, was found in the ancient

monastery at Ceannanus Mor, now called Kells.  It is a

beautifully illustrated manuscript of the Latin Gospels,

and also contains notes on local history.

It is believed to have been written in the eighth century.

The manuscript is generally regarded as the finest example

of Celtic illumination.
Using diff like this can get confusing, especially when there are many changes. It is very easy to get the direction of changes confused, or to make the wrong edits. Just remember to do the following:
![]() Specify the file that is closest in content to your eventual target as the first file on the
Specify the file that is closest in content to your eventual target as the first file on the diff command line. This will minimize the size of the editing script that is produced.
![]() After you have corrected the editing script so that it makes only the changes that you want, apply it to that same file (the first file).
After you have corrected the editing script so that it makes only the changes that you want, apply it to that same file (the first file).
Nonetheless, because there is so much room for error, it is better not to have your script write the changes back directly into one of your source files. Instead of adding a w command at the end of the script, add the command 1, $p to write the results to standard output. This is almost always preferable when you are using a complex editing script.
If we use this command in the editing script, the command line to actually make the edits would look like this:
$ ex - version1 < exscript > version3
The diff manual page also points out another application of this feature of the program. Often, as a writer, you find yourself making extensive changes, and then wishing you could go back and recover some part of an earlier version. Obviously, frequent backups will help. However, if backup storage space is at a premium, it is possible (though a little awkward) to save only some older version of a file, and then keep incremental diff -e scripts to mark the differences between each successive version.
To apply multiple scripts to a single file, you can simply pipe them to ex rather than redirecting input:
cat script1 script2 script3 | ex - oldfile
But wait! How do you get your w (or 1, $p) command into the pipeline? You could edit the last script to include one of these commands. But, there’s another trick that we ought to look at because it illustrates another useful feature of the shell that many people are unaware of.
If you enclose a semicolon-separated list of commands in parentheses, the standard output of all of the commands are combined, and can be redirected together. The immediate application is that, if you type:
cat script1 script2 script3; echo '1,$p' | ex - oldfile
the results of the cat command will be sent, as usual, to standard output, and only the results of echo will be piped to ex. However, if you type:
(cat script1 script2 script3; echo '1,$p') | ex - oldfile
the output of the entire sequence will make it into the pipeline, which is what we want.
▪ Stream Editing ▪
We haven’t seen the sed program yet. Not only is it a line editor rather than a screen editor, but it takes the process one step further: it is a “noninteractive” line editor. It can only be used with editing scripts. It was developed in 1978 as an extension to ed for three specific cases (according to the original documentation):
![]() to edit files too large for comfortable interactive editing
to edit files too large for comfortable interactive editing
![]() to edit any size file when the sequence of editing commands is too complicated to be comfortably typed in interactive mode
to edit any size file when the sequence of editing commands is too complicated to be comfortably typed in interactive mode
![]() to perform multiple “global” editing functions efficiently in one pass through the input
to perform multiple “global” editing functions efficiently in one pass through the input
All of these are still good reasons for using sed. But these cases can be solved by the scripting ability of ex that we have already looked at. Why learn yet another editor?
One answer lies in the third point. Because it was specifically designed to work with scripts, sed is considerably faster than ex when used with a comparable script.
The other answer lies in sed’s unique capability to be used as an editing filter—a program that makes edits on the fly as data is being passed through a pipe on its way to other programs.
The sed program uses a syntax that is very similar to that used by ex, so it is not very difficult to learn. However, there are some critical differences, which make it inadvisable for an experienced ed or ex user to just blindly jump in.
We’re going to take a close look at sed, not as a general-purpose editor, but as a tool to accomplish specific tasks. As a result, we won’t cover every command, but only those that differ significantly from their ex equivalents or offer specific benefits that we want to utilize.
First, a brief note on usage. The sed command has two forms:
sed -e   command editfiles

sed -f   scriptfile editfiles
The first form, using -e, allows you to specify an editing command right on the command line. Multiple -e options can be specified on the same line.
The second form, using -f, takes the name of a script containing editing commands. We prefer this form for using sed.
In addition, you can specify an entire multiline editing script as an argument to sed, like this:
sed '

      Editing script begins here

             .

             .

             .

      Editing script ends here'    editfiles
This last form is especially useful in shell scripts, as we shall see shortly. However, it can also be used interactively. The Bourne shell will prompt for continuation lines after it sees the first single quotation mark.
You can also combine several commands on the same line, separating them with semicolons:
sed -e 'command1; command2; . . . ' editfiles
One last point: when using sed -e, you should enclose the expression in quotation marks. Although this is not absolutely essential, it can save you from serious trouble later.
Consider the following example:
$ sed -e s/thier/their own/g myfile
The expression s/thier/their own/g will work correctly in a s e d script used with the -f option. But from the command line it will result in the message “Command garbled,” because the shell interprets the space as a separator between arguments, and will parse the command expression as s/thier/their and treat the remainder of the line as two filenames, own/g and myfile. Lacking a closing / for the s command, sed will complain and quit.
Differences between ex and sed
The first difference between sed and interactive line editors like ed and ex is the way lines are addressed. In ex, the default is to affect only a specifically addressed line; therefore, commands like g exist to address multiple lines. The sed program, on the other hand, works by default on all lines, so it needs commands that allow it to bypass selected lines. The sed program is implicitly global. In ex, the default is to edit the current line, and you must explicitly request global edits, or address particular lines that you want to have edited. In sed, the default is to edit every line, and line addresses are used to restrict the operation of the edit.
For example, consider the difference between ex and sed in how they interpret a command of the form:
/pattern/s/oldstring/newstring/
In ex, this means to locate the first line matching pattern and, on that line, perform the specified substitution. In sed, the same command matches every line containing pattern, and makes the specified edits. In other words, this command in sed works the same as ex’s global flag:
g/pattern/s/oldstring/newstring/
In both sed and ex, a command of the form:
/pattern1/,/pattern2/command
means to make the specified edits on all lines between pattern1 and pattern2.
Although you can use absolute line number addresses in sed scripts, you have to remember that sed has the capability to edit multiple files at once in a stream. And in such cases, line numbers are consecutive throughout the entire stream, rather than restarted with each new file.
Besides its addressing peculiarities, you also need to get used to the fact that sed automatically writes to standard output. You don’t need to issue any special commands to make it print the results of its edits; in fact, you need to use a command-line option to make it stop.
To make this point clear, let’s consider the following admittedly artificial example. Your file contains the following three lines:
The files were writeable by thier owner, not by all.

The files were writeable by thier owner, not by all.

The files were writeable by thier owner, not by all.
You use the following editing script (in a file called edscript):
/thier/s//their/

/writeable/s//writable/

1,$p
Here are the very different results with ex and sed:
$ ex - junk < edscript

The files were writeable by their owner, not by all.

The files were writable by thier owner, not by all.

The files were writeable by thier owner, not by all.


$ sed -f edscript junk

The files were writable by their owner, not by all.

The files were writable by their owner, not by all.

The files were writable by their owner, not by all.

The files were writable by their owner, not by all.

The files were writable by their owner, not by all.

The files were writable by their owner, not by all.
The ex command, lacking the g prefix to make the edits global, applies the first line in the script to the first line in the file, and then goes to the second line, to which it applies the second line in the script. No edits are performed on the third line. The contents of the buffer are printed to standard output by the final line in the script. This is analogous to what would happen if you issued the same commands manually in ex.
The sed command, in contrast, applies each line in the script to every line in the file, and then sends the results to standard output. A second copy of the input is printed to standard output by the final line in the script.
Although the same script almost works for ex and sed, the sed script can be written more simply as:
s/thier/their/

s/writeable/writable/
Because edits are applied by default to every line, we can skip the initial pattern address and simply give the s command. And we want to omit the print command, which gave us the annoying second copy of the input.
There are also some special added commands that support sed’s noninteractive operation. We will get to these commands in due course. However, in some ways, the special commands are easier to learn than the familiar ones. The cautionary example shown was intended to underline the fact that there is a potential for confusion when commands that look identical produce very different results.
Some Shell Scripts Using sed
The sed command you are most likely to start with is s (or substitute) because you can put it to work without knowing anything about sed’s advanced control structures. Even if you learn no other sed commands, you should read this section, because this command is easy to learn and will greatly extend your editing power.
Within the constraints just outlined, the s command works similarly to its ex equivalent. Let’s look at several shell scripts that use sed.
First, because speed is definitely a factor when you’re making large edits to a lot of files, we might want to rewrite the correct script shown previously with ex as follows:
for file in $*

do

    sed -f sedscr $file > $file.tmp

    mv $file.tmp $file

done
This script will always look for a local editing script called sedscr, and will apply its edits to each file in the argument list given to correct. Because sed sends the result of its work to standard output, we capture that output in a temporary file, then move it back to the original file.
As it turns out, there is a real danger in this approach! If there is an error in the sed script, sed will abort without producing any output. As a result, the temporary file will be empty and, when copied back onto the original file, will effectively delete the original.
To avoid this problem, we need to include a test in the correct shell script:
for file in $ *

do

   sed -f sedscr $file > $file.tmp

   if [ -s $file.tmp ]

   then

      mv $file.tmp $file

   else

      echo "Sed produced an empty file."

   fi

done
The [-s] test checks to see whether or not a file is empty—a very useful thing indeed when you are using editing scripts.
You might want to create another simple shell script that uses sed to correct simple errors. We'll call this one change:
sed -e "s/$1/$2/g" $3 > $3.tmp

if [ -s $3.tmp ]

then

    mv $3.tmp $3

else

    echo "Possible error using regular expression syntax."
This script will simply change the first argument to the second in the file specified by the third argument:
$ change mispeling misspelling myfile
(Because we control the actual editing script, the most likely errors could come from faulty regular expression syntax in one of the first two arguments; thus, we changed the wording of the error message.)
Integrating sed into format
Let’s consider a brief application that shows sed in its role as a true stream editor, making edits in a pipeline—edits that are never written back into a file.
To set the stage for this script, we need to turn back briefly to typesetting. On a typewriter-like device (including a CRT), an em dash is typically typed as a pair of hyphens (--). In typesetting, it is printed as a single, long dash (—). The troff program provides a special character name for the em dash, but it is inconvenient to type \ (em in your file whenever you want an em dash.
Suppose we create a sed script like this:
s/--/\\(em/g
and incorporate it directly into our format script? We would never need to worry about em dashes—sed would automatically insert them for us. (Note that we need to double the backslash in the string \ (em because the backslash has meaning to sed as well at to troff, and will be stripped off by sed.)
The format script might now look like this:
eqn="";pic="";macros="ms";col="";roff="ditroff -Tlj"

sed="| sed -e ' s/--/\\(em/g'"

while [ $# -gt 0 ]

do

   case $1 in

     -E) eqn="| eqn";;

     -P) pic="| pic";;

     -N) roff="nroff";col="| col";sed="";;

     -*) options="$options $1";;

      *) if [ -f $1 ]; then

         files="$files $1"

         else echo "format: $1: file not found"; exit

         fi;;

   esac

   shift

done

eval "cat $files $sed|tbl $eqn $pic|$roff $options $col | lp"
(Notice that we’ve set up the -N option for nroff so that it sets the sed variable to null, because we only want to make this change if we are using troff.)
Excluding Lines from Editing
Before we go any further, let’s take a moment to be sure the script is complete.
What about the case in which someone is using hyphens to draw a horizontal line? We want to exclude from the edit any lines containing three or more hyphens together. To do this, we use the ! (don't!) command:
/---/!s/--/\(em/g
It may take a moment to understand this syntax. It says, simply, “If you find a line containing three hyphens together, don’t make the edit.” The sed program will treat all other lines as fair game. (It’s important to realize that the ! command applies to the pattern match, not to the s command itself. Although, in this case, the effect might seem to be the same whether you read the command as “Don’t match a line containing ---” or “Match a line containing ---, and don’t substitute it,” there are other cases in which it will be very confusing if you don’t read the line the same way that sed does.)
We might also take the opportunity to improve the aesthetics even further, by putting in a very small space between the ends of the dash and the preceding and following words, using the troff construct \^, which produces a 1/12-em space:
/---/!s/--/\\^\\(em\\^/g
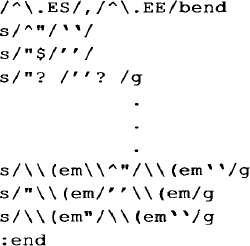
As it turns out, changing hyphens to em dashes is not the only “prettying up” edit we might want to make when typesetting. For example, some laser printers do not have a true typeset quotation mark (“ and ” as opposed to “ and ”). If you are using an output device with this limitation, you could use sed to change each double quotation mark character to a pair of single open or close quotation marks (depending on context), which, when typeset, will produce the appearance of a proper double quotation mark.
This is a considerably more difficult edit to make because there are many separate cases that we need to account for using regular expression syntax. Our script might need to look like this:
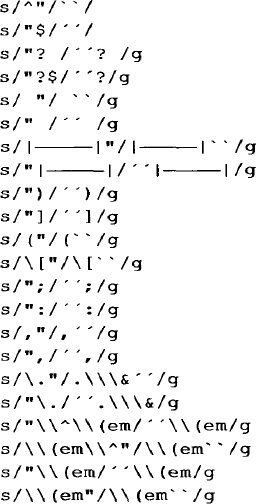
(This list could be shortened by judicious application of \ ( [ . . . ] \ ) regular expression syntax, but it is shown in its long form for effect. Note that the symbol ![]() represents a tab.)
represents a tab.)
Branching to Selective Parts of a Script
In technical books like this, it is usually desirable to show examples in a constant-width font that clearly shows each character as it actually appears. A pair of single quotation marks in a constant-width font will not appear at all similar to a proper typeset double quotation mark in a variable-width font. In short, it is not always desirable to make the substitutions shown previously.
However, we can assume that examples will be set off by some sort of macro pair (in this book, we used .ES and .EE, for example start and example end), and we can use those as the basis for exclusion. There are two ways to do this:
![]() Use the ! command, as we did before.
Use the ! command, as we did before.
![]() Use the
Use the b (brunch) command to skip portions of the editing script.
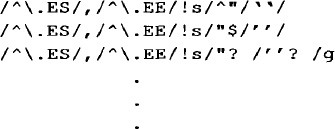
Let’s look at how we’d use the ! command first.
We could apply the ! command to each individual line:
But there has to be a better way, and there is. The sed program supports the flow control symbols { and } for grouping commands. So we simply need to write:
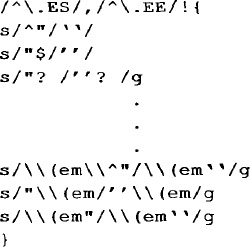
All commands enclosed in braces will be subject to the initial pattern address.
There is another way we can do the same thing. The sed program’s b (brunch) command allows you to transfer control to another line in the script that is marked with an optional label. Using this feature, we could write the previous script like this:
A label consists of a colon, followed by up to eight characters. If the label is missing, the b command branches to the end of the script. (Because we don’t have anything past this point at the moment, we don’t actually need the label in this case. That is the form we will use from now on.)
The b command is designed for flow control within the script. It allows you to create subscripts that will only be applied to lines matching certain patterns and will not be applied elsewhere. However, as in this case, it also gives you a powerful way to exempt part of the text from the action of a single-level script.
The advantage of b over ! for our application is that we can more easily specify multiple conditions to avoid. The ! symbol can apply to a single command, or can apply to a set of commands enclosed in braces that immediately follows. The b command, on the other hand, gives you almost unlimited control over movement around the script.
For example, if we are using multiple macro packages, there may be other macro pairs besides .ES and .EE that enclose text that we don’t want to apply the sed script to. So, for example, we can write:
/^.ES/,/^.EE/b

/^.PS/,/^.PE/b

/^.G1/,/^.G2/b
In addition, the quotation mark is used as part of troff’s own comment syntax (\" begins a comment), so we don’t want to change quotation marks on lines beginning with either a or a :
/^[.']/b
It may be a little difficult to grasp how these branches work unless you keep in mind how sed does its work:
1. It reads each line in the file into its buffer one line at a time.
2. It then applies all commands in the script to that one line, then goes to the next line.
When a branch dependent on a pattern match is encountered, it means that if a line that matches the pattern is read into the buffer, the branch command will cause the relevant portion of the script to be skipped for that line. If a label is used, the script will continue at the label; if no label is used, the script is effectively finished for that line. The next line is read into the buffer, and the script starts over.
The previous example shows how to exempt a small, clearly delineated portion of a file from the action of a sed script. To achieve the opposite effect—that is, to make a sed script affect only a small part of a file and ignore the rest—we can simply anchor the desired edits to the enclosing pattern.
For example, if there were some edits we wanted to make only within the confines of our .ES and .EE macros, and not elsewhere, we could do it like this:
\^/.ES/./^\.EE/{

Editing commands here

}
If the script is sufficiently complex that you’d rather have a more global method of exclusion, you can reverse the sense of a branch by combining it with ! :
/^\.ES/,/^\.EE/!b
When the first line in the script is applied to each line in the input, it says: “Does the line match the pattern? No? Branch to the end of the script. (That is, start over on the next line of the input.) Yes? Go on to the next line in the script, and make the edits.”
Back to format
The edits we’ve shown using sed are very useful, so we want to be sure to properly integrate them with format. Because we are now making a large series of edits rather than just one, we need to use sed with a script file rather than a single-line script using -e. As a result, we’ll change the variable assignment in format to:
sed="| sed -f /usr/local/cleanup.sed"
where cleanup.sed is the name of the script containing the editing commands, and /usr/local could be any generally accessible directory. We’ll add additional formatting cleanup commands to this file later.
Inserting Lines of Text
The sed program, like ex and vi, has commands for inserting new lines of text. The i (insert) command adds text before the current line; a (append) adds text after the current line. In ex, after you enter insert mode, you can type as long as you like, breaking lines with carriage returns.* Insert mode is terminated by typing a period at the start of a line, followed immediately by a carriage return. In sed, you must instead type a backslash at the end of each inserted line. Insert mode is terminated by the first newline that is not “escaped” with a backslash in this way. For example, the sed script:
la\

The backslash is a ubiquitous escape character used by\

many UNIX programs. Perhaps its most confusing appearance\

is at the end of a line, when it is used to "hide a\

newline." It appears t o stand alone, when in fact it is\

followed by a nonprinting character-a newline.
__________
*The terms “carriage return” and “newline” are used somewhat loosely here. They are actually distinct characters in the ASCII character set—equivalent to ^M (carriage return) and ^J (linefeed). The confusion arises because UNIX changes the carriage return (^M) generated by the carriage return key to a linefeed (^J) on input. (That is, when you type a carriage return when editing a file, what is actually stored is a linefeed.) On output, the linefeed is mapped to both characters—that is, a ^J in a file actually is output to the terminal as a carriage return/linefeed pair (^M^J).
will append the five lines shown in the example following line 1 in the file to which the sed script is applied. The insert ends on the fifth line, when sed encounters a new-line that is not preceded by a backslash.
A sed Script for Extracting Information from a File
The -n option to sed suppresses normal output and causes sed to print only the output you explicitly ask for using the p command.
There are two forms of the p command:
![]() As an absolute print command. For example:
As an absolute print command. For example:
/pattern/p
will always print the line(s) matched by pattern.
![]() In combination with a substitute command, in which case the line will only be printed if a substitution is actually made. For example:
In combination with a substitute command, in which case the line will only be printed if a substitution is actually made. For example:
/pattern/s/oldstring/newstring/gp
will not be printed if a line containing pattern is found but oldstring was not replaced with newstring.
This becomes much clearer if you realize that a line of the form:
s/oldstring/newstring/p
is unrestricted—it matches every line in the file—but you only want to print the result of successful substitutions.
Using sed -n with the p command gives you a grep-like facility with the ability to select not just single lines but larger blocks of text.
For example, you could create a simple online quick-reference document, in which topics are delineated by an initial heading and a distinct terminating string, as in the following abbreviated example:
$ cat alcuin_online

      .

      .

      .

Output Devices


Alcuin requires the use of a graphics device with at least

300 dpi resolution, and the ability to store at least

one-half page of graphics at that resolution ...

%%%%

      .

      .

      .

Type Styles
There are a number of ornamental type styles available on

many typesetters. For example, many have an Old English

font. But no typesetter currently on the market has the

capability of Alcuin to create unique characters in the

style of medieval illuminated manuscripts.

%%%%

      .

      .

      .

$
A shell program like the following is all you need to display entries from this “full text database”:
pattern=$*

sed -n "/$pattern/,/%%%%/p" alcuin_online
(The entire argument list supplied to the command ($*) is assigned to the variable pattern, so that the user can type a string including spaces without having to type quotation marks.)
We’ll give an example that is perhaps a bit more realistic. Consider that when you are developing macros for use with an existing package, you may often need to consult macros in the package you are either using or worried about affecting. Of course, you can simply read in the entire file with the editor. However, to make things easier, you can use a simple shell script that uses sed to print out the definition of the desired macro. We use a version of this script on our own system, where we call it getmac:
mac="$2"

case $1 in

  -ms) file="/usr/lib/macros/tmac.s";;

  -mm) file="/usr/lib/macros/mmt";;

  -man) file="/usr/lib/macros/an";;

esac

sed -n -e "/^\.de *$mac/,/^\.\.$/p" $file

done
There are a couple of things about this script that bear mention. First, the name of a macro does not need to be separated from the de request by a space. The ms package uses a space, but mm and man do not. This is the reason the search pattern includes a space followed by an asterisk (this pattern matches zero or more spaces).
Second, we use the -n option of sed to keep it from printing out the entire file. It will now print out only the lines that match: the lines from the start of the specified macro definition (.de *$mac) to the .. that ends the definition.
(If you are new to regular expressions, it may be a little difficult to separate the regular expression syntax from troff and shell special characters, but do make the effort, because this is a good application of sed and you should add it to your repertoire.)
The script prints the result on standard output, but it can easily be redirected into a file, where it can become the basis for your own redefinition. We’ll find good use for this script in later chapters.
Yet another example of how we can use sed to extract (and manipulate) information from a file is provided by the following script, which we use to check the structure of documents we are writing.
The script assumes that troff macros (in this case, the macros used to format this book) are used to delineate sections, and prints out the headings. To make the structure more apparent, the script removes the section macros themselves, and prints the headings in an indented outline format.
There are three things that sed must accomplish:
1. Find lines that begin with the macro for chapter (.CH) or section headings (.H1 or .H2).
2. Make substitutions on those lines, replacing macros with text.
3. Print only those lines.
The sed command, do. outline, operates on all files specified on the command line ($*). It prints the result to standard output (without making any changes within the files themselves).
sed -n '/^\.[CH][H12]/ {

     s/"//g

     s/^\.CH /\

CHAPTER  /

     s/^\.H1/    A. /

     s/^\.H2/         B. /

     p

}' $*
The sed command is invoked with the -n option, which suppresses the automatic printing of lines. Then we specify a pattern that selects the lines we want to operate on, followed by an opening brace ({). This signifies that the group of commands up to the closing brace (}) are applied only to lines matching the pattern. This construct isn’t as unfamiliar as it may look. The global regular expression of ex could work here if we only wanted to make one substitution (g/^\.[CH] [H12]/s/"//g). The sed command performs several operations:
1. It removes double quotation marks.
2. It replaces the macro for chapter headings with a newline (to create a blank line) followed by the word CHAPTER.
3. It replaces the section heading with an appropriate letter and tabbed indent.
4. It prints the line.
The result of do.outline is as follows:
$ do.outline ch13/sect1

CHAPTER  13 Let the Computer Do the Dirty Work

     A.  Shell Programming

          B.  Stored Commands

          B.  Passing Arguments to Shell Scripts

          B.  Conditional Execution

          B.  Discarding Used Arguments

          B.  Repetitive Execution

          B.  Setting Default Values

          B.  What We've Accomplished
Because the command can be run on a series of files or “chapters,” an outline for an entire book can be produced in a matter of seconds. We could easily adapt this script for ms or mm section heading macros, or to include a C-level heading.
The Quit Command
The q command causes sed to stop reading new input lines (and to stop sending them to the output). So, for example, if you only want some initial portion of your file to be edited, you can select a pattern that uniquely matches the last line you want affected, and include the following command as the last line of your script:
/pattern/q
After the line matching pattern is reached, the script will be terminated.*
This command is not really useful for protecting portions of a file. But, when used with a complex sed script, it is useful for improving the performance of the script. Even though sed is quite fast, in an application like getmac there is some inefficiency in continuing to scan through a large file after sed has found what it is looking for.
So, for example, we could rewrite getmac as follows:
mac="$2

case $1 in

  -ms) file="/usr/lib/macros/tmac.s";;

  -mm) file="/usr/lib/macros/mmt";;

  -man) file="/usr/lib/macros/an";;

esac

shift

sed -n "

/^\.de *$mac/,/^\.\./{
__________
*You need to be very careful not to use q in any program that writes its edits back to the original file (like our correct shell script shown previously). After q is executed, no further output is produced. It should not be used in any case where you want to edit the front of the file and pass the remainder through unchanged. Using q in this case is a very dangerous beginner’s mistake.
The grouping of commands keeps the line:
/^\.\./q
from being executed until sed reaches the end of the macro we’re looking for. (This line by itself would terminate the script at the conclusion of the first macro definition.) The sed program quits on the spot, and doesn’t continue through the rest of the file looking for other possible matches.
Because the macro definition files are not that long, and the script itself not that complex, the actual time saved from this version of the script is negligible. However, with a very large file, or a complex, multiline script that needs to be applied to only a small part of the file, this script could be a significant timesaver.
For example, the following simple shell program uses sed to print out the top ten lines of a file (much like the standard UNIX head program):
for file

do

sed 10q $file

done
This example shows a dramatic performance gain over the same script written as follows:
for file

do

sed -n 1, 10p $file

done
Matching Patterns across Two Lines
One of the great weaknesses of line-oriented editors is their helplessness in the face of global changes in which the pattern to be affected crosses more than one line.
Let me give you an example from a recent manual one of our writers was working on. He was using the ms .BX macro (incorrectly, it turns out) to box the first letter in a menu item, thus graphically highlighting the sequence of menu selections a user would select to reach a given command. For example:
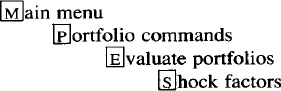
He had created a menu reference divided into numerous files, with hundreds of commands coded like this:
.in 5n

.BX "\s-2M\s0"\c

ain menu

.in +5n

.BX "\s-2P\s0"\c

ortfolio commands

.in +5n

.BX "\s-2E\s0"\c

valuate portfolios

.in +5n

.BX "\s-2S\s0\c

hock factors

.in 0
Suddenly, the writer realized that the M in Main Menu should not be boxed because the user did not need to press this key. He needed a way to remove the box around the M if—and only if—the next line contained the string ain menu.
(A troff aside: The \c escape sequence brings text from the following line onto the current line. You would use this, for example, when you don’t want the argument to a macro to be separated from the first word on the next line by the space that would normally be introduced by the process of filling. The fact that the .BX macro already makes provision for this case, and allows you to supply continued text in a second optional argument, is somewhat irrelevant to this example. The files had been coded as shown here, the mistake had been made, and there were hundreds, perhaps thousands, of instances to correct.)
The N command allows you to deal with this kind of problem using sed. This command temporarily “joins” the current line with the next for purposes of a pattern match. The position of the newline in the combined line can be indicated by the escape sequence \n. In this case, then, we could solve the problem with the following two-line sed script:
/.BX "\s-2M\s0"/N

s/.BX "\s-2M\s0"\c\nain Menu/Main Menu/
We search for a particular pattern and, after we find it, “add on” the next line using N. The next substitution will now apply to the combined line.
Useful as this solution was, the number of cases in which you know exactly where in the input a newline will fall are limited. Fortunately, sed goes even further, providing commands that allow you to manipulate multiline patterns in which the new-line may occur at any point. Let’s take a look at these commands.
The Hold Space and the Pattern Space
The next set of commands—hold (h or H), get (g or G), and exchange (x)—can be difficult to understand, especially if you have read the obscure documentation provided with most UNIX systems. It may help to provide an analogy that reviews some of the points we’ve already made about how sed works.
The operations of sed can be explained, somewhat fancifully, in terms of an extremely deliberate scrivener or amanuensis toiling to make a copy of a manuscript. His work is bound by several spacial restrictions: the original manuscript is displayed in one room; the set of instructions for copying the manuscript are stored in a middle room; and the quill, ink, and folio are set up in yet another room. The original manuscript as well as the set of instructions are written in stone and cannot be moved about. The dutiful scrivener, being sounder of body than mind, is able to make a copy by going from room to room, working on only one line at a time. Entering the room where the original manuscript is, he removes from his robes a scrap of paper to take down the first line of the manuscript. Then he moves to the room containing the list of editing instructions. He reads each instruction to see if it applies to the single line he has scribbled down.
Each instruction, written in special notation, consists of two parts: a pattern and a procedure. The scrivener reads the first instruction and checks the pattern against his line. If there is no match, he doesn’t have to worry about the procedure, so he goes to the next instruction. If he finds a match, then the scrivener follows the action or actions specified in the procedure.
He makes the edit on his piece of paper before trying to match the pattern in the next instruction. Remember, the scrivener has to read through a series of instructions, and he reads all of them, not just the first instruction that matches the pattern. Because he makes his edits as he goes, he is always trying to match the latest version against the next pattern; he doesn’t remember the original line.
When he gets to the bottom of the list of instructions, and has made any edits that were necessary on his piece of paper, he goes into the next room to copy out the line. (He doesn’t need to be told to print out the line.) After that is done, he returns to the first room and takes down the next line on a new scrap of paper. When he goes to the second room, once again he reads every instruction from first to last before leaving.
This is what he normally does, that is, unless he is told otherwise. For instance, before he starts, he can be told not to write out every line (the -n option). In this case, he must wait for an instruction that tells him to print (p). If he does not get that instruction, he throws away his piece of paper and starts over. By the way, regardless of whether or not he is told to write out the line, he always gets to the last instruction on the list.
Let’s look at other kinds of instructions the scrivener has to interpret. First of all, an instruction can have zero, one, or two patterns specified:
![]() If no pattern is specified, then the same procedure is followed for each line.
If no pattern is specified, then the same procedure is followed for each line.
![]() If there is only one pattern, he will follow the procedure for any line matching the pattern.
If there is only one pattern, he will follow the procedure for any line matching the pattern.
![]() If a pattern is followed by a !, then the procedure is followed for all lines that do not match the pattern.
If a pattern is followed by a !, then the procedure is followed for all lines that do not match the pattern.
![]() If two patterns are specified, the actions described in the procedure are performed on the first matching line and all succeeding lines until a line matches the second pattern.
If two patterns are specified, the actions described in the procedure are performed on the first matching line and all succeeding lines until a line matches the second pattern.
The scrivener can work only one line at a time, so you might wonder how he handles a range of lines. Each time he goes through the instructions, he only tries to match the first of two patterns. Now, after he has found a line that matches the first pattern, each time through with a new line he tries to match the second pattern. He interprets the second pattern as pattern !, so that the procedure is followed only if there is no match. When the second pattern is matched, he starts looking again for the first pattern.
Each procedure contains one or more commands or actions. Remember, if a pattern is specified with a procedure, the pattern must be matched before the procedure is executed. We have already shown many of the usual commands that are similar to other editing commands. However, there are several highly unusual commands.
For instance, the N command tells the scrivener to go, right now, and get another line, adding it to the same piece of paper. The scrivener can be instructed to “hold” onto a single piece of scrap paper. The h command tells him to make a copy of the line on another piece of paper and put it in his pocket. The x command tells him to exchange the extra piece of paper in his pocket with the one in his hand. The g command tells him to throw out the paper in his hand and replace it with the one in his pocket. The G command tells him to append the line he is holding to the paper in front of him. If he encounters a d command, he throws out the scrap of paper and begins again at the top of the list of instructions. A D command has effect when he has been instructed to append two lines on his piece of paper. The D command tells him to delete the first of those lines.
If you want the analogy converted back to computers, the first and last rooms in this medieval manor are standard input and standard output. Thus, the original file is never changed. The line on the scrivener’s piece of scrap paper is in the pattern space; the line on the piece of paper that he holds in his pocket is in the hold space. The hold space allows you to retain a duplicate of a line while you change the original in the pattern space. Let’s look at a practical application, a sed program that searches for a particular phrase that might be split across two lines.
As powerful as regular expressions are, there is a limitation: a phrase split across two lines will not be matched. As we’ve shown, even though you can specify a new-line, you have to know between which two words the newline might be found. Using sed, we can write instructions for general-purpose pattern matching across two lines.
N

h

s/ *\n/ /

/pattern-matching syntax/{

g

p

d

}

g

D
This sed script will recognize the phrase pattern-matching syntax even when it’s in the input file on two lines. Let’s see how the pattern space and hold space allow this to be done.
At the start, there is one line in the pattern space. The first action (N) is to get another line and append it to the first. This gives us two lines to examine, but there is an embedded newline that we have to remove (otherwise we’d have to know where the newline would fall in the pattern). Before that, we copy (h) the contents of the pattern space into the hold space so that we can have a copy that retains the newline. Then we replace the embedded newline (\n), and any blank spaces that might precede it, with a single blank. (The sed command does not remove a newline when it terminates the line in the pattern space.) Now we try to match the phrase against the contents of the pattern space. If there is a match, the duplicate copy that still contains the newline is retrieved from the hold space (g) and printed (p). The d command sends control back to the top of the list of instructions so that another line is read into the pattern space, because no further editing is attempted “on the corpse of a deleted line” (to use the phrasing of the original sed documentation). If, on the other hand, there is no match, then the contents of the hold buffer are replaced (g) with the contents of the pattern space. Now we have our original two lines in the pattern space, separated by a newline. We want to discard the first of these lines, and retain the second in order to pair it up with the next line. The D command deletes the pattern space up to the newline and sends us back to the top to append the next line.
This script demonstrates the limits of flow control in sed. After the first line of input is read, the action N is responsible for all input. And, using d and D to avoid ever reaching the bottom of the instruction list, sed does not print the line automatically or clear the pattern space (regardless of the -n option). To return to our analogy, after the scrivener enters the second room, an instruction is always telling him which room to go to next and whether to get another line or to write it out, for as long as there are lines to be read from the manuscript.
As we have emphasized, you can always refine a script, perfecting the way it behaves or adding features. There are three problems with the way this script works. First and most important, it is not general enough because it has been set up to search for a specific string. Building a shell script around this sed program will take care of that. Second, the program does not “go with the flow” of sed. We can rewrite it, using the b (branch) command, to make use of sed’s default action when it reaches the bottom of its instruction list. Last, this program always prints matching lines in pairs, even when the search string is found in its entirety on a single line of input. We need to match the pattern before each new line of input is paired with the previous line.
Here’s a generalized version of this sed script, called phrase, which allows you to specify the search string as a quoted first argument. Additional command-line arguments represent filenames.
search=$1

shift

for file

do

     sed '

     /'"$search"'/b

     N

     h

     s/.*\n//

     /'"$search"' /b

     g

     s/ *\n/ /

     /'"$search"' / {

     g

     b

     }

     g

     D' $file

done
A shell variable defines the search string as the first argument on the command line. Now the sed program tries to match the search string at three different points. If the search string is found in a new line read from standard input, that line is printed. We use the b command to drop to the bottom of the list; sed prints the line and clears the pattern space. If the single line does not contain the pattern, the next input line is appended to the pattern space. Now it is possible that this line, by itself, matches the search string. We test this (after copying the pattern space to the hold space) by removing the previous line up to the embedded newline. If we find a match, control drops to the bottom of the list and the line is printed. If no match is made, then we get a copy of the duplicate that was put in the hold space. Now, just as in the earlier version, we remove the embedded newline and test for the pattern. If the match is made, we want to print the pair of lines. So we get another copy of the duplicate because it has the newline, and control passes to the bottom of the script. If no match is found, we also retrieve the duplicate and remove the first portion of it. The delete action causes control to be passed back to the top, where the N command causes the next line to be appended to the previous line.
Here’s the result when the program is run on this section:
$ phrase "the procedure is followed" sect3

If a pattern is followed by a  \f(CW!\fP, then the procedure

is followed for all lines that do \fInot\fP match the

so that the procedure is followed only if there is
In Conclusion
The examples given here only begin to touch on the power of sed’s advanced commands. For example, a variant of the hold command (H) appends matched lines to the hold space, rather than overwriting the initial contents of the hold space. Likewise, the G variant of the get command appends the contents of the hold space to the current line, instead of replacing it. The X command swaps the contents of the pattern space with the contents of the hold space. As you can imagine, these commands give you a great deal of power to make complex edits.
However, it’s important to remember that you don’t need to understand everything about sed to use it. As we’ve shown, it is a versatile editor, fast enough to recommend to beginners for making simple global edits to a large set of files, yet complex enough to tackle tasks that you’d never think to accomplish with an editor.
Although the syntax is convoluted even for experienced computer users, sed does have flow control mechanisms that, given some thought and experimentation, allow you to devise editing programs. It is easy to imagine (though more difficult to execute) a sed script that contains editing “subroutines,” branched to by label, that perform different actions on parts of a file and quit when some condition has been met.
Few of us will go that far, but it is important to understand the scope of the tool. You never know when, faced with some thorny task that would take endless repetitive hours to accomplish, you’ll find yourself saying: “Wait! I bet I could do that with
sed.”*
▪ A Proofreading Tool You Can Build ▪
Now let’s look at a more complex script that makes minimal use of sed but extensive use of shell programming. It is the first example of a full-fledged tool built with the shell that offers significantly greater functionality than any of the individual tools that make it up.
We call this script proof. It uses spell to check for misspelled words in a file, shows the offending lines in context, and then uses sed to make the corrections. Because many documents contain technical terms, proper names, and so on that will be flagged as errors, the script also creates and maintains a local dictionary file of exceptions that should not be flagged as spelling errors.
This script was originally published with the name spellproofer in Rebecca Thomas’s column in the June 1985 issue of UNIX World, to which it was submitted by Mike Elola. The script as originally published contained several errors, for which we submitted corrections. The following script, which incorporates those corrections, was published in the January 1986 issue, and is reprinted with permission of UNIX World. (Actually, we’ve added a few further refinements since then, so the script is not exactly as published.)
Because the contents of the script will become clearer after you see it in action, let’s work backward this time, and show you the results of the script before we look at what it contains. The following example shows a sample run on an early draft of Chapter 2. In this example, <CR> indicates that the user has typed a carriage return in response to a prompt.
$ proof sect1

Do you want to use a local dictionary? If so, enter

the name or press RETURN for the default dictionary: <CR>


Using local dictionary file dict

working ...
__________
*The preceding sections have not covered all sed commands. See Appendix A for a complete list of sed commands.
The word Calisthentics appears to be misspelled.

Do you want to see it in context (y or n)?

n


Press RETURN for no change or replace "Calisthentics" with:

Calisthenics


.H1 "UNIX Calisthenics"

Save corrections in "sect1" file (y or n)?

y


The word metachacters appears to be misspelled.

Do you want to see it in context (y or n)?

n


Press RETURN for no change or replace "metachacters" with:

metacharacters


generation metacharacters.  The asterisk matches any or all

Save corrections in "sect1" file (y or n)?

y


The word textp appears to be misspelled.

Do you want to see it in context (y or n)?

y

a directory "/work/textp" and under that directories for

each of the chapters in the book, "/work/textp/ch01",

$ cp notes /work/textp/ch01

name in the directory /work/textp/ch01.

$ ls /work/textp/ch*

$ ls /work/textp/ch01/sect?

cwd   /work/textp/ch03

$ book="/work/textp"

/work/textp


Press RETURN for no change or replace 'textp' with: <CR>


You left the following words unchanged

textp


Do you wish to have any of the above words entered

into a local dictionary file (y/n)?

y

Append to dict (y/n)?

y

Do you wish to be selective (y/n)?

y

Include textp (y/n) ?

y


Done.

$
Now let’s look at the script. Because it is more complex than anything we have looked at so far, we have printed line numbers in the margin. These numbers are not part of the script but are used as a reference in the commentary that follows. You will find that the indentation of nested loops and so forth will make the program much easier to read.
 1     echo "Do you want to use a local dictionary? If so, enter"

 2     echo "the name or press RETURN for the default dictionary: "

 3     read localfile

 4     if [ -z "$localfile" ]; then

 5       localfile=dict

 6       echo Using local dictionary file $localfile

 7     fi

 8     echo "working ..."

 9     touch $localfile

10     filelist="$*"; excused=""

11     if [ -z "$filelist" ]; then

12       echo 'Usage: proof file...'

13       exit 1

14     fi

15     for word in 'spell $filelist'

16     do

17       found='grep "^$word$" $localfile

18       if [ -z "$found" ] ; then

19         echo

20         echo "The word $word appears to be misspelled."

21         echo "Do you want to see it in context (y or n)? "

22         read context

23         if [ "$context" = y ]; then

24           grep $word $filelist

25         fi

26         echo

27         echo "Press RETURN for no change or replace \"$word\" with:"

28         read correction

29         if [ -n "$correction" ]; then

30            hitlist="'grep -1 $word $filelist'"

31            for file in $hitlist

32            do

33              echo

34            sed -n -e "s/$word/$correction/gp" <$file

35            echo "Save corrections in \"$file\" file (y or n)? "

36            read response

37            if [ "$response" = y ]; then

38              sed -e "s/$word/$correction/g" <$file>/usr/tmp/$file

39              if test -s /usr/tmp/$file; then

40               mv /usr/tmp/$file $file

41              fi

42            fi

43          done

44       else

45          excused="$excused $word"

46       fi

47     fi

48   done

49   echo;echo;echo

50   if [ -n "$excused" ]; then

51     echo "You left the following words unchanged"

52     echo $excused | tr "\ " r,\012" | pr -5 -t

53     echo

54     echo "Do you wish to have any of the above words entered"

55     echo "into a local dictionary file (y/n)? "

56     read response

57     if [ "$response" = "y" ]; then

58       if [ -n "$localfile" ]; then

59          echo "Append to $localfile (y/n)? "

60          read response

61          if [ "$response" != y ]; then

62          echo "Enter new/alternate local dictionary file: "

63          read localfile

64          fi

65       fi

66       echo

67       echo "Do you wish to be selective (y/n)? "

68       read select

69       for word in $excused

70       do

71         if [ "$select" = y ]; then

72           echo "Include $word (y/n)? "

73           read response

74           if test "$response" = y; then

75              echo $word >>$localfile

76           fi

77         else

78       echo $word >>$localfile

79     fi

80       done

81     fi

82   fi

83   echo

84   echo "Done."
Get UNIX° TEXT PROCESSING now with the O’Reilly learning platform.
O’Reilly members experience books, live events, courses curated by job role, and more from O’Reilly and nearly 200 top publishers.

