
572 WebSphere Information Integrator Q Replication: Fast Track Implementation Scenarios
/usr/mqm/samp/bin/amqsget PEER2_ADMINQ QM_PEER2
Sample AMQSGET0 start
message <This is a test message to a remote queue>
no more messages
Sample AMQSGET0 end
6.5.6 Step 6: Configure and activate Q replication using GUI
In this section we document the step-by-step configuration of Q replication for the
peer-to-peer replication topology in our fictitious company. Figure 6-4 expands
“STEP 6: Configure & activate Q replication (GUI or commands)” into a number
of substeps involved in configuring Q replication. Each of these substeps is
described in detail in the following subsections.
Note: The Model Queues (IBMQREP.SPILL.MODELQ) cannot be
tested—they are only models from which queues are dynamically created
during a load operation.
Attention: Ensure that one “gets” all the messages that one “puts”. Do not
leave test messages in the queues prior to configuring Q replication.
Very important: The Replication Center is typically used to configure and
manage an SQL or Q Replication environment because of its ease-of-use GUI
interface. In order for a Replication Center client to be aware of the database
servers that need to be defined as a first and second server in Figure 6-30 on
page 599 in a replication environment, the Q Capture and Q Apply control
tables
must be created from the same Replication Center client. If the Q
Capture and Q Apply control tables are created by ASNCLP scripts, or using
another Replication Center client, then those database servers will not appear
in the list of available servers for the first and second server selection. In such
cases, you must catalog them in this Replication Center client using the
process described in Appendix H, “Cataloging remote database servers” on
page 881.

Chapter 6. Peer-to-peer Q replication on AIX platforms 573
Figure 6-4 Overview of Q replication configuration steps
Step 6a: Launch Replication Center
Figure 6-5 shows the launching of the Replication Center from the DB2 Control
Center by clicking the Tools tab and selecting Replication Center. This displays
the Replication Center Launchpad screen shown in Figure 6-6.
STEP 6b: Specify Q Capture server details & create control tables at this server
STEP 6a: Launch Replication Center and Replication Center Launchpad
STEP 6c:
Specify WebSphere MQ objects to be used by this server
STEP 6i: Perform manual load if appropriate
STEP 6d: Repeat steps 6b through 6c for the second server
STEP 6e:
Create Q Subscriptions and replication queue maps (if required)
STEP 6f: Start the Q Capture on both the first and second servers
STEP 6g:
Start the Q Apply on both the first and second servers
STEP 6h:
Verify status of Q Capture and Q Apply processes

574 WebSphere Information Integrator Q Replication: Fast Track Implementation Scenarios
Figure 6-5 Launch Replication Center

Chapter 6. Peer-to-peer Q replication on AIX platforms 575
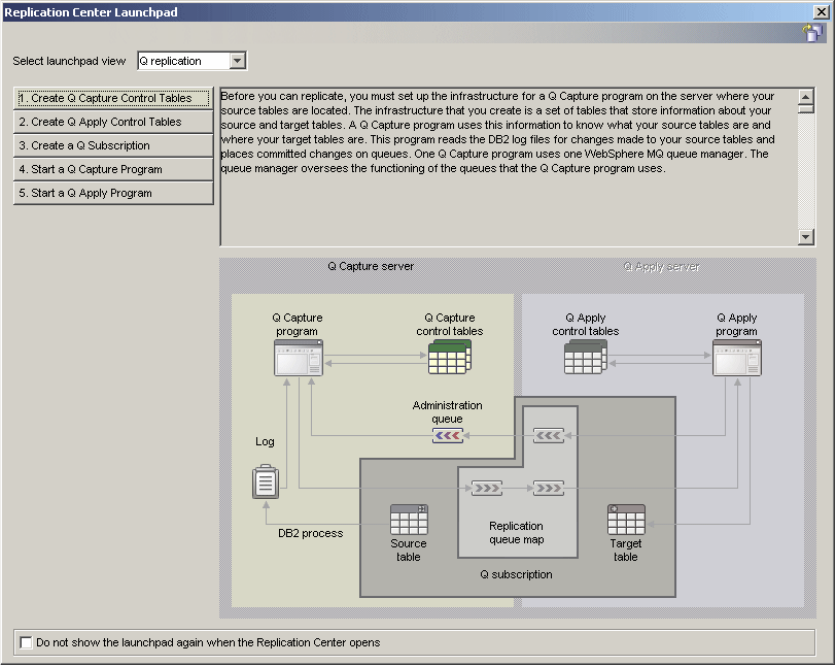
Figure 6-6 Replication Center Launchpad
STEP 6b: Specify Q Capture details
Click Q replication in Figure 6-6 to display Figure 6-7, which describes the five
steps in setting up and activating Q replication, as follows:
1. Create Q Capture control tables.
2. Create Q Apply control tables.
3. Create a Q Subscription.
4. Start a Q Capture program.
5. Start a Q Apply program.
Note: Figure 6-6 can be skipped in the future by selecting the Do not show
this launchpad again when the Replication Center opens option.
Get WebSphere Information Integrator Q Replication: Fast Track Implementation Scenarios now with the O’Reilly learning platform.
O’Reilly members experience books, live events, courses curated by job role, and more from O’Reilly and nearly 200 top publishers.

