Chapter 1. Desktop & Start Menu
These days, the graphic user interface (the colorful world of icons, windows, and menus) is standard. Windows, macOS, Chrome OS, Linux—every operating system is fundamentally the same, which is to say a very long way from the lines of typed commands that defined the earliest personal computers.
Windows 10 restores the desktop to its traditional importance, after a weird three-year detour into the “what the—??” land known as Windows 8. The desktop is your home base, your starting point. It’s the view that greets you when the computer turns on, and it offers all the tools you need to manage and organize your files.
Herewith: a grand tour of the state of the art in computer desktops—the one in Windows 10.
The Lock Screen
When you turn on a Windows 10 machine, the first thing you see is a colorful curtain that’s been drawn over the computer’s world. It’s the Lock screen (Figure 1-1).
The Lock screen serves the same purpose as on a phone: It gives a quick glance at the time, the date, your Wi-Fi signal strength, the weather, and (on laptops and tablets) your battery charge. As you download and install new apps, they can add informational tidbits to the Lock screen, too.
The point is that sometimes you don’t really need to wake the machine up. Maybe you just want to know what time it is. Or to ask about tomorrow’s weather, or to find out yesterday’s sports scores, or to speak a reminder for yourself—courtesy of Cortana, Windows 10’s voice assistant. She’s available at the Lock screen, too (unless you object; see “Establish Privacy Control”).
The Lock screen can also give you instant access to your Camera and Skype apps (pages 296 and 338). You might want to take a picture or answer a call without having to go through the red tape of fully signing in. Little icons offer one-click access to headlines, weather, and financial news, too; see Figure 4-3.
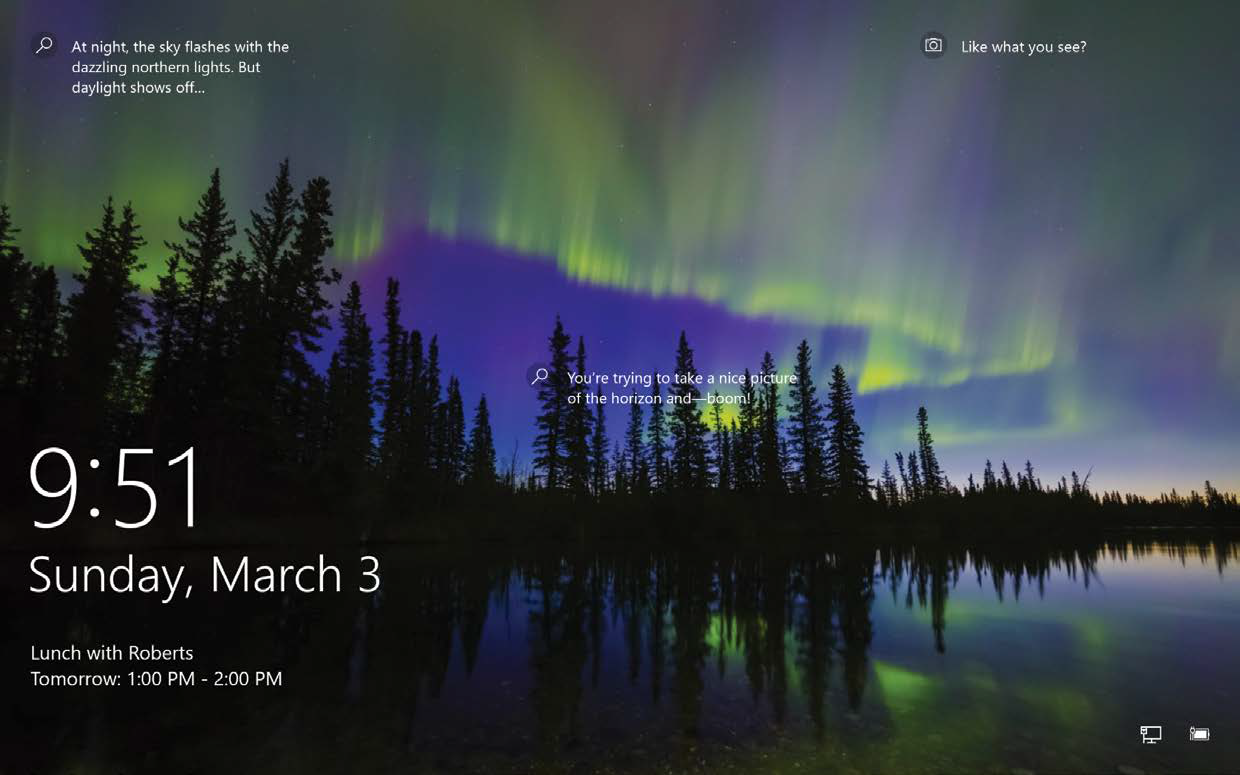
Figure 1-1. In Settings, you can control which apps are allowed to add information to the Lock screen, like the options shown here.
You’re not stuck with the Lock screen photo as Mother Microsoft has installed it, either. You can change the picture, if you like, or you can eliminate it altogether. Chapter 4 has the details.
When you do want to go past the Lock screen to sign in, there’s nothing to it. Almost anything you do that says “I’m here!” works:
Touchscreen: Swipe a finger upward. (Swipe down to jump into Camera mode.)
Mouse: Click anywhere. Or turn the mouse wheel.
Keyboard: Press any key.
The Lock screen slides up, revealing the sign-in screen (Figure 1-2).
Tip
You can change almost everything about the Lock screen. Out of the box, it shows you a gorgeous photo every day, courtesy of Bing Images, but you may prefer one of your own pictures, or a slideshow of them. You can also fiddle with which information appears here, or even eliminate the Lock screen altogether. (After all, it’s an extra click every time you sign in.) See “Lock Screen” for details on customizing the Lock screen.
The Sign-In Screen
As in any modern operating system, you have your own account in Windows. It’s your world of files, settings, and preferences. So the second thing you encounter in Windows 10 is the sign-in screen. Here, at lower left, you see the name and photo for each person who has an account on this machine (Figure 1-2). Choose yours.
Tip
Ordinarily, the sign-in screen offers its own wallpaper backdrop: a Windows logo or a solid color. But if you prefer, for consistency’s sake, you can direct it to use the same wallpaper photo as the Lock screen before it. To set that up, open ![]() →
→ ![]() → Personalization → Lock screen; turn on “Show lock screen background picture on the sign-in screen.”
→ Personalization → Lock screen; turn on “Show lock screen background picture on the sign-in screen.”
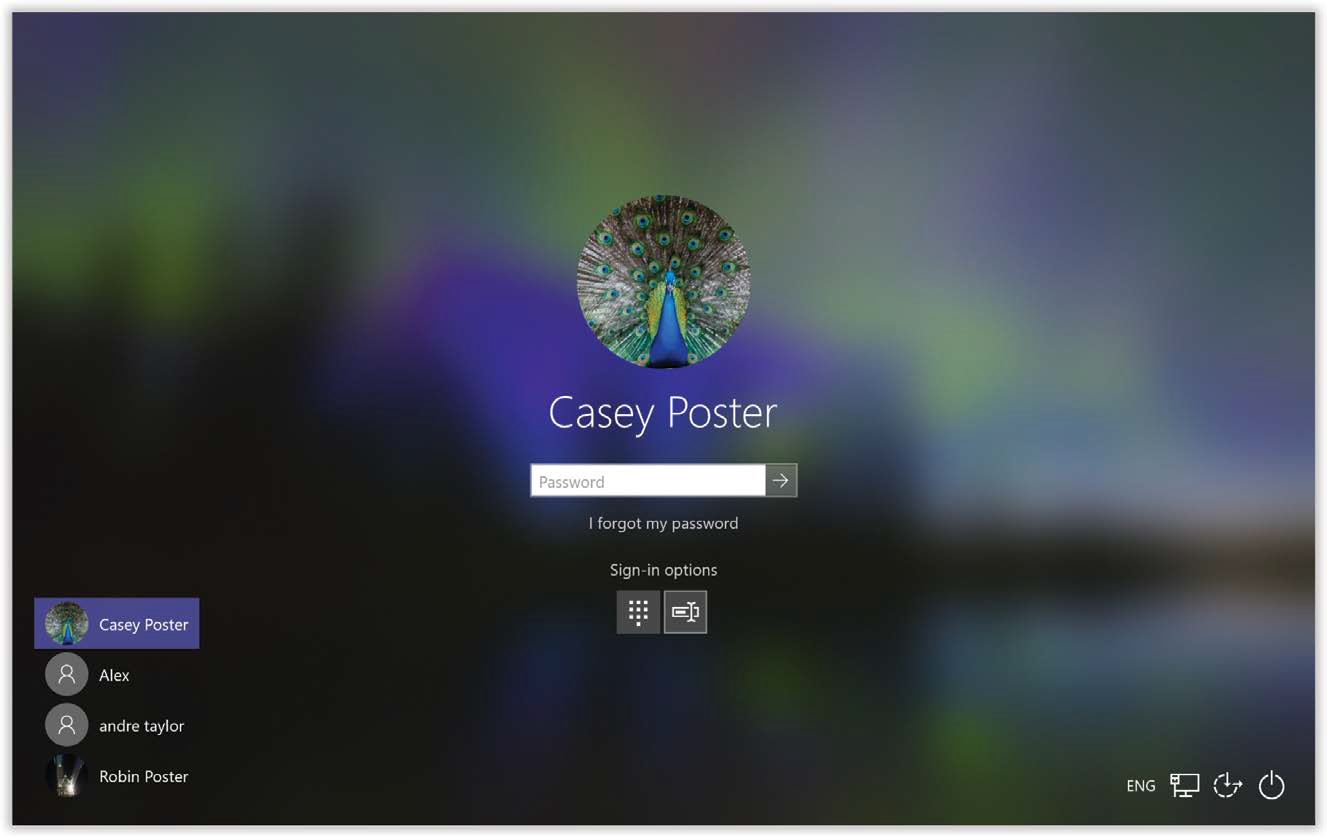
Figure 1-2. If your machine has more than one account set up, tap or click your own icon to sign in.
This is also where you’re supposed to sign in—to prove you’re you. But signing in doesn’t have to mean typing a password. One of Windows 10’s primary goals is to embrace touchscreens, and typing on tablets is a pain.
Therefore, you can sign in using any of these techniques:
Just look at your screen. On laptops or tablets with Intel’s RealSense infrared cameras, facial recognition signs you in.
Swipe your finger across the fingerprint reader, if your computer has one.
Put your eye up to the iris reader, if your machine is so equipped.
Draw three lines, taps, or circles on a photo you’ve selected.
Type in a four-digit PIN you’ve memorized.
Type in a traditional password.
Skip the security altogether. Jump directly to the desktop when you turn on the machine.
See Chapter 18 for instructions on setting each of these up.
The Desktop
Once you’ve gotten past security, you finally wind up at the home base of Windows: the desktop. See Figure 1-3 for a crash course.
You can, and should, make the desktop look however you want. You can change its background picture or color scheme; you can make the text larger; you can pack it with icons you use a lot. Chapter 4 is a crash course in desktop decoration.
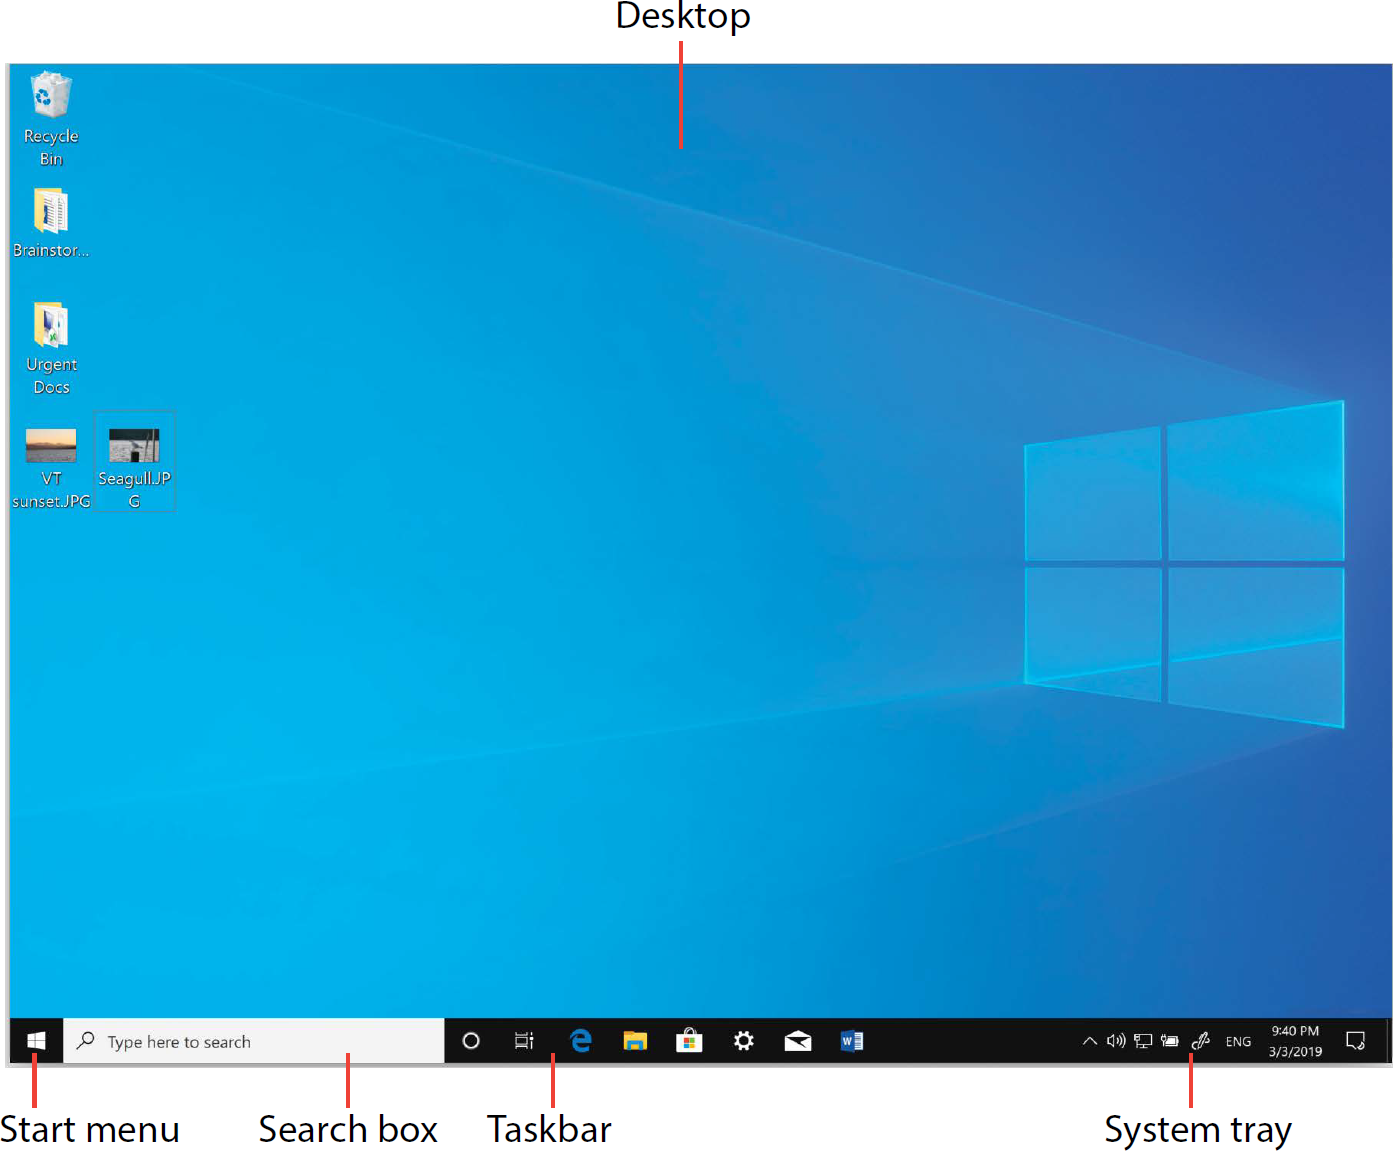
Figure 1-3. The desktop is your starting place, the first thing you see after you sign in. It has a shiny, clean look, as well as the time-honored landmarks—Start menu, taskbar, system tray—just where they’ve always been.
Meet the Start Menu
Windows is composed of 50 million lines of computer code, scattered across your hard drive in thousands of files. The vast majority of them are not for you; they’re support files, there for behind-the-scenes use by Windows and your applications. They may as well bear a sticker reading “No user-serviceable parts inside.”
That’s why the Start menu is so important (Figure 1-4). It lists every useful piece of software on your computer, including commands, programs, and files. Just about everything you do in Windows can begin with your Start menu.
The word “Start” doesn’t actually appear on the Start menu, as it did for years; now the Start menu is just a square button in the corner of your screen, bearing the Windows logo (![]() ). But it’s still called the Start menu, and it’s still the gateway to everything on the PC (Figure 1-3, lower left).
). But it’s still called the Start menu, and it’s still the gateway to everything on the PC (Figure 1-3, lower left).
If you’re the type who bills by the hour, you can open the Start menu by clicking it with the mouse. If you feel life’s too short, however, tap the ![]() key on the keyboard instead—or the one on the screen, if you have a touchscreen.
key on the keyboard instead—or the one on the screen, if you have a touchscreen.
Really, truly: Learn this. Use ![]() to open the Start menu (or to close it!).
to open the Start menu (or to close it!).
The Start menu is usually split into three columns (Figure 1-4). For convenience, let’s call them the places list (far left); the apps list (center); and the tiles (right).
Note
If your computer is a tablet, with no physical keyboard at all, it may start up in Windows 10’s Tablet mode. In this mode, the tiles side of the Start menu fills the entire screen, and the left columns don’t appear unless you tap the ![]() in the top-left corner. For details on Tablet mode, see Chapter 12.
in the top-left corner. For details on Tablet mode, see Chapter 12.
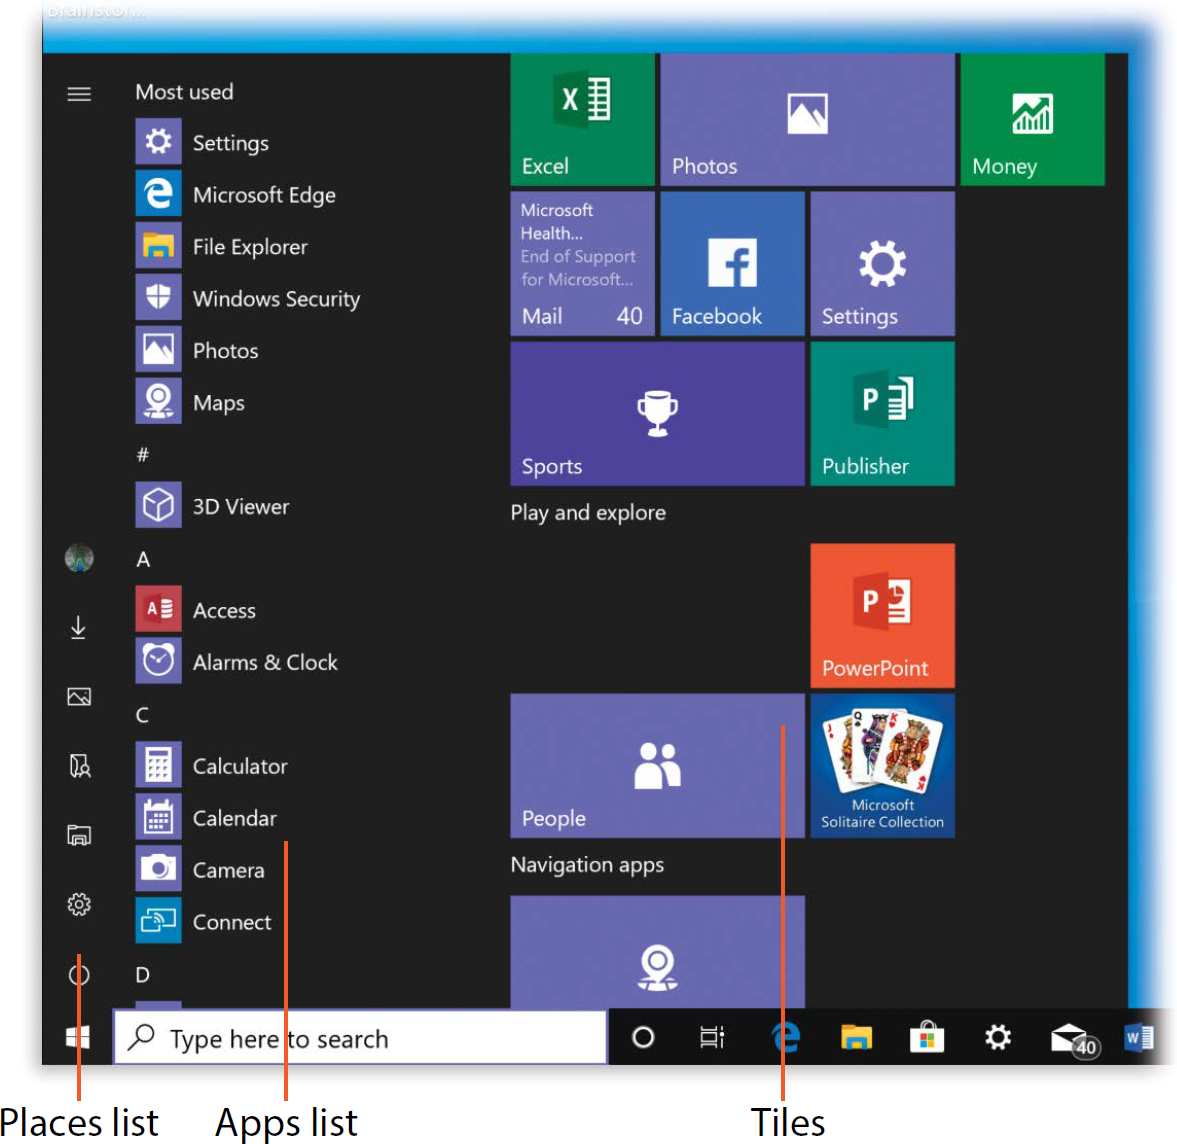
Figure 1-4. Here it is, the famous Start menu.
It generally comes in three columns: the skinny places column at far left, the primary apps list in the center, and the tiles area at right, which is yours to customize.
Start Menu: The Places List
Ever since Microsoft completely fouled up the works in Windows 8, it’s been trying to perfect the Start menu. And starting in 2017, it added yet another twist: a skinny mini-column at the far left. It begins life with only a few icons—here’s a rundown.
[Your Round Icon]
See the tiny round icon at the top of the places list, at the left edge of the Start menu (Figure 1-5)?
The picture is a pop-up menu. And its commands all have to do with switching from one account to another. (In Windows’ accounts feature, each person gets to see her own desktop picture, email account, files, and so on. See Chapter 18.) Here’s what they do:
Tip
Some keystrokes from previous Windows versions are still around. For example, you can still press Ctrl+Alt+Delete to summon three of the features described here—lock the machine, switching the user, and signing out—plus a bonus link for the Task Manager (“When Programs Die: The Task Manager”).
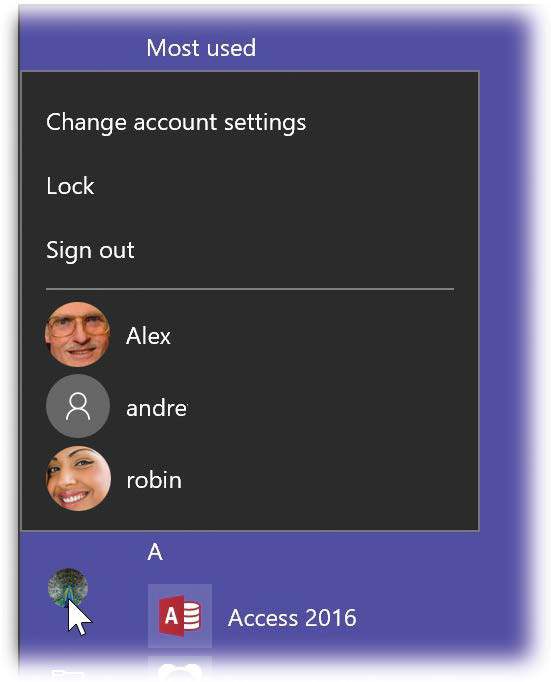
Figure 1-5. Your account icon isn’t just an icon; it’s also a menu. Click it to see the “Sign out” and “Lock” commands, as well as a shortcut to your account settings.
Change account settings opens the Accounts settings screen, where you can change your account picture, password, sign-in method, and other details of your account—and you can create accounts for other family members.
Lock. This command takes you back to the Lock screen described at the beginning of this chapter. This is an ideal way to protect your PC from nosy people who wander by your desk while you’re away.
Sign out. When you choose “Sign out,” Windows presents a new sign-in screen so somebody else can sign in. Whatever you had running remains open behind the scenes. When you sign in again, you’ll find all your open programs and documents exactly as you left them.
[Other account names.] The drop-down menu concludes with the names of other account holders on this PC. It lets other people dive directly into their own accounts without having to sign you off first.
Settings ( )
)
Adjusting the settings and preferences of your PC is about six steps quicker now, since Settings is listed right here in the Start menu. Chapter 7 covers Settings in absurd detail.
Power ( )
)
Hard though it may be to believe, there may come a day when you want to shut down or restart your computer. See “Shutting Down”.
How to Customize the Places List
You can add other important folders to the places list, following the steps shown in Figure 1-6. These are some of your options:
File Explorer. This icon in the places column represents the File Explorer “app”: the standard desktop window, which shows the contents of your drives and folders.
Personal folder. Windows keeps all your stuff—your files, folders, email, pictures, music, bookmarks, even settings and preferences—in one handy, central location: your personal folder. This folder bears your name, or whatever account name you typed when you installed Windows.
Technically, your personal folder lurks inside the C: > Users folder. But that’s a lot of burrowing when you just want a view of your empire. That’s why you can install your personal folder here, right on the Start menu.
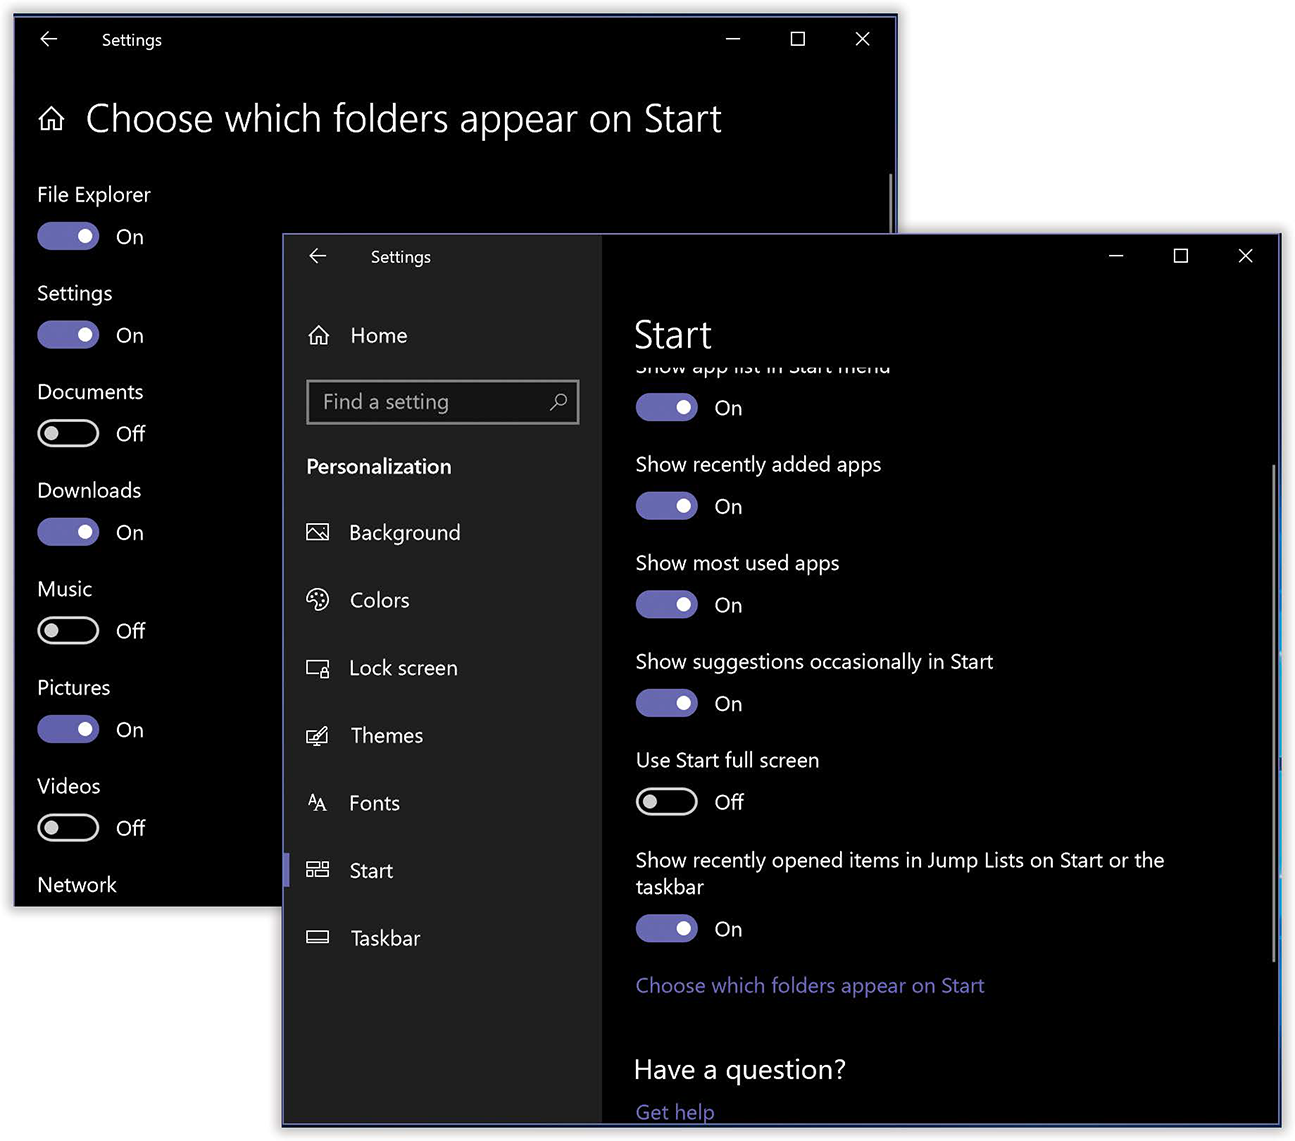
Figure 1-6. You can add other important folders to your Start menu. Choose
 → → Personalization → Start (bottom right).
Click “Choose which folders appear on Start.”
Up pops a list of items like File Explorer, Settings, Documents, Downloads, Music, Pictures, Videos, and Network (top left), so you can turn on or off the ones you like.Documents. This opens your Documents folder, a very important folder indeed. It’s designed to store just about all the work you do on your PC—everything except music, pictures, and videos, which get folders of their own.
Of course, you’re welcome to file your documents anywhere on the hard drive, but most programs propose depositing newly created documents into the Documents folder.
Note
The Documents folder actually sits in the This PC > Local Disk (C:) > Users > [your name] folder.
If you study that path carefully, it should become clear that what’s in Documents when you sign in isn’t the same thing as other people will see when they sign in. That is, each account holder (Chapter 18) has a different Documents folder, whose contents switch according to who’s signed in.
Music, Pictures, Videos. Microsoft assumes (correctly) that most people these days use their home computers for managing digital music, photos, and video collections. As you can probably guess, the Music, Pictures, and Videos folders are intended to house them—and these Start-menu icons are quick ways to open them.
Downloads. Out of the box, Windows puts your downloaded files into this Downloads folder (which is inside your personal folder). It makes sense to add this item to your Start menu so you have quick access to it.
Network opens (what else?) the Network folder, where you can see a map of your home or office network and make changes to the settings. See Chapter 19.
Start Menu: The Apps List
The center column of the Start menu—the list of programs—may look like the Start menu that’s been in Windows from the beginning (except during that unfortunate Windows 8 phase). But there’s a big difference: In Windows 10, you can’t use it to list your own favorite programs, folders, and files. (That’s what the right side is for.) The apps list is meant to be managed and run entirely by Windows itself.
This column has three sections, described here from top to bottom.
Recently Added
The “Recently added” list appears only if you’ve recently downloaded or installed some new apps. It’s surprisingly handy, especially for novices, who often download something from the internet and then can’t find where it landed.
If you’ve installed lots of new apps, scroll down into the full apps list; little “New” indicators show you which are the recent arrivals.
Tip
You can hide the “Recently added” section if you like. Open the Start menu; choose ![]() → Personalization → Start; turn off “Show recently added apps.” Close Settings.
→ Personalization → Start; turn off “Show recently added apps.” Close Settings.
Most Used
The next part of the apps menu is a list of the programs Windows sees you using a lot. Windows computes this list automatically and continuously. It’s a really great feature, because, well, if you’ve been using something a lot recently, you’ll probably use it a lot more still, and now you don’t have to burrow around looking for it.
On the other hand, if you’d rather not have Windows track what you’re doing, you can get rid of the “Most used” list, or just certain items on it; see “The App List Shortcut Menu”.
All Apps
The next chunk of the Start menu’s middle list is an important list indeed: the master catalog of every program on your computer (Figure 1-7). As a bonus, the word “New” appears beneath the name of any new programs—ones you’ve installed but haven’t yet used.
Tip
Once the “All apps” list is open, you can choose anything in it without involving the mouse. Just press the ↑ and ↓ keys to highlight the item you want, or type a few letters of its name. Then press Enter to seal the deal.
You can jump around in the list using an alphabetic index, shown at right in Figure 1-7.
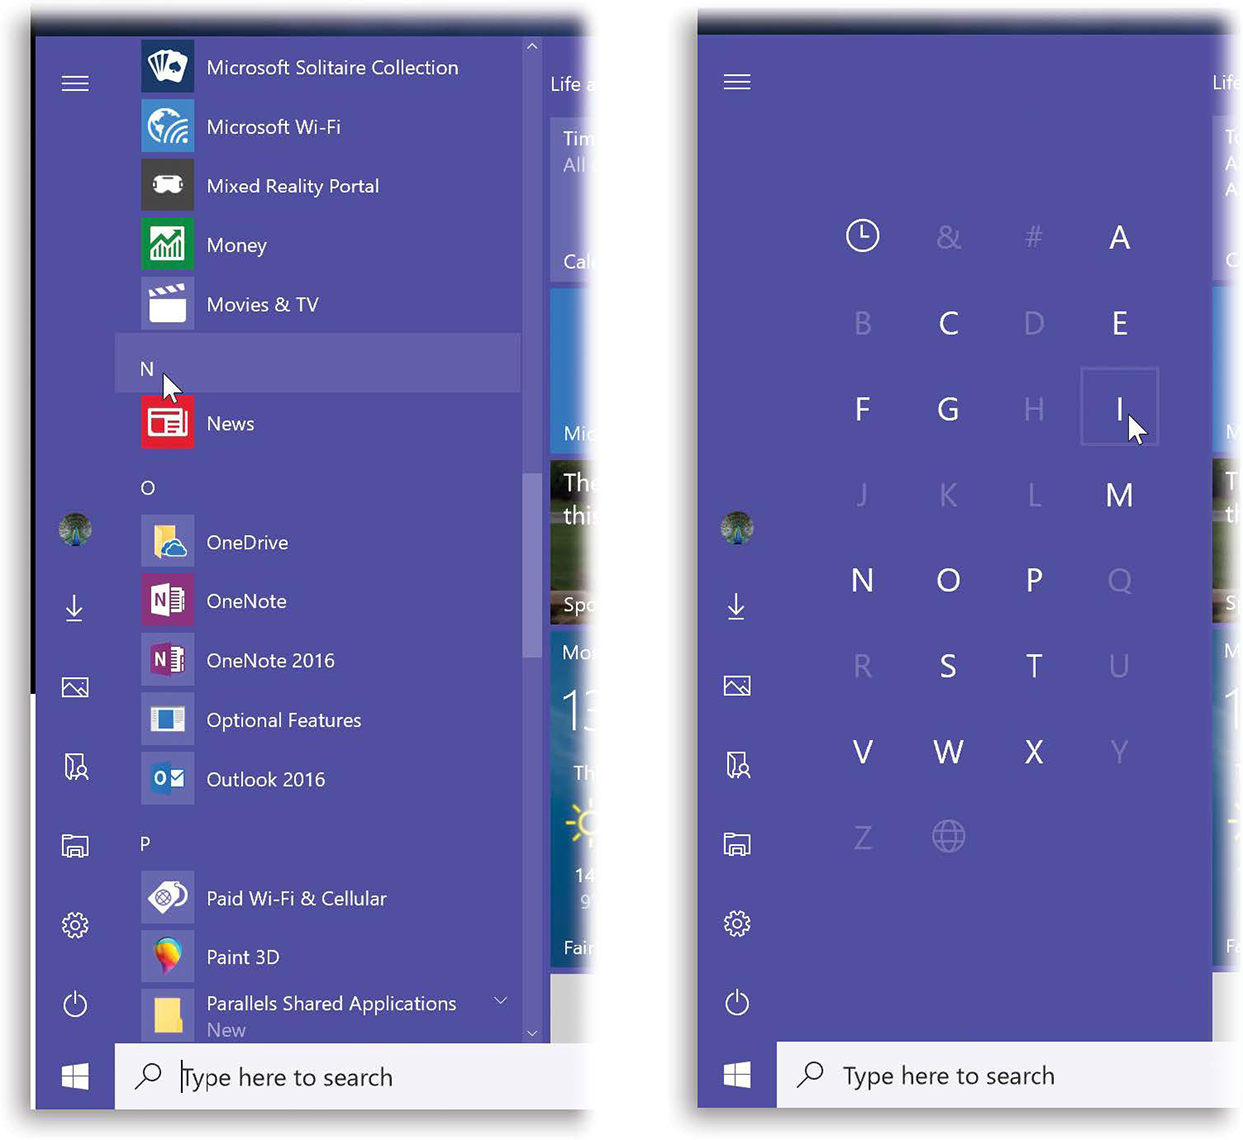
Figure 1-7. Left: Your apps are grouped alphabetically. Turns out those letter headings (A, B, C…) are also buttons. When you click one, Windows offers you a grid of the entire alphabet (right).
Click a letter to jump directly to that section of the “All apps” list. If you have a lot of programs, this trick can save you a lot of scrolling.
Tip
How cool is this? You can uninstall a program right from the Start menu apps list. Just right-click it (or hold your finger down on it); from the shortcut menu, choose Uninstall. Confirm in the dialog box that appears. (You can’t uninstall apps that came with Windows 10 this way—only stuff you’ve added.)
Folders
The “All apps” list doesn’t list just programs. It also houses a number of folders. See Figure 1-8.
Tip
Submenus, also known as cascading menus, have been eliminated from the Start menu. Instead, when you open something that contains other things—like a folder listed in the Start menu—you see its contents listed beneath, indented slightly, as shown at right in Figure 1-8. Click the folder name again to collapse the sublisting.
Keyboard freaks should note that you can also open a highlighted folder in the list by pressing the Enter key (or the → key). Close the folder by pressing Enter again (or the ← key).
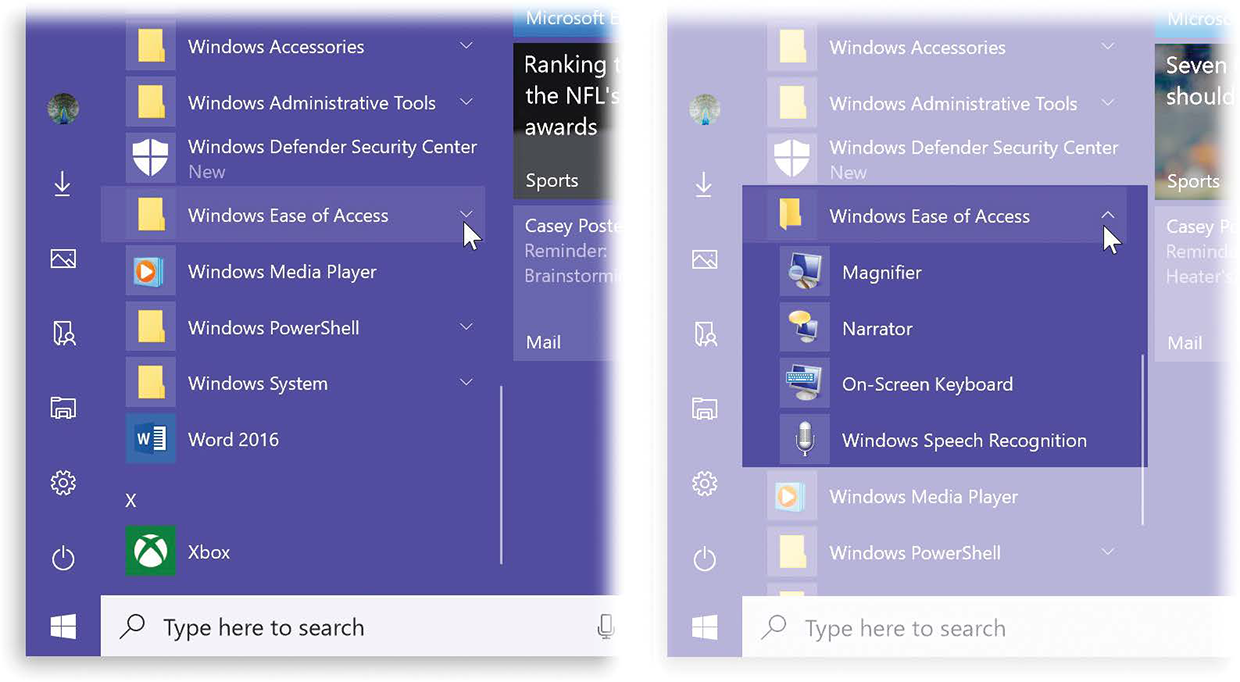
Figure 1-8. You know when you’re looking at a folder in the “All apps” list, because a  appears to the right of its name (left). Click the folder’s name to expand the listing—to see what’s hiding inside. (You don’t have to click squarely on the .) When the folder is expanded (shown highlighted at right), the symbol changes to
  , just in case you didn’t get the point.
Software-company folders. Some of these folders bear the names of software you’ve installed; you might see a folder called, for example, PowerSoft or Logitech. These generally contain programs, uninstallers, instruction manuals, and other related junk.
Program-group folders. Another set of folders is designed to trim down the Programs menu by consolidating related programs, like Games, Accessories (little single-purpose programs), and Maintenance. Everything in these folders is described in Chapter 8.
How to Customize the Apps List
You can’t add anything to the apps list yourself. Nor can you change the order.
You do, however, have several opportunities to redesign the apps list. To find these special switches, open ![]() →
→ ![]() → Personalization → Start. Now look over your options:
→ Personalization → Start. Now look over your options:
Eliminate the “Most used” list. Maybe it would be best that your boss or your spouse didn’t know what you’ve been up to. In that case, turn off “Show most used apps.” When you next inspect the Start menu, you’ll be happy to see that the top-center chunk, where the recently used programs are usually listed, is creepily blank.
Tip
If there’s just one compromising listing here, no big deal; right-click its name and, from the shortcut menu, choose More → “Don’t show in this list.” It’s gone.
Eliminate the “Recently added” list. Similarly, you can get rid of the second section of this menu, where Windows displays apps you’ve recently installed. Just turn off “Show recently added apps.” (You can also hide just one item in this list, using the technique in the previous Tip.)
Eliminate the entire apps list. Weird but true: you can ask Windows not to show the apps list at all (turn off “Show app list in Start menu”). Instead, you get only two columns in the Start menu: the places column and the tiles. Your Start menu is now more compact and tidy—an arrangement that’s not for everyone, but just right for certain lovable oddballs who use other techniques for opening their apps.
Besides, your full apps list isn’t really gone forever. You can bring it back by clicking the
 icon that now appears in the places column. It replaces tiles with the regularly scheduled apps list. (You can then click the
  icon to bring back the tiles.)
Move something to Start or the taskbar. Suppose there’s some app—say, Calculator—that’s listed in “Most used,” “Recently installed,” or the main apps list. And you think you’d rather have it installed on your taskbar, visible at all times. Or you think it’d work best as a tile on the right side.
Right-click its name. From the shortcut menu, choose “Pin to taskbar” or “Pin to Start.” It disappears from the left side and goes where you sent it.
Tip
On a touchscreen, you can “right-click” something by holding your finger down on it for a second.
The App List Shortcut Menu
If you right-click an app’s name (Figure 1-9), you get a very promising submenu that may contain commands like these:
Unpin from Start. If this app is also represented as a tile on the fly-out Start menu, then this command vaporizes the tile. Now the app is listed only here, in the apps list.
More. This submenu usually offers commands like “Unpin from taskbar” (if the app is, in fact, pinned to the taskbar as described on “The Taskbar as App Launcher”), “App settings” (dive directly into this app’s settings), “Rate and review” (on the app store), “Share” (with friends you think might like the app), and “Don’t show in this list” (stop making this app appear in the “Most used” list, possibly because you don’t want your spouse or boss knowing it’s among your most-used apps).
New window, Uninstall. Some apps offer these app controls right in the shortcut menu, too.
Recent documents. Some apps, including Microsoft Office apps like Word and Excel, add your most used documents to this list, too, for quick and easy access later.
Tip
In fact, you can “pin” these documents to this list, so they won’t disappear when newer ones come along. To do that, just point to a document’s name and click the ![]() that appears next to its name; see Figure 1-9.
that appears next to its name; see Figure 1-9.
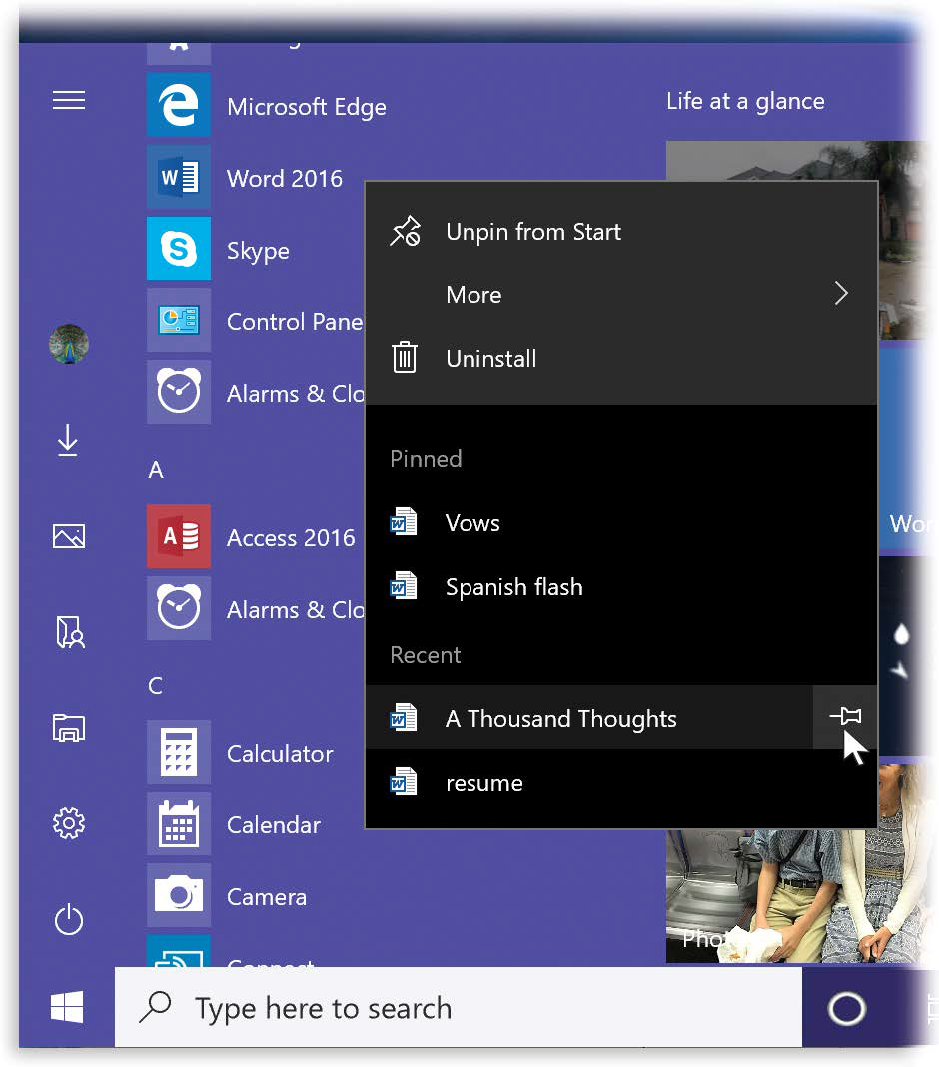
Figure 1-9. For some programs, the Start menu can display the most recently opened documents in each program. Right-click the program name to see them.
To pin one of these documents so it won’t disappear on you, point to it without clicking, as shown here, and then click the  icon. Now there’s a new section in the jump list called Pinned, where that document will remain undisturbed until you unpin it (by clicking the pushpin again).
Start Menu: The Tiles
The right side of the Start menu is all that remains of the Great Touchscreen Experiment of 2012, during which Microsoft expected every PC on earth to come with a touchscreen. Instead of a Start menu, you got a Start screen, stretching across of your monitor, displaying your files, folders, and programs as giant rectangular tiles.
Turns out most people preferred the Start menu.
There were some nice aspects of the Start screen, though. For one thing, it was more than just a launcher—it was also a dashboard. The tiles weren’t just buttons that opened the corresponding program; they were also little displays—live tiles—showing real-time information from that program.
So in Windows 10, Microsoft decided to retain those colorful live tiles—on the right side of the Start menu (Figure 1-10). The Calendar tile shows you your next appointment. The Mail tile shows your latest incoming subject line. The People tile shows Twitter and Facebook posts as they pour in.
Tip
The tiles for Calendar, People, and Mail are meant to be visual dashboards, so how are you supposed to know those apps’ names? To find out, point to one with your cursor without clicking. A tinted, rectangular tooltip bar appears, identifying the name.
You can make this scrolling “column” bigger; you can even make it fill the screen, as it did in Windows 8; or you can hide it completely. But this time it’s up to you. The Start menu takes over your world only as much as you want it to.
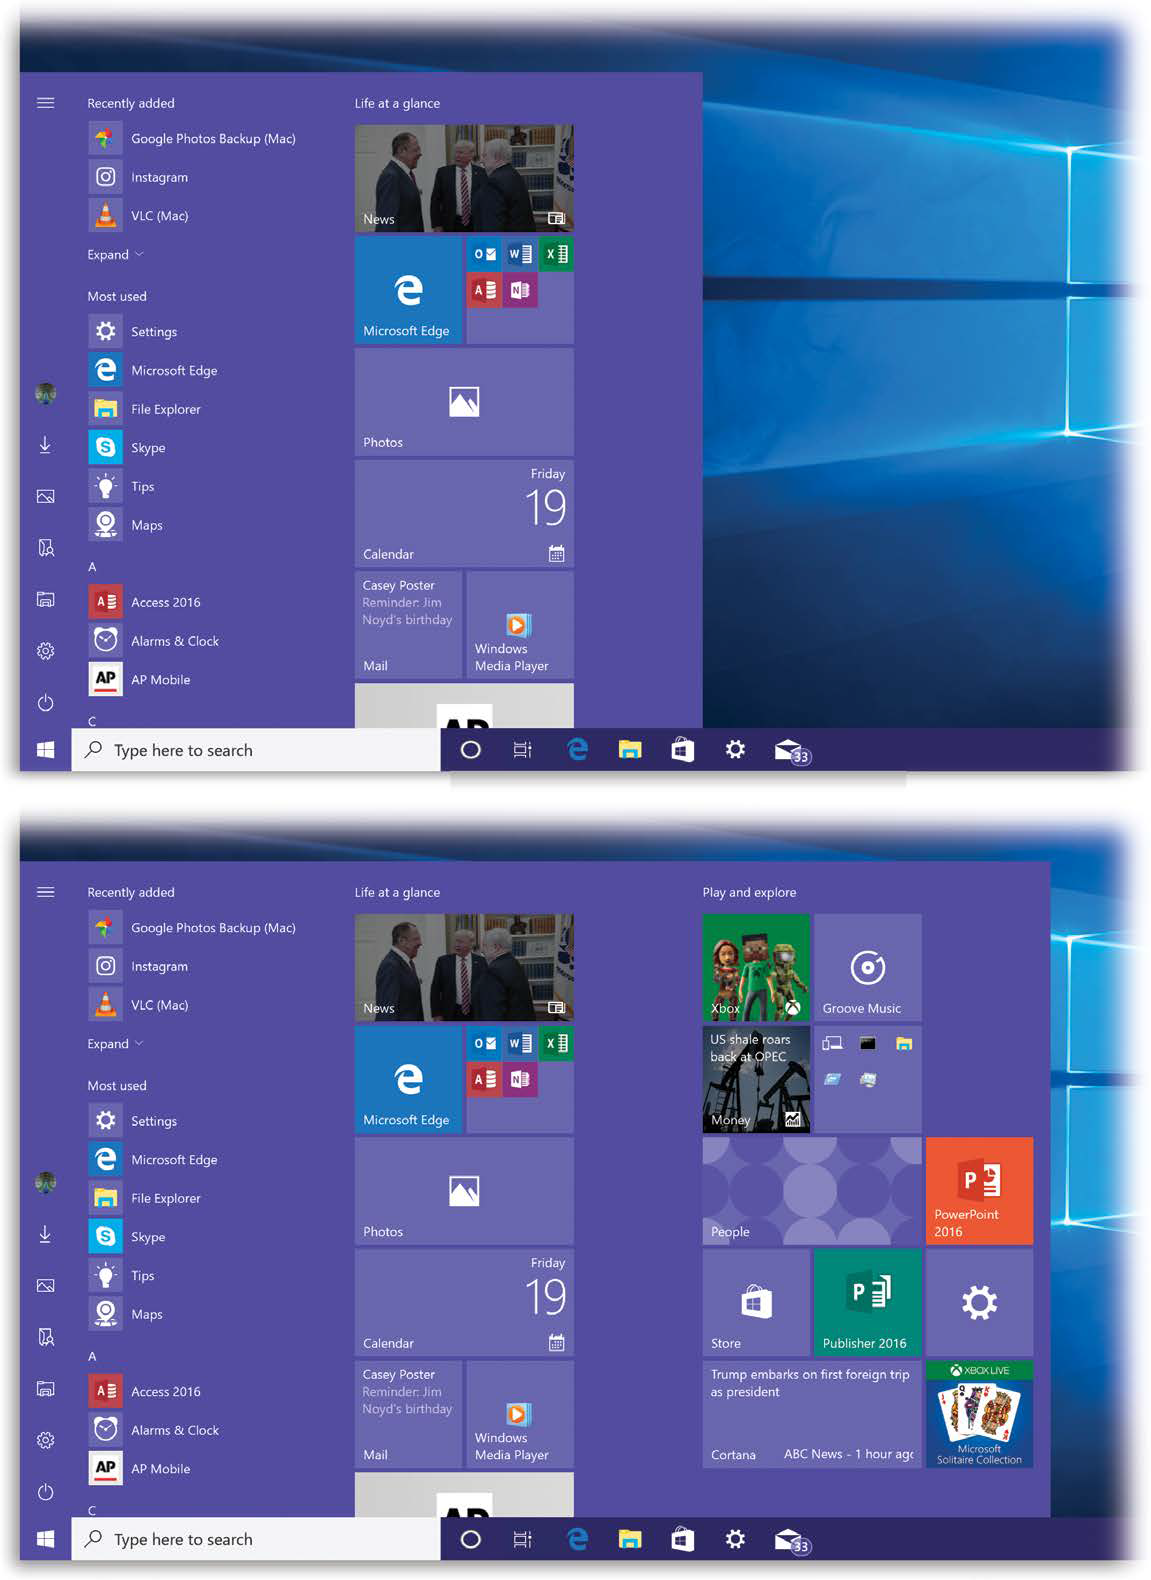
Figure 1-10. As you drag the top or right edge of the right side of the Start menu, you see it snap to a larger size once you’ve moved your cursor far enough. You don’t have an infinite degree of freedom here; you can only double the width or, if you have one of those rare Samsung Billboard Monitors, maybe triple it.
You can also adjust the height of the Start menu—by dragging the top edge. You can goose it all the way to the top of your screen, or you can squish it down to mushroom height.
Tip
If you’re keyboard oriented, you can use the arrow keys to highlight the icon you want and then press the Enter key to open it.
How to Customize the Tiles Menu
The tiles section of the Start menu is your playground. If your current job doesn’t work out, you could become a full-time tiles-menu customizer.
Make the tile area bigger or smaller
If you have a mouse or a trackpad, you can make the right side of the Start menu wider or taller; just grab the right edge or the top edge and drag. (You can’t enlarge the Start menu with your finger on a touchscreen.)
Make the tile area fill the screen
Maybe you were one of the 11 people who actually liked Windows 8, including the way it had a Start screen instead of a Start menu. Well, that look is still available. From the Start menu, choose ![]() → Personalization → Start. Turn on “Use Start full screen.”
→ Personalization → Start. Turn on “Use Start full screen.”
In this mode, the live tiles fill your entire desktop (which is handy for touchscreens). You still get the Utility menu (“Navigating the Start Menu by Keyboard”), along with the ![]() icon in case you want to bring the apps list back.
icon in case you want to bring the apps list back.
Note
If your goal is to use Windows 10 on a tablet, you don’t need to do all this. Just turn on Tablet mode (“Manual Tablet Mode”). In Tablet mode, the full-screen tiles section is standard and automatic.
Resize a tile
Tiles come in four sizes: small square, medium square, large square, and rectangle. As part of your Start menu interior-decoration binge, you may want to make some of the tiles bigger and some of them smaller. Maybe you want to make the important ones rectangular so you can read more information on them. Maybe you want to make the rarely used ones smaller so more of them fit into a compact space.
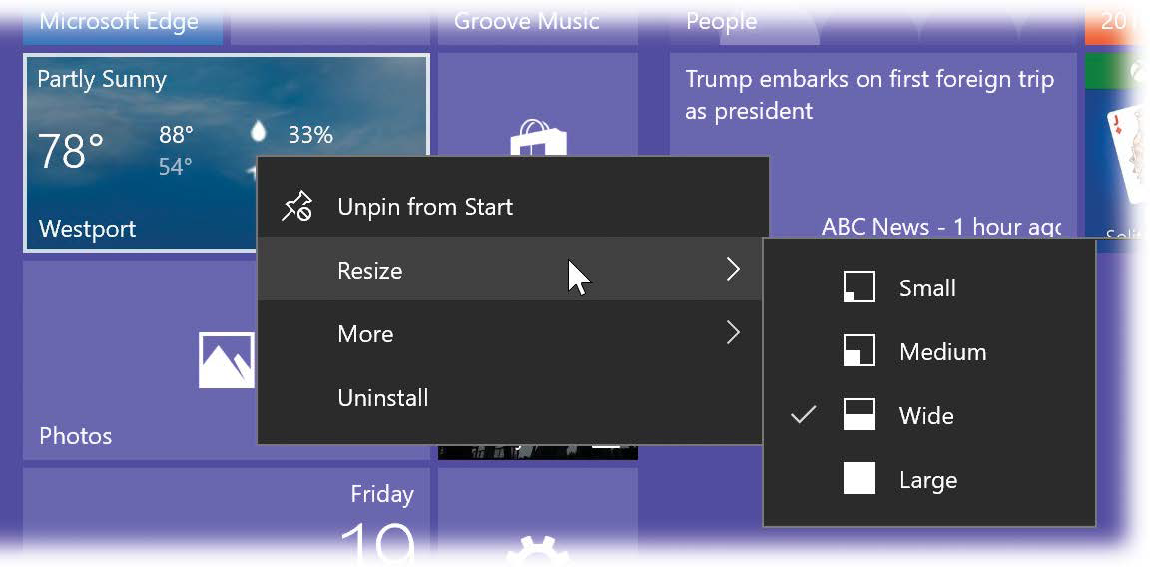
Figure 1-11. Tiles come in four sizes: Small (tiny square, no label); Medium (4x the times of Small—room for a name); Wide (twice the width of Medium); and Large (4x the size of Medium). Wide and Large options appear only for apps whose live tiles can display useful information. Drag them around into a mosaic that satisfies your inner Mondrian.
Right-click the tile. (Touchscreen: Hold your finger down on the tile; tap the ![]() button that appears.) From the shortcut menu, choose Resize. All icons give you a choice of Small and Medium; some offer Wide or Large options, too. See Figure 1-11.
button that appears.) From the shortcut menu, choose Resize. All icons give you a choice of Small and Medium; some offer Wide or Large options, too. See Figure 1-11.
Move a tile
You can drag the tiles into a new order. With the Start menu open, just drag the tile to a new spot. The other tiles scoot out of the way to make room.
If you’re using a touchscreen, hold your finger down on the tile for half a second before dragging it.
Add new tiles
You can add tiles to the right side. They can be apps, folders, or disks (but not individual files).
The right-click method. Right-click an icon wherever fine icons are found: in a window, on the desktop, or in the apps list. (Touchscreen: Hold your finger down on the icon for a second.) From the shortcut menu, choose Pin to Start.
The drag method. You can also drag an app’s name out of the apps list directly into the tiles area. (You can’t drag them from desktop windows.)
Tip
In the Edge browser, you can also add a web page to the right side. With the page open, click the ![]() button at top right; choose Pin to Start.
button at top right; choose Pin to Start.
In each case, the newly installed tile appears at the bottom of the right side. (You might have to scroll to see it.)
Make the tile blocks wider
In the beginning, each major block of tiles is the width of three Medium tiles. That is, you could fit three Medium tiles across, or one Wide plus one Medium, or one Large plus one Medium. But you couldn’t put two Large tiles side by side, or two Wides, or four Mediums.
But now, thanks to vociferous lobbying by the Wider Tile Blocks Bloc, you can.
To bring about this happy arrangement, open ![]() →
→ ![]() → Personalization → Start, and then click “Show more tiles on Start.”
→ Personalization → Start, and then click “Show more tiles on Start.”
Make a tile stop blinking
Some tiles are live tiles—tiny dashboards that display real-time information. There, on the Mail tile, you see the subject lines of the past few incoming messages; there, on the Calendar tile, is your next appointment; and so on.
It has to be said, though: A Start menu filled with blinky, scrolling icons can look like Times Square at midnight. If you’re feeling quite caffeinated enough already, you might prefer your live tiles to be a little more…dead.
To silence the animation of a live tile, right-click it. (Touchscreen: Hold your finger down on it, and then tap ![]() .) From the shortcut menu, choose More, and then choose “Turn live tile off.” The tile’s current information disappears, and the live updating stops. To reverse the procedure, right-click an unmoving tile; from the shortcut menu, choose More and then “Turn live tile on.”
.) From the shortcut menu, choose More, and then choose “Turn live tile off.” The tile’s current information disappears, and the live updating stops. To reverse the procedure, right-click an unmoving tile; from the shortcut menu, choose More and then “Turn live tile on.”
Remove a tile
Open the Start menu. Right-click the tile you want to eliminate. (Touchscreen: Hold your finger down on it, and then tap the ![]() button.) From the shortcut menu, choose Unpin from Start. You’re not discarding that item—just removing its tile.
button.) From the shortcut menu, choose Unpin from Start. You’re not discarding that item—just removing its tile.
Group your tiles
The Start menu’s tiles aren’t scattered pell-mell; they present an attractive, orderly mosaic. Not only are they mathematically nestled, but they’re actually grouped. Each cluster of related tiles can bear a name, like “Life at a glance” (Calendar, Mail, Weather…) or “Play and explore” (games, music, TV…).
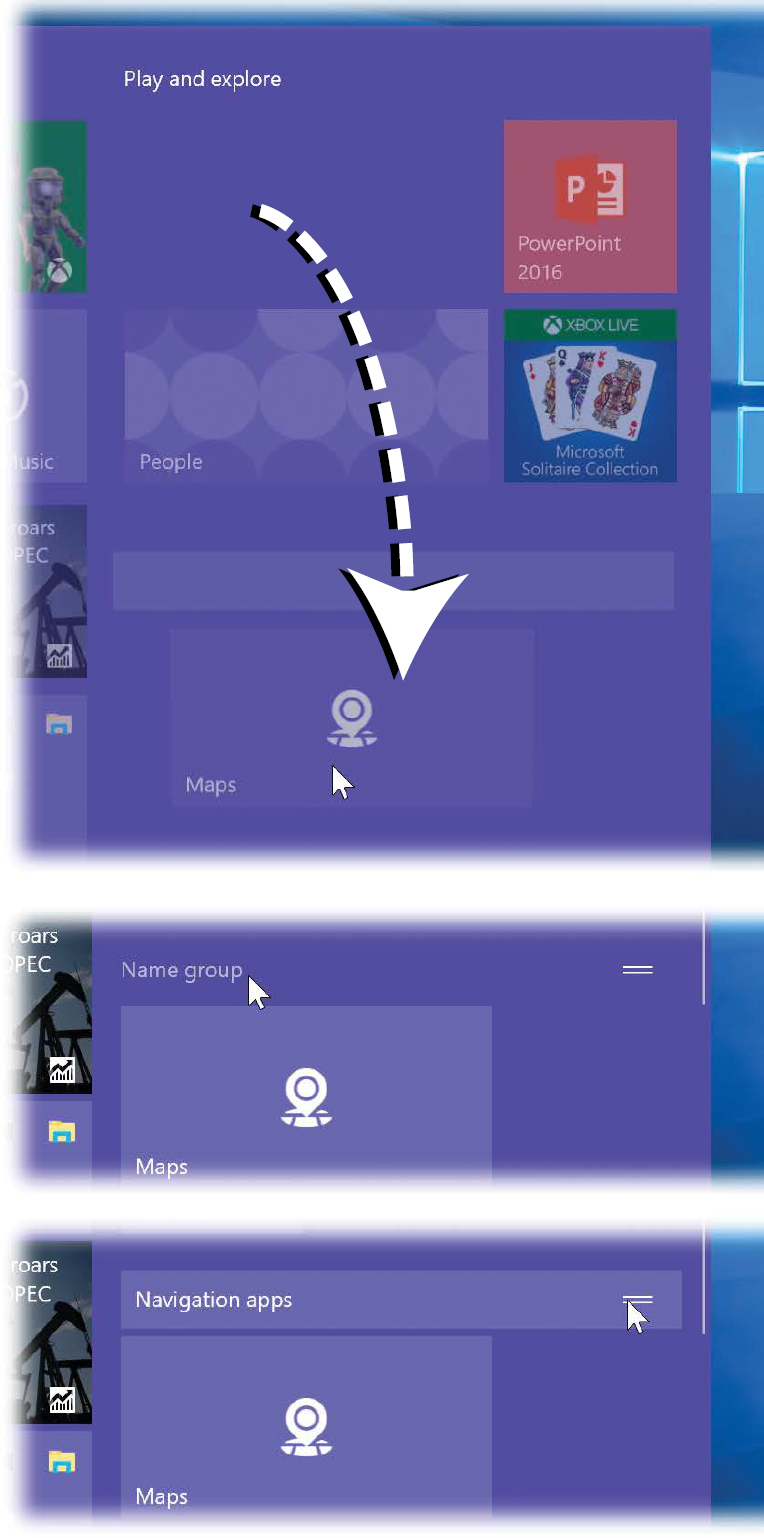
Figure 1-12. Top: To create a new tile group, start by dragging one lonely tile below all other tiles. This is your colonist. A fat horizontal divider bar appears when you’ve gone far enough. Let go.
Middle: Point to the starter name (“Name group”) and click.
Bottom: Type a name for the group. Use the grip strip to drag the group into a new spot, if you like.
But you can change those headings, or those groupings, and come up with new ones of your own (see Figure 1-12). It works like this:
Drag a tile to the very bottom of the existing ones. (Touchscreen: Hold your finger still for a second before dragging.)
When you drag far enough—the tiles area might scroll, but keep your mouse or finger down—a horizontal bar appears, as shown in Figure 1-12. That’s Windows telling you, “I get it. You want to create a new group right here.”
Drag the tile below the bar and release it.
Release the tile you’re dragging; it’s now setting up the homestead. Go get some other tiles to drag over into the new group to join it.
Click or tap just above your newly grouped tiles.
The words “Name group” appear.
Type a name for this group, and then press Enter.
Your group name is now immortalized.
By the way: Whenever you point to (or tap) the heading of any group, you may notice a little “grip strip” at the right side. If you like, you can drag that strip up or down to move the entire group to a new spot among your existing groups. (Or horizontally, if you have a multicolumn right side.)
At any point, you can rename a group (click or tap its name; type). To eliminate a group, just drag all its tiles away, one at a time. When the group is empty, its name vanishes into wherever withered, obsolete tile groups go.
Tip
In the May 2019 Update, you can, for the first time, delete an entire group in one fell swoop. Just right-click the group’s name; from the shortcut menu, choose “Unpin group from Start.”
Create tile folders
You can create folder tiles right there in the Start menu, too, for your organizational pleasure. They look like ordinary tiles—but when you click one, it expands to reveal the tiles within it. You create a new folder exactly the way you would on an iPhone or Android phone: Drag one app’s icon directly on top of another’s (within the tiled area of the Start menu).
Change the color
You can also change the colors of the various Start menu elements (and the taskbar, and the Action Center). See Chapter 4 for the step-by-steps.
Eliminate all tiles
It’s possible to eliminate the entire right side. If you like your Start menu to look like it did in the good old days, with only the left side showing, refer to Figure 1-13.
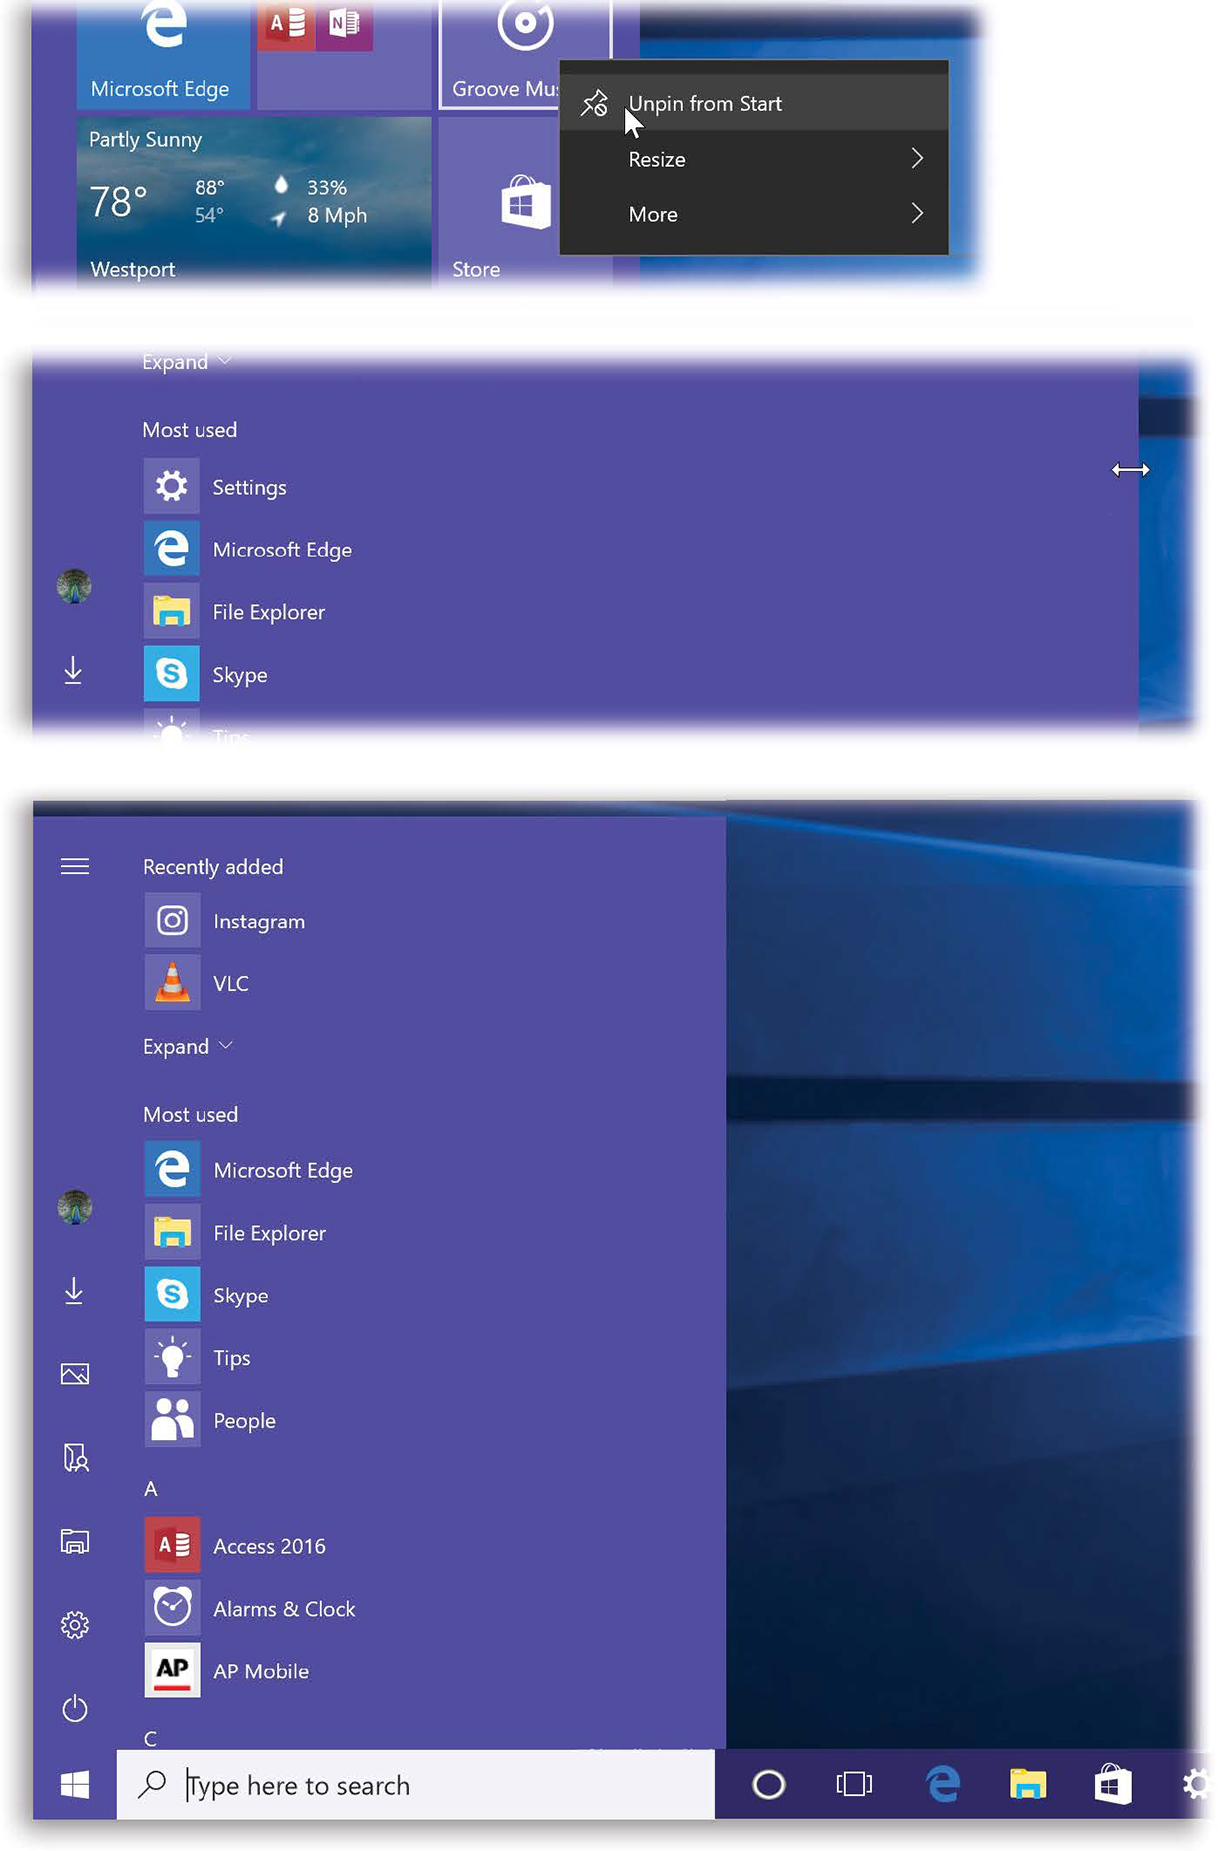
Figure 1-13. Top: To remove all the tiles from the right side, unpin every tile, one at a time.
To do that, right-click any tile; from the shortcut menu, choose Unpin from Start. (Touchscreen: Hold your finger down on the tile, and then tap the … button to see Unpin from Start.)
Repeat until you’ve eliminated all the tiles.
Middle: Now only the list of apps remains (plus the places column at far left).
Bottom: Drag the right edge of the menu inward, closing the empty space where the right side used to be. Voilà: No more tiles.
Of course, now you’ve just eliminated one of the most useful ways of opening things on your PC.
Turn off ads
From time to time, you may spot a Start menu tile you didn’t put there. That’s a suggestion about an app Microsoft thinks you might like—so in other words, an ad.
If you’d prefer Microsoft and its ad partners to keep their hands off your Start menu, open ![]() →
→ ![]() → Personalization → Start and turn off “Show suggestions occasionally in Start.”
→ Personalization → Start and turn off “Show suggestions occasionally in Start.”
Shutting Down
What should you do when you’re finished using your computer for the moment?
Millions of people shut their PCs off, but they shouldn’t; it’s a colossal waste of time. When you shut down, you have to wait for all your programs to close—and then the next morning, you have to reopen everything, reposition your windows, and get everything back the way you like it.
You shouldn’t just leave your computer on all the time, either. That’s a waste of electricity, a security risk, and a black mark for the environment.
What you should do is put your machine to sleep. If it’s a laptop, just close the lid. If it’s a tablet, press the Sleep switch. If it’s a desktop PC, you can set it up so it goes to sleep when you press the physical power button (see “Restart”).
The Sleep/Shut Down/Restart Commands
If you really want to do the sleeping or shutting down thing using the onscreen commands, click the ![]() at the bottom of the places column of the Start menu.
at the bottom of the places column of the Start menu.
As shown in Figure 1-14, shutting down is only one of the options for finishing your work session. What follows are your others.
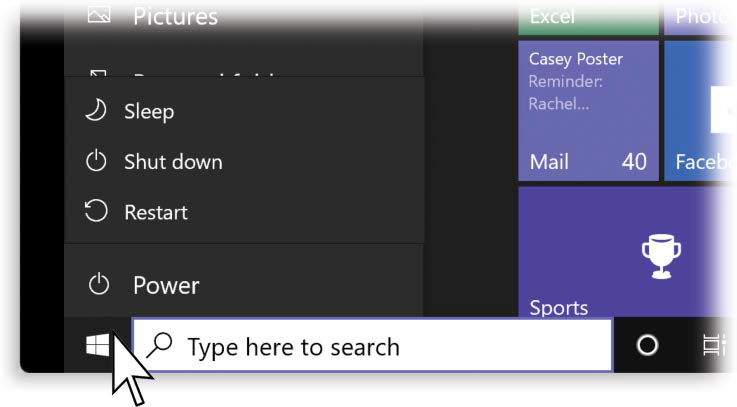
Figure 1-14. Shutting down your computer requires only two steps now, rather than 417 (as in Windows 8).
Open the Start menu. Hit and then “Shut down.”
Sleep
Sleep is great. When the flight attendant hands over your cranberry cocktail, you can take a quick break without closing all your programs. The instant you put the computer to sleep, Windows quietly transfers a copy of everything in memory into an invisible file on the hard drive, keeping it at the ready with a tiny trickle of battery power.
If you do return soon, everything reappears on the screen faster than you can say, “Redmond, Washington.” If you don’t return shortly, Windows eventually cuts power, abandoning what it had memorized in RAM.
Now your computer is using no power at all; it’s in hibernate mode. Fortunately, Windows still has the hard drive copy of your work environment. So now when you tap a key to wake the computer, you may have to wait 30 seconds or so—not as fast as 2 seconds, but certainly better than the 5 minutes it would take to start up, reopen all your programs, reposition your document windows, and so on.
The bottom line: When you’re done working for the moment—or for the day—put your computer to sleep instead of shutting it down. You save power, you save time, and you don’t risk any data loss.
Restart
This command quits all open programs and then quits and restarts Windows again automatically. The computer doesn’t actually turn off. You might do this to “refresh” your computer when you notice it’s responding sluggishly, for example.
Shut down
When you shut down your PC, Windows quits all open programs, offers you the opportunity to save any unsaved documents, exits Windows, and turns off the computer.
There’s almost no reason to shut down your PC anymore, though. Sleep is almost always better all the way around. The only exceptions have to do with hardware installation. Anytime you have to open up the PC to make a change (installing memory, hard drives, or sound or video cards), you should shut the thing down first.
Tip
If you’re stuck without a mouse, here’s an all-keyboard route to shutting down: Press Ctrl+Alt+Delete to summon the Lock/Switch User screen, and then tab your way over to the ![]() button in the lower right. Press Enter, and arrow-key your way to “Shut down.” Press Enter again.
button in the lower right. Press Enter, and arrow-key your way to “Shut down.” Press Enter again.
Three Triggers for Sleep/Shut Down—and How to Change Them
You now know how to trigger the Sleep command using the ![]() in the Start menu. But there are even faster ways.
in the Start menu. But there are even faster ways.
If you have a laptop, just close the lid. If it’s a tablet, tap its Sleep switch. If you have a desktop PC, press its power button (![]() ). In each of these cases, though—menu, lid, switch, or button—you can decide whether the computer shuts down, goes to sleep, hibernates, or just ignores you.
). In each of these cases, though—menu, lid, switch, or button—you can decide whether the computer shuts down, goes to sleep, hibernates, or just ignores you.
To find the factory setting that controls what happens when you close the lid or hit the power button, click in the “Type here to search” box and search for lid. In the search results, the top hit is “Change what closing the lid does.” Press Enter to select it.
Note
You can get to the same options by opening Control Panel → Hardware and Sound → Power Options → System Settings.
Now you arrive at the “Define power buttons” screen of the old Control Panel. Here, for each option (pressing the power button; pressing the Sleep button, if you have one; closing the lid), you can choose “Sleep,” “Do nothing,” “Hibernate,” “Shut down,” or “Turn off the display.” And you can set up different behaviors for when the machine is plugged in and when it’s running on battery power.
Tip
You can also restart, shut down, lock, or sign out of your computer with Cortana; see Figure 5-4.
Navigating the Start Menu by Keyboard
If your computer has a physical keyboard—you old-timer, you!—you can navigate and control the Start menu in either of two ways.
Use the Arrow Keys
Once the Start menu is open, you can press the Tab key to hop among the three columns (the places icons, the apps list, and the tiles). Once you’ve highlighted a column, you can press the ↑ or ↓ keys to “walk” up or down that column, highlighting successive items.
Once you’ve highlighted something, you can press Enter to “click” it (open it), or tap the ![]() key or Esc to close the Start menu and forget the whole thing.
key or Esc to close the Start menu and forget the whole thing.
Use the Search Box
This thing is awesome. The instant you press the ![]() key, your insertion point blinks in the “Type here to search” search box on the taskbar (Figure 1-14).
key, your insertion point blinks in the “Type here to search” search box on the taskbar (Figure 1-14).
The instant you start to type, you trigger Windows’ very fast, whole-computer search function. This search can find files, folders, programs, email messages, address book entries, calendar appointments, pictures, movies, PDF documents, music files, web bookmarks, and Microsoft Office documents, among other things.
It also finds anything in the Start menu, making it a very quick way to pull up something without having to click through a bunch of submenus. You can read the meaty details about search in Chapter 3.
The Secret Power Users’ Menu
The ![]() button harbors a secret: It can sprout a hidden utility menu, as shown in Figure 1-15. To see it, right-click the
button harbors a secret: It can sprout a hidden utility menu, as shown in Figure 1-15. To see it, right-click the ![]() button, or (on a touchscreen) hold your finger down on it. Or just press
button, or (on a touchscreen) hold your finger down on it. Or just press ![]() + X.
+ X.
There, in all its majesty, is the secret utility menu. It’s seething with shortcuts to toys for the technically inclined. Some are especially useful to have at your mousetip:
System opens a window that provides every possible detail about your machine.
Desktop offers one-click teleportation back to your desktop from within whatever program you’re using.
Task Manager. Huge. This special screen (“When Programs Die: The Task Manager”) is your lifeline when a program seems to be locked up. Thanks to the Task Manager, you can quit that app and get on with your life.
Note
To the dismay of the technically inclined, Microsoft has made two changes to the power users’ menu. First, the Control Panel is no longer listed. (Microsoft’s feeling is that the much cleaner-looking Settings app houses almost everything you’d ever want to change. If you disagree, you can still open the Control Panel—type contr into the Start menu’s search box, for example.)
Second, the Command prompt is no longer in the power users’ menu. It’s been replaced by something called Microsoft PowerShell.
All you have to know is that a) the Command prompt is still available, b) you can bring it back to the power users’ menu, and c) PowerShell is basically the same thing, only much more recent and powerful. See “On-Screen Keyboard” for details on all this stuff.
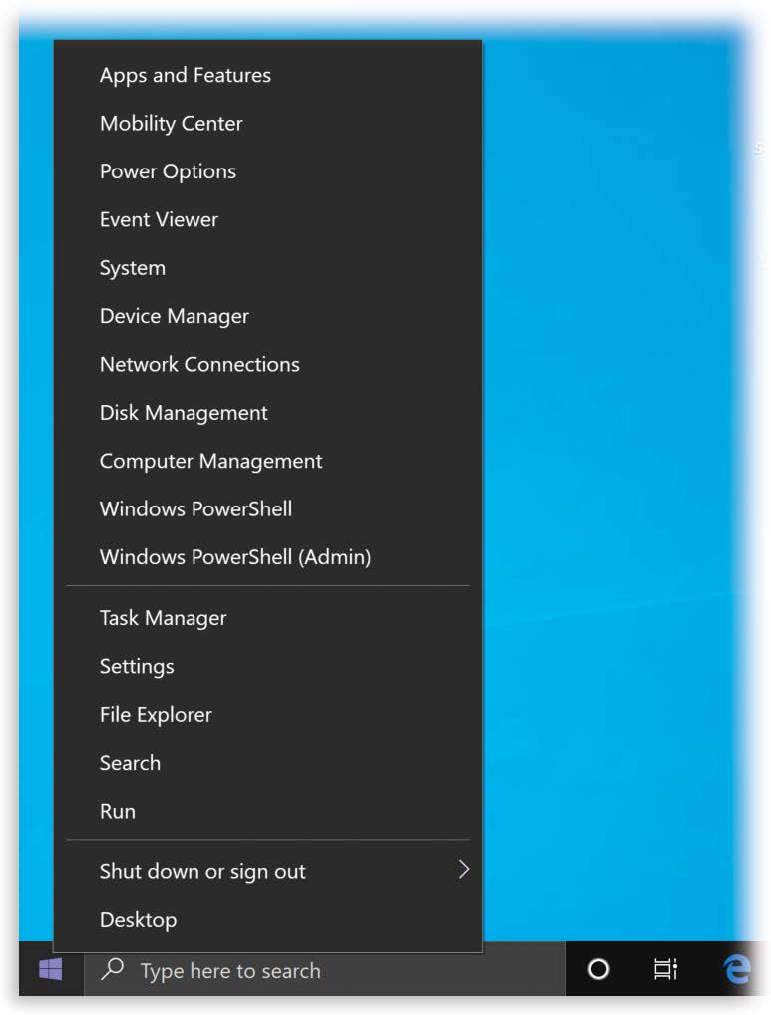
Figure 1-15. This secret little menu of options appears when you right-click the button. It’s a shortcut to the Task Manager and the desktop, among other things.
Sadly, Microsoft removed the Control Panel—one of the most useful items in the list—from this menu in the April 2018 Update. If you want the Control Panel, the quickest way now is to search for it with the search box.
Get Windows 10 May 2019 Update: The Missing Manual now with the O’Reilly learning platform.
O’Reilly members experience books, live events, courses curated by job role, and more from O’Reilly and nearly 200 top publishers.

