Chapter 4. Design Assumptions Impacting Deployment
As interesting as the “Ten minutes to Xen” campaign mentioned in Chapter 3 was, it glossed over the real-world planning that goes into successful deployments. Before starting any deployment, it’s vital to define what the goal behind the installation is, what types of workloads it’ll have, and what service-level expectations are associated with those workloads. It is far too easy to create either a killer deployment that costs more than it should or a deployment that hosts critical workloads but lacks proper redundancy or capacity.
In this chapter, we’ll cover some of the factors that go into “right sizing” a deployment for production use or simply in a test lab.
Pooled Hosts Versus Standalone Hosts
A XenServer pool is a collection of standalone hosts that operate as a single resource: sharing identical hardware, identical setup, and the same shared resources. VMs deployed on one host can be readily migrated to another member host, and the pool master serves as the single point of management. Because the primary purpose of a pool is to provide a single resource made of multiple members, it’s important to understand what this means from a VM perspective.
Figure 4-1 provides an example of a typical, standalone XenServer host and its resources. The resources are owned and controlled by this single host: from local storage to any direct-attach storage (DAS).
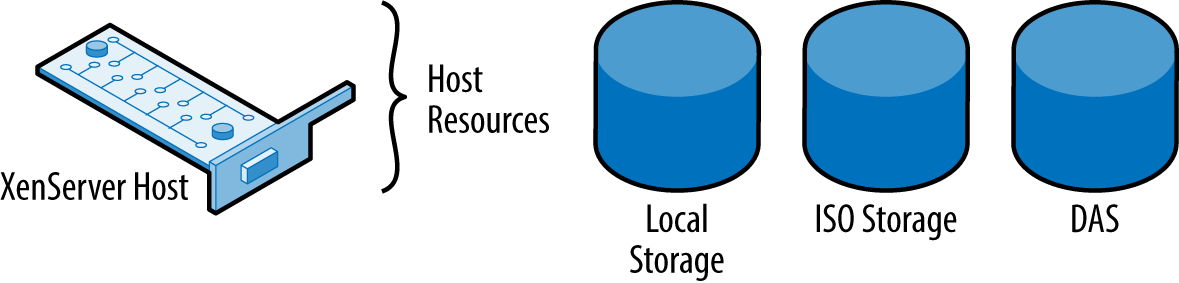
Figure 4-1. Standalone XenServer
In Figure 4-2, we can see an example of multiple hosts—configured as a pool—and that pool resources, such as ISO storage or shared storage allocated for VM disks, can be managed by all hosts within the pool.

Figure 4-2. Pooled XenServer hosts
Pool Master Versus Pool Member
When XenServer is deployed using a pooled model, the pool master is the primary management point for the pool and its member hosts. Configuration changes should always be first applied to the pool master and then replicated to member servers. This replication ensures that any pool member can become a master if required.
In the event a pool master fails, the remaining member servers will continue to function with known good information, but it can be difficult to make configuration changes. To manually elect a new pool master while the pool master is functional, issue the command in Example 4-1 from the member server you wish to become the new master.
Example 4-1. Designating a new pool master in healthy pool
# xe pool-designate-new-master uuid={uuid of new host}
If the pool master has failed and become unavailable, and XenServer HA isn’t enabled, the commands in Example 4-2 can be used to designate a new pool master.
Example 4-2. Recovery from failed pool master
# xe pool-emergency-transition-to-master uuid={uuid of new host}
# xe pool-recover-slaves
If XenServer HA is enabled, a replacement pool master will be nominated by the surviving member servers and automatically promoted to pool master. Depending upon your provisioning solution, it may be necessary to reconfigure it to recognize the new pool master.
Processor Compatibility Within Pools
When a VM is started, the virtual CPUs assigned to that VM are allocated from the physical CPUs in the host. Those physical CPUs have an instruction set defined in them, as well as certain processor features that are collectively known programmatically as physical features. Modern operating systems are aware of these capabilities, and often, applications rely on specific extensions to perform at their peak. This translates into the VM operating system being very aware of its underlying CPU capabilities. If a resource pool is constructed with hosts having identical processors (CPU type and stepping), then VMs can freely migrate between hosts in a pool without risking stability.
On the other hand, if the processors are different in a pool, instabilities can occur.
For example, if a VM is moved to a host that lacks a CPU instruction the original host had, it’s very likely for that VM to crash, or worse, corrupt some data. In XenServer this problem is solved using Intel FlexMigration or AMD Extended Migration, as appropriate. Through the use of this technology, a host with a newer CPU can be added to an existing resource pool, but with the newer CPU downgrading itself to the older features. Not all CPUs can be downgraded to the same point, and it’s always possible that no common set of features was defined by the processor vendor. To determine if a new host is compatible with the existing pool members, issue the command in Example 4-3 on both the new host and a member server.
Example 4-3. Determine CPU capabilities
# xe host-cpu-info
If the physical_features of a new host’s CPU are a superset of the existing pool master’s CPU physical_features, then it may be possible to add the new host to the existing pool. This concept is referred to as CPU Masking, where the CPU with the lowest set of physical_features becomes representative of the pool. From a technical perspective, masking allows old and new processors of the same architecture, family, and sometimes generation to coexist in a XenServer pooled deployment.
The masking comes into play allowing the lowest common denominator, or lowest processor with the least CPU features, within the pool to not be exposed or aware of the more advanced or newer features present in newer processors.
Forcing a Host into a Pool
While it is possible to force a new host into a pool without regard for feature masks, this process should never be performed in a production environment. Doing so can cause significant stability problems with VM migrations if a VM is migrated to a host with different CPU instructions.
If a pool has long since been established with homogenous hardware, instead of adding newer hosts, it is recommended to build out a second pool based on the new hardware, capacity need, and tied into its own shared storage to avoid masking issues.
For more information regarding supported CPUs within pooled configurations, please visit http://hcl.xenserver.org/cpus/.
Resource Pool Sizing
When someone asks about pool sizing, it’s always impressive how often the goal is “bigger is better.” A XenServer pool consists of a pool master and some number of member servers. The compute collection is then used to host VMs that run some type of workload. For example, how you design a pool to handle XenDesktop workloads is very dependent upon the fact that users will expect a seamless desktop experience from the VMs.
If a resource pool should become unavailable for some reason, it’s also possible all the VMs in the pool are also experiencing some form of degraded capability. This degraded capability can extend from loss of pool master and potential management of the pool through to shared resource failure. Using this model, a server should be no bigger than required to host the maximum number of VMs you can tolerate losing in the event of hardware failure. By extension, a pool should contain no more hosts than you are willing to experience degraded operation for.
Maximum Hosts per Pool
Every version of XenServer has included a configuration limit covering how many hosts could reliably be placed in a pool. For some customers, this number has felt insufficient. In reality, there is no hard limit to the number of hosts that can be placed in the pool. Important factors such as the number of VMs running on each host and the number of XAPI operations occurring within the pool have direct impact on the pool size.
Because it is difficult to determine a precise value for each parameter, we instead provide guidance on pool sizes. Occasionally, a given provisioning solution such as XenDesktop might determine that for its needs a smaller maximum pool size is warranted.
When to Create a New Pool
While it is possible to extend a pool with newer hardware, the best practice may instead be to create a new pool with the updated hardware. Masking CPU features is fantastic when you are looking purely at fresh capacity, but the mask will disable capabilities in the new CPU, which may impact performance. If your original XenServer installation is now at a utilization level that demands extra capacity, you should look back at the rationale used to originally define the pool size.
If the pool size was defined around failure tolerance, then adding capacity to an existing pool could represent additional risk. Creating a new pool would allow for the new hardware to perform at its peak and your pool design and associated risk profile to remain valid.
Because a pool is a collection of hosts working to support a common goal, it’s important to account for the workloads in the pool when defining a pool. Factors to account for could include:
- Compliance requirements, which dictate how VMs are to be deployed or managed.
- Performance considerations of VMs, which could impact the number of VMs a host is able to support.
- Data sensitivity, which might impact where a host is deployed within an organization. For example, if a XenServer pool is hosting VMs that are public facing, it may not be appropriate for it to also host VMs containing financial information.
- Unique hardware dependencies present within a workload. For example, a GPU-intensive VM will require access to a GPU, but you can only install a limited number of GPUs in a host due to power and cooling contraints.
Defining a Management Paradigm
XenServer has a fantastic distributed architecture, but it is only as efficient as its administrators. When defining a use for a XenServer pool, you will need to define how it will be managed. If management isn’t planned in the design phase, it’s entirely possible for the resultant architecture to be challenging to operate.
Provisioning Tools
If your XenServer infrastructure is to form part of an Apache CloudStack, OpenStack, or XenDesktop environment, those tools will define how VMs are to be provisioned. Each of these tools will assume they have complete ownership over the XenServer resources, and manual changes could easily break things. Nominally simple tasks such as applying security patches or performing hardware maintenance can be complicated if the provisioning tool expects a consistent configuration.
This problem is easily encountered during planned activities such as patching but can be particularly problematic when emergency activities are necessary. Administrators are strongly encouraged to perform the backup operations listed in Chapter 10, but to also retain configuration information for key items such as pool management interfaces.
Multiple XenCenter Administrators
XenCenter is a graphical management tool that can be installed on any Microsoft Windows machine. Because XenServer has a distributed architecture, it isn’t required to have XenCenter constantly running, and many XenServer installations are never managed from within XenCenter. If you do use XenCenter and have multiple XenServer administrators, it’s important to understand how XenServer commands work.
XenCenter is fundamentally a graphical user interface (GUI) around the XAPI. As such, it takes login credentials and establishes a session with a given XenServer resource pool. Multiple resource pools can be administered from within a single XenCenter session provided they use the same credentials. Because XenCenter is fully aware of what role a user has within a given XenServer resource pool, it is entirely possible for a user to have different access rights within different pools.
When a user requests an action to be performed (e.g., start a VM), XenCenter maps that command to the corresponding XenAPI call and issues it. Multiple concurrent commands can be executed; and while XenCenter naturally sequences commands based on user input, when multiple users are accessing the same resource pool, oddities can happen.
Consider, for example, the case of starting a VM. The VM power state can only be “HALTED,” “RUNNING,” “PAUSED,” or “SUSPENDED.” If you attempt to start a VM that is already running, an error will be returned. This is precisely the type of administrative “oddity” that can occur with multiple administrators attempting to perform the same action. In the event an unexpected error occurs when attempting to perform a task, verify the state of the error in the XenCenter notifications area. It will show which user performed the task and will also include those tasks performed via API and command line.
Hardware Compatibility
Like many operating systems, XenServer has a hardware compatibility list, or HCL. That HCL can be found at http://hcl.xenserver.org and lists all the hardware that Citrix and the hardware vendor agree to deliver support for. In effect, the hardware listed represents hardware that is known to work with XenServer and for which the vendor still offers production support.
So if the hardware you wish to use isn’t listed, that doesn’t mean XenServer won’t install and run perfectly fine. What it does mean is that either Citrix hasn’t yet tested the hardware, in which case you can submit to have it tested from the HCL website, or that the vendor doesn’t wish to support its hardware for the given XenServer version. This is a particularly important consideration for production use and is an important item to verify prior to performing a version upgrade. With legacy hardware that was previously on the HCL, XenServer often will function without issue upon upgrade, but it is important to test first.
Host Requirements
Installation of XenServer can occur on the vast majority of x86 server class hardware available today. The core requirements are to have the server boot from a BIOS (or legacy mode if using UEFI) and enable virtualization extensions for your chosen CPU. While XenServer can be installed onto workstation or desktop class machines, the performance and reliability of those machines are only appropriate for test labs.
It has been our experience that, XenServer aside, having one or more bare minimum hosts to test internally before rolling out to production is of benefit to production. Certain tests within a lab will never scale to production levels, but the majority of XenServer-related administrative tasks can be carried out within a lab environment to better prepare, plan, and document what should be done going into production changes.
In our test environments, we keep one or more hosts with the following “bare minimum” resources available before rolling out changes to our production-grade environments:
- Multisocket/multicore AMD or Intel-based host
- 8 GB–12 GB of physical RAM
- 100 GB or more of spindle-based storage
- 1 or more gigabit-based networking cards
- Guest VMs that reflect those in a production environment
As for production grade hardware and host requirements, this will be discussed further in Chapter 5.
BIOS, Firmware, and Driver Updates
The HCL contains very specific information regarding various peripherals, drivers, and firmware used during the certification process for XenServer. As such, it is critical that a particular component’s firmware (provided by a vendor) matches the HCL. Drivers distributed with the XenServer installation media or in subsequent patches are developed against a given component and firmware level. This is done to ensure the desired functionality as well as for performance with respect to the function of said component.
So, for you administrators, always ensure that your hosts have the latest BIOS, firmware, and additional software from your vendor applied to each host before installation, forming a pool, or upgrading to a newer XenServer version.
Driver Updates and XenServer Updates
If the default installation of XenServer doesn’t contain a driver for your hardware, or you installed a hardware driver post XenServer installation, pay particular attention to XenServer updates. A XenServer update may downgrade your driver, and the driver and kernel version requirements in a XenServer update are listed in the release notes.
Shared Versus Local Storage
Local Storage is storage that is a part of the host’s hardware, such as spindle or SSD-based drives. After XenServer has been installed onto a host, the remaining disk space is left as local storage. This storage is also managed by the host’s native hardware and maintained by dom0. For many on a budget, this is quite sufficient because drive capacity in comparison to price is quite cheap. It also means that all VMs are stored on the same drive or drives and do not require complex storage networks, such as with Fibre Channel, iSCSI, or NFS.
Shared storage is the opposite of local storage in that it facilitates much of what a local disk drive would do, but that other authorized XenServer hosts can also leverage this. It is also important to note that not only can multiple hosts use this storage for virtual-machine disks, snapshots, and configuration data, but provisioning applications and other third-party utilities can leverage this storage via the XAPI API. Shared storage is always remote, such as an iSCSI chassis, Fibre Channel array, or NFS container that leverages standardized storage area network protocols with each XenServer host.
Historically, building a XenServer resource pool using only local storage meant giving up the ability to live migrate a VM between hosts using the XenMotion feature. XenMotion of a VM was accomplished in part by transferring ownership of the underlying virtual block device from one XenServer host to another. Because local storage was tied to a given host, such vbd transfer wasn’t possible until Storage XenMotion was implemented in XenServer 6.1.
Storage XenMotion allows the disk of a VM to be moved from one storage repository to another, without powering off the VM. The migration can be between different storage implementations and can both occur between local storage and shared storage and across XenServer resource pools. With the flexibility Storage XenMotion provides, the automatic decision to choose shared storage isn’t as strong a requirement for certain deployment scenarios such as those supporting cloud operations.
Storage Provisioning Model
Storage is provisioned in XenServer using storage repositories to contain virtual disks. Based on the needs of a XenServer deployment, two different types of storage provisioning are available to meet the needs for a deployment that scales, but is also manageable: thin or thick provisioning. The choice of provisioning model will both dictate certain storage topologies and have a direct bearing on storage consumption.
During the design phase of a XenServer deployment, it is best to decide upon which of the two provisioning methods should be used. The primary reason for this is that, over time with data accumulation, converting a storage device’s provisioning method may be time consuming, complex, and in certain cases, impossible based on storage limitations.
Thick provisioning
A thick-provisioned storage device ensures that the allocated size for a storage volume will represent the consumed size regardless of how much of the device is actually used. From the perspective of the XenServer administrator who has just created a Guest VM with a 60 GB virtual disk, the storage device immediately reports its total space, minus 60 GB. While the Guest VM’s virtual disk may only use 20 GB of physical space, the thick-provisioned storage device blocks of 60 GB of “used space” despite the 40 GB of “empty space.” This is to ensure the virtual disk will always have its 60 GB of potential storage available to the Guest VM as well as preventing the overlap, or over provisioning of the storage device’s physical size.
As the storage management APIs talk to the storage device, which is thick provisioned, it considers and reports:
- I have that space available.
- The administrator has permission to create a virtual disk.
- I will pre-allocate 60 GB of disk space for this VM.
- I will subtract 60 GB from my total.
- I will present all of this back to the administrator through XAPI.
Finally, a high-level overview of thick-provisioned, logical-volume managed storage devices is presented in Figure 4-3. It is important to note that if any of the logical volumes (LVMs) are close to full, more space for new virtual disks, snapshots, and backups will not be possible until space is “freed” or “returned” to the storage device as usable space.
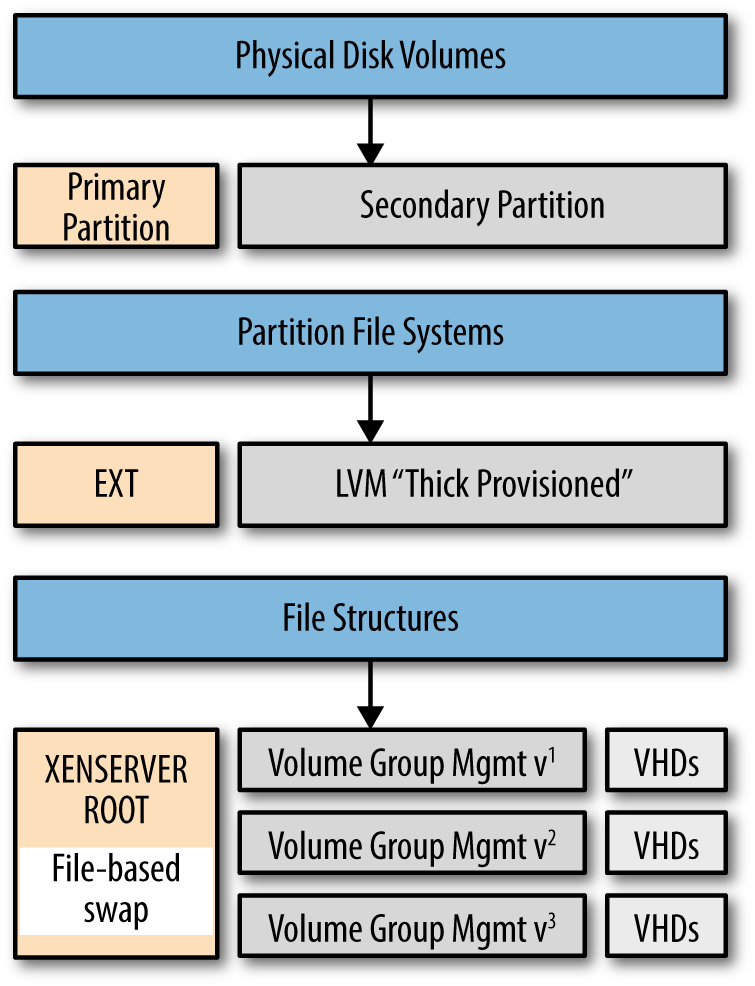
Figure 4-3. Relationship between disk volumes and volume groups
Thick Provisioning Is a Default for iSCSI and HBA
The iSCSI and HBA storage repositories use a thick-provisioned storage model. As discussed earlier, this means the virtual disk consumes its full configured size on the storage solution. While this can be designed for a running VM, it’s important to realize that any snapshots are also thick provisioned. Without accounting for this extra storage, its quite easy to run low on storage without clear indication why.
Thin provisioning
In contrast to “thick provisioning,” storage that is thinly provisioned will only consume physical storage that compares to its actual usage. In the case of a VM, that is allocated a 60 GB disk but is only consuming 20 GB of that disk, the underlying storage will see roughly 20 GB consumed. This overprovisioning of storage has a clear benefit but also comes with distinct risks.
The most immediate benefit to VM administrators is that expensive storage solutions can be utilized more efficiently. Consider a deployment that will use 80 GB disks for each VM but on average will only have 20 GB used. If the available storage is 5 TB, this means you can comfortably fit roughly 64 VMs on that storage solution when thickly provisioned. Changing to thin provisioning will result in up to 256 VMs being able to fit within that same storage footprint. Considering the cost of storage, this is a definite benefit, but adds the additional management burden of ensuring disks whose usage increases, won’t exhaust the available storage of the physical hardware.
NFS Storage Is by Default Thin Provisioned
When using NFS-based storage, it’s important to monitor the free space on your NAS to ensure sufficient free space exists to account for VM growth. If monitoring isn’t in place, it is quite possible to run out of storage on the underlying storage, particularly if snapshots and disk clones are used.
Sparse allocation
Sparse allocation occurs when the physical disk layout doesn’t contain contiguous blocks. For example, if you write a single file at the start of the disk and another at the end of the disk, the middle isn’t allocated. When working with thinly provisioned disks, it is very likely the filesystem the VM is using is sparsely allocated. This allows the disk to report low disk utilization because the unused portions of the disk can be represented as empty blocks.
When using thinly provisioned disks, it’s important to understand how the filesystem is actually represented on disk and how unused file blocks are handled. Consider the case of a file that gets deleted.
If when a file is deleted, the filesystem simply updates a file table indicating the blocks to be free, then to the underlying storage the blocks freed may still look like they are in use. If the storage is sparsely allocated, and the storage has no way to know the file was deleted, then it will assume the blocks to be in use resulting in increased storage utilization. In this scenario, copying of files within the VM could actually cause disk usage to increase when thinly provisioned. A real-world example of this occurs with disk defragmentation tools and can occur within certain applications that use just-in-time compilation.
Storage I/O Operations Per Second (IOPS)
All storage solutions have a maximum number of I/O operations they can perform per second. Factors governing the maximum IOPS for a storage solution include the size of transfer, the storage controller, the RAID level, and the physical disk characteristics. As a general rule, the faster the physical disk spins, and the more disks in the RAID-set, the more I/O you can generate, with solid state storage having the highest I/O. As with most things in computing, faster means more costly, so it’s important to understand if you really need all the speed you think you do.
Validating Local Storage
Historically, XenServer administrators used shared storage to enable live migration of VMs. Starting with XenServer 6.1, shared storage was no longer required to live migrate a VM. This opened the potential for local storage to be used, without losing the benefit of live migration. While there are distinct performance benefits for using shared storage for live migration, if you rarely need to migrate a VM, local storage could benefit you, and at a potentially lower cost.
The key to determining if local storage is sufficient for your needs is to look at the IOPS you require, and the size of the storage. IOPS per disk will vary from well over 5000 for SSD to roughly 125 for SATA 10K. The formula to determine the number of VMs a disk array can handle is:
Using a single SSD with 5000 IOPS and 30 IOPS per VM, we are able to handle roughly 150 VMs per host, while using eight SATA 10K disks in a RAID 10 configuration with 30% writes would result in 28 VMs on the same host. If each VM requires 40 GB, the SSD solution requires six terabytes of SSD, which can be expensive and will likely require multiple drives making shared storage attractive, while using SATA 10K the requirements can be met with eight drives.
Memory Management
Memory management within a XenServer host can be a bit confusing for some. This confusion only increases when Internet searches reference increasing dom0 memory utilization for certain types of workloads. In this section, we’ll cover the basics of memory usage within a XenServer environment, but should you believe it beneficial to increase dom0 memory, you should do so only under the guidance of support services.
Fixed Memory Concepts
Fixed memory represents a memory object that is fixed within the system. Examples of fixed memory include the physical memory in a host, the memory consumed by the hypervisor, and memory used by dom0.
Host memory
Host memory is the physical memory present within a XenServer host. While it is possible to overcommit host memory, at no point in time can there be running VMs whose allocated memory exceeds the physical memory contained within a host. Determining the host memory via command line is shown in Example 4-4.
Physical Hot Plug or RAM
XenServer currently doesn’t support hot plug of host memory. If the physical memory configuration needs to be changed, place the host in maintenance mode, evacuate all VMs to other hosts, and perform the hardware reconfiguration.
Example 4-4. Determine current host memory configuration
# xe host-list uuid=[host-uuid] params=memory-total,memory-free
Hypervisor memory
Hypervisor memory is used by the core Xen hypervisor, the crash kernel, and core tooling. It is referred to as the “host memory overhead,” and is obtained using the memory-overhead parameter, as shown in Example 4-5.
Example 4-5. Determine hypervisor memory overhead
# xe host-list uuid=[host-uuid] params=memory-overhead
dom0 memory
dom0 memory is used by the control domain. Because the control domain is a specialized virtual machine, correct configuration of its memory is important to optimum performance. Each XenServer version has had recommendations on the maximum memory configuration for dom0, and with XenServer versions 6.2 and prior, many of the recommendations were a balance between Linux low-memory requirements and user space. Starting with XenServer 6.5, dom0 became 64 bit, and with that change, all previous best practices with respect to memory configuration should be avoided. dom0 memory will be automatically sized based on the physical memory configuration but may need to be resized based on specific hardware devices (drivers that need more memory) or specific usage scenarios (adjustment for cache utilization).
It’s strongly recommended that such changes be performed with the guidance of support services. Example 4-6 shows you how to obtain the current memory utilization in dom0. It starts with determining the UUID of the control domain or dom0.
Example 4-6. Determine current memory utilization within dom0
# xe vm-list is-control-domain=true
# xe vm-list uuid={dom0-uuid} \
params=memory-actual,memory-overhead
The total memory used will be the sum of memory-actual and memory-overhead expressed in bytes.
Dynamic VM Memory Management
Dynamic memory management, also known as dynamic memory control, is a mechanism within XenServer that allows the configured maximum memory of all running VMs to exceed the physical memory within a given XenServer host. This allows for efficient utilization of host memory while maximizing VM density. It is important to note that when host memory is overcommitted, VM performance can suffer, and that recovery from host failures is made more complex. As a result, extreme utilization of dynamic memory should be avoided where possible.
Implementation
Dynamic memory management is implemented within dom0 using the squeezed daemon and within the Guest VM using the XenServer tools with an operating system memory balloon driver. This balloon driver is configured with the maximum and minimum dynamic memory settings. When the VM starts up, XenServer configures the VM with the maximum memory. This allows the operating system to define any memory access tables and caches appropriately. The operating system then loads its drivers, which then causes the XenServer balloon driver to be loaded. The balloon driver then reserves as much free memory as possible to either provide the operating system with available memory equal to the dynamic minimum memory, or some value of memory between minimum and maximum. If the host has sufficient free memory for the VM to use its configured maximum, the balloon driver releases all memory back to the operating system.
In the event a VM requests to load on a host, XAPI will call squeezed to process the memory-allocation request. If there is insufficient free host memory, squeezed sends a request into all running VMs on the host requesting they free any unused memory. The balloon driver in each VM responds by attempting to reclaim any free memory it had reserved at startup and reports the result back to squeezed. If after the process of memory reclamation completes there is sufficient memory to load the VM, then normal VM start occurs. If there wasn’t sufficient memory, an insufficient memory error is returned via XAPI to the caller.
Enabling dynamic memory management
Dynamic memory management is automatically enabled for any VM that is running the XenServer tools, and for which the dynamic memory parameters are configured. The dynamic memory parameters are memory-dynamic-max and memory-dynamic-min, and they are closely related to their static memory cousins, memory-static-max and memory-static-min. XenServer enforces the following memory relationship for dynamic memory within a VM:
memory-static-min ≤ memory-dynamic-min ≤ memory-dynamic-max ≤ memory-static-max
It’s important to note that with each supported operating system, the XenServer engineering team explicitly tests the limits of dynamic memory for that operating system. This can result in different bounds for memory configuration than what the vendor or operating system author provides. Often this discrepancy is due to observed instabilities in the operating system at the lower bound for dynamic memory. If no observed instabilities are present, then the minimum value for dynamic memory will be defined at the pool level as one quarter of the static maximum for the operating system.
Changing the memory configuration on a VM is easily performed from within XenCenter, which will automatically validate the configuration and any restart requirements. In example Example 4-7, we see the command line method for changing the minimum value for dynamic memory on a specific VM. Example 4-8 shows how to verify the running configuration for a given VM.
Example 4-7. Change dynamic memory using CLI
# xe vm-param-set uuid=[vm-uuid] memory-dynamic-min=2147483648
If Dynamic Memory Constraints Are Violated
Error code: MEMORY_CONSTRAINT_VIOLATION
Error parameters: memory limits must satisfy: static_min ≤ dynamic_min ≤ dynamic_max ≤ static_max
Example 4-8. Determine current memory configuration
# xe vm-list uuid=[vm-uuid] params=all
Migration of VMs to other hosts
When a VM is migrated to another host, it’s possible the new host lacks sufficient memory to run the VM. In order to attempt migration, XAPI first requests via squeezed that the VM being migrated reduce its memory requirements as much as possible. This then establishes a minimum running configuration whose values are then communicated via XAPI to the XAPI daemon on the destination host. XAPI on the destination host takes the memory requirements and communicates them to squeezed as if the migrating VM were starting. Assuming the VM can start, migration will proceed. In the event migration can’t proceed, an insufficient memory error will be returned via XAPI to the caller.
Planning for Infrastructure Failure
Modern data-center operations assume some level of infrastructure failure will eventually occur. XenServer provides a number of options intended to provide resiliency in the face of failure. Examples include bonding and link aggregation of networks and multiple paths to storage; both of which are covered in Chapter 5. In addition to resiliency, XenServer can be configured to self monitor for host failures and automatically restart impacted virtual machines.
Host Failure Protection
Host failure protection, or high availability (HA), uses a combination of network and shared storage heartbeat monitors to determine if a given host within a resource pool is operating. In the event the requisite heartbeat interval isn’t satisfied, the Xen hypervisor watchdog will trip and self-fence the host. This has the direct benefit of ensuring that crashes and instabilities from within dom0 are also trapped. In the event the pool master is deemed to have failed, one of the surviving hosts—in a discussion with the remaining hosts—will promote a suitable host with enough resources as the new pool master. The pool master then automatically restarts any VMs configured to restart in the event of host failure that were running on the failed server, and VM operations continue with minimal interruption.
Host failure protection isn’t designed to detect a VM that crashes or operate with a pool with fewer than three hosts and does require that all protected VMs have no affinities to a specific host and have their disks on shared storage. If host failure protection is required for resource pools with fewer than three hosts, an external monitoring and attestation service will be required. The creation of such a service is beyond the scope of this book.
Host failure protection also requires that each member within a XenServer pool has multiple paths to both storage, management infrastructure, and other essential networks. In regards to network, this is accomplished via bonded networking; and for iSCSI and Fibre Channel storage, this is accomplished with multipathed storage networks. Even without the host-failure protection enabled, multipathed storage and bonding can help eliminate single points of failure within the storage, management, and infrastructure network.
Protection levels
VMs in a pool can be protected as “best effort,” “protected,” and “unprotected.” Within each category, a restart priority can be given. Any VM with protected status will automatically be restarted in priority order if there is sufficient remaining capacity to do so. The XenServer pool master continually monitors the status of member servers, and if insufficient capacity existed to restart all protected and best-effort VMs, as new capacity becomes available, the pool master will automatically restart any remaining protected and “best effort” VMs.
XenServer HA can be enabled by issuing the command in Example 4-9, where heartbeat-sr-uuids is the UUID of the shared storage repository on which the heartbeat metadata will be written.
Example 4-10 shows the command for disabling XenServer HA.
Example 4-9. Enable XenServer HA
# xe pool-ha-enable heartbeat-sr-uuids={SR-UUID}
Example 4-10. Disable XenServer HA
# xe pool-ha-disable
Configuration of which VMs to protect is easily done using XenCenter but can also be performed from the command line. Example 4-11 shows how a specific VM can be configured to automatically restart as the first VM in the restart order. Note that the order parameter is optional.
Example 4-11. Specifying a VM to automatically restart
# xe vm-param-set uuid={vm-uuid} ha-restart-priority=restart \
order=1
Preventing Aggressive Fencing
Occasionally XenServer will determine that a storage heartbeat failure has occurred and fence a host, or worse, an entire pool. This typically occurs when a redundant storage solution or a storage solution with redundant controllers is used, and the failover timer used by the storage solution is longer than the default XenServer HA timeout of 30 seconds. The value for this timeout can be changed, but it’s important to know that simply enabling HA from within XenCenter, or using the default form of the pool-enable-ha command will reset the timeout to the default value.
In Example 4-12, the timeout has been increased from the default to two minutes.
Example 4-12. Set HA timeout to prevent aggressive fencing
# xe pool-enable-ha heartbeat-sr-uuids={SR-UUID} \
ha-config:timeout=120
Capacity Planning During Failure
Ensuring sufficient capacity to restart protected hosts is a key result of the HA plan created by the HA daemon. This plan takes into account the current operational state of every protected VM, and also the state of each host. If dynamic memory control is enabled, available free host memory, current VM memory consumed per VM, and minimum required memory for protected VMs is factored into the plan.
As you can imagine, the more hosts in a pool and the greater the number of protected VMs, the more complex the HA plan becomes. To account for these complexities, the XenServer HA daemon computes the maximum number of host failures that can be tolerated and still allow for all protected VMs to run.
To determine the current maximum failure count, issue the command in Example 4-13.
Example 4-13. Determine the current maximum host failures that can be accepted
# xe pool-ha-compute-max-host-failures-to-tolerate
If the failure count is three or fewer, the HA daemon will compute a failure plan that accounts for most eventualities and can accommodate hosts with dissimilar configurations. If the host count is greater than three, the HA daemon assumes that every VM is as large as the largest, and that every host is as densely populated as the most densely populated host. As a result, for most production deployments, it will be important to set the maximum host failures to as few as required to meet the operational requirements for the pool.
To set the maximum number of host failures, issue the command in Example 4-14.
Example 4-14. Set the maximum host failures to accept
# xe pool-param-set ha-host-failures-to-tolerate={count}
No Single Points of Failure
To a certain extent, this should be obvious, but you’d be surprised at how often complaints are raised against XenServer that are really the result of single points of failure in the deployment. Under normal operation, XenServer configuration information is automatically replicated between all member servers in a pool, and the final arbiter of sanity is the pool master. This means that any member server can become a pool master as needed with minimal interruption of XenServer operations. Replication of configuration information always occurs over the primary management network, which implies the primary management network should have redundant links. Similarly, if shared storage is used, it is assumed the VMs will be updating some information on their attached virtual disks, so redundant network connections are also required for storage networks. It is of course not sufficient to simply have multiple NICs in the host and bond them together; network redundancy must also exist within the network switches between hosts and to storage.
Get XenServer Administration Handbook now with the O’Reilly learning platform.
O’Reilly members experience books, live events, courses curated by job role, and more from O’Reilly and nearly 200 top publishers.

