Build a super fast deep learning machine for under $1,000
The adventures in deep learning and cheap hardware continue!
 Brain. (source: Pixabay)
Yes, you can run TensorFlow on a $39 Raspberry Pi, and yes, you can run TensorFlow on a GPU powered EC2 node for about $1 per hour. And yes, those options probably make more practical sense than building your own computer. But if you’re like me, you’re dying to build your own fast deep learning machine.
OK, a thousand bucks is way too much to spend on a DIY project, but once you have your machine set up, you can build hundreds of deep learning applications, from augmented robot brains to art projects (or at least, that’s how I justify it to myself). At the very least, this setup will easily outperform a $2,800 Macbook Pro on every metric other than power consumption and, because it’s easily upgraded, stay ahead of it for a few years to come.

Learn faster. Dig deeper. See farther.
I hadn’t built a computer since the ’80s, and I was pretty intimidated by dropping hundreds of dollars on something I might not be able to build (and might not really use), but I’m here to tell you it can be done! Also, it’s really fun, and you will end up with a great general-purpose computer that will generally do inference and learning 20 times faster than your laptop.
Here’s what you need to buy and some specific recommendations:
Motherboard
Motherboards come in different sizes. Since I didn’t want to use multiple GPUs, the cheapest and smallest standard size is called mini-ITX, which will be fine for this sort of project. My minimum requirements were a PCIe slot to plug the GPU into and two DDR4 slots to plug RAM into, and the board I went with was an ASUS Mini ITX DDR4 LGA 1151 B150I PRO GAMING/WIFI/AURA Motherboard for $125 on Amazon. It comes with a WiFi antenna, which is actually super useful in my basement.
Case
Cases don’t matter much, but they’re pretty cheap, and since this market for DIY computers is dominated by gamers, they come in all kinds of fun shapes and colors. The size should match the motherboard, so it needs to have mini-ITX in the name. I bought a Thermaltake Core V1 Mini ITX Cube on Amazon for $50.
RAM
I can’t believe how cheap RAM has gotten! You need to buy DDR4 RAM to match the motherboard (that’s most of what you will find online) and the prices are all about the same. I bought two 8GB of Corsair Vengeance for $129.
I spent the extra $5 because of the Amazon review that stated, “For those who just cannot get enough LEDs crammed into their system, these are the perfect choice.” If you build a computer in your basement and you don’t embrace your inner Burning Man/teenager aesthetic, you are going to have a really hard time finding components.
CPU
I looked at speed comparison CPU tests online, and I think I would have been fine with a slower CPU, as very few things I do are CPU-limited (except training neural nets and I’m going to use the GPU for that). But I couldn’t bring myself to build a whole computer with a CPU three generations old. I went with the Intel I5-6600 for $214.
Pretty much any CPU you can find on Amazon will work fine. I didn’t spend the extra $20 for the I5-6600K, which is the same exact chip but overclockable because the whole notion of sacrificing reliability for a 10% speed increase seemed insane to me. I do have to admit that as I started getting into the idea of building my own machine, I started to regret the decision. So who knows? Building a computer can change your outlook on life. Probably fewer regrets if you go with the overclockable chip. On the other hand, maybe it’s best to protect yourself from yourself and take the option off the table.
Hard drive
I also can’t believe how cheap hard drives have gotten. I bought a 1TB SATA drive for $50. A solid state drive would be faster, but much more expensive, and, typically, my deep learning programs have not been disk I/O bound, since they generally load batches of data into RAM and then crunch on them for a long time. If you wanted to use your computer for heavy file transfer workloads or just wanted to make sure that it’s clearly faster than your friend’s Macbook for all applications, I would get a solid state drive like the Samsung 850 EVO 250GB 2.5-Inch SATA III Internal SSD, which is 250Gb for $98.
All these drives make you realize what a rip off it is when Apple charges you $200 more for an extra 250Gb in your Macbook Pro.
Graphics card/GPU
Which graphics card is the most important and the toughest question. For pretty much all machine learning applications, you want an NVIDIA card because only NVIDIA makes the essential CUDA framework and the CuDNN library that all of the machine learning frameworks, including TensorFlow, rely on.
Not being a GPU expert, I found the terminology incredibly confusing, but here’s a very basic primer on selecting one.
Perhaps the most important attribute to look at for deep learning is the available RAM on the card. If TensorFlow can’t fit the model and the current batch of training data into the GPU’s RAM it will fail over to the CPU—making the GPU pointless.
Another key consideration is the architecture of the graphics card. The last few architectures NVIDIA has put out have been called “Kepler,” “Maxwell,” and “Pascal”—in that order. The difference between the architectures really matters for speed; for example, the Pascal Titan X is twice the speed of a Maxwell Titan X according to this benchmark.
Most of the papers on machine learning use the TITAN X card, which is fantastic but costs at least $1,000, even for an older version. Most people doing machine learning without infinite budget use the NVIDIA GTX 900 series (Maxwell) or the NVIDIA GTX 1000 series (Pascal).
To figure out the architecture of a card, you can look at the spectacularly confusing naming conventions of NVIDIA: the 9XX cards use the Maxwell architecture while the 10XX cards use the Pascal architecture. But a 980 card is still probably significantly faster than a 1060 due to higher clock speed and more RAM.
You will have to set different flags for NVIDIA cards based on the architecture of the GPU you get. But the most important thing is any 9XX or 10XX card will be an order of magnitude faster than your laptop. Don’t be paralyzed by the options; if you haven’t worked with a GPU, they will all be much better than what you have now.
I went with the GeForce GTX 1060 3GB for $195, and it runs models about 20 times faster than my MacBook, but it occasionally runs out of memory for some applications, so I probably should have gotten the GeForce GTX 1060 6GB for an additional $60.
Power supply
I was talked into a 650W power supply for $85. It’s so annoying and hard to debug when electronics have power issues it doesn’t seem worth trying to save money on this. On the other hand, I haven’t seen my setup draw more than 250W at peak load.
Heat sink
I remember the first startup I worked at kept their servers in their closet and the fans were unbelievably loud, even through the closet door. Those days seem to be long gone. Still, that 650W power supply lets you put almost 10 times the energy into this rig as goes into your laptop, and that energy has to come out somewhere. It might be unnecessary, but I bought a bad-ass $35 Cooler Master Hyper 212 EVO heat sink. It keeps the CPU cool and runs super quiet.
Overview
| Component | Price |
| Graphics Card | $195 |
| Hard Drive | $50 |
| CPU | $214 |
| Case | $50 |
| Power Supply | $85 |
| Heat Sink | $35 |
| RAM | $129 |
| Motherboard | $125 |
| Total | $883 |
To actually use this thing, you will need a monitor, mouse and keyboard. Those things are easy (I had them lying around). The total so far is $883, so there’s plenty of room to get a sweet setup for around $1,000.
Putting the computer together
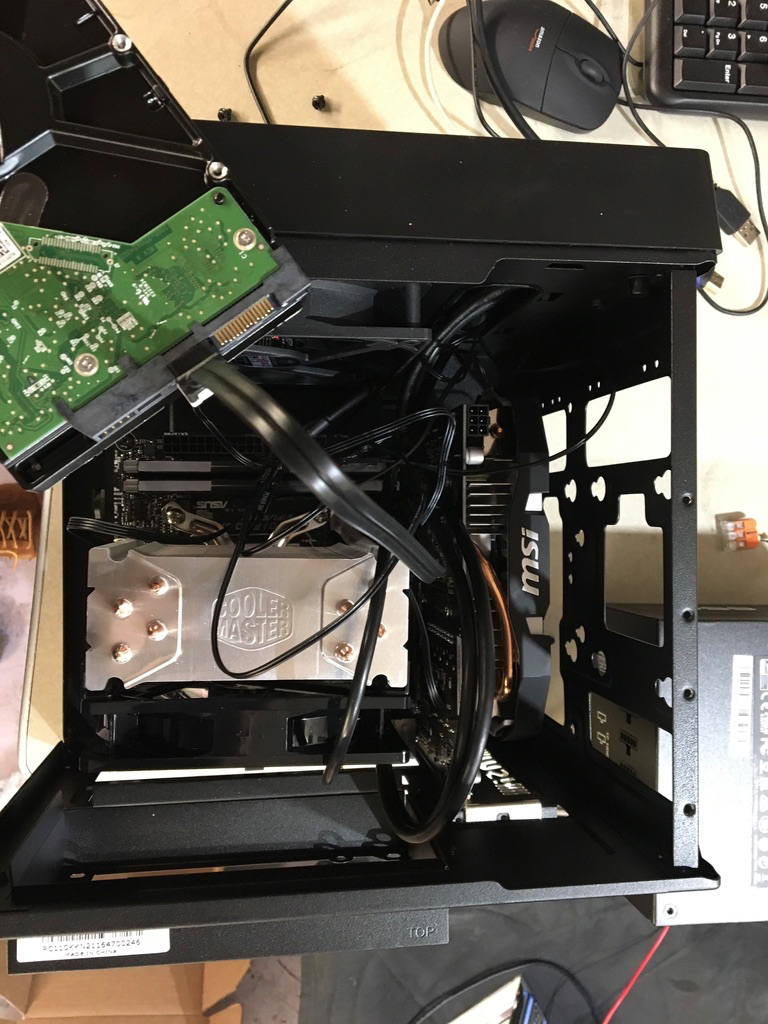
I was pretty excited when all the packages starting arriving, and I found assembling the computer deceptively easy. It took me around an hour, following the many manuals that came with the machine. In the end, the computer wouldn’t turn on, and I had to replace the motherboard, which was frustrating but worked out OK.
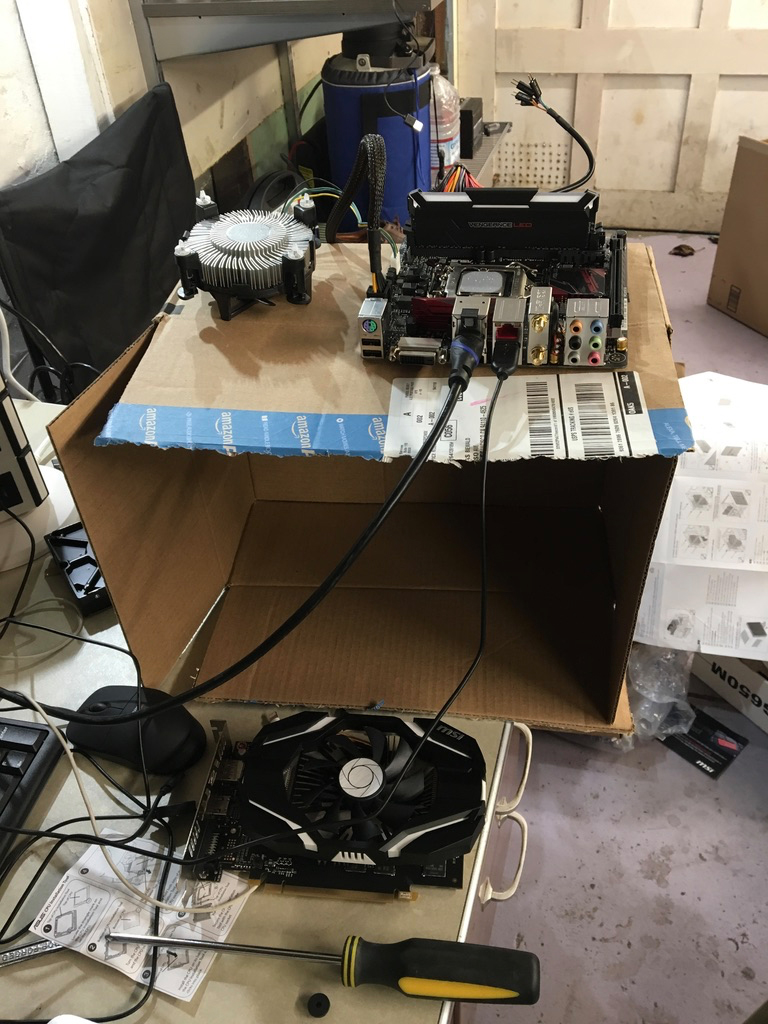
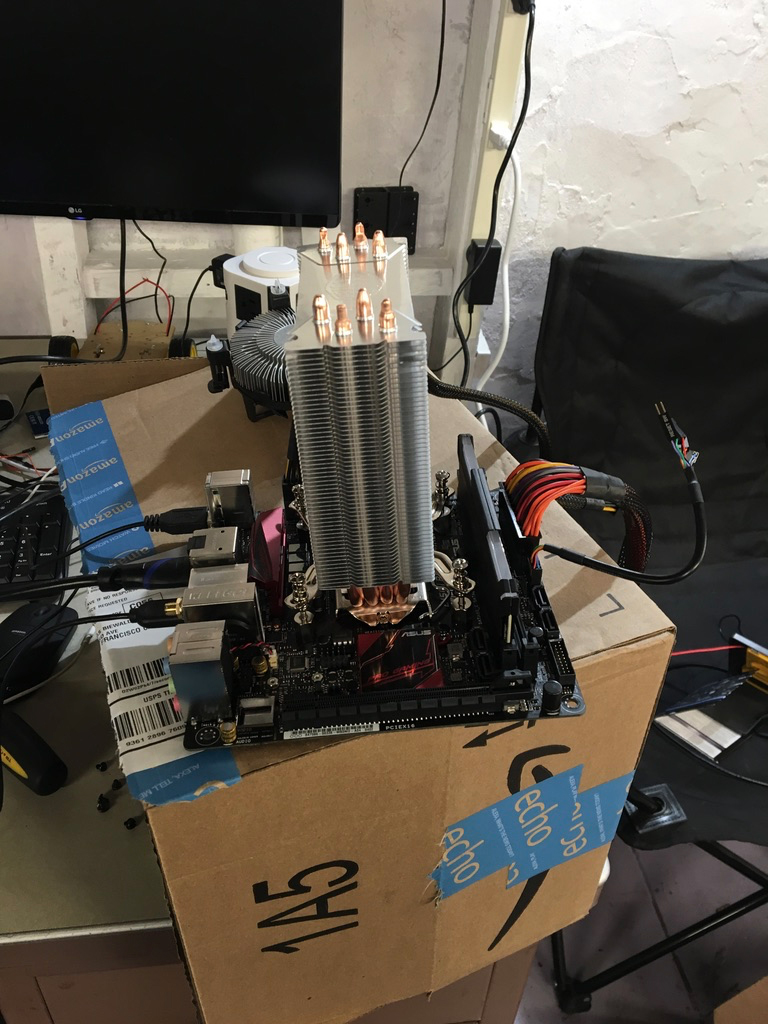
The second time around, I put everything together on a cardboard box first to check that it worked.
Basically, if you plug everything into the places it looks like it probably fits, everything seems to work out OK.
Booting the machine
You will make your life easier by installing the latest version of Ubuntu, as that will support almost all the deep learning software you’ll install. You can put an image on a USB stick and install it using this simple step-by-step guide. The linux desktop install process has changed a lot since my days of fighting with drivers in the 90s—it went incredibly smooth.
The new Ubuntu desktop is also great. I’ve been using this machine as a personal computer quite frequently ever since I built it. With a ton of RAM, reasonably fast CPU, and lightweight OS, it’s by far the fastest machine in the house.
Installing CUDA, OpenCV and TensorFlow
In order to use your fancy new deep learning machine, you first need to install CUDA and CudNN; the latest version of CUDA is 8.0 and the latest version of CudNN is 5.1. To look at things from a high level: CUDA is an API and a compiler that lets other programs use the GPU for general purpose applications, and CudNN is a library designed to make neural nets run faster on a GPU. You need to download the software from the NVIDIA website.
OpenCV is an open source library for image processing that most applications use. Right now, the latest version of OpenCV (3.1) doesn’t work with the latest version of CUDA (8.0) on EC2. You can make it work by explicitly setting the CUDA_GENERATION flag to Kepler, Maxwell, or Pascal, depending on the type of GPU you bought. Here’s the command sequence to download OpenCV and set it to run:
git clone https://github.com/opencv/opencv.git \
    && cd opencv \
    && mkdir build \
    && cd build \
    && cmake .. \
    && make -j3 \
    && make install
Finally, TensorFlow turns out to be pretty easy to install these days—just check the directions on this website.
To see if GPU support is enabled, you can run TensorFlow’s test program or you can execute from the command line:
python -m tensorflow.models.image.mnist.convolutional
This should start training a model without errors.
The fun part!
Now that you’ve paid over $1,000 and spent countless hours fighting with build and packaging software, it comes time to justify your investment! The GPU makes things run significantly faster, so you need applications that take advantage of its speed. Fortunately, there are a ton of fun things you can do.
Real-time object recognition on the neighbors
Mount a cheap USB camera or a Raspberry Pi with a camera outside your house. You can make a Pi stream video pretty easily with the RPi Camera Module that I talked about in my previous article on the $100 TensorFlow robot.
YOLO
The YOLO package will do real-time object recognition on the data coming in. With a Macbook, I found object recognition with a bounding box takes 3-4 seconds, but with a GPU, I can actually run this in real time, and the accuracy is quite good.
It’s easy to take the YOLO model and run it on TensorFlow with the YOLO_tensorflow project. It’s also fun to install “Darknet,” a different deep learning framework that YOLO was originally designed to work with:
git clone https://github.com/pjreddie/darknet
cd darknet
make
Once Darknet is installed you can run it on images with:
./darknet detect cfg/yolo.cfg yolo.weights data/dog.jpg
Since the Pi camera just puts a file on a web server, you can link directly to that and do real-time object recognition on a stream. Here I am in my garage doing object recognition on a traffic jam happening outside:
Give your Raspberry Pi robots an augmented brain
In writing my previous article on a $100 TensorFlow robot, I found it incredible that the robots can do deep learning on a $30 piece of hardware. Unfortunately, the most disappointing thing is that it takes the robots several seconds to do the object recognition, so real-time decision-making doesn’t work well. But if your robots use your new GPU machine, you can do not just real-time image recognition, but compute the bounding boxes at around 12-20 frames per second!
If you follow my instructions on GitHub, you can build a robot that streams everything it’s seeing from its camera in a format that’s easy to parse and fast.
My friend Shawn Lewis taught me pretty much everything I’m writing about in this article, so I brought two of my Raspberry Pi robots to my friend Shawn’s office. His dream, along with a lot of roboticists I know, is to build a robot that gets him a beer. Here are the robots fighting over a bottle on the floor:
If you look at his computer, the machine is actually doing real-time object recognition on two robot images in feeds in real time on his GeForce 980. He claims that he can handle four video feeds at once before he runs out of memory.
Make art!
One of the most fun things you can do with neural nets, which would be possible without a GPU but would take forever, is to replicate Google’s Deep Dream work. Essentially, this involves modifying input images to find images that drive the highest response in the neurons, so it requires a ton of horsepower. There’s many variations to do this, and the output is generally incredibly weird and cool.
One great tutorial that worked out of the box for me is the Deep Dream code published by Google.
You need to install the Jupyter notebook server (which you should anyway!) and Caffe.
Then plug your friends’ faces into Google’s tutorial. With your new machine, these images should take minutes rather than hours to generate, and they’re really fun to explore.


If you want to get crazier, there’s a TensorFlow implementation of Neural Style, built on the Deep Dream work, that can do even more amazing things, some of them outlined in this mind blowing blog post.
Conclusion
You don’t need to spend thousands of dollars to get a deep learning box that’s much faster than your laptop. And while building a computer and getting everything running on it is a great learning experience, you also get a machine that’s upgradable. I have now swapped in a Titan X graphics card with the same architecture, and everything ran without recompiling.
All in all, it’s a win: this machine runs at around the same speed as a $1/hour Amazon P2 instance that uses K80 GPUs, with more memory and an older architecture. I use it most for training models, which is where this approach really shines—perhaps the topic of a follow up post.
Related: