Chapter 1. Creating Databases
IN THIS CHAPTER, YOU’LL CREATE YOUR FIRST DATABASE, from the initial concept to a full-fledged Access file. Using Access’s Order Entry template as an example, you’ll learn how to set up all the types of database fields to give you the information you want, when you want it, and in exactly the way you want it. You’ll also learn how to put information into your database and print a simple report.
A Tour of an Access Database
As you read in the introduction to this book, a database typically refers to any organized collection of information. In Access, however, a database is much more than that: it’s a kind of wrapper to hold other database objects like tables, forms, and reports. An Access database is also relational, which means (among other things) that you can link tables together to combine their information.
A computerized database must let you add, store, find, display, and print information. Access does all these things and more. For each task, Access has different database objects.
The Access Window
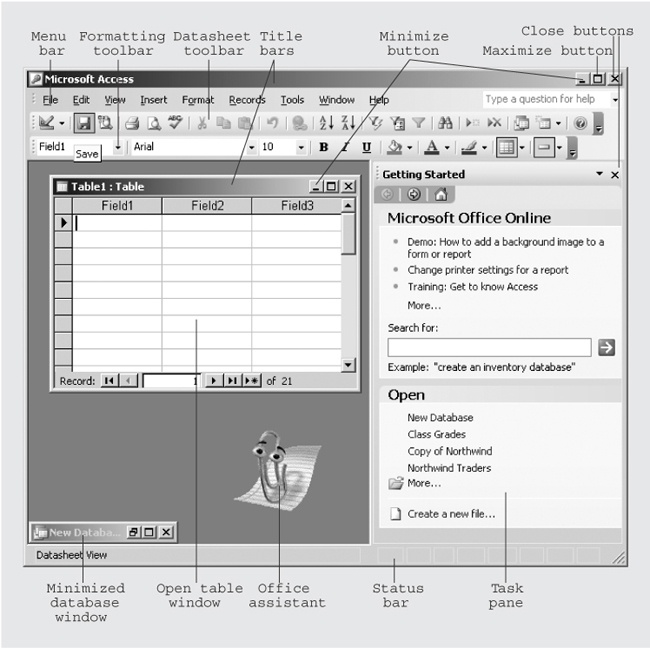
When you start Access, a large window opens on your desktop. When you open a database, its window appears inside this outer one. You can have any number of individual database windows open in Access, so in effect, the Access window is like a desktop-within-a-desktop. As shown in Figure 1-1, all of Access’s toolbars and the task pane also reside in the same window, so it can get pretty busy in there. You can make more room by closing the task pane (click the close button in the upper-right corner) and minimizing any windows you’re not currently using.
Tables
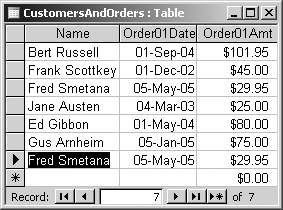
Access tables hold the information you store in the database (see Figure 1-2), and you can also use them for data entry. In a table, each row contains one record with information about a specific item, like a customer, sales order, or inventory item. Each column contains a field with information about a specific feature of the record in that row, like a customer’s first name, the date of a sales order, or the part number of an inventory item.
Forms
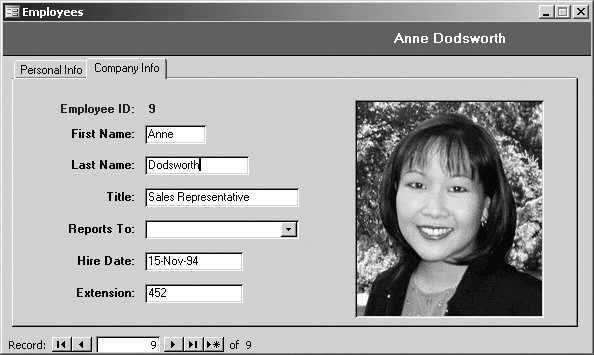
Forms are windows that you can use to enter or display database information (see Figure 1-3). You lay out a form on the screen by dragging text boxes, labels, list boxes, and other controls onto the form window. You get a fill-in-the-blanks window that resembles a paper form. You’ll learn how to create your own forms in Chapter 3.
Queries
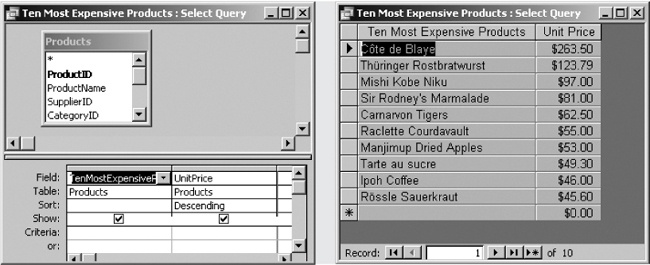
A query is simply a question you ask Access about the information in your database, like “What are the names and addresses of our customers in Chicago?” or “What are our 10 most expensive products?” Access then searches through your database, finds the information to answer your question, and displays it in an easy-to-read format. Access lets you create queries quickly and easily by dragging table fields with your mouse and clicking a button.
Surprisingly, Access queries can do more than just answer your questions. You can use queries to update or change your data, add new records to a table, create cross tab reports, ask people for information, or connect to other database management systems, like Microsoft SQL Server. You’ll learn how to create queries in Chapter 6 and Chapter 7. See Figure 1-4 for an example.
Reports
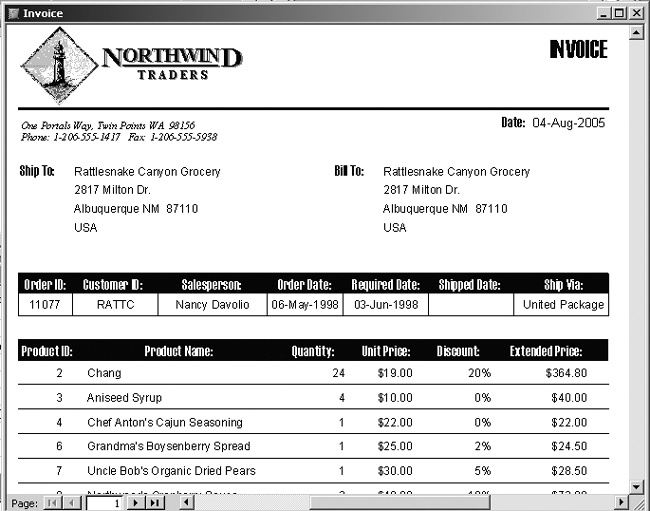
You can use reports to print your database information or display it onscreen (see Figure 1-5). You can group the information by city or sort the information by last name, for example. You can include totals and other calculations. You can even include graphics.
Access lets you tailor reports so that they not only show the information you want but show it exactly the way you want it. For simple lists, you can create reports with plain columns. For grouped information, you can create columns that stair-step through each group. You can create reports that group together blocks of information or present information in outline format. You can apply any of six predefined styles to give your reports a professional appearance. And, of course, you can either print reports or display them on your screen.
Just as with forms, you design reports by dragging fields into a grid on your screen. If you need a fairly standard report format, you can also have the Access Report Wizard create your report for you. You’ll learn how to create reports in Chapter 8.
Putting It All Together
Your own needs determine which forms, reports, and other database objects you’ll put into your database. You can add, take away, and edit objects at any time as your skills increase and your needs grow and change. As you become more familiar with Access, you’ll develop a keener sense of what you can do. The possibilities are endless! Here are some examples of objects you may want to build into your database:
Onscreen data-entry forms that check data for accuracy and make sure it’s in the correct format.
Saved queries that let you quickly see, for example, only the new customers added in the past week.
Reports that include calculated values, like totals, or that group records based on city, Zip code, or account balance.
You can always add more features to your database later on, but when you start out it’s good to have an idea where you want to end up. You may find some of the forms you need, for example, in one of Access’s templates, so knowing what you want helps save time right from the beginning.
Take a piece of paper (or a blank screen) and make a list of the information you want in your database. Names and addresses? Products and orders? Even if you don’t yet know how the information fits in, get it down in writing. Where to put it will become clear as you learn about Access. Also think about how you need to use your information. Do you plan to look at long lists of items, for example, or do you need to store large volumes of information, like the standard documents your company uses? When you’ve jotted down some notes, your database begins to take shape. You’re ready to launch Access and get to work.
Creating a New Database
Now that you’ve got some lists or diagrams of the information you need to track and how you’re going to organize it (you did read the previous section, didn’t you?), you can launch Access and start building your database. You can start Access two ways:
Click the Windows Start button, and then choose Program Files → Microsoft Office → Microsoft Office Access 2003.
In Windows Explorer, double-click an Access database you want to open.
Tip
Just like a text document or a spreadsheet, you can close an Access file and pick up where you left off when you return. To close Access, choose File → Exit, or click the close button at the top-right corner of the Access window.
Access gives you two main ways to create a database. The method you choose depends on your specific database needs. You can create a database:
With the Access Database Wizard. Access includes 10 predefined databases (templates) designed for common purposes, like tracking customer orders or managing expenses. With this method you use one of the templates as a rough draft of your database. If the template’s database fits your needs perfectly, you can then use it without modification; otherwise, you can change it as you wish.
From a blank database. With this method you design and create all the database tables, forms, reports, and other objects yourself. (For more detail on creating a database from scratch, see Figure 1-20.)
The easiest way to create a database is to use the Database Wizard with one of Access’s database templates. Each database template includes tables, forms, reports, and links that are custom-tailored for a specific kind of database.
Note
The tutorial on the following pages uses an image file, RoyalQuietDeluxe.jpg, which you can download from this book’s “Missing CD” page as described in Example Databases. You can also find an example of the completed Typewriter Orders database there.
Starting with a Wizard
When you use a template to create a database, the Access Database Wizard asks you questions about what you need. The wizard gives you more choices with some templates than it does with others, but you always use the same process:
The wizard asks questions—and you answer them—in a series of windows.
The wizard builds a database based on your answers.
You either use the database as the wizard created it, or you modify it further.
Phase 1: Choosing Your Template
Templates are predesigned database files that let you get started with ease because someone’s already done part of the work for you. Templates include common elements, like name and address, so you won’t have to spend time creating them. (See the box in Up to Speed: Database Templates for a tour of Access’s templates.)
To start the Access Database Wizard:
Choose File → New.
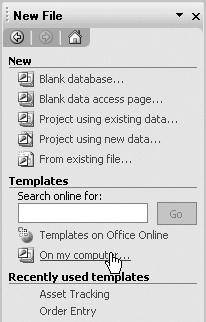
Access displays the New File task pane at the right side of your screen (Figure 1-6).
In the Templates section of the New File task pane, click “On my computer.”
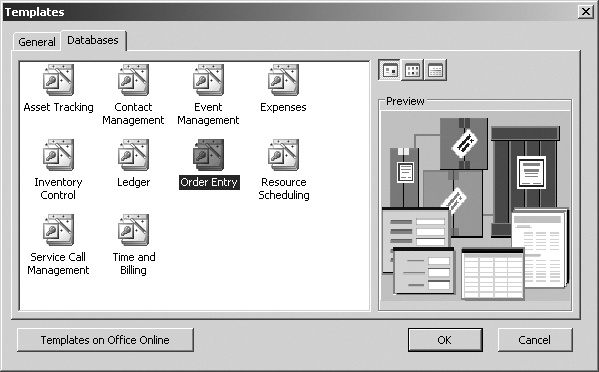
Access displays the Templates dialog box.
Near the top of the Templates dialog box, click the Databases tab.
The dialog box moves the Databases tab to the front and shows the database templates available on your computer (Figure 1-7).
On the Databases tab, click the Order Entry template, and then click OK.
Access displays the New Database dialog box. In this example, you’re creating an order entry database. Depending on the template you pick, the steps may differ slightly from the ones you see here.
In the New Database dialog box, browse to where you want to save the file and type TypewriterOrders as the filename.
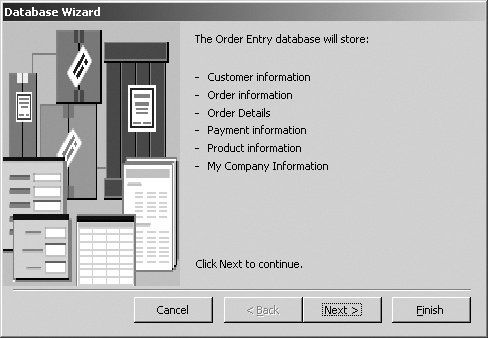
To keep the examples in this book organized, you may want to create a folder in My Documents called, for example, Practice Databases and save this database there. Access creates the new database and then displays the first Access Database Wizard screen, as shown in Figure 1-8.
Click Next.
Access displays the second Access Database Wizard screen.
You’ve created the database file. Next, you’ll choose the fields to include in your database tables.
Phase 2: Choosing Table Fields
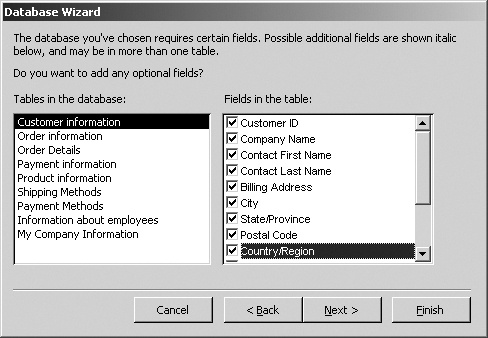
In the second screen, you can choose the fields for the wizard to include in each table. On the left side of the second Database Wizard screen (see Figure 1-9), Access lists the tables that the wizard can create. On the right side, Access lists the fields that you can put into the currently selected table. Every field that will be in the table has a checkmark in the box next to it.
You can sometimes remove a field from the selected table by clicking its box to uncheck it. However, the wizard requires certain tables to have specific fields because without those fields, the tables wouldn’t serve their intended purposes. For example, Access requires the Customer Information table to have a Customer ID field, because without one, the table would lack a foolproof way to identify each customer. If you try to turn off a required field, the wizard politely but firmly refuses.
To add a field to the selected table, click the box next to it.
Try clicking different tables in the “Tables in the Database” list and notice how the “Fields in the Table” list changes to show only the fields in the selected table. The template usually has all the fields you need preselected for a particular table. However, if you want to keep extra information, like each customer’s email address, you need to turn on these fields in the template.
Tip
To add, change, or delete fields after you’ve created your database, you can use the Table Design window (Figure 1-18).
To choose table fields:
In the “Tables in the Database” list, click the Information About Employees table.
In the “Fields in the Table” list, the wizard shows the fields it plans to put in the table. The box next to the Home Phone field is turned off.
Click the box next to the Home Phone field.
The wizard turns on the field’s box. When the wizard creates the Information About Employees table, it now includes the Home Phone field.
In the Tables list, click the Customer Information table.
The wizard shows the fields it plans to put in the table.
In the Fields list, drag the scroll bar down to see the rest of the field list. Click the box next to the Email Address field to turn it on.
The wizard adds Email Address to the list of fields it’ll put in the Customer Information table.
Note
If you’ve completely abandoned the telephone in favor of email, you may be tempted to turn off the Phone Number field. But if you try it, the wizard displays a message box saying it’s a required field and can’t be removed. As discussed in Figure 1-8, some fields are integral to a database’s design, so the wizard’s trying to protect them.
Click Next.
Access displays the third Database Wizard screen. You’ve chosen the fields for your tables.
Phase 3: Choosing Styles for Forms and Reports
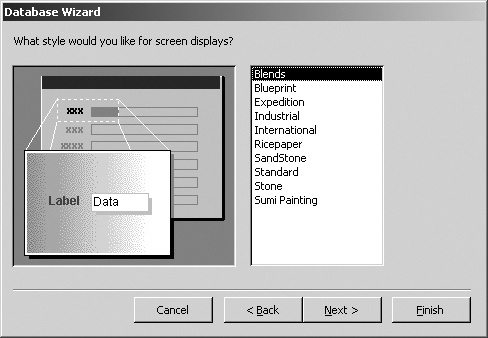
In the third screen, you can control the colors, type fonts, and overall look of onscreen data-entry forms in your new database. On the left side of the third Access Database Wizard screen (see Figure 1-10), Access shows a preview of what your database forms will look like with the currently selected style. The program automatically shows the Standard style. It’s a bit drab but won’t ruffle the feathers of upper management.
Tip
To change a form design after you’ve created your database, use the Form Design window. You’ll learn more about that in Chapter 3 (Creating Forms in Design View).
To choose styles for forms and reports:
In the Style list, click Blends.
The wizard shows a preview of what the style looks like, as shown in Figure 1-10. You can click some others to get an idea of what they look like.
Click Next.
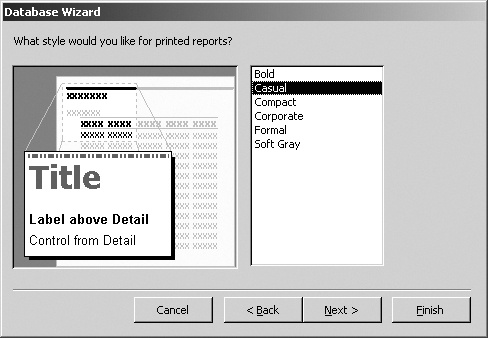
Access displays the fourth Database Wizard screen (see Figure 1-11) where you choose a style for reports. This screen works the same way as the previous one, except that styles are now applied to reports instead of to forms.
In the Style list, click the style you want.
For this example, choose Bold.
Click Next.
Access displays the fifth—and final—Database Wizard screen.
You’ve chosen styles for your onscreen forms and reports. Next you’ll add the final touches: a title for your database and, if you wish, a picture to jazz up the appearance of your reports.
Phase 4: Adding a Title and a Picture
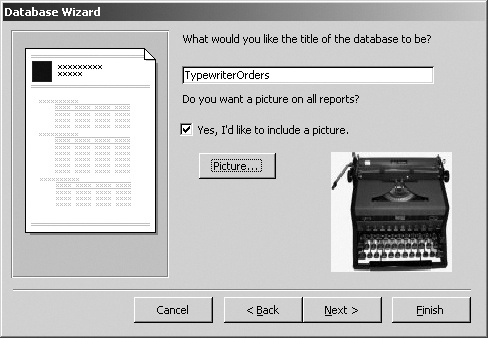
In the last screen (see Figure 1-12), you finish your work by naming your database. If you wish, you can choose to add a picture file to your database reports. As in earlier cases, a preview appears on the left side of the screen. In this case, however, the preview doesn’t change as you type a new title or choose a picture; it simply gives you a general idea of what reports will look like.
Tip
Keep your database title descriptive but as short as possible. If you use a long title, it may not fit in some onscreen windows. Your database still works just fine, but the last few letters of your database title may not be visible onscreen.
To add a title and picture:
In the title text box, delete the title Access suggests and type the title you want. For this example, type Customers and Orders.
If you like the title Access suggested, you can skip this step.
Turn on the checkbox labeled “Yes, I’d like to include a picture.” Click the Picture button.
Access displays the Insert Picture dialog box.
Browse to and select the file RoyalQuietDeluxe1947.jpg, and then click OK.
The wizard adds the picture to your report design and shows a preview in the dialog box. If everything looks good, click Next.
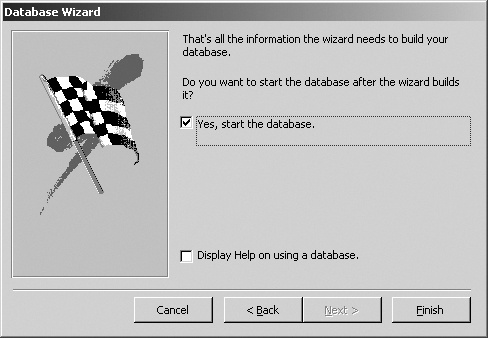
Access displays the final Database Wizard screen.
Click Finish.
The wizard creates your database. Access cranks for a few moments while a message box displays its progress in creating the database.
Click OK.
The wizard prompts you to enter information about your company (see Figure 1-13).
In the form boxes, type the appropriate information. For this example, type:
Company: Cambridge Typewriters
Address: 123 Font Street
City: Cambridge
State/Province: MA
Postal Code: 02138
Country/Region: USA
Sales Tax Rate: 0.05
Default Terms: Net 30
Invoice Descr: For Items Ordered
Phone Number: 617-555-9876
At the top-right corner of the form, click Close.
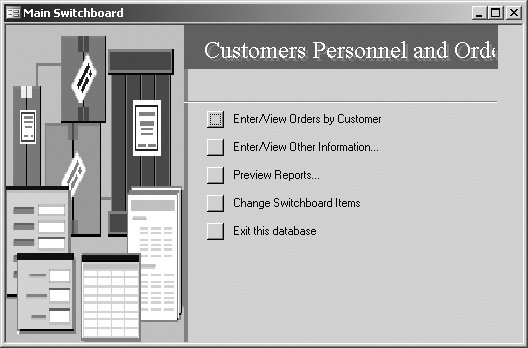
The wizard starts your database. Onscreen you see a switchboard (see Figure 1-14), which is a panel with buttons you can click to open tables, generate reports, and do other database tasks.
On the Main Switchboard panel, click the button labeled Exit This Database.
Access closes the TypewriterOrders database. You’ve finished creating your database and its features. Next you’ll explore what you’ve made.
Modifying the Wizard’s Database
Congratulations! You’ve created your first database in Access. You made all the big decisions, but the Database Wizard handled the details. You can learn a lot about Access databases by exploring and modifying a database similar to what you and the wizard have just designed. (If you haven’t downloaded the example database as discussed in Example Databases, do so now and then read on.)
Opening a Database
Before you can explore a database, you have to open it. To open a database:
Choose File → Open.
The Open dialog box appears. Just as if you were opening any document in Windows, you can use this box to locate and open Access databases anywhere on your PC.
Browse to and select TypewriterOrders_example.mdb. Then click Open.
Before opening the database, Access displays a warning box. This message merely means that Access databases may contain programming code that could harbor computer viruses, not necessarily that it does contain them. The box has three buttons: Cancel, Open, and More Info. If you created a database yourself or obtained it from a trusted source, the database is probably safe.
Click Open one more time.
Access opens the database. The TypewriterOrders database reveals a menu panel called a switchboard. By clicking buttons on the panel, you can do things in your database: view tables, enter data, print reports, and so forth. See Figure 1-14.
Navigating with the Switchboard
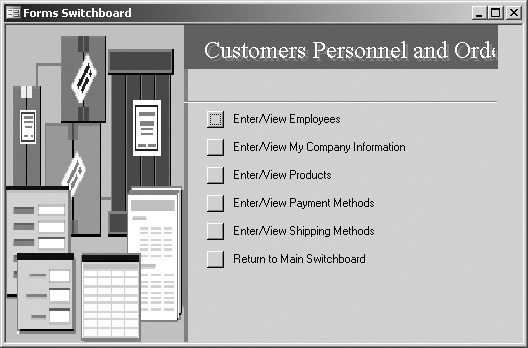
You can click around a database switchboard to get a good tour of the database and familiarize yourself with how switchboards work. Each switchboard button either performs a task, like displaying an order list, or opens another panel of switchboard buttons that you can click to do something else, like generate a report.
Here’s how to use the switchboard to get to tables, forms, and other objects in your database:
Click the Enter/View Orders by Customer button.
Access opens the Orders by Customer form, in which you can view order records or add new records. Notice that the top of the form has information about one customer, while the bottom of the form has a table showing all the orders that the customer has placed. (For more about forms, see Chapter 3.)
In the Orders by Customer form, click the Orders button.
Access opens a new form window that shows the details of orders placed by the customer whose record you were viewing. Click the Close button at the top of the Orders window, and then use the same method to close the Orders by Customer window.
Click the Enter/View Other Information button.
Access displays another switchboard with buttons for entering and viewing information. See Figure 1-15 for the full story.
Click the Return to Main Switchboard button.
You’ve learned how to click switchboard buttons to do database tasks or to display subswitchboards. This skill may lack the excitement of bungee-jumping, but it’s a more useful skill in real life.
From the Window menu, choose 1 TypewriterOrders_example: Database.
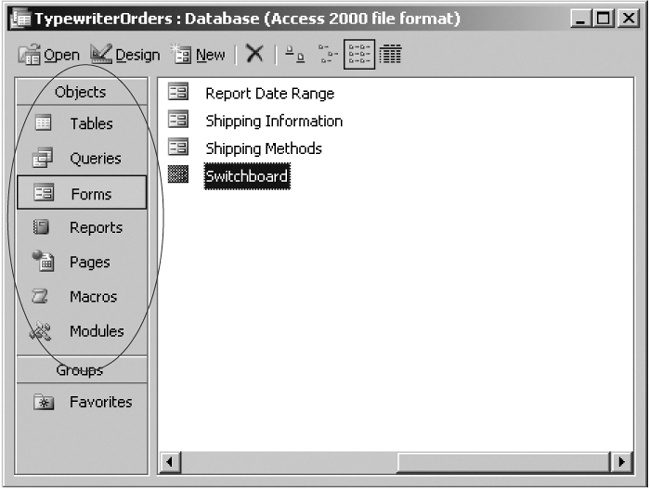
Access closes the switchboard and displays the Database window.
The switchboard is handy, but it limits what you can do to what’s available in its menu buttons. The Database window, on the other hand, lets you get “under the hood” of your database to create, edit, view, and add information to tables and other database objects. In the sections coming up, you’ll use the Database window to change a table design, use a form, and print a report (see Figure 1-16).
Note
In Figure 1-16 you see the Forms list because you’ve been looking at the switchboard, which is itself simply a type of form (see Up to Speed: Database Objects Defined). You’ll learn how to create and modify forms, including switchboard forms, in Chapter 3.
Adjusting Table Designs
When you created your database with the wizard, you chose fields for your tables. But what does that really mean? To understand tables, fields, rows, columns, and records, you should practice working with them. Already, you can make simple adjustments to a table easily:
At the left side of the Database window, on the Objects bar, click Tables.
The Database window shows a list of the tables in the database. Notice that the top of the list shows three ways to create a table: in Design view, by using a wizard, or by entering data. (In Chapter 2, you’ll learn how to create tables with these methods.)
In the Tables list, double-click Customers.
Access displays the table in Datasheet view, as shown in Figure 1-17. This table is the correct one, but to add or delete fields, you have to switch to Design view.
Choose View → Design View.
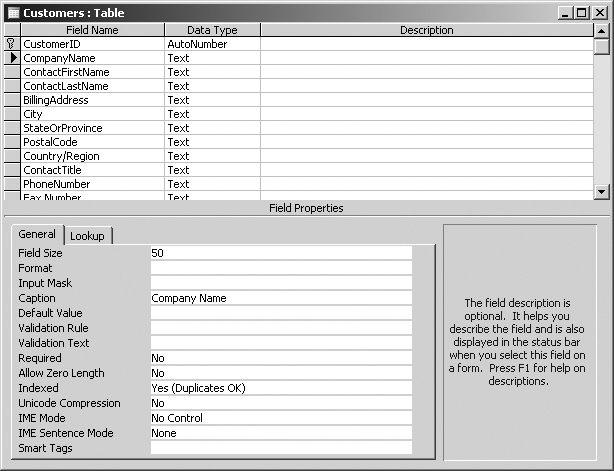
Access displays the table in Design view (as shown in Figure 1-18). Here you can make changes to the table the wizard built for you. Suppose you never use fax machines to communicate with customers, so you can delete the fax number field from the Customers table.
In the top half of the Design window, click the gray button to the left of the Fax Number field.
Access highlights the row and puts an arrow at the left end of the row.
Choose Edit → Delete Rows, and then click Yes.
Access deletes the Fax Number field from the table. Next, you’ll tell Access to give you more space to display your customers’ names.
Click in the row of the ContactFirstName field. In the bottom half of the Design window (the Field Properties pane), click in the Field Size row.
This box shows how many characters the field can hold.
Delete the default field size, type 20 as the new field size, and then click in a different row.
Access changes the field size to 20 characters (letters, digits, and so on).
At the top-right corner of the Design window, click the Close button, and then click Yes.
Access closes the table.
You just deleted one field and changed the properties of another.
Adding Records Using a Form
Forms give you a way to enter and display your database information. They hide the technical details of the database and let computer-challenged people focus on entering the information. To understand how it works, look at a simple form:
On the Database window’s Objects bar, click Forms.
The Database window shows a list of the forms in the database.
Sometimes, the object list in the Database window is too long to fit in the window. You’ll know this is the case in List view if you see a horizontal scroll bar at the bottom of the Database window. When you see that scroll bar, you can click it to scroll left and see the rest of the list.
In the Forms list, double-click Employees.
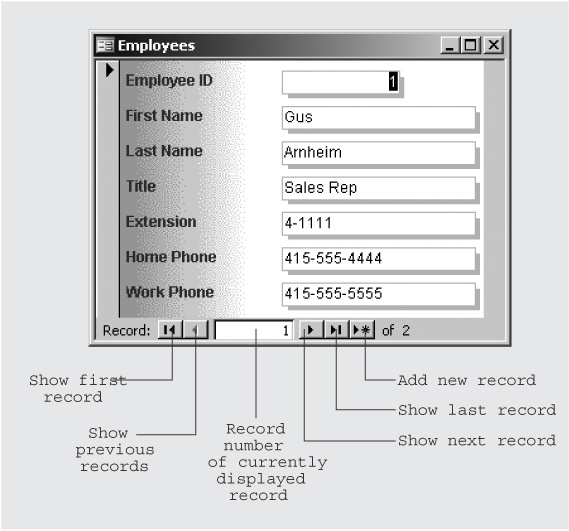
Access displays the form in Data view (see Figure 1-19).
At the bottom of the Form window, click the Next Record button several times.
Access moves forward from record to record in the table.
At the bottom of the Form window, click the First Record button.
Access displays the first record in the table.
Figure 1-19. With a form in Data view, you can view information that’s already in a table or add new data. The navigation buttons at the bottom of the window let you display the first, last, previous, or next record in the table. By clicking the far-right button, you can display an empty form to add a new record to the table.At the bottom of the Form window, click the Add New Record button.
Access displays a blank form in which you can add a new record.
Press the Tab key to move to the First Name field. Type Benny, press Tab again, and type Goodman in the Last Name field.
Notice that Access automatically put the number 3 in the Customer ID field. That’s because Customer ID is an Autonumber field.
Click in the Title field, type Music Director, and then press the tab.
Fill in the rest of the form, pressing Tab after each field. Type 4-9999 in the Extension field, 408-555-9999 in the Home Phone field, and 415-555-9999 in the Work Phone field.
At the bottom of the Form window, click the First Record button.
Access moves to the first record in the table and saves your data. If you click the Last Record button, you can see your new record.
When you’re done, click the Close button at the top-right corner of the Form window to close it.
Printing a Report
You can use database reports to print your information and also to display it on the computer screen. In a report design, you can group data by city, sort it by last name, and do totals and other calculations. Try viewing and printing a simple report:
On the Objects bar, click Reports.
The Database window shows a list of the reports in the database. Notice at the top of the list the two ways you can create a report: in Design view and by using a wizard. Any time you want to design a report, you can use either of these methods by starting from the Database window.
In the Reports list, double-click Customers.
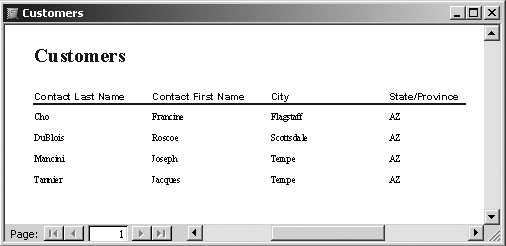
Access displays a print preview of the report (see Figure 1-20).
Make sure that your printer is ready to print, and then choose File → Print and click OK.
Access prints your report.
Figure 1-20. As in the Table and Form windows, you can use controls at the bottom of the Report Preview window to move forward and backward in the report. Here, however, you don’t move from record to record: you move from page to page. This report has only one page, so the forward and backward buttons are “grayed out,” that is, unavailable.At the left end of the Access toolbar, click the Design View button.
Access displays the report in Design view. Design view lets you modify your report design by adding or moving fields and controls. You can also add grouping, sorting, totals, and other features. You’ll learn about designing reports in Chapter 8.
When you’re done, you can close the Report window, or choose File → Close to close the Order Entry database.
Starting from a Blank Database
If your database needs are unusual—or if you’re an incorrigible do-it-yourselfer—you may not want to use one of Access’s database templates. As an alternative you can create a blank database. You can then manually design all your tables, forms, reports, and other database objects. That’s how the developers of Access created the templates you use with the Database Wizard: they started with a blank database and added one piece at a time.
On the plus side, creating a blank database gives you freedom: you can design everything just as you want it from the get-go. On the minus side, it’s more work, but as database guru Kahlil Gibran said, “Work is love made visible.” If you love what you’re doing—or even just like it a bit—then it’s never a burden to put in a little extra work.
It’s easy to create a blank database. Here are the steps:
Start Access, and then choose File → New.
At the right side of your screen, Access displays the New File task pane. It’s just like the one in Figure 1-6 that you used to open a template. This time, however, you’re going to use the New section to create a fresh, empty database document.
Near the top of the Getting Started dialog box, click Blank Database.
Access displays the File → New Database dialog box.
In the File → New Database dialog box, choose a folder to save the database in, and then type a filename of your choice.
If you’re just practicing, you can keep all your work for this chapter in one folder, as described in Figure 1-7.
Click Create.
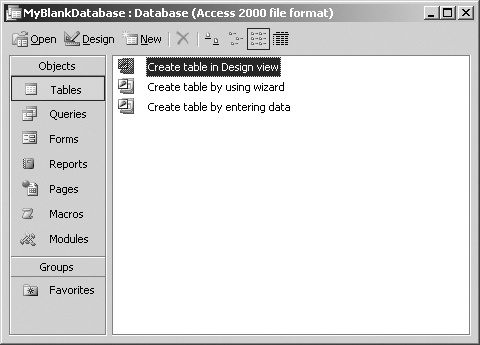
Access creates a blank database (see Figure 1-21). You can now add tables (as you’ll do in Chapter 2), forms (covered in Chapter 3), and other database objects.
Figure 1-21. A database is a wrapper for tables and other database objects. When you create a blank database, you start with just the wrapper. Notice that the title bar of the Database window reads “Access 2000 file format.” Access 2003 automatically uses the older Access 2000 file format so that other people can use your database even if they don’t have an up-to-date version of Access.
Get Access 2003 for Starters: The Missing Manual now with the O’Reilly learning platform.
O’Reilly members experience books, live events, courses curated by job role, and more from O’Reilly and nearly 200 top publishers.
