In a database, minor variations can add up to big trouble. Suppose youâre running International Cinnamon, a multinational cinnamon bun bakery with hundreds of orders a day. In your Orders table, you have entries like this:
Quantity     Product
10           Frosted Cinnamon Buns
24           Cinnamon Buns with Icing
16           Buns, Cinnamon (Frosted)
120          FCBs
...
(Other fields, like the ID column and the information about the client making the order, are left out of this example.)
All the orders shown here amount to the same thing: different quantities of tasty cinnamon and icing confections. But the text in the Product column is slightly different. This difference doesnât pose a problem for ordinary human beings (for example, youâll have no trouble filling these orders), but it does create a small disaster if you want to analyze your sales performance later. Since Access has no way to tell that a Frosted Cinnamon Bun and an FCB are the same thing, it treats them differently. If you try to total up the top-selling products or look at long-range cinnamon sales trends, then youâre out of luck.
Note
This example emphasizes a point that youâve seen before. Namely, databases are strict, no-nonsense programs that donât tolerate minor discrepancies. For your databases to be useful, you need to make sure you store topnotch information in them.
Lookups are one more tool to help standardize your data. Essentially, a lookup lets you fill a value in a field by choosing from a readymade list of choices. Used properly, this tool solves the problem in the Orders tableâyou simply need a lookup that includes all the products you sell. That way, instead of typing the product name in by hand, you can choose Frosted Cinnamon Buns from the list. Not only do you save some time, but you also avoid variants like FCBs, thereby ensuring that the orders list is consistent.
Access has two basic types of lookup lists: lists with a set of fixed values that you specify, and lists that are drawn from a linked table. In the next section, youâll learn how to create the first type. Then, in Chapter 5, youâll graduate to the second.
Simple lookups make sense if you have a simple, short list thatâs unlikely to change. The state prefix in an address is a perfect example. In this case, thereâs a set of just 50 two-letter abbreviations (AL, AK, AZ, and so on).
To try out the process in the following list of steps, you can use the Bachelors table included with the online examples for this chapter (look for the DatingService.accdb database file). Or, you can jump straight to the completed lookup by checking out the DatingServiceLookup.accdb file:
Open the table in Design view.
If youâre using the DatingService.accdb example, then open the Bachelors table.
Find the field where you want to add the lookup.
In the Bachelors table, itâs the State field.
Make sure your field has the correct data type.
Text and Number are the most common data types that youâll use in conjunction with the lookup feature.
Choose Lookup Wizard from the data type list.
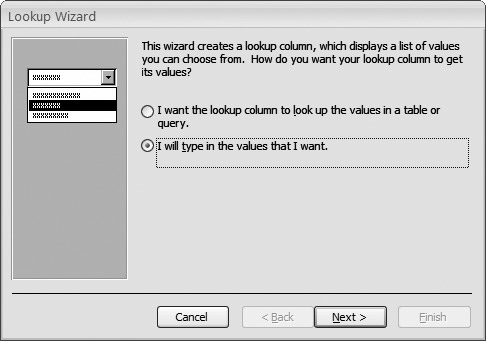
This action doesnât actually change your data type. Instead, it tells Access you want to run the Lookup wizard based on the current data type. When you select this option, the first step of the Lookup wizard appears (Figure 4-17).
Choose âI will type in the values that I wantâ.
Lookups with Related Tables describes your other choice: drawing the lookup list from another table.
Click Next.
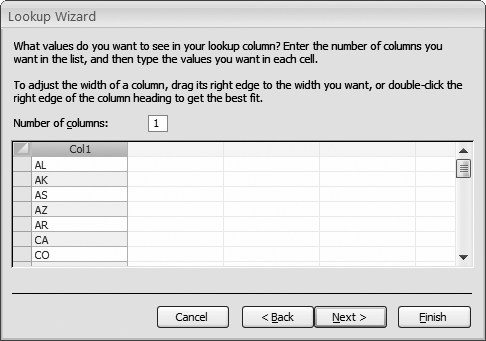
The second step of the wizard gives you the chance to supply the list of values that should be used, one per row (Figure 4-18). In this case, itâs a list of abbreviations for the 50 U.S. states.
You may notice that you can supply multiple columns of information. For now, stick to one column. Youâll learn why you may use more on Lookups with Related Tables.
Click Next.
The final step of the Lookup wizard appears.
Choose whether you want the lookup column to store multiple values.
If you allow multiple values, then the lookup list displays a checkbox next to each item. You can select several values for a single record by choosing more than one item.
Warning
Once you configure a field to allow multiple values and you save your table, you canât back out. Access wonât let you modify the fieldâs Allow Multiple Values setting to convert it back to a single-value field.
In the State field, it doesnât make sense to allow multiple valuesâafter all, a person can physically inhabit only one state (discounting the effects of quantum teleportation). However, you can probably think of examples where multiple selection does make sense. For example, in the Products table used by International Cinnamon, a multiple-value lookup would let you create an order for more than one product. (Youâll learn more about multiple-value selections and table relationships in Chapter 5.)
Click Finish.
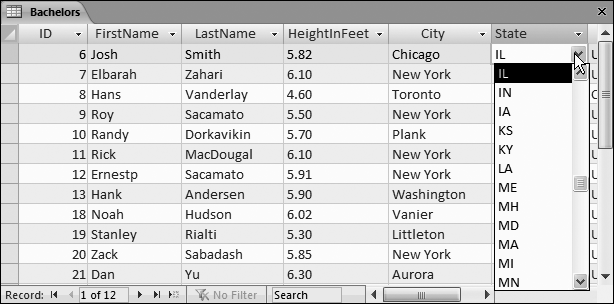
Switch to Datasheet view (right-click the tab title, and then choose Datasheet View), and then save the table changes. Figure 4-19 shows the lookup in action.
When you create a lookup that uses fixed values, the lookup list provides a list of suggestions. You can choose to ignore the lookup list and type in a completely different value (like a state prefix of ZI), even if it isnât on the list. This design lets you use the lookup list as a timesaving convenience without limiting your flexibility.
In many cases, you donât want this behavior. In the Bachelors table, you probably want to prevent people from entering something different in the State field. In this case, you want the lookup to be an error-checking and validation tool that actually stops entries that donât belong.
Fortunately, even though this option is mysteriously absent in the Lookup wizard, itâs easy enough to add after the fact. Hereâs what you need to do:
In Design view, go to the field that has the lookup.
In the Field Properties section, click the Lookup tab.
The Lookup tab provides options for fine-tuning your lookup, most of which you can configure more easily in the Lookup wizard. In the Row Source box, for example, you can edit the list of values you supplied. (Each valueâs on the same line, in quotation marks, separated from the next value with a semicolon.)
Set the âLimit to Listâ property to Yes.
This action prevents you from entering values that arenât in the list.
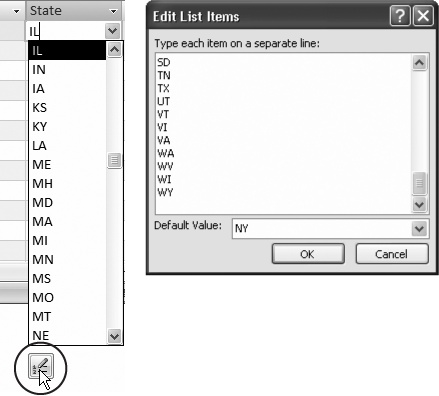
Optionally, set Allow Value List Edits to Yes.
This action lets people modify the list of values at any time. This way, if somethingâs missing from the lookup list, you can add it on the fly (Figure 4-20).
Get Access 2010: The Missing Manual now with the O’Reilly learning platform.
O’Reilly members experience books, live events, courses curated by job role, and more from O’Reilly and nearly 200 top publishers.


