Chapter 1. Creating Your First Database
Although Microsoft won’t admit it, Access can be intimidating—intimidating enough to trigger a cold sweat in the most confident office worker. Even though Microsoft has spent millions of dollars making Access easier to use, most people still see it as the most complicated Office program on the block. They’re probably right.
Access seems more daunting than any other Office program because of the way that databases work. Quite simply, databases need strict rules. Other programs aren’t as obsessive. For example, you can fire up Word, and start typing a letter straight away. Or you can start Excel, and launch right into a financial report. But Access isn’t nearly as freewheeling. Before you can enter a stitch of information into an Access database, you need to create that database’s structure. And even after you’ve defined that structure, you’ll probably want to spend more time creating other useful tools, like handy search routines and friendly forms that you can use to simplify data lookup and data entry. All of this setup takes effort and a good understanding of how databases work.
In this chapter, you’ll conquer any Access resistance you have, and learn to create a simple but functional database. Along the way, you’ll get acquainted with the slick Access user interface, and you’ll learn exactly what you can store in a database. You’ll then be ready to tackle the fine art of database design, which is covered in detail throughout this book.
Understanding Access Databases
As you already know, a database is a collection of information. In Access, every database is stored in a single file. That file contains database objects, which are the components of a database.
Database objects are the main players in an Access database. Altogether, you have six different types of database objects:
Tables store information. Tables are the heart of any database, and you can create as many tables as you need to store different types of information. A fitness database could track your daily running log, your inventory of exercise equipment, and the number of high-protein whey milkshakes you down each day, as three separate tables.
Queries let you quickly perform an action on a table. Usually, this action involves retrieving a choice bit of information (like the 10 top-selling food items at Ed’s Roadside Diner or all the purchases you made in a single day). However, you can also use queries to apply changes.
Forms are attractive windows that you create, arrange, and colorize. Forms provide an easy way to view or change the information in a table.
Reports help you print some or all of the information in a table. You can choose where the information appears on the printed page, how it’s grouped and sorted, and how it’s formatted.
Macros are mini-programs that automate custom tasks. Macros are a simple way to get custom results without becoming a programmer.
Modules are files that contain Visual Basic code. You can use this code to do just about anything—from updating 10,000 records to firing off an email.
Access gurus refer to all these database ingredients as objects because you manage them all in essentially the same way. If you want to use a particular object, you add it to your database, give it a name, and then fine-tune it. Later on, you can view your objects, rename them, or delete ones you don’t want anymore.
Note
Designing a database is the process of adding and configuring database objects. For those keeping score, an Access database can hold up to 32,768 separate objects.
In this chapter, you’ll consider only the most fundamental type of database object: tables. But first, you need to create a blank database you can work with.
Starting a Database
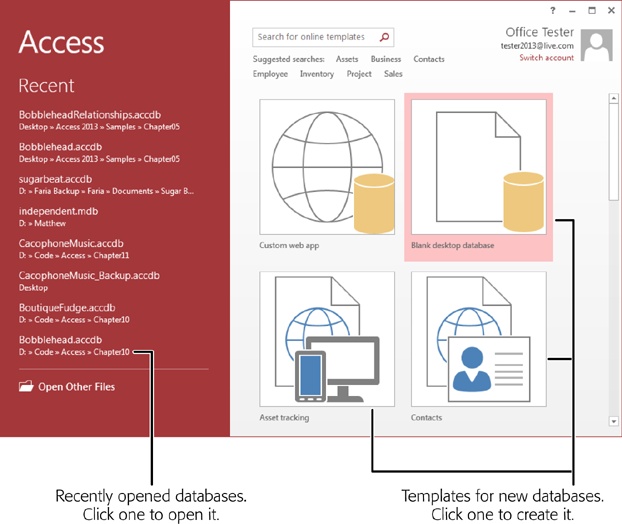
When you start Access, you begin at the welcome page. From there, you’re just a few clicks away from generating a database of your very own.
In this chapter, you’ll slap together a fairly straightforward database. This example is designed to store a list of prized bobblehead dolls. (For those not in the know, a bobblehead doll is a toy figure with an oversized head on a spring, hence the signature “bobbling” motion. Bobblehead dolls usually resemble a famous celebrity, politician, athlete, or fictional character.)
Tip
You can get the Bobblehead database, and all the databases in this book, on the Missing CD page at www.missingmanuals.com/cds/access2013mm.
Here’s how to create a blank new database:
Access starts you out with what is, for Microsoft, a remarkably streamlined window (Figure 1-1). Here you can create a new database or open an existing one.
Click the “Blank desktop database” template.
When you choose to create a blank database, that’s exactly what you get—a new, empty database file with no tables or other database objects. Starting from scratch is the best way to learn about Access. It’s also the favorite choice of database experts, who prefer to create everything themselves so it’s exactly the way they like it.
Other templates let you create databases that are preconfigured for specific scenarios and certain types of data. The box on Templates: One Size Fits Some has more information.
The cool-sounding “Custom web app” template is a special case. It lets you create a web-enabled database that runs on SharePoint. You’ll explore this new feature (and its limitations), in Chapter 20.
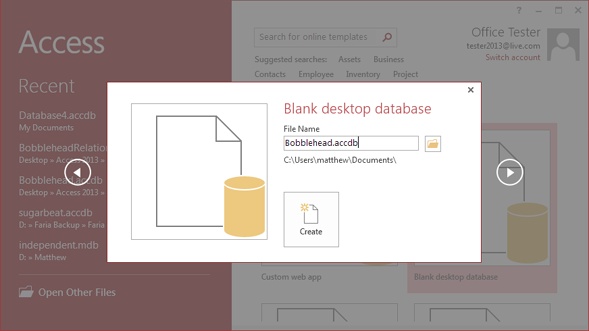
No matter which template you click, Access pops open a new window that lets you choose a name and location for your new database (Figure 1-2).
Type a file name for the database you’re about to create.
Access stores all the information for a database in a single file with the extension .accdb (which stands for “Access database”). Don’t stick with the name Access picks automatically (like “Database1.accdb”). Instead, pick something more descriptive. In this example, Bobblehead.accdb does the trick.
As with any other file, Access files can contain a combination of letters, spaces, numbers, parentheses, hyphens (-), and the underscore (_). It’s generally safest to stay away from other special characters, some of which aren’t allowed.
Figure 1-2. This database will be named Bobblehead.accdb. As you can see by the file path below the File Name box, it will be saved in the folder C:\Users\matthew\Documents. You can edit the file name by typing in the File Name box, and you can browse to a different folder by clicking the folder icon.Note
Depending on your computer settings, Windows may hide file extensions. Instead of seeing the Access database file MyScandalousWedding.accdb in file-browsing tools like Windows Explorer, you may just see the name MyScandalousWedding (without the .accdb part on the end). In this case, you can still tell the file type by looking at the icon. If you see a small Access icon next to the file name, that’s your signal that you’re looking at an Access database.
Choose the folder where you want to store your database.
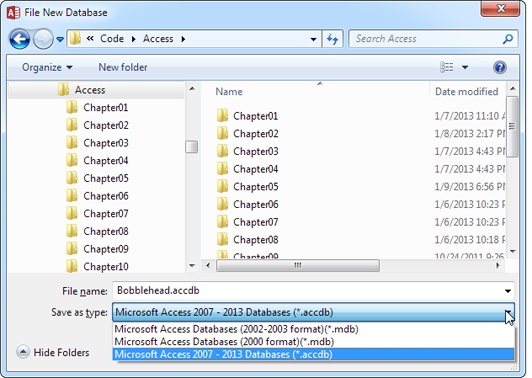
Like all Office programs, Access assumes you want to store every file you create in your personal Documents folder. If this isn’t what you want, click the folder icon to show the File New Database window, browse to the folder you want (Figure 1-3), and then click OK.
Figure 1-3. The File New Database window lets you choose where you’ll store a new Access database file. It also gives you the option to create your database in the format used by older versions of Access (.mdb), instead of the more modern format used by Access 2007, Access 2010, and Access 2013 (.accdb). To change the format, simply choose the corresponding Access version from the “Save as type” list, as shown here.Click the big Create button (under the File Name box).
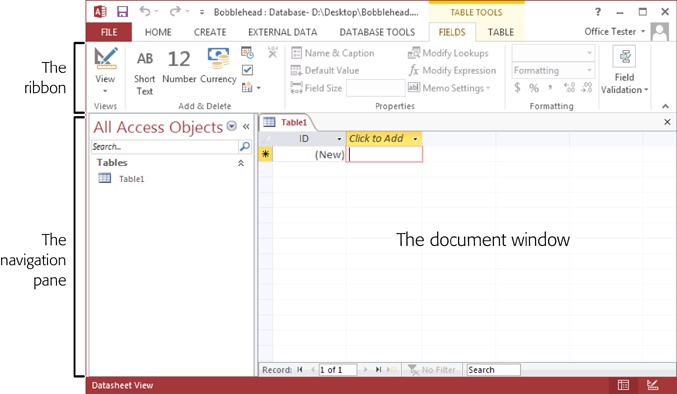
Access creates your database file and then shows a datasheet where you can get to work creating your first table.
Once you create or open a database, the Access window changes quite a bit. An impressive-looking toolbar (the ribbon) appears at the top of your screen, and a Navigation Pane shows up on the left. You’re now in the control center where you’ll perform all your database tasks (Figure 1-4).
If you haven’t used the ribbon before (either in Access or in another Office program), the Introduction covers the basics of how the ribbon works. Otherwise, carry on to the next section, where you’ll learn how to add a table to your brand-new, empty database.
Building Your First Table
Tables are information containers. Every database needs at least one table—without it, you can’t store any data. In a simple database, like the Bobblehead database, a single table (which we’ll call Dolls) is enough. But if you find yourself wanting to store several lists of related information, you need more than one table. In the database BigBudgetWedding.accdb, you may want to keep track of the guests that you invited to your wedding, the gifts that you requested, and the loot that you actually received. In Chapter 5, you’ll see plenty of examples of databases that use multiple tables.
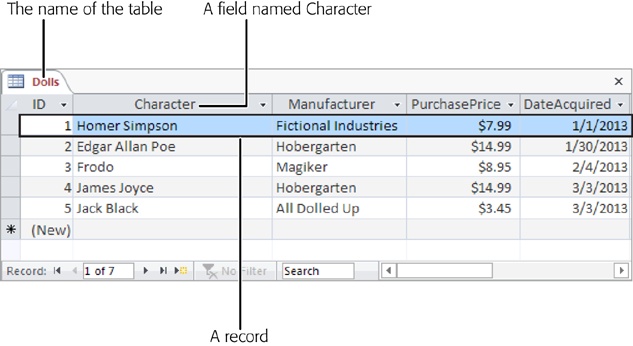
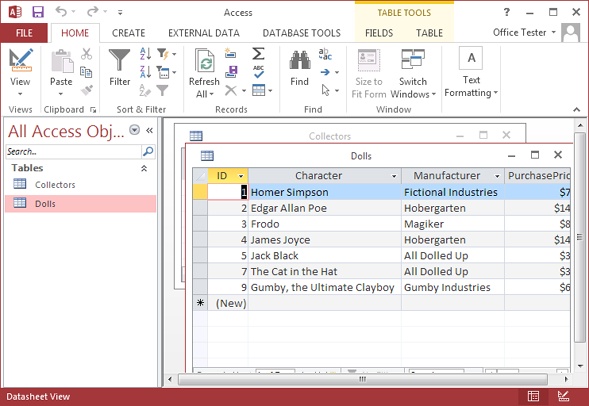
Figure 1-5 shows a sample table.
Before you start designing this table, you need to know some very basic rules:
A table is a group of records. A record is a collection of information about a single thing. In the Dolls table, for example, each record represents a single bobblehead doll. In a Family table, each record would represent a single relative. In a Products table, each record would represent an item that’s for sale. You get the idea. When you create a new database, Access starts you out with a new table named Table1, although you can choose a more distinctive name when you decide to save it.
Each record is subdivided into fields. Each field stores a distinct piece of information. For example, in the Dolls table, one field stores the person on whom the doll is based, another field stores the price, another field stores the date you bought it, and so on.
Tables have a rigid structure. In other words, you can’t bend the rules. If you create four fields, every record must have four fields (although it’s acceptable to leave some fields blank if they don’t apply).
Newly created tables get an ID field for free. The ID field stores a unique number for each record. (Think of it as a reference number that will let you find a specific record later on.) The best part about the ID field is that you can ignore it when you’re entering a new record. Access chooses a new ID number for you and inserts it in the record automatically. You’ll learn much more about ID fields on AutoNumber.
Creating a Simple Table
When you first create a database, it’s almost empty. But to get you started, Access creates your first database object—a table named Table1. The problem is, this table begins life completely blank, with no defined fields (and no data).
If you followed the steps in the previous section to create a new database, you’re already at the Datasheet view (Figure 1-5), which is where you enter data into a table. All you need to do is customize this table so that it meets your needs.
You can customize a table in two ways:
Design view lets you precisely define all aspects of a table before you start using it. Almost all database pros prefer Design view, and you’ll start using it in Chapter 2.
Datasheet view is where you enter data into a table. Datasheet view also lets you build a table on the fly as you insert new information. You’ll use this approach in this chapter.
The following steps show you how to turn a blank new table (like Table1) into the Dolls table by using the Datasheet view:
To define your table, simply add your first record.
In this case, that means choosing a bobblehead doll to add to the list. For this example, you’ll use a nifty Homer Simpson replica.
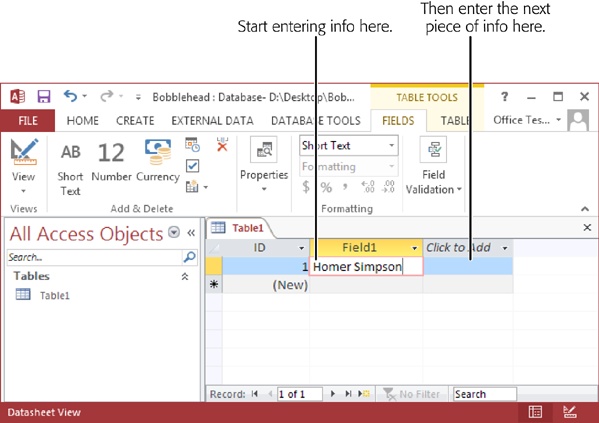
In the datasheet’s rightmost column, under the “Click to Add” heading, type the first piece of information for the record (see Figure 1-6).
Based on the simple analysis you performed earlier, you know that you need to enter four fields of information for every doll. For the Homer Simpson doll, this information is “Homer Simpson” (the name), “Fictional Industries” (the manufacturer), “$7.99” (the price), and today’s date (the purchase date). Although you could start with any field, it makes sense to begin with the name, which is clearly an identifying detail.
Figure 1-6. To fill in your first record, start by entering something in the first field of information (like the doll name “Homer Simpson”). Then, hit Tab to jump to the second column, and then enter the second piece of information. Ignore the ID column for now—Access adds that to every table to identify your records.Press Tab to move to the next field, and return to step 2.
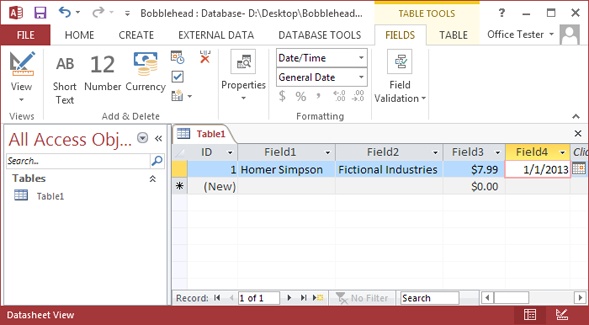
Repeat steps 2 and 3 until you’ve added every field you need, being careful to put each separate piece of information into a different column (Figure 1-7).
You may notice one quirk—a harmless one—when you add your first record. As you add new fields, Access may change the record’s ID value of the record (changing it from 1 to 2 to 3, for example). Because the new record hasn’t been inserted yet, every time you change the table’s design by adding a new field, Access starts the process over and picks a new ID number, just to be safe. This automatic renumbering doesn’t happen if you officially add the record (say, by moving down to the next row, or, in the ribbon, by clicking Home→Records→Save) and then add more fields to the table. However, there’s really no reason to worry about the ID number. As long as it’s unique—and Access guarantees that it is—the exact value is unimportant.
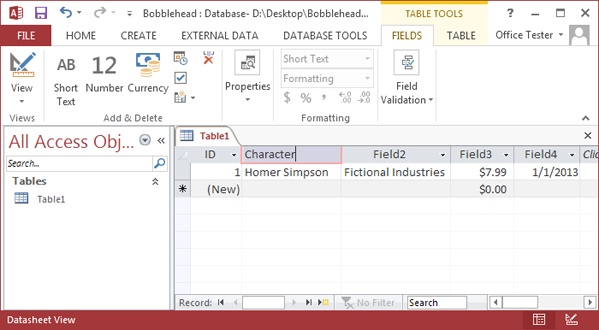
Figure 1-7. The only problem with this example so far is that as you enter a new record, Access creates spectacularly useless field names. You see its choices at the top of each column (they have names like Field1, Field2, Field3, and so on). The problem with using these meaningless names is that they may lead you to enter a piece of information in the wrong place. You could all too easily put the purchase price in the date column.It’s time to fix your column names. Double-click the first column title (like Field1).
The field name switches into Edit mode.
Type a new name, and then press Enter.
Repeat this process until you’ve cleaned up all the field names. The proper field names for this example are Character, Manufacturer, PurchasePrice, and DateAcquired. Figure 1-8 shows how it works.
Press Ctrl+S or choose File→Save to save your table.
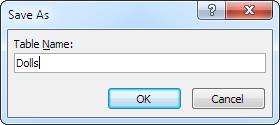
Access asks you to supply a table name (see Figure 1-9).
Type a suitable table name, and then click OK.
Congratulations! The table is now a part of your database.
Note
Technically, you don’t need to save your table right away. Access prompts you to save it when you close the datasheet (by clicking the X at the document window’s top-right corner), or when you close Access.
As you can see, creating a simple table in Access is almost as easy as laying out information in Excel or Word. If you’re itching to try again, you can create another table in your database by choosing Create→Tables→Table from the ribbon. But before you get to that stage, it makes sense to take a closer look at how you edit your table.
Editing a Table
You now have a fully functioning (albeit simple) database, complete with one table, which in turn contains one record. Your next step is filling your table with useful information. This often-tedious process is data entry.
To fill the Dolls table, you use the same datasheet you used to define the table. You can perform three basic tasks:
Editing a record. Move to the appropriate spot in the datasheet (using the arrow keys or the mouse), and then type in a replacement value. You may also want to use Edit mode, which is described in the next section.
Inserting a new record. Move down to the bottom of the table to the row that has an asterisk (*) on the left. This row doesn’t actually exist until you start typing some information. At that point, Access creates the row and moves the asterisk down to the next row. You can repeat this process endlessly to add as many rows as you want (Access can handle millions).
Deleting a record. You have several ways to remove a record, but the easiest is to right-click the margin immediately to the left of the record, and then choose Delete Record. Access asks you to confirm that you really want to remove the selected record, because you can’t reverse the change later on.
Edit Mode
You’ll probably spend a lot of time working with the datasheet. So settle in. To make your life easier, it helps to understand a few details.
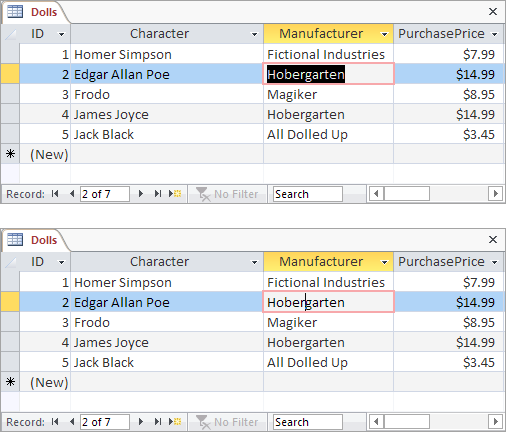
As you already know, you can use the arrow keys to move from field to field or row to row. However, you may have a bit of trouble editing a value. When you start typing, Access erases any existing content. To change this behavior, you need to switch into Edit mode by pressing F2; in Edit mode, your typing doesn’t delete the stuff that’s already in that field. Instead, you get to change or add to it. To switch out of Edit mode, you press F2 again. Figure 1-10 shows a close-up look at the difference.
Edit mode also affects how the arrow keys work. In Edit mode, the arrow keys move through the current field. For example, to move to the next cell, you need to move all the way to the end of the current text, and then press the right arrow key again. But in Normal mode, pressing the arrow keys always moves you from cell to cell.
Datasheet Shortcut Keys
Power users know the fastest way to get work done is to use tricky keyboard combinations like Ctrl+Alt+Shift+*. Although you can’t always easily remember these combinations, a couple of tables can help you out. Table 1-1 lists some useful keys that can help you whiz around the datasheet.
RESULT | |
Tab (or Enter) | Moves the cursor one field to the right, or down when you reach the edge of the table. This key also turns off Edit mode if it’s currently switched on. |
Shift+Tab | Moves the cursor one field to the left, or up when you reach the edge of the table. This key also turns off Edit mode. |
→ | Moves the cursor one field to the right (in Normal mode), or down when you reach the edge of the table. In Edit mode, this key moves the cursor through the text in the current field. |
← | Moves the cursor one field to the left (in Normal mode), or up when you reach the edge of the table. In Edit mode, this key moves the cursor through the text in the current field. |
↑ | Moves the cursor up one row (unless you’re already at the top of the table). This key also turns off Edit mode. |
↓ | Moves the cursor down one row (or it moves you to the “new row” position if you’re at the bottom of the table). This key also turns off Edit mode. |
Home | Moves the cursor to the first field in the current row. This key brings you to beginning of the current field if you’re in Edit mode. |
End | Moves the cursor to the last field in the current row. This key brings you to the end of the current field if you’re in Edit mode. |
Page Down | Moves the cursor down one screenful (assuming you have a large table of information that doesn’t all fit in the Access window at once). This key also turns off Edit mode. |
Page Up | Moves the cursor up one screenful. This key also turns off Edit mode. |
Ctrl+Home | Moves the cursor to the first field in the first row. This key doesn’t do anything if you’re in Edit mode. |
Ctrl+End | Moves the cursor to the last field in the last row. This key doesn’t do anything if you’re in Edit mode. |
Table 1-2 lists some convenient keys for editing records.
KEY | RESULT |
Esc | Cancels any changes you’ve made in the current field. This key works only if you use it in Edit mode. Once you move to the next cell, the change is applied. (For additional cancellation control, try the Undo feature, described next.) |
Ctrl+Z | Reverses the last edit. Unfortunately, the Undo feature in Access isn’t nearly as powerful as it is in other Office programs. For example, Access lets you reverse only one change, and if you close the datasheet, you can’t even do that. You can use Undo right after you insert a new record to remove it, but you can’t use the Undo feature to reverse a delete operation. |
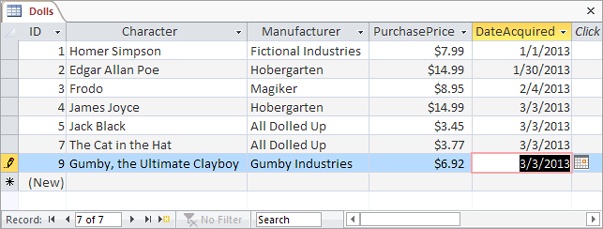
Ctrl+” | Copies a value from the field that’s immediately above the current field. This trick is handy when you need to enter a batch of records with similar information. Figure 1-11 shows this often-overlooked trick in action. |
Ctrl+; | Inserts today’s date into the current field. The date format is based on computer settings, but expect to see something like “12-24-2013.” You’ll learn more about how Access works with dates on Date/Time. |
Ctrl+Alt+Space | Replaces whatever value you’ve entered with the field’s default value. You’ll learn how to designate a default value on Setting Default Values. |
Cut, Copy, and Paste
Access, like virtually every Windows program, lets you cut and paste bits of information from one spot to another. This trick is easy using just three shortcut keys: Ctrl+C to copy, Ctrl+X to cut (similar to copy, but the original content is deleted), and Ctrl+V to paste. When you’re in Edit mode, you can use these keys to copy whatever you’ve selected. If you’re not in Edit mode, the copying or cutting operation grabs all the content in the field.
Saving Databases
Unlike other programs, Access doesn’t require that you save your data. It automatically saves any edits you make to the records in a table. This automatic-saving process takes place every time you change a record, and it happens almost instantaneously. It also takes place behind the scenes, and you probably won’t notice anything. But don’t be alarmed when you exit Access and it doesn’t prompt you to save changes, as any change to your data is saved the moment you make it.
The rules are a bit different for database objects (Understanding Access Databases). When you add or edit a database object, Access waits until you finish and close the object, at which point it prompts you to save or discard your changes. If you’re a bit paranoid and you can’t stand the wait, just click the tiny Save icon in the Quick Access toolbar in the top-left corner of the window (it looks like a floppy disk) to save the current database object immediately.
Note
Remember, when you click File, you enter Backstage view, which provides a narrow strip of commands (on the left) and a page with options for the currently selected command (on the right). You use Backstage view to open, save, and convert database files—see The Quick Access Toolbar if you need a quick review about how it works.
Making Backups
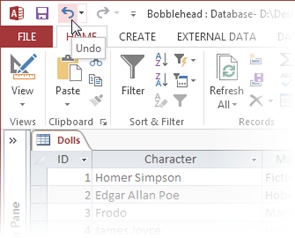
The automatic save feature can pose a problem if you make a change mistakenly. If you’re fast enough, you can use the Undo feature to reverse your last change (Figure 1-12). However, the Undo feature reverses only your most recent edit, so it’s no help if you edit a series of records and then discover the problem. It also doesn’t help if you close your table and then reopen it.
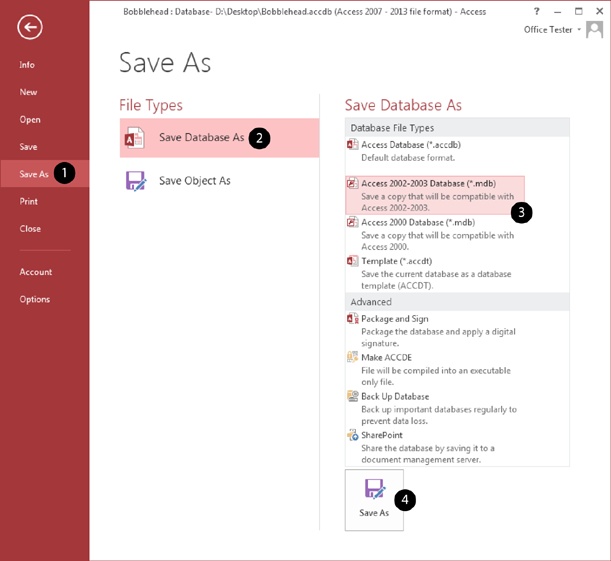
For these reasons, it’s a good idea to make frequent database backups. To make a database backup, you simply need to copy your database file to another folder, or make a copy with another name (like Bobblehead_Backup1.accdb). You can perform these tasks with Windows Explorer, but Access gives you an even easier option. First, choose File→Save As. Then, under the “File Types” heading, choose Save Database As. Finally, under the Save Database As heading, double-click Back Up Database. This opens a Save As window that offers to create a copy of your database, in the location you choose (Figure 1-13).
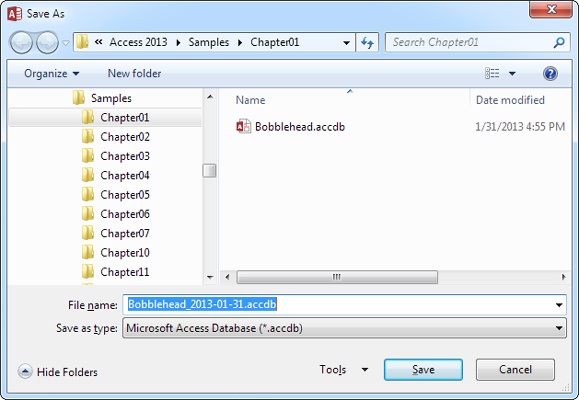
Of course, it’s still up to you to remember to copy your database backup to another location (like a network server) or to a different type of storage (like a DVD or a USB memory stick), so you’re ready when disaster hits.
Saving a Database with a Different Name
Access makes this job easy. Just choose File→Save As and click the big Save As button. Access opens a Save As window, where you can browse to a different folder on your hard drive and type a new file name. When you’re finished, click Save to seal the deal and create the newly named copy of your database.
Keep in mind that once Access creates the new database file, that file is the one it keeps using. In other words, if you create another table or edit some of your data, Access updates the new file. If you want to go back to the old file, you need to open it in Access again. (Alternatively, you can use the backup feature described in the previous section. Like the File→Save As command, the backup feature creates a copy of your database with a new name, but after it makes the backup it carries on using the original version.)
Saving a Database in a Different Format
When you create a new database, Access uses its modern .accdb format (which is short for “Access database”). Microsoft introduced the .accdb format with Access 2007, and it still works in Access 2010 and Access 2013. That makes it the go-to choice for new databases.
However, there may be times when you need to share your data with people who are using truly ancient copies of Access. Versions before Access 2007 use a different database format, called .mdb (which stands for “Microsoft database”). And, as you can see in Figure 1-14, the .mdb format actually comes in two versions: a really, really old version that supports Access 2000, and an improved that Microsoft introduced with Access 2002 and reused for Access 2003.
The standard .accdb format is the best choice if you don’t need to worry about compatibility, because it has the best performance and a few extra features. But if you need to share databases with people running much older versions of Access, the .mdb format is your only choice.
Tip
Older database formats are less reliable and may not support all of the Access features you want to use. The best approach is to stick with the .accdb format and save a copy of your data in an older format for the people who need it. However, if possible, keep using the modern .accdb format as the master copy of your database—the one you’ll use to enter new data and to create your Access queries, reports, and forms.
You can also use the old-style .mdb format when you first create a database. Choose File→New and then click the folder icon next to the File Name box. Access opens the File New Database window (which you saw back in Figure 1-3). It includes a “Save as type” box where you can choose the Access 2002-2003 file format or the even older Access 2000 format. (If you’re set on going back any further, say the Access 95 format, your best bet is a time machine.)
Shrinking a Database
When you add information to a database, Access doesn’t always pack the data as compactly as possible. Instead, Access is more concerned with getting information in and out of the database as quickly as it can.
After you’ve been working with a database for a while, you might notice that its size bloats up like a week-old fish in the sun. If you want to trim your database back to size, you can use a feature called compacting. To do so, just choose File→Info and click the big Compact & Repair Database button. Access then closes your database, compacts it, and opens it again. If it’s a small database, these three steps unfold in seconds. The amount of space you reclaim varies widely, but it’s not uncommon to have a 20 MB database shrink down to a quarter of its size.
Note
If you compact a brand-new database, Access shows a harmless security warning when the database is reopened. You’ll learn about this message, and how to avoid it, in the next section.
The only problem with the database-compacting feature is that you need to remember to use it. If you want to keep your databases as small as possible at all times, you can switch on a setting that tells Access to compact the current database every time you close it. Here’s how:
Open the database that you want to automatically compact.
Choose File→Options to get to the Access Options window.
In the list on the left, choose Current Database.
Under the Application Options heading, turn on the “Compact on Close” checkbox.
Click OK to save your changes.
Access tells you that this change has no effect until you close and reopen your database.
You can set the “Compact on Close” setting on as few or as many databases as you want. Just remember, it’s not switched on when you first create a new database.
Opening Databases
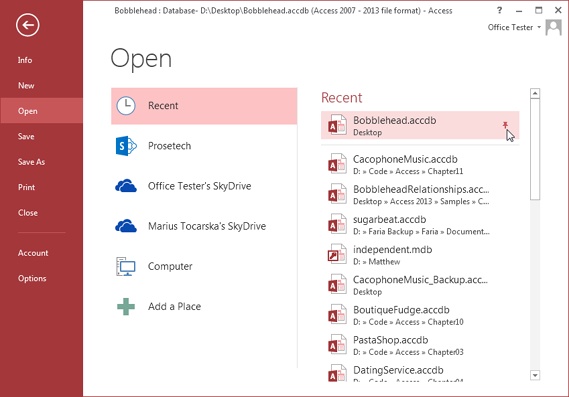
Once you’ve created a database, it’s easy to open it later. The first step is go backstage; choose File→Open. There you’ll see a list of all the databases you’ve viewed most recently (Figure 1-15). To open one, just click it. Incidentally, you see the same list of recent databases when you first start Access (Figure 1-1).
Tip
Do you want to hide your recent work? You can remove any file from the Recent Databases list by right-clicking it and choosing “Remove from list.” And if the clutter is keeping you from finding the databases you want, just pin the important files, right-click any file, and choose “Clear unpinned items.” This action removes every file that isn’t pinned down.
Ordinarily, Access tracks the previous 25 databases in the File→Recent list, but you can tell it to keep a shorter or longer list. To change this setting, choose File→Options, choose Client Settings, scroll down to the Display section, and change the number for “Show this number of Recent Documents.” You can pick any number from 0 to 50.
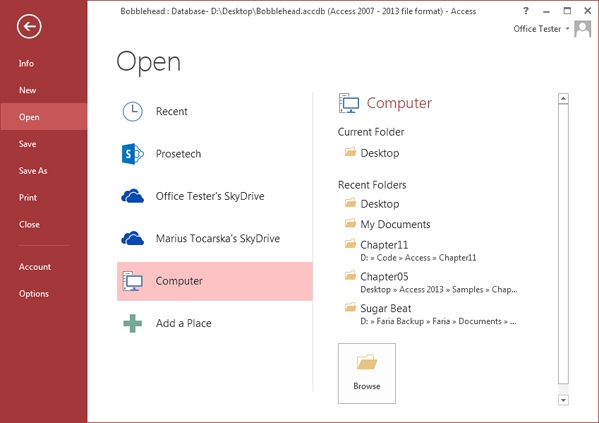
If you want to open a database that’s on your computer but not on the list of recent databases, you can browse your way to the file. Start by choosing File→Open, and, in the Places list, click Computer (Figure 1-16). Click one of the folders you’ve recently used, and Access shows an Open window listing the files in that location. Or, just click the big Browse button underneath to hunt around in the current folder. When you find the file you want, double-click it.
Tip
You can also grab files from your SkyDrive file-sharing account, if you’ve configured it in Access. However, this is strictly a one-way street: you can download databases from your SkyDrive folder, but you can’t upload new ones from Access. In other words, you’ll use SkyDrive as a way to transfer databases from one computer to another, not as a permanent home for your databases. If you want to keep your database on the Web, you need the web database feature described in Chapter 20. (And to learn more about Microsoft’s SkyDrive service, visit http://tinyurl.com/skydr.)
Finally, as always, you can open a database file from outside Access by simply double-clicking it in Windows Explorer or on your desktop.
Designating a Database as Trusted
When you open a database for the first time, you’ll notice something a little bizarre. Access pops up a message bar with a scary-sounding security warning (Figure 1-17).

If you’re opening your own recently created database, this security warning is a bit confusing, because right now your database doesn’t even attempt to do anything risky. However, once you start building databases with code routines (as described in Part 5), or when you start using action queries (Chapter 8), it’s a different story. In those situations, you need to know if Access trusts your database and will allow it to run code and action queries.
In the meantime, you’re probably wondering what you should do about the message bar. You have two options:
Click the X at the right side of the message bar to banish it. (But it’ll reappear the next time you open the database.)
Click Enable Content to tell Access that it can trust this database. Access won’t bother you again about this file, unless you rename the database file or move it to a new folder. This arrangement is called trusted documents, and it’s described in more detail on Trusted Databases.
Opening More Than One Database at Once
Every time you use the File→Open command, Access closes the current database and then opens the one you chose. If you want to see more than one database at a time, you need to fire up more than one copy of Access at the same time. (Computer geeks refer to this action as starting more than one instance of a program.)
It’s almost embarrassingly easy. If you double-click another database file while Access is already open, a second Access window appears in the taskbar for that database. You can also launch a second (or third, or fourth…) instance of Access from the Start menu, and then use File→Open to load up a different database in each one.
Opening a Database Created in an Older Version of Access
You can use the File→Open command to open an Access database created with a previous version of Access.
Access handles old database files differently, depending on just how old they are. Here’s how it works:
If you open an Access 2002-2003 file, you don’t get any notification or warning. Access keeps the current format, and you’re free to make any changes you want.
If you open an Access 2000 file, you’re also in for smooth sailing. However, if you change the design of the database, the new parts you add may not be accessible in Access 2000 anymore.
If you attempt to open an older Access file (like one created for Access 95 or 97), Access presents a warning message…and gives up. If you need to rescue valuable data trapped in a Paleolithic database, your best bet is to find someone who still has a copy of Access 2010, which can handle older file formats.
Tip
You can tell the current database’s format by looking at the text in parentheses in the Access window’s title bar. For example, if you open an Access 2002-2003 file, the title bar will include the text “(Access 2002-2003 file format).”
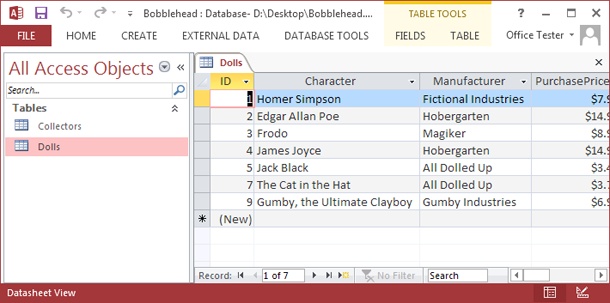
When you open an old-school Access database, you’ll notice something else has changed. When you open a table, it doesn’t appear in a tabbed window like the ones shown in Figure 1-19. Instead, the table opens in an ordinary window that can float wherever it wants inside the main Access window. This seems fine at first, until you open several tables at once. Then, you’re stuck with some real clutter, as shown in Figure 1-18.
This somewhat unfriendly behavior is designed to mimic old versions of Access, like Access 2003. But don’t worry—you can get back to the slick tabs even if you don’t convert your database to the new format. All you need to do is set a single configuration option:
In the list on the left, choose Current Database.
Under the Application Options heading, look for the Document Windows Options setting, where you can choose Overlapping Windows (the Access 2003 standard) or Tabbed Windows (the wave of the future).
Click OK.
Close and open your database so the new setting takes effect.
For a retro touch, you can use the same setting to make a brand-new Access database use overlapping windows instead of tabs.
The Navigation Pane
It’s time to step back and take a look at what you’ve accomplished so far. You’ve created the Bobblehead database and added a single database object: a table named Dolls. You’ve filled the Dolls table with several records. You don’t have the fancy windows, reports, and search routines that make a database work smoothly, but you do have the most important ingredient—organized data.
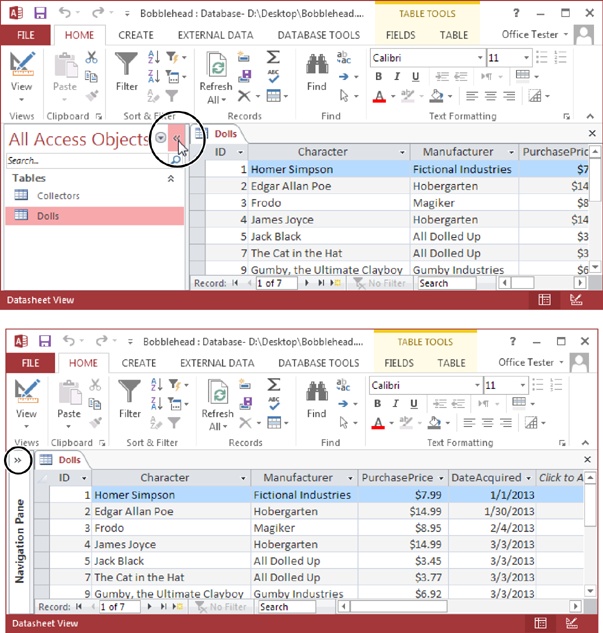
One issue you haven’t tackled yet is how you manage the objects in your database. For example, if you have more than one table, you need a way to move back and forth between the two. That tool is the navigation pane, shown in Figure 1-19.
Browsing Tables with the Navigation Pane
The navigation pane shows the objects (Understanding Access Databases) that are part of your database, and it lets you manipulate them. However, you don’t necessarily see all your database objects at all times. The navigation pane has several different viewing modes, so you can home in on exactly what interests you.
When you first create a database, the navigation pane shows only the tables in your database. That’s good enough for now—after all, your database doesn’t contain anything but the tables you’ve created. (You’ll learn how to customize the navigation pane in Chapter 14.)
To try out the navigation pane, you need a database with more than one table. To give it a whirl, choose Create→Tables→Table from the ribbon to add a new blank table. Follow the steps starting on Creating a Simple Table to define the table and insert a record or two.
Tip
Not sure what table to create? Try creating a Collectors table that tracks all the friends you know who share the same bobbleheaded obsession. Now try to come up with a few useful fields for this table (while remembering that there’s no need to go crazy with the details yet), and then compare your version to the example in Figure 1-20.
Once you’ve added the new table, you see both the new table and the old in the navigation pane at the same time. If you want to open a table, then, in the navigation pane, just double-click it. If you have more than one datasheet open at once, Access organizes them into tabs (see Figure 1-20).
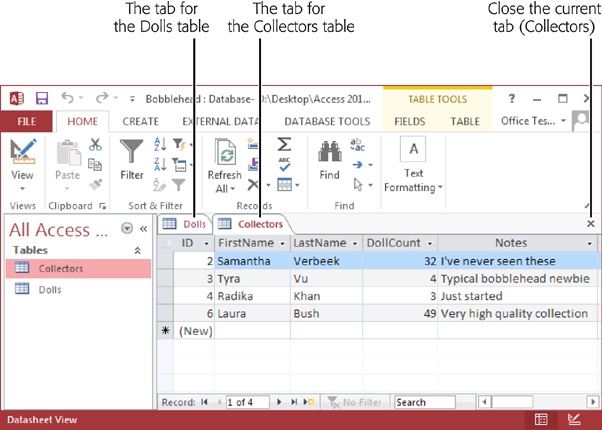
If you open enough tables, eventually all the tabs won’t fit. In this situation, Access adds tiny scroll buttons to the left and right of the tab strip. You can use these buttons to move through all the tabs, but it takes longer.
Managing Database Objects
So far, you know how to open a table using the navigation pane. However, opening tables isn’t all you can do with the navigation pane. You can actually perform three more simple tasks with any database object that shows up in the navigation pane:
Rename it. Right-click the object, and then choose Rename. Type in the new name, and then press Enter. Go this route if you decide your Dolls table would be better off named DollsInMyWorldRenownedCollection.
Create a copy. Right-click the object, and then choose Copy. Right-click anywhere in the navigation pane, and then choose Paste. Access prompts you to supply the new copy’s name. The copy-an-object feature is useful if you want to take an existing table and try redesigning it, but you’re not ready to remove the original copy just yet.
Delete it. Right-click the object, and then choose Delete. Access asks you to confirm this operation, because you can’t reverse it with the Undo command.
Access gives you a few more options for transferring database objects and tucking them out of sight. You’ll consider these features later in the book.
Get Access 2013: The Missing Manual now with the O’Reilly learning platform.
O’Reilly members experience books, live events, courses curated by job role, and more from O’Reilly and nearly 200 top publishers.

