Access queries—the six types that can
be created on the easy-to-use query by
example (QBE) grid, plus the three SQL-specific
queries—give you a tremendous amount of power and flexibility
in selecting, sorting, summarizing, modifying, and formatting the
data stored in your tables before presenting it to the user on forms
or printing it on reports. Access queries can be intimidating at
first, but mastering queries will give you complete control over the
appearance and functionality of your forms and reports. And Access
queries are flexible—once you learn how to control them, you
can use them in places where you might have written less efficient
program code.
In this chapter you’ll learn to create parameter queries, which allow you to control selected rows of a report at runtime rather than at design time. You’ll use this same technique to control the available values in one combo box based on the choice in another. You’ll study the ways to control the output of crosstab queries and will learn a handy technique for mailing labels that lets you group labels by residence to avoid sending duplicate mailings to family members. You’ll learn to take advantage of update queries to alter the values in one table based on the values from another, and you’ll learn a trick that can be used to filter a query based on the value of a Visual Basic for Applications (VBA) variable. In case you need to pull random sets of data from a data source, you’ll see how to use a query to create a random set of rows. And you’ll examine a query that uses a Partition function to perform an aging analysis.
You’ll also find solutions dealing with more advanced uses of queries. You’ll learn how to create a join that’s based on a non-equality comparison, how to use union queries to horizontally splice together the data from two tables, and how to take advantage of union queries to add an extra choice to a combo box. You’ll find out how to create self-join queries to model powerful recursive relationships, how to perform case-sensitive searches using a query, and how to use data definition language (DDL) queries to create or alter the structure of a table. You’ll also examine a suggested method for storing query information in a table, which can be protected and made invisible in applications, giving you complete control over which queries are run and when. Finally, you’ll learn a technique for creating recordsets in VBA code based on parameter queries.
Many of the examples in this chapter are based on a fictional music collection database that you could use to keep track of your favorite musicians and your album collection.
When you design a query, you don’t always know which subset of records you would like to see when you run the query. Instead of creating several queries with the same basic design but slightly different criteria, you’d like to be able to create one query that can be used to return the same fields, but a different set of records, each time it’s run.
Use a parameter query with one or more replaceable parameters that it will request at runtime (when you run the query). This solution demonstrates how you can create and run parameter queries using the default parameter prompt.
Here are the steps to create a parameter query using default prompts:
Create any type of query in query design view.
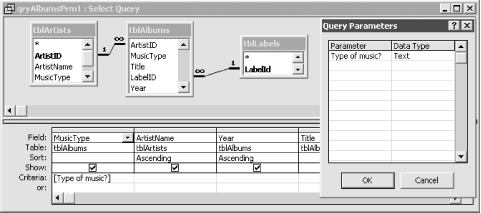
Choose a field for which you wish to define a parameter. Create a parameter for that field by entering the prompt you would like to see when the query is executed surrounded by square brackets ([]) in the Criteria row for that field. For the example query qryAlbumsPrm1, you would create a parameter for the MusicType field by typing:
[Type of Music?]
in the Criteria row under MusicType.
Select Parameters from the Query menu to open the Query Parameters dialog, where you declare the parameter. For this example, enter:
Type of Music?
in the Parameter column of the Query Parameters dialog, and choose:
Text
from the data type combo box to tell Access that this is a text parameter. This step is optional in this query, but some queries require it (see Recipe 1.1.3), so make it a habit. Steps 2 and 3 are shown in Figure 1-1.
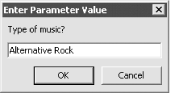
Save the query and run it. Access will prompt you to enter the type of music with a parameter dialog (see Figure 1-2).
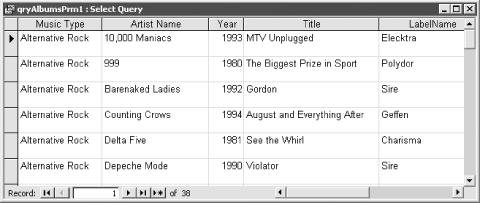
To see how this works using the sample database, open 01-01.MDB and run the qryAlbumsPrm1 query. You will be prompted for the type of music. Enter a music type, such as rock, alternative rock, or jazz. The query will then execute, returning only the records of the specified music type. For example, if you enter “Alternative Rock” at the prompt, you’ll see the datasheet shown in Figure 1-3.
For queries with simple text parameters, you can get away without declaring the parameter using the Query → Parameters command. If you create parameters for crosstab or action queries, however, you must declare the parameter. We recommend that you get in the habit of always declaring all parameters to eliminate any chance of ambiguity. The entries you make in the Parameters dialog end up in the Parameters clause that is added to the beginning of the query’s SQL, which you can see by selecting View → SQL View.
The result of a parameter query needn’t be a query’s datasheet. You can base reports, forms, and even other queries on a parameter query. When you run the object that is based on the parameter query—for example, a report—Access knows enough to resolve the parameters prior to running the report.
You can use parameters in any type of query, including select, totals, crosstab, action, and union queries.
The default type of parameter query is useful but has several drawbacks:
You get one Enter Parameter Value dialog for each parameter. Since these are sequential, you can’t return to a previous dialog to change an incorrect value.
You can’t select the value from a combo box or use a format or input mask, which makes it likely that the user will enter invalid data or data not found in the database.
You can’t write any VBA event procedures to run behind the Parameters dialog.
Use a form-based parameter query by creating a more user-friendly form that collects the parameters.
Here are the steps to create a parameter query using a form-based prompt:
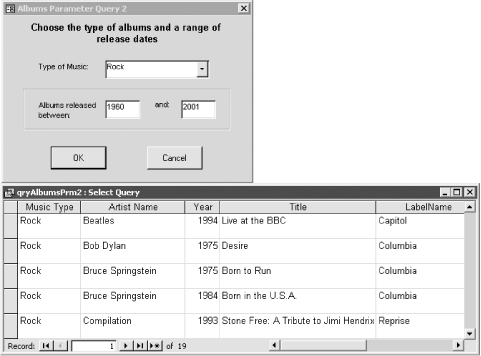
Decide how many parameters you will define for the query, in what order you would like them to be presented to the user, and what type of form control you would like to use for each parameter. For the qryAlbumsPrm2 query shown later, in Figure 1-4, we defined three parameters, as shown in Table 1-1. (Don’t worry about the last column in the table yet—we will discuss it soon.) Note that we included two parameters for the Year field so we could select rows based on a range of years, such as “between 1970 and 1975.”
Table 1-1. Parameters for qryAlbumsPrm2
|
Query field |
Data type |
Control type |
Parameter reference |
|---|---|---|---|
|
MusicType |
Text |
Combo box |
Forms!frmAlbumsPrm2!cboMusicType |
|
Year |
Integer |
Text box |
Forms!frmAlbumsPrm2!txtYear1 |
|
Year |
Integer |
Text box |
Forms!frmAlbumsPrm2!txtYear2 |
Create an unbound form with controls that will be used to collect the query’s parameters. For qryAlbumsPrm2, we created a form named frmAlbumsPrm2 with three controls that will be used to collect the parameters from Table 1-1. All three controls are unbound; that is, they have no entry for the ControlSource property. We named the text boxes txtYear1 and txtYear2. We also created a combo box called cboMusicType to allow the user to select the type of music from a list of music types. You can use the combo box control wizard to assist you in creating this control, or you can create it by hand. If you decide to create it by hand, select Table/Query for the RowSourceType property and tblMusicType for the RowSource (not the ControlSource). Leave all the other properties at their default settings.
Add one command button to the form that will be used to execute the query and another that will be used to close the form. For frmAlbumsPrm2, we created two buttons with the captions OK and Cancel. To accomplish this, you can use the command button wizard, which will write the VBA code for you. Here’s what the code in the two event procedures looks like:
Private Sub cmdCancel_Click( )
    DoCmd.Close
End Sub

Private Sub cmdOK_Click( )
    DoCmd.OpenQuery "qryAlbumsPrm2", acViewNormal, acEdit
End Sub
Create the query. You will now create the parameters that reference the controls on the form created in Steps 2 through 4. You create form-based parameters a little differently than default parameters. Instead of creating a prompt surrounded by square brackets, you will enter references to the form control for each parameter. For qryAlbumsPrm2, create the parameters shown in Table 1-1. In the MusicType field, enter:
Forms![frmAlbumsPrm2]![cboMusicType]
Enter brackets only around each form and control reference, not around the entire parameter. For the Year field, enter:
Between Forms![frmAlbumsPrm2]![txtYear1] And Forms![frmAlbumsPrm2]![txtYear2]
Select Query → Parameters to declare the data types of the parameters. Use the same parameter names you used in the previous step. Choose the data types shown in Table 1-1.
Save the query and close it.
Open the parameter form in form view. Select or enter each of the parameters. Click on the OK button to execute the parameter query, returning only the rows selected using the parameter form.
To see how a form-based query works using the sample database, open the frmAlbumsPrm2 form in 01-02.MDB (see Figure 1-4). This form collects three parameters for the parameter query qryAlbumsPrm2. Choose the type of music from the combo box and the range of years to include in the two text boxes. Click on the OK button to execute the parameter query using the parameters collected on the form.
When you add a parameter to the criteria of a query, Access knows that it needs to resolve that parameter at runtime. You must either reference a control on a form or enter a prompt surrounded by square brackets to let Access know you wish to use a parameter. If you don’t use the brackets, Access will interpret the entry as a text string.
When Access runs a query, it checks to see if there are any parameters it needs to resolve. It first attempts to obtain the value from the underlying tables. If it doesn’t find it there, it looks for any other reference it can use, such as a form reference. Finally, if there is no form reference (or if you created a form-based parameter and the form is not open), Access prompts the user for the parameter. This means that you must open the form prior to running any parameter queries that contain references to forms.
Tip
Parameter dialogs can sometimes be a symptom of an error in the design of one or more objects in your database. If you ever run a query, form, or report and are prompted for a parameter when you shouldn’t be, you probably misspelled the name of a field or renamed a field in a table without changing the reference in the query. Access sometimes creates queries on its own to support subforms or sorting and grouping in reports. You may need to check the LinkChildFields or LinkMasterFields properties of a subform or the Sorting and Grouping dialog of a report to find the unrecognized term that is triggering the errant Enter Parameter Value dialog. Also, if you change a parameter in the query grid, remember to change it in the Parameters dialog too!
Sometimes in a form-based parameter query it would be nice to limit the values in one combo box based on the value selected in another combo box. For example, if a form has two combo boxes, one for the type of music and the other for artists, when you select the type of music in the first combo box, you’d like the list of artists in the second combo box to be limited to artists of the selected music type. But no matter which type of music you select, you always see all the artists in the second combo box. Is there any way to link the two combo boxes so you can filter the second combo box based on the selected item in the first?
When you place two combo boxes on a form, Access by default doesn’t link them together. But you can link them by basing the second combo box on a parameter query whose criteria point to the value of the first combo box. This solution demonstrates how you can use a parameter query tied to one combo box on a form as the row source for a second combo box to limit the second combo box’s drop-down list to items appropriate to the user’s selection in the first combo box.
Follow these steps to create linked combo boxes:
Create a form bound to a table or query. Make it a continuous form by setting the DefaultView property of the form to Continuous Forms. This will be used as a subform, like fsubAlbumBrowse in the frmAlbumBrowse example.
Create a second form with two unbound combo boxes. In the frmAlbumBrowse example found in 01-03.MDB, we named the combo boxes cboMusicType and cboArtistID. Drag the subform from the Access Forms object list in the database window onto the main form. We dragged the icon for fsubAlbumBrowse onto frmAlbumBrowse, underneath the combo boxes.
Set the LinkChildFields and LinkMasterFields properties of the subform control to keep the subform in sync with the main form. We entered ArtistID as the LinkChildFields and cboArtistID as the LinkMasterFields.
Create the query that will supply rows for the first combo box. The query that’s the source of rows for cboMusicType is a simple one-column query based on tblMusicType and sorted alphabetically by MusicType.
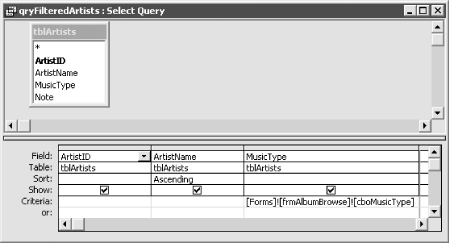
Create the query that will supply rows to the second combo box. The query that provides rows for the cboArtistID combo box, qryFilteredArtists, contains three columns—ArtistID, ArtistName, and MusicType—and is sorted by ArtistName.
Create the parameter that links this query to the first combo box. For qryFilteredArtists, enter the following in the MusicType field:
Forms![frmAlbumBrowse]![cboMusicType]
Select Query → Parameters to declare the data type of the parameter. Use the exact same parameter name you used in the previous step. For qryFilteredArtists, choose Text for the data type. This query is shown in Figure 1-5.
Adjust the properties of the two combo box controls so they now obtain their rows from the queries created in Steps 3 through 6. In the frmAlbumBrowse example, set the properties of the combo boxes as shown in Table 1-2.
When the value selected for the first combo box changes, you need two things to happen:
Blank out any value in the second combo box to avoid a mismatch.
Requery the second combo box so that only matching values will show. In the example, we want to see artists of only the selected music type.
You could use a macro to accomplish this, but adding a VBA procedure is just as easy. To make your code run automatically when the value in the first combo box, cboMusicType, changes, use that combo box’s AfterUpdate property. Select [Event Procedure] on the properties sheet, and click the “...” button that appears to the right of the property. This brings up the VBA Editor, with the first and last lines of your event procedure already created. Enter an additional two lines of code, so that you end up with this:
Private Sub cboMusicType_AfterUpdate( )
    cboArtistID = Null
    cboArtistID.Requery
End Sub
Table 1-2. Key properties for the combo boxes on frmAlbumBrowse2
|
Name |
RowSourceType |
RowSource |
ColumnCount |
ColumnWidth |
BoundColumn |
|---|---|---|---|---|---|
|
cboMusicType |
Table/Query |
qryMusicType |
1 |
<blank> |
1 |
|
cboArtistID |
Table/Query |
qryFilteredArtists |
2 |
0 in; 2 in |
1 |
To see a form-based query in which one drop-down combo box depends on the value selected in another, open and run frmAlbumBrowse from 01-03.MDB. This form has been designed to allow you to select albums by music type and artist using combo boxes, with the selected records displayed in a subform. If you select a type of music using the first combo box, cboMusicType—for example, Alternative Rock—the list of artists in the second combo box, cboArtistID, is filtered to show only Alternative Rock musicians (see Figure 1-6). Once you pick an artist, the form displays all the albums by that artist.
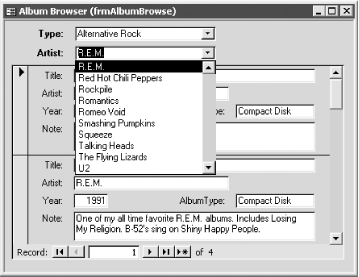
The parameter query (in this example, qryFilteredArtists) causes the second combo box’s values to be dependent on the choice made in the first combo box. This works because the criteria for the MusicType field in qryFilteredArtists point directly to the value of the first combo box.
This works without any macro or VBA code until you change the value in the first combo box. To keep the two combo boxes synchronized, however, you must create an event procedure to force a requery of the second combo box’s row source whenever the first combo box’s value changes. Any value in the second combo box (cboArtistID) will probably become invalid if the first combo box (cboMusicType) changes, so it is also a good idea to blank out the second combo box when that happens. This is accomplished in the frmAlbumBrowse example by using two simple lines of VBA code placed in the AfterUpdate event procedure of the first combo box.
The subform in this example automatically updates when an artist is selected, because cboArtistID was entered as the LinkMasterFields (the property name is plural because you may need to use more than one field). The LinkMasterFields property can contain the names of one or more controls on the main form or fields in the record source of the main form. If you use more than one field, separate them with semicolons. The LinkChildFields property must contain only field names (not control names) from the record source of the subform.
The example shown here uses two unbound combo boxes and a subform. Your use of this technique for relating combo boxes, however, needn’t depend on this specific style of form. You can also use this technique with bound combo boxes located in the detail section of a form. For example, you might use the frmSurvey form (also found in the 01-03.MDB database) to record critiques of albums. It contains two linked combo boxes in the detail section: cboArtistID and cboAlbumID. When you select an artist using the first combo box, the second combo box is filtered to display only albums for that artist.
To create a form similar to frmSurvey, follow the steps described in this solution, placing the combo boxes in the detail section of the form instead of the header. Create an event procedure in the AfterUpdate event of the first combo box, cboArtistID, to blank out and requery the second combo box, cboAlbumID. Because the artist may be different on different records in the form, cboAlbumID also needs to be requeried as you navigate from record to record. You can accomplish this by requerying cboAlbumID in the Current event of the form:
Private Sub Form_Current( )
    cboAlbumID.Requery
End Sub
Warning
Using related combo boxes in the detail section of a continuous form can cause problems. Unbound combo boxes will show the same value on every row, and bound ones may mysteriously turn blank when they lose focus. This happens if a dependent combo box has a displayed column that isn’t also its bound column. You can demonstrate this by changing the DefaultView property of frmSurvey from Single Form to Continuous Forms. You’ll find that cboAlbumID appears blank on all rows that have a different artist than the one selected on the current row. That’s because the bound column in cboAlbumID is not the displayed column (the bound AlbumID column has a column width of 0). Access can’t display a value that’s not in the current row source unless it’s in the bound column.
To fill a combo box programmatically, see Recipe 7.5 in Chapter 7. To optimize your combo box performance, see Recipe 8.3 in Chapter 8.
If you have a crosstab query that uses the built-in Format function to convert dates into text for column headings, Access sorts them alphabetically (Apr, Aug, and so on) rather than chronologically. For example, open 01-04.MDB and run the qryAlbumTypeByMonth1 crosstab query (see Figure 1-7). This query shows the cross-tabulation of the number of albums purchased by album type and the month the albums were purchased. The month columns are sorted alphabetically instead of chronologically.
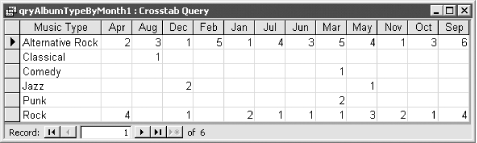
When the purpose of using the month in a crosstab query is to examine chronological variation by month, this makes the crosstab query all but useless. Is there some way to tell Access to sort the columns by date rather than alphabetically?
The query properties sheet allows you to specify fixed column headings for a crosstab query. This solution illustrates how to use the ColumnHeadings property to specify column headings so that formatted dates sort chronologically.
Follow these steps to create a crosstab query with correctly sorted formatted-date columns:
Create a select query. Select Query → Crosstab to convert the query into a crosstab query.
Add the columns you want to the crosstab query. Use a calculation for the Column Heading field. This calculation should use the built-in Format function to convert a normal date into an alphabetic string for cross-tabulation purposes. This might be the day of week or the month of year—in the example shown in Figure 1-7, we took the date field, DateAcquired, and formatted it as a three-letter month string. Add the remaining fields to qryAlbumTypeByMonth2, as shown in Table 1-3.
All crosstab queries must have at least three fields: Row Heading, Column Heading, and Value.
Table 1-3. Field settings for the qryAlbumTypeByMonth2 crosstab query
|
Field |
Table |
Total |
Crosstab |
|---|---|---|---|
|
AlbumType |
tblAlbums |
Group By |
Row Heading |
|
Month: Format([DateAcquired], “mmm”) |
Group By |
Column Heading | |
|
Album ID |
tblAlbums |
Count |
Value |
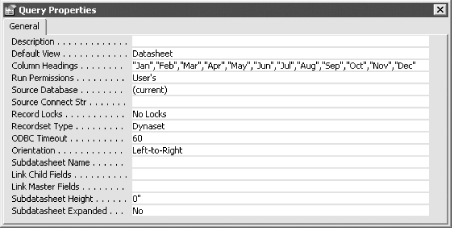
Select View → Properties if the properties sheet is not already visible. Click on any part of the background of the upper-half of the query screen. This will select the properties for the query itself (as opposed to the Field or FieldList properties). Enter the values of the formatted date, in the order in which you want them to appear, into the ColumnHeadings property. For the qryAlbumTypeByMonth2 query, add three-letter strings for each month of the year (see Figure 1-8). Separate each entry with a comma.
Save and run the query. The date columns should be ordered chronologically.
Now run qryAlbumTypeByMonth2, which you’ll also find in 01-04.MDB. In this query, the months are ordered chronologically (see Figure 1-9).
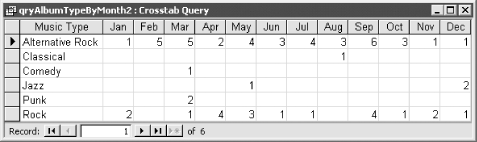
When you convert a date/time field to a formatted date using the Format function, Access converts the date into a string. This means that the formatted date will sort alphabetically, like any other string. Access includes a special query property, ColumnHeadings, to make it easy to work around this unpleasant side effect of using the Format function.
You aren’t limited to using fixed column headings with formatted date strings. This crosstab query property comes in handy for several other situations. For example, you might use the ColumnHeadings property to:
Force a crosstab to always contain a column heading, even if no values exist for that column. For example, you could use the ColumnHeadings property to include all employee names in a crosstab report, even if one of the employees has no sales for the reporting period.
Force a unique ordering for the columns of a crosstab query. For example, if your Column Heading field is made up of the names of regions, you can use the ColumnHeadings property to ensure that the home region always appears as the leftmost column.
Eliminate a column value. If the ColumnHeadings property contains any values, any column headings in the result set that are not listed in the property will be left out of the crosstab query. You can also accomplish this by using query criteria.
Warning
When you use the ColumnHeadings property, you must spell the column
heading values exactly as they appear in your data. If you misspell a
column heading value, that value will not appear in the crosstab
query. For example, if you use Format(datefield,
"ddd") as the Column Heading field and create
fixed column headings of Mon, Tue, Wed, Thr, Fri, Sat, and Sun, the
Thr column will be completely blank because the
Format function returns Thu (not Thr) for day of
week.
You cannot set the ColumnHeadings property programmatically. Setting this property in the Access user interface causes an IN clause to be added to the SQL of the query, and the only way to accomplish this in code is to add or modify that IN clause yourself.
You need to print mailing labels intended for the general public. If your mailing list contains multiple occurrences of the same last name at the same address, you want to print only one label (addressed to the entire family). Otherwise, you need to print one label for each person in the table.
To avoid sending duplicate mailings to multiple members of a family, you can use a totals query to group label data so that people with the same last name who live at the same address will make up only one row in the output query. In addition, if you count the number of occurrences of combinations of last name, address, and zip code, you can create the mailing-label text with different text for mailings to a family based on that count.
To create this grouping in your own data, follow these steps:
Create a new query (qryCountNames, in this example) based on your table. Turn this query into a totals query by choosing View → Totals or by clicking on the Sigma button on the toolbar. This query will group the data using one row for each unique combination of the grouping fields.
Add a column to the query grid for each column in your table on which you want to group rows. Our example uses [LastName], [Address], and [Zip]. For each column, set the Total field to Group By. If you want to specify column names, place those names, followed by a colon, before the field names, as shown in Figure 1-10.
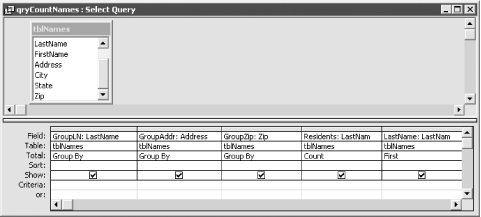
Add a column to the query grid in which Access will count the number of rows that it groups together to make a single row in the output. Choose any field that won’t have null values (i.e., a required field), place it in the query grid, and set its Total row to Count. (This field is called [Residents] in this example.) This instructs Access to count the number of rows in the same grouping, as shown in Figure 1-10. You can also use the expression
Count(*)instead of using a field.Add any other fields that you want to show on your labels to the query grid. For each field, set the value in the Total row to First. For each column, add a specific title—if you don’t, Access will change each title to FirstOf
<ColumnName>. When you run this query, its output will look something like that shown in Figure 1-11. Note that there’s only one row in the output for each unique grouping of last name, address, and zip code.

To create the text for your labels, create a new query (qryLabels, in this example) based on the previous query (qryCountNames). You’ll base the mailing label name on the field in which you counted rows ([Residents], in this example), along with the [FirstName] and [LastName] fields. Pull in whatever columns you want in your label, and add one more for the label name. In our example, the expression for this column ([LabelName]) is:
LabelName: Iif ([Residents] > 1, "The " & [LastName] & " Family",
 [FirstName] & " " & [LastName])
On the mailing label itself, use the [LabelName] field instead of the [FirstName] and [LastName] fields. This field (shown in Figure 1-12) shows either the family name or the single individual’s first and last name, depending on the value in the [Residents] column.

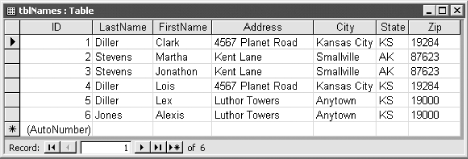
To see how this works, open the tblNames table in
01-05.MDB. The raw data appears as in
Figure 1-13. Note that there are several examples of
family members living at the same address, and we want to create only
one label for each of these families. There’s also
an example of two people with different last names at the same
address—we don’t want to combine these names
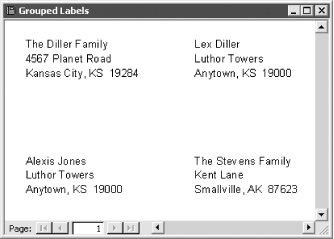
into one label. Open the rptLabels report (shown in Figure 1-14). This mailing label report groups the people
with common last names and addresses onto single labels, using the
family name instead of individual names.
By creating a totals query that groups on a combination of fields, you’re instructing Access to output a single row for each group of rows that have identical values in those columns. Because you’re grouping on last name and address (the zip code was thrown in to ensure that you wouldn’t group two families with the same name at the same address in different cities), you should end up with one output row for each household. You included one column for counting (the [Residents] field, in our example), so Access will tell you how many rows collapsed down into the single output row. This way, the query can decide whether to print an individual’s name or the family name on the label.
If the value in the counted field is greater than 1, the query builds an expression that includes just the family name:
"The " & [LastName] & " Family"
If the count is exactly 1, the query uses the first and last names:
[FirstName] & " " & [LastName]
The immediate If function, IIf, does this for you, as shown in Step 5. It looks at the value in the [Residents] field and decides which format to use based on that value.
Access does its best to optimize nested queries, so don’t feel shy about resorting to basing one query on another. In this case, it simplifies the work. The first-level query groups the rows, and the second one creates the calculated expression based on the first. Though it might be possible to accomplish this task in a single query, splitting the tasks makes it easier to conceptualize.
We also could have solved this problem by changing the design of the database so that instead of having a single table, tblNames, with repeating address information for multiple family members, we had two tables, perhaps called tblFamilies and tblFamilyMembers, related in a one-to-many relationship.
To include quotes inside quoted strings, see Recipe 7.1 in Chapter 7.
You’ve imported a table that contains updated prices for some of the records in a table in your database. The data in all the other fields in the existing table is still correct. Is there any way—short of using a complex VBA procedure—to update the price data in the existing table based on the updated prices from the imported table without overwriting any of the other fields in the existing table?
You probably already know that you can use an Update query to update the values of fields in a table, but did you know that you can use an Update query to update the values in one table with the values from another? This solution will show you how to do just that. If you can join the two tables on some common field or combination of fields, you can use an Update query to update a field in one table based on the values found in a second table.
Here are the steps to create an Update query that updates values across tables:
Create a standard Select query. Add the two tables to the query and join them on the common field or fields. In the sample database, we added the tblAlbums and tblAlbumsUpdated tables to the query. We will refer to tblAlbumsUpdated as the source table because it will supply the values to be used to update the other table; tblAlbums is the target table because it will be the target of the updates. Access has automatically joined the two tables on AlbumID. If the name of the common field is not the same, you will have to join the two tables by dragging the common field from one table to the other.
Select Query → Update to change the type of query to an update action query.
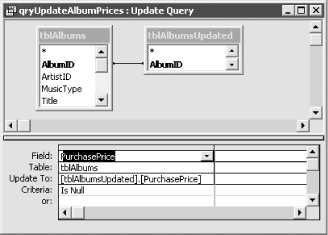
Drag the field to be updated in the target table to the query grid. In the Update To cell for the field that will be updated, specify the fully qualified name of the field in the source table that will be the source of the updated values. This field name should include the name of the table surrounded by square brackets, a period, and the name of the field surrounded by square brackets. For qryUpdateAlbumPrices, drag the PurchasePrice field from tblAlbums to the query grid. The field settings for PurchasePrice are shown in Table 1-4.
Table 1-4. Field settings for qryUpdateAlbumPrices
|
Field |
Table |
Update To |
Criteria |
|---|---|---|---|
|
PurchasePrice |
tblAlbums |
[tblAlbumsUpdated].[PurchasePrice] |
Is Null |
Warning
Be careful when specifying the Update To value. If you misspell the source field name, you run the risk of changing the values to the misspelled string rather than to the values in the source field. If Access surrounds the Update To value with quotes or prompts you for an unexpected parameter when you attempt to execute the update query, it’s likely that you made a spelling mistake.
Optionally specify criteria to limit the rows to be updated. In the qryUpdateAlbumPrices example, we used criteria to limit the updated rows to those with null (missing) prices (see Table 1-4). This prevents Access from overwriting any existing non-null values in tblAlbums.
Execute the query by selecting Query → Run or by clicking on the exclamation point icon.
Tip
You can preview the selected records in an action query by choosing View → Datasheet or by clicking on the Datasheet icon. The query will not be run, but you’ll be able to see which records would be updated had you run the query.
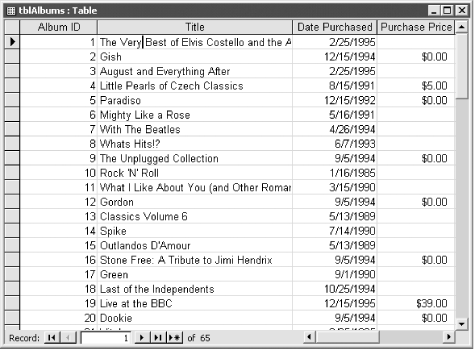
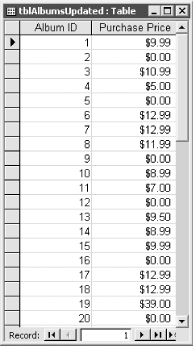
For an example of updating a field in a table based on the value of a field in another table, open the tblAlbums table found in the 01-06.MDB database. Note that most of the purchase prices are null (see Figure 1-15). Open tblAlbumsUpdated, and you’ll see that many of the purchase prices for the same albums have been entered (see Figure 1-16).
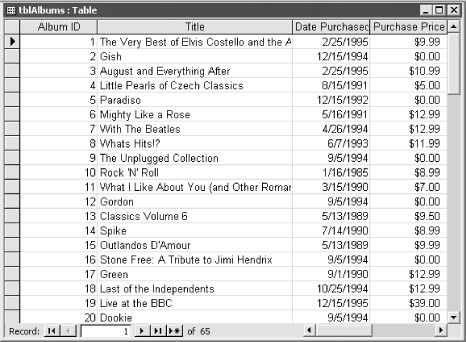
Now run the qryUpdateAlbumPrices query found in the same database (see Figure 1-17). This action query will take the PurchasePrice values from tblAlbumsUpdated and copy it into the Purchase Price field in tblAlbums for each record where the two AlbumID fields match and the price value in tblAlbums is currently null. When the query is finished, open tblAlbums again—you should see that the Purchase Price field in this table has been updated based on the values in tblAlbumsUpdated (see Figure 1-18).
You can use update queries in Access to update the values in a target table, and you can use another table to supply the values for the update. The trick is to join the two tables using a common field and to properly specify the name of the field from the source table in the Update To cell.
You can update more than one field at a time in an update query. You can also include additional fields in the query grid to further limit the rows to be updated. Drag these additional fields to the query grid and specify criteria for them. As long as you leave the Update To row blank for these columns, they will be used for their criteria only and will not be updated. Update queries are the most efficient way to make bulk changes to data; they are much more efficient than using a recordset in a VBA procedure.
You’d like to be able to return rows in a query that have a test score greater than a specified value, which is stored in a VBA variable. When you try to use the variable in the query design grid, Access thinks it’s a literal value. Is there some way to get queries to understand VBA variables?
To use a VBA variable in a query, you need to write a VBA function that returns the value of the variable as its return value and then reference the VBA function either as part of a calculation or in the criteria of a field. The only way to work with VBA in queries is to call a function. This solution shows you how to do that.
In the sample database 01-07.MDB you’ll find tblScores, a table of names and test scores. The goal of the sample is to allow you to specify a cutoff value and list everyone whose scores are greater than that value.
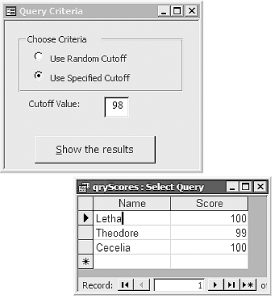
Open the frmScores form. This form allows you to choose between a randomly selected cutoff value and a user-specified cutoff value. If you choose the user-specified cutoff value, a text box is made visible to allow you to enter the cutoff value. When you click on the “Show the results” command button, an event procedure runs that saves the cutoff value—either the randomly chosen cutoff or the user-specified cutoff—to a private variable and then runs the qryScores query.
The qryScores query references the private variable using the GetCutoff function and then returns the rows in tblScores in which the score is greater than the cutoff value (see Figure 1-19).
Follow these steps to use a VBA variable in a query:
Create a select query, adding the tables and fields you wish to include in the query. The sample query, qryScores, is based on the tblScores table and contains two fields, Name and Score.
Create a VBA function or subroutine for which you wish to pass a variable to the query from Step 1. The sample database includes the frmScores form.
The following event procedure is attached to the cmdRunQuery command button:
Private Sub cmdRunQuery_Click( )

    Dim intCutoff As Integer

    If Me.grpCriteria = 1 Then
        ' Use a random cutoff.
        ' You generate a random number between x and y
        ' by using the formula Int((y-x+1)*Rnd+x).
        ' This example generates a number between 0 and 100.
        Randomize
        intCutoff = Int(101 * Rnd)
        MsgBox "The random cutoff value is " & intCutoff, _
         vbOKOnly + vbInformation, "Random Cutoff"
        Me.txtCutOff = intCutoff
    End If
    SetCutoff Me.txtCutOff
    DoCmd.OpenQuery "qryScores"
End Sub
Based on the user choice made using the grpCriteria option group, the procedure will either generate its own randomly chosen cutoff or grab the cutoff value from the txtCutoff text box. Once the value is generated, the event procedure calls the public subroutine SetCutoff, which stores the value in a private variable. The SetCutoff procedure and the variable declaration are shown here:
Private intCutoff As Integer

Public Sub SetCutoff(Value As Integer)
   ' Set the module variable to be
   ' the value passed in from externally.
   intCutoff = Value
End Sub
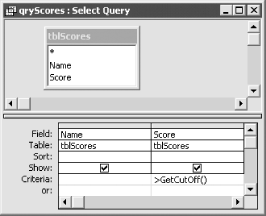
Reference the module-global variable intCutOff using a wrapper function that returns the value currently stored in the variable. For the sample query qryScores, enter the following criteria for the Score field:
>GetCutoff( )
The design view for this query is shown in Figure 1-20. The code for the GetCutoff function is:
Public Function GetCutoff( )
   ' Return the value of the module variable.
   GetCutoff = intCutoff
End Function
Execute the VBA procedure from Step 2. This causes the variable to be set, and the query then runs. When the query is executed, it references a function that returns the value stored in the VBA variable.
A query cannot directly reference a VBA variable. It can, however, call a VBA function that returns the value stored in the VBA variable. To do this, you write a VBA wrapper function for each variable you wish to pass to a query. Because functions on form and report modules are normally local to that form or report (although you can make these functions public), you’ll usually want to call a function stored in a global module—a module you can see in the database container.
In the example, we used a form to collect the values to pass to the
VBA variable, intCutoff. Another way to
solve this problem would be to use a parameter query that directly
references the text box on frmScores. The example form
frmScoresTextbox combined with qryScoresTextbox show this approach in
action.
Using a form to feed the values to a query will not, however, always be so convenient. There will be times where you need to use a variable without a form. For example, you might use global variables to store settings that are read from an options table upon application startup. This options table might store, for example, the complete name of the user, her address, and other preferences. You may decide to store these values in a set of global variables to minimize the number of times you have to reread the values from the options table. In this case, these variables will not be stored on any form. As another example, you may need to base the query on some value obtained from another application using Automation. Even in those cases, however, you can always use a hidden form if you prefer that approach.
For more information on declaring variables and creating modules, see How Do I Create a New Module? in the Preface.
You need to be able to retrieve a random set of rows from a table or a query so you can identify a random sample for a research study. You can’t find a way to make this happen in the normal query design grid. What’s the trick to getting a random sample of a certain number of rows?
The solution to this problem is not quite as simple as it might first appear, because of the way Access attempts to optimize the use of function calls in queries. You can call a VBA function to generate a random value for each row, but to ensure that your function runs for each row, and not just once, you need to feed it a value from the row. Once you’ve generated the random numbers, you can sort by that random column and use a Top Values query to select a random group.
In 01-08.MDB, open tblRandom. This table
includes 50 rows of data. Your goal is to pull five randomly selected
rows for this set of data. To do this, follow these steps:
Import the module basRandom from
01-08.MDBor create your own, including this single function:Public Function acbGetRandom(varFld As Variant) ' Though varFld isn't used, it's the only way to force the query ' to call this function for each and every row. Randomize acbGetRandom = Rnd End Function
Create a new select query or use an existing one. Add any fields you’re interested in.
Add an extra column, with the following expression replacing the reference to the State field with a single field in your query’s underlying table or query (this query won’t run correctly unless you pass one of your field names to the function):
acbGetRandom([State])
You can clear this field’s Show checkbox, because there’s not much point in viewing a continually changing random number as part of your query output. Set the Sort value for the newly calculated field to Ascending (see Figure 1-21).
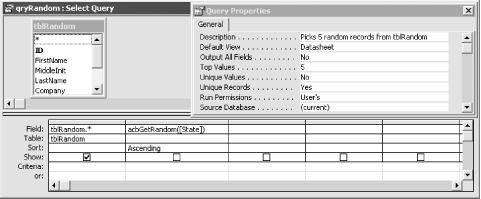
Open the query’s properties sheet (make sure the View → Properties menu item is checked, and click on the upper area of the query design surface so the properties sheet’s titlebar says Query Properties). Fill in the number of rows you’d like to return in the TopValues property. Figure 1-21 shows the sample query, qryRandom, in design view with the property filled in.
Run the query. Your query grid should show you as many rows as you specified in the properties sheet. If you press Shift-F9, asking Access to requery the data, you will see a different set of rows. Repeating the process will return a different set of rows each time.
The general concept behind this solution is simple: you add a new column to your query, fill it with a list of random numbers, sort on those random numbers, and retrieve the top n rows, where n is a number between 1 and the number of rows in your underlying data. There’s only one complicating factor: to create the random number, you need to call a function for each row. Access tries to optimize such a function call and will call it only once for the entire set of data, unless the function call involves a field in the data. That is, if you replace the call to acbGetRandom (in Step 3) with a simpler call directly to Access’s random number function (Rnd), you’ll find that every value in every row will be exactly the same. Access’s query engine thinks that the function has nothing to do with data in the query, so it calls the function only once. This makes the random number meaningless, as the whole point of using a random number is to generate a different one for each row.
The workaround, though, is simple: pass a field, any field, as a parameter to the function you call. That way, Access believes that the return value from the function is dependent on the data in each row and so calls the function once per row, passing to it the field you specify in the expression. The acbGetRandom function doesn’t really care about the value you pass it, because its only goal is to get a random number and return that back to the query. Once you successfully place a random number in each row Access will sort the data based on that number, because you specified Ascending for the column’s sorting.
Finally, by specifying the TopValues property for the query, you’re asking Access to return only that many rows as the result set of the query. If you want a certain percentage of the total rows, change it by adding the % sign after the Top value.
The acbGetRandom function includes a call to the VBA Randomize subroutine. By calling Randomize, you’re asking Access to give you a truly random result every time you call the function. If you omit this call, Access gives you the same series of random numbers each time you start it up and run this query. If you want a repeatable series of random rows, remove the call to Randomize. If you want a different set of rows each time you run the query, leave the Randomize statement where it is.
Because Access will pass a field value to the acbGetRandom function for each and every row of data in your data source, you’ll want to optimize this function call as much as you can. If possible, use either a very short text field (zip code, for example) or, even better, an integer. You must pass some value, but you want it to be as small as possible to minimize the amount of information that must be moved around for each row of the data.
Using a crosstab query, you need to age transactions, grouped by Account ID, into ranges of 1-30 days, 31-60 days, 61-90 days, and greater than 120 days. You know that you can group transactions by month using the standard query tools, but you can’t find a way to group them by 30-day increments.
Access provides the seldom-used Partition function, which is perfect for this task. It allows you to take a range of values and partition it into even-sized chunks. By specifying a 30-day partition size, you can create a crosstab query that will give you the information you need.
To create a query in your own application, follow these steps:
Create a new query based on a table or query containing the appropriate account, date, and amount information.
Convert this query to a crosstab query by choosing the Query → Crosstab menu item or by clicking on the Crosstab button on the Query Design toolbar.
As when you create any crosstab query, specify at least three columns in the query grid: one for the column headings, one for the row headings, and one for the values that make up the crosstab. In this case, choose the account number (or account name, depending on your data) as the Row Heading and the amount (summed) as the Value. Figure 1-22 shows the sample query in design mode, and Figure 1-23 shows the sample data that will be used in this example.
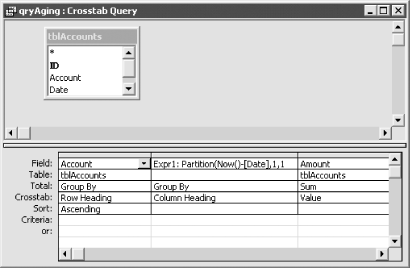
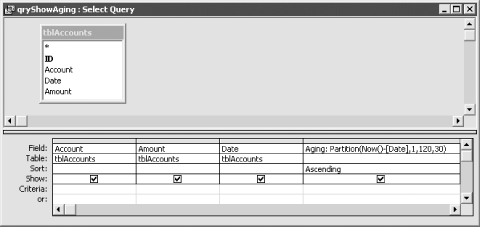
For the column headings, group the dates in 30-day increments, using the built-in Partition function. For this specific example, use the following value:
Expr1:Partition(Now( )-[Date],1,120,30)
for the column’s expression. This tells the query to break the information into groups based on the difference between today and the field named Date, starting with 1 day old, ending with 120 days old, and breaking every 30 days. Set the Total item to Group By and the Crosstab item to Column Heading.
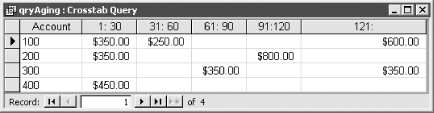
When you execute the query, you will see output similar to that shown in Figure 1-24, which shows the aging data grouped in 30-day increments. You would usually create a report based on this query, but you can also use this raw output to get an overview of the aging of your receivables.
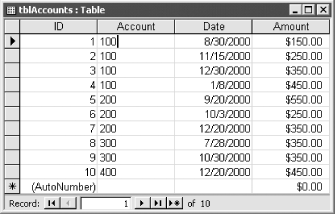
To see an example of a query that shows the aging of receivables, load the sample database, 01-09.MDB. This database includes a simple table, tblAccounts (see Figure 1-23), containing sample data about accounts and their activity to be used in an aging query. The query qryAging, shown in Figure 1-24, shows the final outcome: a crosstab query including the aging information, grouped in 30-day increments. You may want to update this small table with dates that are closer to the date on which you are testing it.
Except for the use of the Partition function, this crosstab query is no different from any other. It summarizes rows of data, summing the amount column, grouped on a range of values in various columns. The only innovation is the use of the Partition function.
The
Partition function returns a string indicating
where a value occurs within a calculated series of ranges. That
string (in the format
start:end)
becomes the column heading in your query and is based on the starting
value, the ending value, and the range size. You tell Access each of
these values when you call the Partition
function. Table 1-5 shows the four parameters
you’ll use.
Table 1-5. Parameters for the Partition function
For example, the following expression:
Partition(42, 1, 120, 30)
would return the value " 31:
60“. This function call asks,
“Where does the number 42 occur within the range of
1 to 120, broken into 30-day ranges?” Clearly, it
falls in the 31- to 60-day range. That’s
what’s indicated by the return value
" 31: 60"
from the previous example. In doing its calculation, Access formats
the result for you, in the format you see in the column headings in
Figure 1-25.
If a value falls outside the requested range, Access returns an
open-ended result. For example, the previous case will return
"121: " if the value is greater
than 120 or " :
0" if the value is less than 1. Access always
includes enough space in the two halves of the result string for the
largest possible value. This way, the result strings will sort
correctly.
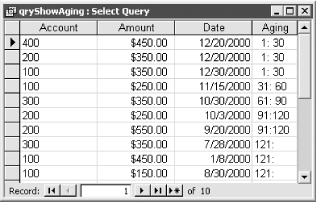
To see the Partition function doing its work, open the query qryShowAging from 01-09.MDB in design mode (see Figure 1-25). This simple select query will show the account number, the amount due, the date on which the transaction occurred, and the age range into which the transaction fits, using the Partition function to calculate the ranges. Figure 1-26 shows the same query in datasheet view, using the data as shown in Figure 1-23. The last column of the datasheet shows the output from the Partition function. When you group the rows on the values in this column, you end up with the crosstab query you created earlier in this section.
There are some limitations to the Partition function. If you want uneven partitions, you’ll need to write your own VBA function to do the work. For example, if you want your partitions to be 0-30 days, 31-60 days, 61-90 days, and 91-120 days, you’d be out of luck with the Partition function: all the partitions specified are 30 days except the first, which is 31. In addition, using Partition in a crosstab query will omit ranges for which no values exist. For example, if no account has transactions between 31 and 60 days ago, there will be no column for this range in the output query. To avoid this problem, use fixed column headings (see the Solution in Recipe 1.4).
You
need to join together two tables in a query on the
Between operator. For example, you have a table of
students and their grades, and a table of grade ranges and the
matching letter grade. Though there are lots of ways to solve this
problem with complex expressions and VBA, you know there must be a
solution involving just queries. You need a way to join these two
tables, finding matches when a value in the first table is between
two values in the second table.
In Access, relationships between tables are normally based on equality, matching values in one table with those in another. Two tables in an Access query are normally joined in the upper half of the query design screen—the table pane—by dragging the join field from one table or query to the other. You can join tables this way for joins based on equality (“equijoins”) that can be inner or outer in nature.
Sometimes, though, you need to join two tables on some other
relationship. However, Access doesn’t graphically
support joins between tables that are based on an operator other than
=. To perform these types of joins, you must
specify the join in the criteria of the linking field.
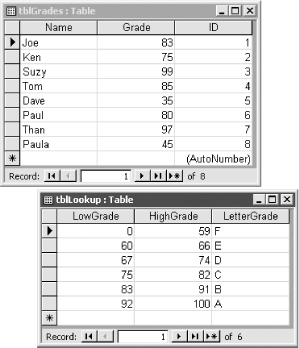
From 01-10.MDB, open the tblGrades and tblLookup
tables, both shown in Figure 1-27. The first table,
tblGrades, includes a row for each student and the
student’s numeric grade. The lookup table,
tblLookup, contains two columns for the ranges of numeric grades and
a third for the corresponding letter grade.
Your goal is to create a query listing each student along with his letter grade. To accomplish this goal, follow these steps:
Create a new query including both the sample tables. Don’t attempt to use the standard Access methods to create a join between the tables, because there’s no mechanism for creating the kind of join you need.
Drag the fields you’d like to include in your query to the query grid. Make sure to include the field that will link the two tables together (Grade, from tblGrades, in this case).
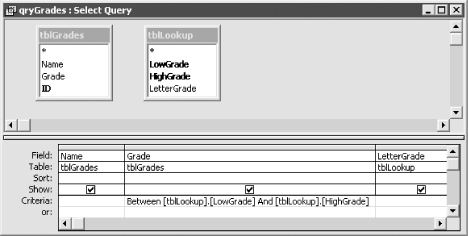
In the Criteria cell for the linking field, enter the expression you’ll use to link the two tables, using the following syntax for any fields in the second table:
TableName.FieldName
Because you have not related the two tables, Access needs the table name to know what you’re referring to. In the sample, the expression is:
Between [tblLookup].[LowGrade] And [tblLookup].[HighGrade]
Your finished query should resemble Figure 1-28.
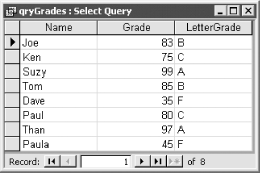
Run the query. The output should look something like Figure 1-29. For each numeric grade, you have related the data in tblGrades to the values in tblLookup, matching one row in tblLookup to each numeric grade.
In a normal join relating two tables, Access takes each value in the lefthand table (imagine the two tables laid out in the query design, one on the left and one on the right), finds the first matching value in the related field in the righthand table, and creates a new row in the output set of rows containing information from the two joined rows. In this case, however, you want to match the two tables not on equality, but rather on “betweenness.” Access doesn’t graphically support this type of join in query design view, but you can get the same result by specifying that you want values for the linking field in the lefthand table only when they are between the two comparison values in the righthand table. As it builds the output set of rows, Access looks up each value of the linking field in the righthand table, searching for the first match. It joins the rows in the two tables based on the value from the lefthand table being between the two values in the righthand table.
All queries in Access are converted to SQL. If you select View → SQL or use the SQL icon on the toolbar, you can view the SQL for the qryGrades query. When you do, you’ll see the following SQL:
SELECT tblGrades.Name, tblGrades.Grade,
tblLookup.LetterGrade
FROM tblGrades, tblLookup
WHERE (((tblGrades.Grade) Between [tblLookup].[LowGrade]
And [tblLookup].[HighGrade]));
The
inequality join has been translated into the WHERE
clause of Access SQL. If you’re familiar with Access
SQL, however, you may notice that the join information is not where
Access normally places it. For example, if we had created a
“normal” equijoin between these two
tables, joining Grade from tblGrades to LowGrade in tblLookup, the
SQL would look like this:
SELECT tblGrades.Name, tblGrades.Grade,
tblLookup.LetterGrade
FROM tblGrades INNER JOIN tblLookup
ON tblGrades.Grade = tblLookup.LowGrade;
This query will not give us the desired
result. Notice that Access has placed the join information in the
FROM clause. (The joining of tables in the
FROM clause was introduced in the ANSI 92 SQL
standard, but Access also supports joins in the
WHERE clause, which is ANSI 89 SQL compatible.)
It’s interesting to note that you can run queries
converted from older versions of Access that specify non-equijoins
using the FROM clause syntax, but you
can’t create new queries with this syntax.
qryScoresSQL in the sample database runs fine, and you can view the
following syntax in SQL view:
SELECT DISTINCTROW tblGrades.Name, tblGrades.Grade, tblLookup.LetterGrade
FROM tblGrades INNER JOIN tblLookup ON tblGrades.Grade
BETWEEN tblLookup.LowGrade AND tblLookup.HighGrade
However, if you copy this SQL and paste it into the SQL View pane of
a new query, you’ll find that Access will report a
syntax error and won’t let you save it. So, if you
need to create non-equijoins, just stick to using the
WHERE clause to define them.
This technique isn’t limited to the
Between operator. You can use any comparison
operator (Between, In,
>, <,
>=, <=, or
<>) to perform a search in the second table,
finding the first row that meets the required criterion. You can even
link two tables using the InStr function (which
indicates if and where one string occurs within another) to match
words in a column of the first table with messages that contain that
word in the second table.
As with any relationship between two tables, you’ll get the best performance if the values in the matching fields in the righthand table are indexed. This won’t always help (using InStr, for instance, there’s really no way for an index to help Access find matches within a string), but in many cases it will. Consider indexing any fields used in the matching condition in either of the tables involved in your relationships, whether you build them yourself or use Access’s primary key indexes.
You have two tables of addresses, one for clients and one for leads. Generally you send different mailings to these two groups, but sometimes you need to send the same letter to both. You can always create a third table and append to it the data from each of the two tables, but there must be an easier way that doesn’t involve the use of temporary tables. Is there a way to combine the data from these two tables into a single recordset, including only the U.S. addresses and sorted by zip code?
Access provides a special type of query that you can use to vertically splice together the data from two or more tables. The tables don’t even need to have the same fields or fields of exactly the same data types. This is the union query, which can be constructed only by using the SQL View pane in the query designer.
The following steps show you how to construct a union query to combine data from two tables into a single recordset, limited to addresses in the U.S. and sorted by zip code:
Open 01-11.MDB. Open the two tables (tblClients and tblLeads) and examine their structure and data.
Create a new select query. Click on Close when you are prompted to add a table.
Select Query → SQL Specific → Union. Access will present a blank SQL view.
If you’d like, open tblClients in design view so you can see the field names while typing. Then type in the first part of the query:
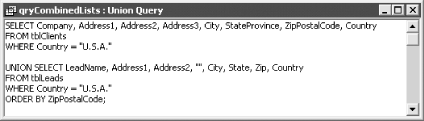
SELECT Company, Address1, Address2, Address3, City, StateProvince, ZipPostalCode,
Country
FROM tblClients
WHERE Country = "U.S.A."
Yes, you must type it—there is no query by example equivalent to a union query. However, you could create this select query first using the query grid and then copy and paste the SQL into your new union query.
Type
UNION, and then enter the matching fields from tblClients in the same order in which they were entered in Step 4:UNION SELECT LeadName, Address1, Address2, "", City, State, Zip, Country FROM tblLeads WHERE Country = "U.S.A."
To sort the query’s output by zip code, add an
ORDERBYstatement using the name of the field as it appears in the first table:ORDER BY ZipPostalCode;
The completed query is shown in Figure 1-30.
Switch to datasheet view to see the output of the query, as shown in Figure 1-31. Notice that the Canadian addresses are excluded and that all the addresses are sorted by zip code.
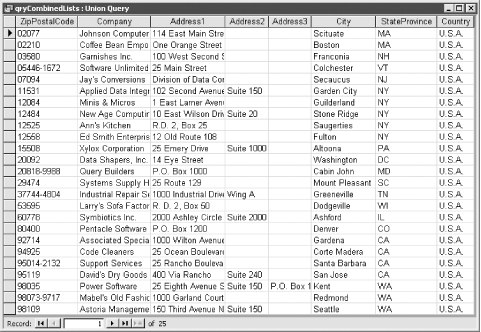
Save the new query with a name of your choice; in the sample database, it is called qryBothLists.
The
SQL UNION statement joins together the output of
two or more SELECT statements into a single result
set. The field names from the tables need not match, but they must be
entered in the same order. If matching fields in the tables appear in
different positions but have the same name, you must reorder them in
the SELECT statements because Access uses the
order of the fields—not their names—to determine which
fields’ data to combine together.
If a matching field is absent from
one of the tables—as is the case for tblLeads, which lacks an
Address3 field—you can include a constant. In the
qryCombinedLists example, we used a zero-length string constant
(“”), but we could have used
another constant, such as None or
N/A.
You can also add a column called Type that contains either “Client” or “Lead,” depending on which table it comes from, as shown in qryCombinedListswType in the sample database. Here’s the SQL for that query:
SELECT Company, Address1, Address2, Address3, City, StateProvince, ZipPostalCode,
Country, "Client" AS Type
FROM tblClients
WHERE Country = "U.S.A."

UNION SELECT LeadName, Address1, Address2, "", City, State, Zip, Country,
"Lead" AS Type
FROM tblLeads
WHERE Country = "U.S.A."
ORDER BY ZipPostalCode;
While typing in the text of the union query, you may find it helpful
to keep the source tables open in design view so you can be sure you
are entering the field names correctly. Or you can just
“cheat” and use the query designer
to create SELECT statements that you copy and
paste into your union query.
Some dialects of SQL require the SQL statement to end with a semicolon. Access does not, but it doesn’t hurt to use the standard syntax, especially if you program in other databases too.
A union query is a snapshot of the data in the underlying tables, so it can’t be updated.
To sort a union query, add one
ORDER
BY clause at the end of
the last SELECT statement, referring to the sort
fields using the field names from the first SELECT
clause (as in the sample query). You can’t sort each
SELECT clause individually; you have to sort the
whole union query. Any criteria should be included in
WHERE clauses in the respective
SELECT statements. You can’t use
one WHERE clause at the end of a union query to
filter all the records.
You’d like to
be able to create a combo box that looks up items in a table and is
limited to this list of items, but with the additional choice of
<N/A>, which can be used to enter a null
value for the field. You don’t want your users to be
able to enter any invalid entries, just
<N/A> (or some other special code).
You can set the LimitToList property for
the combo box to Yes to limit entries to those that your combo box
provides and use a sorted union query to add an additional
<N/A> row to the row source for the combo
box. We suggest using <N/A> rather than
simply N/A to force the entry to sort to the top
of the combo box list. To make this work right,
you’ll need to make the combo box unbound and use a
bit of VBA code to move values between the underlying table and the
combo box.
To create a combo box with an <N/A> entry on
a form of your own, follow these steps:
Create an unbound combo box that draws its records from a table. In the sample database, we created a combo box called cboArtistID on the form frmAlbums. To duplicate the combo box in the sample database, create a combo box with the properties shown in Table 1-6.
The other properties for this control don’t matter. We purposely left RowSource blank; you will fill this in after you create the union query. The ColumnWidths entries of “0 in;2 in” will make the first column, which will hold the ArtistID, hidden from the user. Only the second column, with the ArtistName (or
<N/A>), will show.
Table 1-6. Properties for the cboArtistID combo box
|
Property |
Value |
|---|---|
|
Name |
cboArtistID |
|
ControlSource | |
|
RowSourceType |
Table/Query |
|
RowSource | |
|
ColumnCount |
2 |
|
ColumnHeads |
No |
|
ColumnWidths |
0 in;2 in |
|
BoundColumn |
1 |
|
ListRows |
8 |
|
ListWidth |
2 in |
|
LimitToList |
Yes |
Create a new query that will supply the values for the combo box control. Click on Close when you are prompted to add a table. Switch to SQL view by selecting Query → SQL Specific → Union. For the frmAlbums sample form, enter:
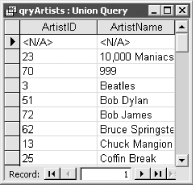
SELECT  ArtistID, ArtistName
FROM tblArtists

UNION

SELECT "<N/A>","<N/A>"
FROM tblArtists
ORDER BY ArtistName;
Save the query and close it. In this example, we saved the query as qryArtists.
Open the form again in design view, and select the name of the query you created in Steps 2 through 3 in the RowSource property of the combo box.
Select [Event Procedure] in the combo box AfterUpdate property, click the “...” button, and enter the following code:
Private Sub cboArtistID_AfterUpdate( )
    If cboArtistID = "<N/A>" Then
        ArtistID = Null
    Else
        ArtistID = cboArtistID
    End If
End Sub
Select [Event Procedure] in the form’s OnCurrent property, click the “...” button, and enter the following code:
Private Sub Form_Current( )
    If IsNull(ArtistID) Then
        cboArtistID = "<N/A>"
    Else
        cboArtistID = ArtistID
    End If
End Sub
Run the form. You should now be able to select
<N/A>from the list of values for the combo box. Null values will be entered in the ArtistID field in the table for those items, and as you scroll through the form they will show up as<N/A>.
To see how this works using the sample database, open the frmAlbums
form in the 01-12.MDB database. You can use this
form to edit or add new albums to tblAlbums. Add a new album that has
no single artist. For example, enter a record for Woodstock, which is
a compilation of multiple artists. When you pull down the Artist
combo box you will see, at the top of the list, the choice
<N/A> (see Figure 1-32).
Select this item from the list and a null value will be entered into
the underlying ArtistID long integer field.

The key to this solution is
using a union query and an unbound combo box. You use a union
query—which was discussed in the Solution in Recipe 1.11—to splice together the data from two
tables. This union query is different from the usual variety because
it combines the values in one table with values that you are
providing in the query. This is accomplished by the union
query’s second SELECT statement,
shown here:
UNION
SELECT "<N/A>","<N/A>"
FROM tblArtists
Notice that this
SELECT statement selects two constants from a
table. These constants aren’t actually stored in the
tblArtists table (or anywhere else, for that matter), but you need to
refer to some existing table in the SELECT
statement—we used tblArtists, since that table is already
referenced in the query. This part of the query creates a single row
that contains <N/A> in both the bound and
displayed columns and combines it with the first half of the union
query. Finally, the ORDER BY clause for the query
tells Access to sort the entries by ArtistName, but because <
comes before any letter in the alphabet, the
<N/A> entry will sort to the top. If you run
this query outside of the form, it will return a datasheet with a row
made up of two constants and combined with the rows from tblArtists,
as shown in Figure 1-33.
It is
easy to see why <N/A> is entered in the
displayed column (the second column)—that’s
the value you want the user to see. But why also place it in the
first column? Actually, any value would work in the first column, as
long as it doesn’t match one of the actual values
that might show up in that column. We used the same
<N/A> value for simplicity. This first
column is used by the VBA code only for setting and reading the value
selected by the user. The VBA code in the Current event of the form
takes care of selecting the correct row in the combo box when a
record becomes current, and the code in the AfterUpdate event of the
combo box enters the appropriate value into the ArtistID field when a
selection is made.
You may wonder why we
didn’t use a combo box bound to the ArtistID field
in the form. You might think that we could have used our union query
to add a row with a null value in the first column and
<N/A> in the displayed column.
Unfortunately, this simple solution just won’t work.
When a combo box is set to null or even to
“” it will always show a blank,
even if there is a null (or “”)
value in a row in its bound column. The
<N/A> value would not show up for records
where the ArtistID was null—instead, the combo box would just
be blank. To work around this column, we needed to use an unbound
combo box and VBA code.
The combination of using the Current event of the form and the AfterUpdate event of a control is a common pattern when programming Access forms. Both events are needed to keep the user interface of a form in sync with data as the user edits the data and scrolls through the form. This pattern is often used with bound controls too—not just with unbound controls, as demonstrated in this example.
Tip
With simple text boxes, you can use the Format property of the text box to control how nulls are displayed. For example, a text box bound to a date field could have this Format setting:
Short Date;;;"<not scheduled>"
This will automatically display the specified message for null dates. The four optional parts of the Format setting respectively control positive, negative, zero, and null values. But this technique won’t work for a combo box.
To fill a combo box programmatically, see Recipe 7.5 in Chapter 7. To optimize your combo box performance, see Recipe 8.3 in Chapter 8.
You have a table that includes information on every employee in the company, including management. You’d like to be able to store information on who supervises each employee in this same table and then be able to create a query to show this hierarchical relationship.
You can display an employee-supervisor hierarchical relationship, also known as a recursive relationship, in Access with a select query that uses a self-join to join another copy of a table to itself. This solution shows how to create the table that will store the necessary recursive information and then how to create the self-join query to list each employee and his or her supervisor.
To create the employee table and a query that displays the recursive employee-supervisor relationship, follow these steps:
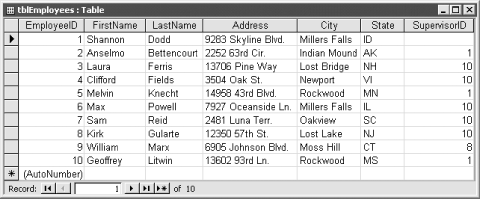
Create the employee table. This table should contain both an EmployeeID field and a SupervisorID field. These fields must have the same field size. In the sample database, tblEmployees contains the EmployeeID and SupervisorID fields. Because EmployeeID is an AutoNumber field with the FieldSize property set to Long Integer, SupervisorID must be a Number field with a FieldSize of Long Integer.
Enter data into the employee table, making sure that the SupervisorID field is equal to the EmployeeID field of that employee’s immediate supervisor.
Create a new select query. Add two copies of the employee table. The second copy of the table will automatically have a “_1” appended to the end of the table name to differentiate it from the first one. Now join the two tables together by dragging the SupervisorID field from the first copy of the table (the one without the _1 suffix) to the EmployeeID field in the second copy of the table (the one with the _1 suffix).
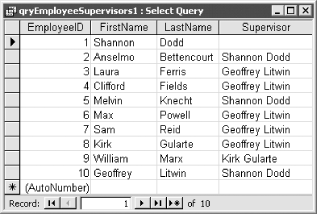
Drag any fields you wish to include in the query to the query grid. The fields from the first copy of the table describe the employee; the fields from the second copy of the table describe the supervisor. Because the fields of the two tables have the same names—remember they’re really two copies of the same table—you need to alias (rename) any fields from the second table to avoid confusion. For example, in the qryEmployeeSupervisors1 query, we included the following calculated field, named Supervisor, which displays the name of the employee’s immediate supervisor:
Supervisor: [tblEmployees_1].[FirstName] & " " &
[tblEmployees_1].[LastName]
Notice that the fields that make up the supervisor name both come from the second copy of the employee table.
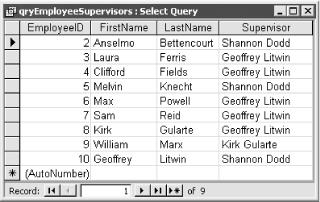
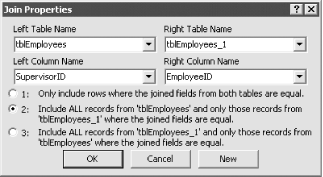
If you run the query at this point, you will get only employees with supervisors (see Figure 1-34). That’s because this version of the query—named qryEmployeeSupervisors in the sample database—uses an inner join. To see all employees, even those without a supervisor (in our example this would include Shannon Dodd, the company’s president), you must change the type of join between the two tables to a left outer join. Double-click on the join line you created in Step 3. At the Join Properties dialog, select choice #2 (see Figure 1-35).
Run the query, and the datasheet will display the employee-supervisor relationship.
Now, open tblEmployees in 01-13.MDB. This table, which is shown in Figure 1-36, contains a primary key, EmployeeID, and the usual name and address fields. In addition, it contains a field, SupervisorID, which stores the EmployeeID of the employee’s immediate supervisor. Now run the query qryEmployeeSupervisors1. This query uses a self-join to display a recursive relationship between employee and supervisor; its datasheet lists each employee and his or her immediate supervisor (see Figure 1-37).
You can always model an employee-supervisor relationship as two tables in the database. Put all supervised employees in one table and supervisors in a second table. Then create a regular select query to list out all employees and their supervisors. This design, however, forces you to duplicate the structure of the employee table. It also means that you must pull data from two tables to create a list of all employees in the company. Finally, this design makes it difficult to model a situation in which employee A supervises employee B, who supervises employee C.
A better solution is to store both the descriptive employee information and the information that defines the employee-supervisor hierarchy in one table. You can view the employee-supervisor relationship using a self-join query. You can create a self-join query by adding a table to the query twice and joining a field in the first copy of the table to a different field in the second copy of the table. The key to a self-join query lies in first having a table that is designed to store the information for the recursive relationship.
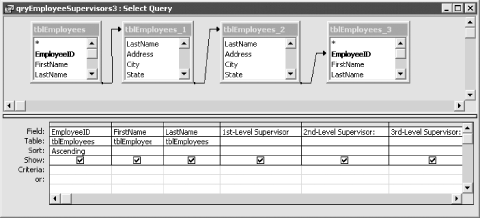
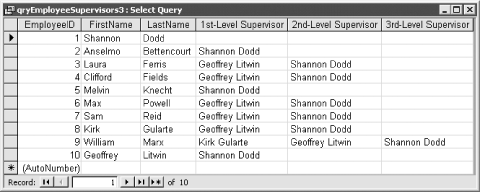
The sample query qryEmployeeSupervisors1 displays the employee-supervisor relationship to one level. That is, it shows each employee and his or her immediate supervisor. But you aren’t limited to displaying one level of the hierarchy—the sample query qryEmployeeSupervisors3 displays three levels of the employee-supervisor relationship using four copies of tblEmployees and three left outer joins. The design of qryEmployeeSupervisors3 is shown in Figure 1-38; the output is shown in Figure 1-39.
You can use the Access Relationships dialog to enforce referential integrity for recursive relationships. Select Tools → Relationships to display the Relationships dialog and add two copies of the table with the recursive relationship. Join the two copies of the table together as if you were creating a self-join query. Choose to establish referential integrity, optionally checking the cascading updates and deletes checkboxes. Click on Create to create the new relationship. Now when you enter a value for SupervisorID, Access will prevent you from entering any reference to an EmployeeID that doesn’t already exist.
Although the sample database uses an employee-supervisor relationship example, you can use the techniques discussed in this solution to model other types of hierarchical relationships. This will work, however, only if each “child” record has only one “parent.” In this example, each employee has only one supervisor. For hierarchies in which one child can have many parents—such as parts and assemblies in a bill of materials database—a separate table is needed to contain the multiple records needed for each child, each one specifying a different parent.
You have a table of words, some of which appear multiple times. Each instance of these words is spelled using a different combination of upper- and lowercase. You’d like to create a query that finds exact matches using case-sensitive criteria, but no matter what you type into the criteria for the query, Access always returns all instances of the same word, disregarding each instance’s case. Is there any way to create a query that can select records based on case-sensitive criteria?
Access normally performs
case-insensitive string comparisons. You can use the
Option
Compare
Binary statement in the declarations section of a
module to force VBA to make string comparisons that are
case-sensitive within the bounds of that module, but this affects
only string comparisons made in a VBA module, not comparisons made by
the Jet engine. Thus, even when you run the query from a VBA
Option
Compare Binary
procedure, any comparisons made in the query are case-insensitive.
The problem is that the Jet engine doesn’t know how
to make case-sensitive string comparisons using any of the standard
query operators. Fortunately, you can create your own case-sensitive
string-comparison function in an Option
Compare
Binary module and call
this function from the query. This solution shows you how to create
the VBA function and how to use it to perform case-sensitive
searches.
To use this technique in your own database, follow these steps:
Import the basExactMatch module from
01-14.MDBinto your database.Create a query for which you wish to perform a case-sensitive search. Add all the desired fields in the query grid.
Create a computed field in the query grid that references the acbExactMatch function found in basExactMatch. For example, if you wish to compare the Word field with a user-entered parameter, create a field like that shown in Table 1-7.
You can also use a hard-coded string instead of a parameter. We used a parameter in the qryWordCS query, shown in design view in Figure 1-40.
Table 1-7. Settings for the acbExactMatch field
|
Attribute |
Value |
|---|---|
|
Field |
acbExactMatch([Word], [Enter word]) |
|
Table |
(Blank) |
|
Sort |
(Blank) |
|
Show |
(Unchecked) |
|
Criteria |
-1 |
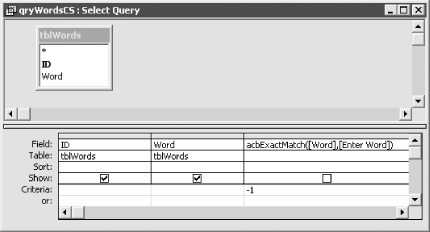
When you execute the query, it will return only exact, case-sensitive matches. If you run qryWordCS in the 01-14.MDB database and enter “SwordFish” at the parameter prompt, you should get the datasheet shown in Figure 1-41.
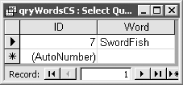
Now, open the tblWords table in 01-14.MDB (see Figure 1-42). Notice that the word “swordfish” appears in four records, each spelled using a different combination of upper- and lowercase letters. Run the qryWordsCI parameter query and enter SwordFish at the prompt. When the query executes, it returns all four swordfish records, not the specific version you typed at the prompt. Now run the qryWordsCS query, entering the same string at the prompt. This time the query returns only one swordfish record, the one that’s spelled exactly as you typed it.

This solution uses a simple VBA function to perform a string
comparison. Because this function resides in a module that contains
the Option
Compare
Binary statement, any string comparisons made
using procedures in this module are case-sensitive. The
acbExactMatch function is simple:
Option Compare Binary
Public Function acbExactMatch(var1 As Variant, var2 As Variant) As Boolean
    acbExactMatch = (var1 = var2)
End Function
This function returns True only when the strings
are spelled exactly the same way. The code compares the values in
var1 and var2, and returns True if the values are
equal, and False if they’re not.
Another alternative, which provides slightly less flexibility, is to use the VBA StrComp function. This function can compare two strings on a binary basis (that is, it compares each character in the strings, taking case into account) and returns 0 if the two strings are exact matches. The syntax for calling StrComp in qryWordsCS looks like this:
StrComp([Word], [Enter Word], 0)
and the Criteria is 0 (not -1, as shown earlier).
You know how to create a table from a make-table query, but when you create a table in this way it has no primary key or any other indexes. Furthermore, you can only create a new table with a structure based on that of an existing table. You’d like a way to create a table on the fly with the data types and field sizes you want and with appropriate indexes.
Access provides the data definition language (DDL) query, which is used to programmatically create or modify tables. It is one of the SQL-specific queries, which can be created only using SQL view. This solution shows you how to create and modify table definitions using DDL queries.
Follow these steps to create a table using a DDL query:
Design your table, preferably on paper, deciding which fields and indexes you wish to create. For example, before creating qryCreateClients, we came up with the design for tblClients shown in Table 1-8.
Table 1-8. Design for tblClients
|
FieldName |
DataType |
FieldSize |
Index |
|---|---|---|---|
|
ClientID |
AutoNumber |
Long Integer/Increment |
Yes, primary key |
|
FirstName |
Text |
30 |
Yes, part of ClientName index |
|
LastName |
Text |
30 |
Yes, part of ClientName index |
|
CompanyName |
Text |
60 |
Yes |
|
Address |
Text |
80 |
No |
|
City |
Text |
40 |
No |
|
State |
Text |
2 |
No |
|
ZipCode |
Text |
5 |
No |
Create a new query. Click on Close at the Add Table dialog. Select Query → SQL Specific → Data Definition. This will place you in SQL view.
Enter a
CREATETABLESQL statement. To create the sample table tblClients, enter the following SQL:CREATE TABLE tblClients (ClientID AutoIncrement CONSTRAINT PrimaryKey PRIMARY KEY, FirstName TEXT (30), LastName TEXT (30), CompanyName TEXT (60) CONSTRAINT CompanyName UNIQUE, Address TEXT (80), City TEXT (40), State TEXT (2), ZipCode TEXT (5), CONSTRAINT ClientName UNIQUE (LastName, FirstName) );
Save your query and run it by selecting Query → Run or clicking on the exclamation point icon on the toolbar. You should now see the newly created table in the database container.
To see how this works, open 01-15.MDB. Note that there are no sample tables in this database. Open the sample DDL query, qryCreateClients (see Figure 1-43). Select Query→ Run or click on the exclamation point icon on the toolbar to execute the DDL query. The tblClients table will be created, complete with a primary key and two other indexes.

When you run a DDL query, Access reads through the query’s clauses and creates a table according to your specifications. This allows you to precisely control the structure of the table and its indexes.
A DDL query can contain only one data-definition statement. The five types of data-definition statements are:
Note that we specified the lengths of most of the text fields in the sample query to save space. If you don’t specify a length for a text field in a DDL query, Access will assign it the maximum length of 255 characters, but that length won’t necessarily affect the size of the database. The field length is just a maximum—the space is not used unless it is needed.
If you wish to create field names with embedded spaces, you’ll need to surround the names with brackets; otherwise, the brackets are optional.
Like make-table queries, DDL queries do
not automatically overwrite an existing table. However, unlike
make-table queries, you aren’t offered the option of
overwriting the existing table if you want to. If you need to
overwrite an existing table when running a DDL query, first execute
another DDL query containing a DROP
TABLE statement.
After you create (or delete) a table with a DDL query, the new table won’t immediately appear in (or disappear from) the database window. To refresh the display and see the change you made, click on another object type in the database window (for example, Forms) and then on the Table tab again.
Warning
As with other SQL-specific queries, be careful not to switch a DDL query to another query type, such as a Select query. If you do, your SQL statement will be discarded, because SQL-specific queries don’t have a design-view equivalent.
You can also create tables complete with indexes using Data Access Objects (DAO) or ADOX, using VBA code, and you can use DAO QueryDefs or ADO commands to execute your DDL statements in code.
Tip
New DDL syntax was added in Access 2000 (Jet 4.0), but few Access
programmers ever used it because it didn’t work in
the SQL pane of the Access user interface. The only way to take
advantage of the new syntax was by executing ADO commands. In Access
2002 and Access 2003, this syntax is supported inside of Access. For
example, you can use ALTER TABLE
ALTER
COLUMN to change the data
type of an existing field in a table. In the past, you had to drop
the column and create a new one.
Your application uses a lot of queries, and you don’t want these queries available or even visible to the users of your application. Also, you call your queries from VBA code. How can you hide the queries from users and make them easier to retrieve, modify, and execute?
You can create a query-management table that stores the SQL string of your queries in a memo field. Each query is named and includes a description. This technique allows you to store your queries in a table rather than in the Access collection of queries. You can also create a simple VBA function that you can use to quickly retrieve the SQL string of any of your saved queries.
Open and run frmSavedQueries from 01-16.MDB. After a few moments of processing, the form shown in Figure 1-44 should appear. This form is based on the tblQueryDefs table, which stores a record for each query you save. To add a new query to the table, add a new record and enter the SQL statement in the SQL Text control. You may find it easier to copy the SQL from an existing query (see Step 2 for more details). Type in a name and description. Notice that creation and modification times are automatically updated.
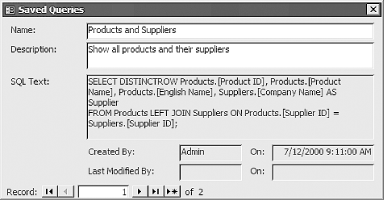
To use a saved query in your code, search the tblQueryDefs table for the name of a query and get the value from the SQLText field. To use this technique in your application, follow these steps:
Import the tblQueryDefs table, the frmSavedQueries form, and the basSavedQueries module from 01-16.MDB into your database.
To add a query to the tblQueryDefs table using the frmSavedQueries form, design and test the query using the Access query designer. Then, from query design view, select View → SQL. When the query’s SQL string is displayed, highlight it and copy it to the clipboard. Next, add a new record in the frmSavedQueries form and paste the SQL string into the SQLText text box. Type in a name and description.
To get the SQL string of a saved query, use the acbGetSavedQuerySQL function, located in the basSavedQueries module. The syntax for this function is:
strSQL = acbGetSavedQuerySQL("queryname")where strSQL is the string variable in which you want to store the query’s SQL string and queryname is the name of the saved query you want to retrieve.
The core of this technique is a simple function that retrieves a value from the tblQueryDefs table. The function uses the Seek method to find the supplied value and, if it finds a match, returns the record’s SQLText field value.
Public Function acbGetSavedQuerySQL(strName As String) As String

   ' Returns a SQL string from tblQueryDefs
   ' In  : strName - name of query to retrieve
   ' Out : SQL string

   Dim db As DAO.Database
   Dim rst As DAO.Recordset

   Set db = CurrentDb( )
   Set rst = db.OpenRecordset("tblQueryDefs")

   rst.Index = "PrimaryKey"
   rst.Seek "=", strName

   If Not rst.NoMatch Then
      acbGetSavedQuerySQL = rst!SQLText
   End If

   rst.Close
   Set rst = Nothing
   Set db = Nothing
End Function
(If you import this module into an Access 2000 or later database, make sure to use the Tools → References menu item to add a reference to the Microsoft DAO type library. The code uses DAO objects, and later versions of Access don’t reference this library by default.) By extending this technique, you can create a replacement for saved queries in Access. Because you have full programmatic access to each query, you can load, modify, execute, and save queries at will without having to open QueryDef objects. Additionally, because you can store the queries table in a library database, you can completely remove a user’s access to saved queries except through your code. One drawback of this technique is that you cannot base forms or reports on queries saved in tblQueryDefs without using some VBA code. However, this drawback is easily overcome by writing a function that retrieves a saved query’s SQL string from tblQueryDefs and assigns the value to the form or report’s RecordSource property before the form or report is run.
An obvious enhancement to this technique would be a conversion routine that reads each of your database’s saved queries and converts them to records in the tblQueryDefs table. Once this conversion is complete, you can delete the queries from the database window.
Tip
Using saved queries gives you a slight performance advantage over saved SQL strings. The Jet database engine creates and saves a query plan the first time it runs a query after the design has been saved. With saved queries this plan can be reused, but with ad hoc queries a new plan must be generated each time. The time required to generate these plans, however, probably will not noticeably impact your performance. There are also ways to hide saved queries from users—you can give them names that start with “Usys” or set their Hidden property. You can also protect their design using Access security. Nevertheless, it is useful to understand that queries can be encapsulated in SQL strings, since you may find it helpful to be able to manage them yourself in a table rather than as Access objects.
You have a parameter query that is linked to a form by three parameters. When you open the form, enter the information into the form’s controls to satisfy the parameters, and then run the query interactively, everything is fine. But when you open the form, satisfy the parameters, and create a recordset from VBA code based on the same query, you get an error message complaining that no parameters were supplied. This doesn’t make sense, since you’ve already supplied the parameters on the form. Is there any way to create a recordset from VBA based on a parameter query?
When you run a parameter query from the user interface, Access can find the parameters if they have already been satisfied using a form and run the query. When you create a recordset from VBA, however, the Jet engine isn’t able to locate the parameter references. Fortunately, you can help the Jet engine find the parameters by opening the QueryDef prior to creating the recordset and telling Jet where to look for the parameters.
Open the frmAlbumsPrm form found in 01-17.MDB. This form, which is similar to a form used in the Solution in Recipe 1.1, is used to collect parameters for a query, qryAlbumsPrm. Select a music type from the combo box, enter a range of years in the text boxes, and click on OK. An event procedure attached to the cmdOK command button will run, making the form invisible but leaving it open. Now run qryAlbumsPrm from the database container. This query, which has three parameters linked to the now-hidden frmAlbumsPrm, will produce a datasheet limited to the records you specified on the form.
Now open the basCreateRst module from 01-17.MDB. Select the function CreatePrmRst1 from the Proc drop-down list. Its source code is shown here:
Public Sub CreatePrmRst1( )

    ' Example of creating a recordset based on a parameter query.
    ' This example fails!

    Dim db As DAO.Database
    Dim rst As DAO.Recordset

    Set db = CurrentDb( )

    ' Open the form to collect the parameters.
    DoCmd.OpenForm "frmAlbumsPrm", , , , , acDialog

    ' OK was pressed, so create the recordset.
    If IsFormOpen("frmAlbumsPrm") Then

        ' Attempt to create the recordset.
        Set rst = db.OpenRecordset("qryAlbumsPrm")

        rst.MoveLast

        MsgBox "Recordset created with " & rst.RecordCount & _
         " records.", vbOKOnly + vbInformation, "CreatePrmRst"

        rst.Close
    Else
        ' Cancel was pressed.
        MsgBox "Query canceled!", vbOKOnly + vbCritical, _
         "CreatePrmRst"
    End If

    DoCmd.Close acForm, "frmAlbumsPrm"
    Set rst = Nothing
    Set db = Nothing
End Sub
As you can see, this routine starts by opening the form in dialog mode to collect the three parameters. When the user satisfies the parameters and clicks OK, the form is hidden by an event procedure and control passes back to CreatePrmRst1. The procedure then attempts to create a recordset based on the parameter query and display a message box with the number of records found. To test this procedure, select View → Debug Window and enter the following in the debug window:
Call CreatePrmRst1
The procedure will fail with error 3061—“Too few parameters. Expected 3”—at this line:
Set rst = db.OpenRecordset("qryAlbumsPrm")Now select the function CreatePrmRst2 from the Proc drop-down list. This subroutine is the same as CreatePrmRst1, except for some additional code that satisfies the query’s parameters prior to creating the recordset. Run this version of the subroutine by entering the following in the debug window:
Call CreatePrmRst2
You should now see a dialog reporting the number of records in the recordset.
The VBA code for the second version of the routine, CreatePrmRst2, is shown here:
Sub CreatePrmRst2( )

    ' Example of creating a recordset based on a parameter query.
    ' This example succeeds!

    Dim db As DAO.Database
    Dim qdf As DAO.QueryDef
    Dim rst As DAO.Recordset

    Set db = CurrentDb( )

    ' Open the form to collect the parameters.
    DoCmd.OpenForm "frmAlbumsPrm", , , , , acDialog

    ' OK was pressed, so create the recordset.
    If IsFormOpen("frmAlbumsPrm") Then

        ' Satisfy the three parameters before attempting to create a recordset.
        Set qdf = db.QueryDefs("qryAlbumsPrm")

        qdf("Forms!frmAlbumsPrm!cboMusicType") = Forms!frmAlbumsPrm!cboMusicType
        qdf("Forms!frmAlbumsPrm!txtYear1") = Forms!frmAlbumsPrm!txtYear1
        qdf("Forms!frmAlbumsPrm!txtYear2") = Forms!frmAlbumsPrm!txtYear2

        ' Attempt to create the recordset.
        Set rst = qdf.OpenRecordset( )

        rst.MoveLast

        MsgBox "Recordset created with " & rst.RecordCount & " records.", _
         vbOKOnly + vbInformation, "CreatePrmRst"

        qdf.Close
        rst.Close
    Else
        ' Cancel was pressed.
        MsgBox "Query cancelled!", vbOKOnly + vbCritical, "CreatePrmRst"
    End If

    DoCmd.Close acForm, "frmAlbumsPrm"
    Set qdf = Nothing
    Set rst = Nothing
    Set db = Nothing
End Sub
The main difference between the two procedures is the inclusion of the following lines of code prior to the line that creates the recordset:
Set qdf = db.QueryDefs("qryAlbumsPrm")

qdf("Forms!frmAlbumsPrm!cboMusicType") = Forms!frmAlbumsPrm!cboMusicType
qdf("Forms!frmAlbumsPrm!txtYear1") = Forms!frmAlbumsPrm!txtYear1
qdf("Forms!frmAlbumsPrm!txtYear2") = Forms!frmAlbumsPrm!txtYear2
The extra code opens the parameter QueryDef and then sets each of its parameters equal to its current value. You do this using the following syntax:
qdf("Parameter") = ParameterThen the recordset is created based on the opened QueryDef:
Set rst = qdf.OpenRecordset( )
This time the recordset is created without a problem because you supplied the parameters prior to executing the OpenRecordset method.
You can also use this technique to satisfy parameters using VBA
variables, instead of actually going to the form. For example, if you
collected the parameters for qryAlbumPrm and stored them in three
variables—varMusicType,
varYear1, and
varYear2--you could open the QueryDef and
create the recordset using the following code:
Set qdf = db.QueryDefs("qryAlbumsPrm")

qdf("Forms!frmAlbumsPrm!cboMusicType") = varMusicType
qdf("Forms!frmAlbumsPrm!txtYear1") = varYear1
qdf("Forms!frmAlbumsPrm!txtYear2") = varYear2

Set rst = qdf.OpenRecordset( )
The advantage of using this approach instead of the one demonstrated in the Solution in Recipe 1.7, which uses a function to satisfy a parameter, is that this technique allows you to use the same parameter query and run it either interactively or from VBA code.
If you know that all your parameters are references to controls on forms, and if you do want to get the values from the forms, you can use a generic shortcut for filling in the parameter values. Thus, instead of hardcoding the parameter names, you could do this:
Dim prm as DAO.Parameter


For Each prm in qdf.Parameters
   prm.Value = Eval(prm.Name)
Next prm
If you feed a control reference to the Access Eval function, it will give you back the value contained in the control.
Get Access Cookbook, 2nd Edition now with the O’Reilly learning platform.
O’Reilly members experience books, live events, courses curated by job role, and more from O’Reilly and nearly 200 top publishers.

