You’d like to be able to
create a combo box that looks up items in a table and is limited to
this list of items, but with the additional choice of
<N/A>, which can be used to enter a null
value for the field. You don’t want your users to be able to
enter all sorts of “garbage” entries, just
<N/A> (or some other special code).
You can set the LimitToList property for
the combo box to Yes to limit entries to those that your combo box
provides and use a sorted union query to add an additional
<N/A> row to the row source for the combo
box. We suggest using <N/A> rather than
simply N/A to force the entry to sort to the top
of the combo box list. To make this work right, you’ll need to
make the combo box unbound and use a bit of VBA code to move values
between the underlying table and the combo box.
To create a combo box with an <N/A> entry on
a form of your own, follow these steps:
Create an unbound combo box that draws its records from a table. In the sample database, we created a combo box called cboArtistID on the form frmAlbums. To duplicate the combo box in the sample database, create a combo box with the properties shown in Table 1-6.
Table 1-6. Properties for the cboArtistID combo box
Property
Value
Name
cboArtistID
ControlSource
RowSourceType
Table/Query
RowSource
ColumnCount
2
ColumnHeads
No
ColumnWidths
0 in;2 in
BoundColumn
1
ListRows
8
ListWidth
2 in
LimitToList
Yes
The other properties for this control don’t matter. We purposely left RowSource blank; you will fill this in after you create the union query. The ColumnWidths entries of “0 in;2 in” will make the first column, which will hold the ArtistID, hidden from the user. Only the second column, with the ArtistName (or
<N/A>), will show.Create a new query that will supply the values for the combo box control. Click on Close when you are prompted to add a table. Switch to SQL view by selecting Query → SQL Specific → Union. For the frmAlbums sample form, enter:
SELECT  ArtistID, ArtistName
FROM tblArtists

UNION

SELECT "<N/A>","<N/A>"
FROM tblArtists
ORDER BY ArtistName;
Save the query and close it. In this example, we saved the query as qryArtists.
Open the form again in design view, and select the name of the query you created in Steps 2 through 3 in the RowSource property of the combo box.
Select [Event Procedure] in the combo box AfterUpdate property, click the “...” button, and enter the following code:
Private Sub cboArtistID_AfterUpdate(  )
    If cboArtistID = "<N/A>" Then
        ArtistID = Null
    Else
        ArtistID = cboArtistID
    End If
End Sub
Select [Event Procedure] in the form’s OnCurrent property, click the “...” button, and enter the following code:
Private Sub Form_Current(  )
    If IsNull(ArtistID) Then
        cboArtistID = "<N/A>"
    Else
        cboArtistID = ArtistID
    End If
End Sub
Run the form. You should now be able to select
<N/A>from the list of values for the combo box. Null values will be entered in the ArtistID field in the table for those items, and as you scroll through the form they will show up as<N/A>.
To see how this works using the sample database, open the frmAlbums
form in the 01-11.MDB database. You can use this
form to edit or add new albums to tblAlbums. Add a new album that has
no single artist. For example, enter a record for Woodstock, which is
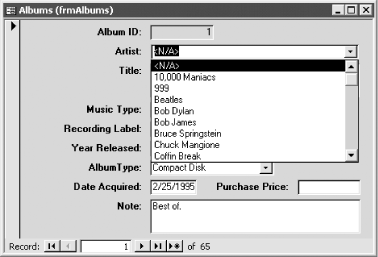
a compilation of multiple artists. When you pull down the Artist
combo box you will see, at the top of the list, the choice
<N/A> (see Figure 1-32).
Select this item from the list and a null value will be entered into
the underlying ArtistID long integer field.
The key to this solution is
using a union query and an unbound combo box. You use a union
query—which was discussed in Section 1.11.2
—to
horizontally splice together the data from two tables. This union
query is different from the usual variety because it combines the
values in one table with values that you are providing in the query.
This is accomplished by the union query’s second
SELECT statement, shown here:
UNION
SELECT "<N/A>","<N/A>"
FROM tblArtists
Notice that this
SELECT statement selects two constants from a
table. These constants aren’t actually stored in the tblArtists
table (or anywhere else, for that matter), but you need to refer to
some existing table in the SELECT
statement—we used tblArtists, since that table is already
referenced in the query. This part of the query creates a single row
that contains <N/A> in both the bound and
displayed columns and combines it with the first half of the union
query. Finally, the ORDER BY clause for the query
tells Access to sort the entries by ArtistName, but because <
comes before any letter in the alphabet, the
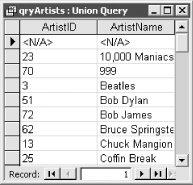
<N/A> entry will sort to the top. If you run
this query outside of the form, it will return a datasheet with a row
made up of two constants and combined with the rows from tblArtists,
as shown in Figure 1-33.
It is
easy to see why <N/A> is entered in the
displayed column (the second column)—that’s the value you
want the user to see. But why also place it in the first column?
Actually, any value would work in the first column, as long as it
doesn’t match one of the actual values that might show up in
that column. We used the same <N/A> value
for simplicity. This first column is used by the VBA code only for
setting and reading the value selected by the user. The VBA code in
the Current event of the form takes care of selecting the correct row
in the combo box when a record becomes current, and the code in the
AfterUpdate event of the combo box enters the appropriate value into
the ArtistID field when a selection is made.
You may wonder why we didn’t use a
combo box bound to the ArtistID field in the form. You might think
that we could have used our union query to add a row with a null
value in the first column and <N/A> in the
displayed column. Unfortunately, this simple solution just
won’t work. When a combo box is set to null or even to
“” it will always show a blank, even if there is a null
(or "“) value in a row in its bound
column. The <N/A> value would not show up
for records where the ArtistID was null—instead, the combo box
would just be blank. To work around this column, we needed to use an
unbound combo box and VBA code.
The combination of using the Current event of the form and the AfterUpdate event of a control is a common pattern when programming Access forms. Both events are needed to keep the user interface of a form in sync with data as the user edits the data and scrolls through the form. This pattern is often used with bound controls too—not just with unbound controls, as demonstrated in this example.
Note
With simple text boxes, you can use the Format property of the text box to control how nulls are displayed. For example, a text box bound to a date field could have this Format setting:
Short Date;;;"<not scheduled>"
This will automatically display the specified message for null dates. The four optional parts of the Format setting respectively control positive, negative, zero, and null values. But this technique won’t work for a combo box.
Get Access Cookbook now with the O’Reilly learning platform.
O’Reilly members experience books, live events, courses curated by job role, and more from O’Reilly and nearly 200 top publishers.


