Since the Internet is a visual medium, it should come as no surprise that most of the efforts of making a website accessible fall under visual accessibility. This group has a variety of alternate ways to access web pages; they might use a screen reader that reads the content of a page back to them. They might override the default styling on a website, allowing them to use colors that are higher contrast or fonts that are easier to read. They might change the scale of a website, increasing the font size until itâs legible.
The blind are particularly impacted by an inaccessible web. A page might be structured in a way thatâs nonsensical if a user is using a screen reader. They might miss out on vital information in a graph or image. They might have to sit through listening to the navigation with every page load.
The goal of this section is to create a website that is accessible to a screen reader. A user should not lose any content or function simply because of the tool they are using.
Though there are many ways to determine complete blindnessâfrom the legally blind who canât drive without glasses to the medically blind who have completely lost all sightâfor the purposes of this book we define complete blindness as a user who is using a screen reader to access websites. Why not simply define it as those that have completely lost all their sight? Many people who have extremely little vision choose to use a screen reader. Screen readers are also popular for some people with extreme information processing disorders who have issues with reading text but not with the spoken word.
The completely blind will almost always have issues with the following:
Poorly structured HTML
Images with no meaningful alt text
Flash that is inaccessible
Features that require vision, or where the fallback is poorly implemented
Repetitive items that cannot be skipped
Poorly structured forms
Screen readers are specialized applications dedicated to reading aloud text on a screen. While every modern operating system comes with screen readers, a number of commercial applications have gained significant popularity. See Table 1-1 for a list of the most common screen readers.
Table 1-1. Common Screen Readers
| Product | Operating System | Availability |
|---|---|---|
| JAWS | Windows | Commercial |
| VoiceOver | Mac | Included in System |
| Microsoft Narrator | Windows | Included in System |
| Orca | Unix | Bundled with Gnome |
| BRLTTY | Unix | Included with most Unix systems |
| ChromeVox | All OSâs | An add-on developed by Google for Chrome |
Since screen readers work by reading text that is visible on the screen or available through option tags, itâs important to keep a few things in mind.
Things screen readers can do:
Read all text visible on a page
Read some tags that a sighted user will not be able to see (such as alt tags)
List all headers and links
Things screen readers cannot do:
Sometimes, read text based on your CSS layout
Read text in images
Detect navigation
Itâs also important to remember that, while modern screen readers have improved in the past few years, you might still have a user who is stuck using an older version. A new copy of JAWSâthe most popular screen reader for Windowsâcosts over $800. A blind user might have issues purchasing it on her own, or might be in a place where she canât install it on her own, like a corporate office. Even if a newer version navigates around annoyances for you, resist the urge to not code for them anyway.
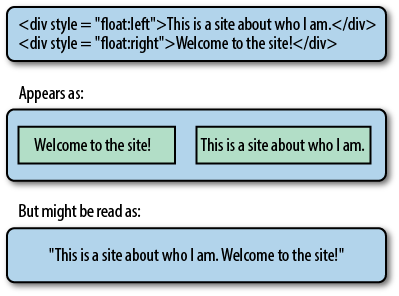
Since screen readers will read from the top of the page to the bottom, itâs important that your document have a logical flow. With the rise of CSS, positioning has made it theoretically possible for the HTML flow of a page to have no resemblance to the end layout.
The problem with this is that, while some screen readers can work with the styled layout of a page, others may be working with the unstyled HTML to figure out what to read first. The safest way to structure your HTML is to have it flow in the same way you would structure it if it were being printed without formatting. Another way of thinking about this is how you would want your userâs eye to travel over the page. This is the way you would want the page to be read.
If you donât want to start up your screen reader, try reading the unstyled HTML out loud. Does it still make sense?
Several of the following methods will deal with hiding text, so we should cover how to do that properly now.
Anyone who uses CSS will generally know about the visibility and
display options. Setting visibility to hidden (or display to none)
seems like the best way to remove text from a visual layout. Thereâs
one problem with this, though: screen readers often obey
display:none and
visibility:hidden by not reading out the hidden
text. For instance, in Example 1-1, the header text
wouldnât be read at all.
Example 1-1. Incorrect way of hiding text (nothing will be read)
In the CSS file:
h1 {
    background: url("welcome-image.png") no-repeat;
    height: 200px;
    width: 600px;
}

h1 span {
    display: none;
}
In the HTML file:
<h1><span>I will not be read.</span></h1>
A better alternative is to push the text off of the screen, as seen in Example 1-2.
Using headers is an important part of keeping the flow of your
page sensible. Headers (<h1>,
<h2>) should descend logically and should be
used for section headers. It can be tempting to use headers for other
uses, overriding them for decorative purposes. This breaks the
structure of the document, and can be confusing to someone using a
screen reader that announces that it has encountered a header.
Does this mean you should never replace a header with a graphic?
Of course not. Itâs a common practice by designers to replace a header
with a more stylized graphic. The text in the header should always
match the text in the image, though. The decorative elements can be
ignored. For example, if your header is on a sports site, and the
designer has included a soccer ball on each header, you have to worry
only about echoing the text. Make certain the proper way to hide text
is used, pushing it off of the screen rather than using
display:none.
Keep in mind that even if you decorate the header, it will still be read aloud through a screen reader. The text used in the header should remain informative to the user. Example 1-3 shows how headers might be read to a user using a screen reader.
Example 1-3. How headers are read by a screen reader
The following:
<h1>Astronomy News</h1>
<h2>New planet found!</h2>
<p>A new planet was found...</p>
might be read as:
"Heading level one, astronomy news. Heading level two, New planet found! A new planet was found..."
Headers are also used by screen readers to help a user scan the document. It can read out all of the level one headers and allow the user to choose to skip to one. This way, a user can move quickly to the section that interests him most. How headers might be read out to a user who is scanning a page is shown in Example 1-4.
Example 1-4. Headers, as read when the user is scanning
The following:
<h1>Astronomy News</h1>
<h2>New planet found</h2>
<p>A new planet was found...</p>
<h1>Sports News</h1>
<h2>Preparations for the Winter Olympics Slowed</h2>
<p>Due to recent weather issues, preparations for the Olympics are...</p>
might be read as:
"Astronomy News. Sports News."
If headers are used incorrectly, however, the userâs ability to
jump around the document has been removed, and she must sit through
the entire screen to find the content that interests her. Always make
sure not to skip headers. If youâve used
<h1>, your next header should be
<h2>, not
<h3>.
Navigation, while necessary for moving around websites, is boring to listen to. A screen reader doesnât know to skip it, however, and every time a user loads a new page, the screen reader will read through the navigation again.
The simplest solution is to add an option to skip navigation that will be read only by a screen reader. If your page features local navigation, it should offer to skip to that as well. Sample code is shown in Example 1-5.
Example 1-5. Skip navigation
Above the navigation:
<span class="hidden">
    <a href = "#content">Skip to content</a>
</span>

<span class="hidden">
    <a href = "#pagenav">Skip to page navigation</a>
</span>
Before the page navigation:
<a name="pagenav"></a>
Before the content:
<a name="content"></a>
This way, the user will be able to skip to both the pageâs unique navigation or the page content every time a page loads.
Before the wide adoption of CSS, tables were often used for controlling layout. With even the most arcane of the common browsers now using CSS, tables no longer need to be used this way. Tables should be used only for tabular content, as screen readers may have problems navigating a page naturally.
If you have tabular data, such as a price list, sports scores,
or a list of features, it absolutely should be put in a table rather
than a series of divs. Screen readers treat tables
differently, making it easier for a blind person to follow, as long as
the tables are set up correctly.
Tables should always include scoping in their HTML. Scopes make it easier for the person listening to the screen reader to understand the values being read to them. Scopes indicate what type of data each column contains and what should be read out as a row. As the table is read aloud, the headers are spoken along with the row items, making it easier for a person using a screen reader to understand the data. Proper scoping is shown in Example 1-6, as well as how a scoped table is read to the user.
Example 1-6. Scoping Tables
This properly scoped table:
<table>
    <tr>
        <th scope="col">State</th>
        <th scope="col">Team name</th>
        <th scope="col">Mascot</th>
        <th scope="col">City</th>
    </tr>
    <tr>
        <th scope="row">District of Columbia</th>
        <td>Capitals</td>
        <td>Slapshot</td>
        <td>Washington</td>
    </tr>
    <tr>
        <th scope="row">Michigan</th>
        <td>Penguins</td>
        <td>Al the Octopus</td>
        <td>Detroit</td>
    </tr>
</table>
is read as:
"State: District of Columbia. Team name: Capitals. Mascot: Slapshot. City: Washington. State: Michigan. Team name: Penguins. Mascot: Al the Octopus. City: Detroit."
Tables should also have a summary, giving a description of the data within it. If the table already has a caption, this should be used to elaborate on the contents, rather than repeat them. This way, the user can choose to listen through the tableâs contents or skip the table and move on to the next part of the content. Example 1-7 shows a proper summary and caption.
Example 1-7. Table with summary and caption
<table summary="A list of hockey teams, with their state, city, and mascot">
    <caption>NHL teams</caption>
       ...
</table>
Another use for the summary is to explicitly state generalizations about the contents of a table. A user without a screen reader might be able to glance over the data and draw conclusions about its contents. A user using a screen reader, however, would have to listen to every single data point and recall them all at the end to do the same thing. See Example 1-8 to see this in action.
Example 1-8. Table with summary stating generalizations
<table summary="A list of hockey tickets purchased every year, showing a general increase.">
    <synopsis>Ticket sales</synopsis>
    ...
</table>
Lastly, a user should be allowed to skip a table. No matter how vital a table might be to the content of a page, blind users shouldnât be forced to listen through them. Not every screen reader allows the user to skip tables, so some extra HTML might be required (shown in Example 1-9).
Images do more than decorate a website; they convey information. This information cannot be lost simply because your user is using a screen reader.
If your image has any text in it, that text must be available to the screen reader. If youâve styled a header, the easiest way to do this is to style the actual header tag, as shown in Example 1-10. This way, the screen reader knows that itâs encountering a header and can announce this to the user.
Example 1-10. Replacing headers with images
In the CSS file:
    h1#welcome {
        text-indent: -5000px;
        background: url("welcome-image.png") no-repeat;
        height: 300px;
    }
In the HTML file:
<h1 id="welcome">Welcome</h1>
This is displayed as:
But will still be read as:
"Welcome"
For images with text that arenât a header, the text should be contained in the imageâs alt tag (Figure 1-1). This tag is read by the screen reader to the user, and should include not only the text in the image, but a description of what any of the images are as well.
<img src="dogs.png" alt="A number of dogs, showing their genetic diversity.">
The descriptions of the images shouldnât be limited to simple descriptions of what is in the picture. If there are certain elements of the image that are important, these should be spelled out. Why was the image included for a sighted user? Was there something significant in the image that adds to the content of the page?
Itâs not uncommon for images to have captions, but the urge to simply make the caption the alt text should be resisted. While, technically, 508 compliance would be satisfied, the user is no better off. What theyâll end up hearing is the caption twice, which does nothing to explain the importance of the image. If the caption does nothing to add to the image, perhaps itâs worth wondering if the caption is needed at all. Figure 1-2 shows an image with a caption that adds to the alt text rather than repeating it.
<div>
    <img src = "galaxy.png" alt = "Two galaxies are shown close together. The arms of one of the galaxies are long and thin." />
    <div class = "caption">The results of two galaxies colliding</div>
</div>
This will be read as:
"Image: Two galaxies are shown close together. The arms of one of the galaxies are long and thin. The results of two galaxies colliding."
There are exceptions to the alt text rule. There are many instances when an image does not add to the content of the page, but is being used for branding or layout. If a designer has had to use a spacer image, that image should have no alt text at all, allowing the screen reader to pass over it silently. The same goes for styled list bullets or branding.
If a logo is presented several times in a page, the first can certainly have alt text. Beyond that, however, any further alt text becomes tiresome. In general, if you wouldnât want to read it aloud to a colleague, the image should be skipped in order to maintain flow and avoid annoying the user.
Keep in mind that not including alt text will cause automated programs to falsely report that image. This is one of the reasons why good 508 testing is done both automatically and manually. Be prepared to justify why that image does not need alt text, and in the case of spacer or decorative images, see if thereâs a way to remove the image and instead use CSS.
Graphs, while still images, require a special amount of consideration. In this case, if every data point and bit of text were read out, the graph would be useless. With graphs, the rule of reading out all text can be bent in favor of giving an overall feel for the content of the graph.
Some good rules of thumb for creating alt text for a graph:
If the graph image has a title in it, make certain to include that title.
State what is being charted (e.g., what variable against what constant, or what percentages of a population).
If there is a caption for the graph, take care not to repeat its content in the alt text.
State the trends in the graph as plainly as possible, but refrain from drawing conclusions (e.g., âThe drop in sales proves that the new product was a bust.â)
If two data points are being graphed against each other then the variable is being graphed against the constant. In other words, the thing being graphed on the Y-axis is being graphed against the X-axis. Make certain the alt text reflects that.
A quick test for a well-described chart is to show the alt text to another person, then show them the chart. Do the trends you described match with the chart, or did you accidentally miss something? Figure 1-3 shows a properly captioned chart.
<div>
    <img
        src = "christmas.png"
        alt = "A chart titled Christmas Sales, with units sold being graphed against the months September through January. Sales start at a thousand units in September, double to two thousand in November, rise again to three thousand in December. In January, the sales drop down to five hundred."
    />
    <div class = "caption">Sales diving after Christmas</div>
</div>If your website has forms (and most do, even if itâs simply a search field), special consideration is need to make these usable to a screen reader. It can be easy to get lost within a form when itâs laid out poorly.
Labels are extremely important to screen readers, as they determine what fields go with what form fields, and determine how a user should navigate through the form. Fortunately, theyâre also easy to make accessible. Titles and labels should always match each other, so when the screen reader processes the page, the screen reader can read the text within the label and also announce the kind of form field the user will be working with (see Example 1-11).
Example 1-11. Labels in forms
<label for="last">Last Name: </label>
<input type="text" name="lastname" id="last">
The only form fields that donât require labels are buttons, since these already contain the text that explains what they are. Make certain that this text is helpful, however. If the button has been styled with a graphic, make certain the text in the graphic matches the text in the value attribute (Figure 1-4).
<label for="search">Search: </label>
<input type="text" name="search" id="search">
<input type="submit" value="Go">
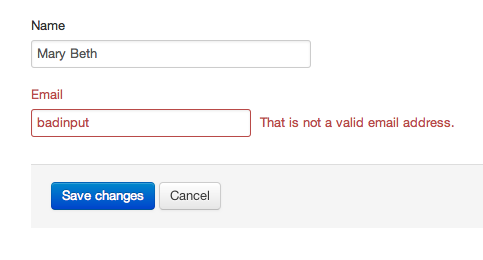
If your site includes a form that validates itself, make certain that if the form encounters errors, it errors out vocally. Rather than simply making the incorrect field turn red (a common design choice), add text that explains which part of the form is incorrect, and why (Figure 1-5).
<p class = "error">That's not a email address. Email addresses should have the format of user@host.com</p>
<label for="email">Email: </label>
<input type="text" name="email" id="email">
<input type="submit" value="Go">
This actually increases the usability of the form overall, since many users would like to know exactly what they need to do to get the form to submit, rather than guess at what might work.
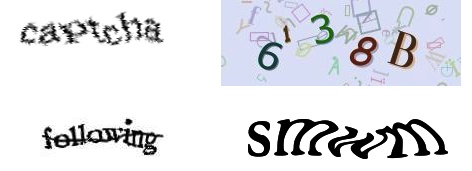
Often, forms that allow an anonymous person to submit them will include a form element intended to deter bots from spamming the website. The most typical of these is CAPTCHA (âCompletely Automated Public Turing test to tell Computers and Humans Apartâ), which asks a user to type in letters or words from an image. Some samples of popular formats for CAPTCHAs are shown in Figure 1-6.
A CAPTCHA, of course, is a huge issue for someone using a screen reader, since the letters cannot be included in the alt text. If they were, the test would be rendered useless, allowing for bots to simply read that text and enter it.
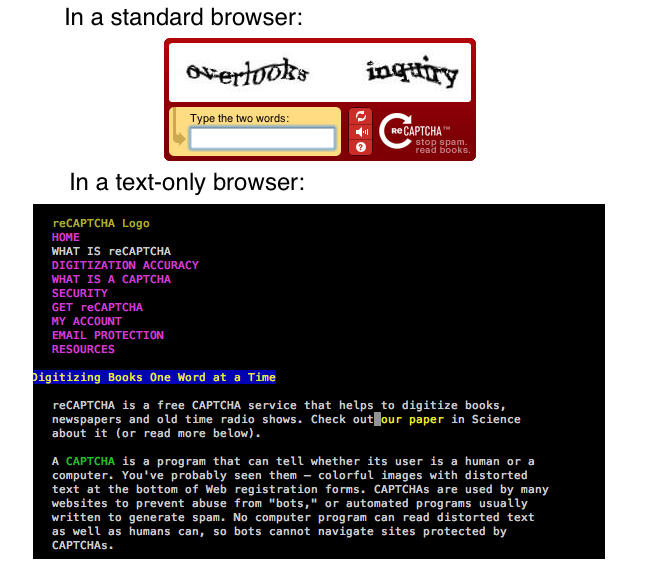
One work-around is to offer an audio CAPTCHA as well. A user using a screen reader could play the audio of a voice saying the numbers and letters, and then enter them into the form. CAPTCHA.net offers a widget that gives both a visual and an audio option. If the user is using a text-only browser, however, he wouldnât be able to use the form at all (as seen in Figure 1-7).
If the CAPTCHA canât be used at all, make certain that a user has a way to submit information, even if itâs offering an email address or an alternate form that doesnât use CAPTCHA.
If your site chooses to use CAPTCHA that has an audio fallback, make certain to text the fallback rigorously. Just like the images used for CAPTCHA, it can be easy for the text to become too garbled to be used.
Another option for a challenge response is to use a question that a human would find easy to answer but a robot would not. For example, a user could be asked what sport uses a hockey puck. To a human, thatâs a fairly simple question to answer (the answer is in the question, after all). A robot would have trouble parsing it, unless it was rather sophisticated. Care must be taken, though, that the answer would be obvious to any user, in spite of cultural lines (for example, a website created by a South American developer might find it quite intuitive that the country west of Brazil is Peru, but North American users might be stumped). One example that can cross cultural lines is in Figure 1-8.
Questions such as these should be regularly rotated, since it is still possible to find a way to crack them after a human sees them.
While writing questions, keep in mind the portion of the websiteâs audience that might be completely blind. The question about the color of a Pepsi label may seem obvious, but might be unanswerable by a blind person who hasnât bothered to remember that Pepsi usually uses blue.
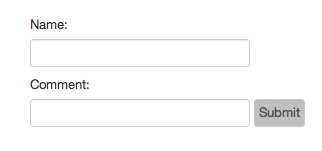
One last option is a test that is actually invisible to sighted users: the honeypot, shown in Figure 1-9. A form field is added to the site, then hidden. A bot would automatically fill in all fields, so if that field is filled in, that user must be a bot. The form fails silently, not alerting the bot that something has gone awry.
<form>
    <label for='name'>Name:</label><input id='name' type='text' />
    <label class='hide' for='state'>Please leave this blank</label><input class='hide' id='state' type = 'text' />
    <label for='comment'>Comment:</label><input id='comment' type='text' />
    <input value='Submit' type='submit' />
</form>
While effective, a user using a screen reader must be told to skip the honeypot portion of the form. If he fills it out, and the form fails, he wouldnât know that anything had gone wrong. If the form fails vocally, a bot would be alerted that one of the fields is a honeypot, and it would be able to try again, but this time knowing to leave a section of the form blank.
Another version of the honeypot is where all users can see the form field, but itâs obvious to a human that it shouldnât be filled out, or a different answer should be selected. Figure 1-10 shows a visual honeypot, where the answer the person should pick is obvious.
Whatever method fits a website, the end goal should always be to ensure that all users not only can use it, but that they are not overly annoyed by it.
A common myth regarding screen readers is that theyâre incapable of processing JavaScript, so any site that uses JavaScript is automatically inaccessible. Screen readers have come a long way since the early 2000s, and most have no issues with JavaScript. According to a 2011 survey by http://WebAIM.org, 98.4% of respondents had JavaScript enabled. Most of the remaining 1.6% were using browsers that support AdBlock, so it is possible that they had AdBlock installed, which would make it impossible to detect JavaScript.
This doesnât mean, however, that JavaScript is automatically accessible. Care must still be taken to ensure that users using screen readers can access the functions and content of a website, just as a sighted user might.
Keep in mind, though, that JavaScript is still unusable by pure text browsers, which may render your site unusable. At the very least, make certain that the site functions with JavaScript turned off. This would also help those who are in a corporate or public environment, where JavaScript is sometimes turned off on shared terminals. Not every mobile browser supports JavaScript, or supports it in awkward ways.
The safest way to add JavaScript to a website is to start with a site that works without it at all. All of the functionality and content should be present, even if the presentation isnât as slick as the designer might have liked. This way, if a user doesnât have JavaScript, she has something to fall back on.
Now that thereâs a baseline, the developer can begin to add a scripting layer. This scripting layer should remain separate from the content, as shown in Example 1-12. In other words, no inline JavaScript, please.
Why, in Example 1-12, is one example good and one bad? One only needs to look at the HTML. If the user has no JavaScript, the first code sample wouldnât work at all. With the second, the user would simply go to a new page, where the survey could be taken, rather than having a new window opened.
Example 1-12. Inline versus external JavaScript
Inline (bad):
<a href = "Javascript:window.open('survey.html')">Take our survey!</a>External (good)
In the HTML file:
<a href = "survey.html" id="new_window">Take out survey!</a>
In the JavaScript file:
function doNewWindow() {
    if (document.getElementsByTagName) {
        var links = document.getElementsByTagName("a");
        for (var i = 0; i < links.length; i++) {
            if (links[i].className.match("new_window")) {
                links[i].onclick = function () {
                    window.open(this.getAttribute("href"));
                    return false;
                };
            }
        }
    }
}
Frames and iframes, while readable to almost every screen reader, can be disorienting if not set up correctly. The user should always be able to tell where they are on a page, move around easily, and have an alternative if they cannot, or choose not, to use frames.
If at all possible, avoid the use of frames. Not only are they more difficult for screen readers to cope with, but even sighted users report issues using them. Sometimes, however, redesigning a website to not use frames isnât possible, especially if theyâre built on a framework that uses them heavily.
In this instance, keep in mind that a screen reader doesnât allow for scanning the same way a browser allows a sighted person to scan a web page. It starts at the beginning of the page and reads in the order that seems to make the most sense. If a website uses frames, a screen reader will begin reading at the first frame, read through it completely, then move to the next frame. A user, however, can hear a list of available frames and skip among them as needed.
The frames shouldnât be given generic titles such as âframe1,â âframe2,â or âframe3.â These names donât give the user any indication of what is actually contained in the frames. Better names would be ânavigation,â âcontent,â and ârelated content.â Frames with useful titles are shown in Example 1-13.
Example 1-13. Frames with titles
<!DOCTYPE HTML PUBLIC "-//W3C//DTD HTML 4.01 Frameset//EN" "http://www.w3.org/TR/html4/frameset.dtd">
<frameset>
    <frame src="menu.html" title="Navigation" name="nav" />
    <frame src="content1.html" title="Content" name="content" />
    <frame src="related.html" title="Related content" name="related" />
</frameset>
Also, if the user is not using frames (or canât see them), they should be given an option to go to a page without frames.
Iframes are reportedly much better supported by screen readers, but steps still have to be taken to make certain that theyâre accessible for a screen reader.
As usual, accessibility comes with well-formed HTML. The frameset should be properly declared, rather than hoping the browser will sort out what itâs supposed to display. Example 1-14 shows a properly declared frameset.
Example 1-14. Iframe DOCTYPE
<!DOCTYPE HTML PUBLIC "-//W3C//DTD HTML 4.01 Frameset//EN" "http://www.w3.org/TR/html4/frameset.dtd">
Each frame should also have its own title attribute that describes the content of the frame. It can be tempting for a web developer to refer to the frames by their position, especially if sheâs using a content management system or framework, where data might change dynamically. However, this leads to confusion for someone using a screen reader when the user is trying to scan the page. A description of âmiddle frameâ doesnât help the user navigate the page quickly.
Also, some screen readers will read out the name of the HTML page linked in the iframe. Though this is rare, developers should try to name the files something sensible, like âmenu.htmlâ or âinstructions.html.â
If the user is using a screen reader that cannot handle frames, heâll be dependent on the developer providing noframes content. A common solution for those who canât use frames or iframes is to include code similar to that in Example 1-15. The only text displayed to a user who canât use frames is a suggestion that he use a browser that can cope with frames.
Example 1-15. Bad alternate content for iframes
<iframe src = "menu.html">We're sorry, this site requires frames.</iframe>
In Example 1-15, the user is given no clue as to what the content might have been, or how to get to it. A slightly better option is to offer the user a link to the missing content, as seen in Example 1-16.
Example 1-16. Linking to frame content
<iframe src = "menu.html">
    <a href = "menu.html" title = "Menu">Our menu</a>
</iframe>
Often, though, HTML pages for iframes are bare-bones, stripped of navigation and any other global site features. The best option, shown in Example 1-17, is to offer a page that is as fully featured as any other page within the website.
Example 1-17. Linking to alternate page
<iframe src = "menu.html">
    <a href = "menu_noframe.html" title="Menu">Our menu</a>
</iframe>
This is the least jarring to a user that canât use iframes and is on a screen reader. Her user experience isnât suddenly changed, and the fact that she canât use frames or iframes isnât being unnecessarily harangued upon.
Flash is often criminalized as being completely inaccessible. Like JavaScript, itâs unfair to judge Flash out of hand. Flash can be very accessible, as long as the browser is compliant, and in fact, can be even more accessible to some groups, as will be seen in later chapters.
The largest problem with making Flash accessible isnât the tool itself, but the fact that some developers donât use the tools provided by Adobe or other open source tools. A 2009 survey of screen readers found that 34% of users found Flash objects very difficult to use, and 37% found them somewhat difficult to use. This was in spite of accessibility tools being built into most products since 2001.
Just because something can be made in Flash, however, doesnât always mean it should.
The first step to having an accessible Flash object on a page is determining if it would be better to provide an alternative page for screen readers. For example, if the Flash object is a slide presentation, perhaps the content can simply be offered on another page in a plainer format (see Figure 1-11). The user will likely not care about the slide transitions and the pauses while they execute might be annoying.
One place to avoid Flash is in the navigation. Not only should navigation remain unobtrusive for basic usability principles, but if the user doesnât have Flash, he might not be able to use the site at all! Instead, use CSS and JavaScript to create attractive navigation elements, leaving Flash for more complicated features.
Flash objects, if theyâre intended to be accessed by the blind, should be accessible by the keyboard, so the user can tab through them, and pressing Enter should count the same as a click from a mouse.
The Flash object should not automatically play audio, as that could interfere with the screen readerâs reading of the page content. Two voices overlaying would be extremely frustrating to a blind user. Auto-play is a bad idea for any user, in fact, so disabling it should be a priority on any site. A common complaint is that advertisers will sometimes include videos that auto-play, and are out of the control of the site. How valuable is an advertiser who drives away a websiteâs users, though?
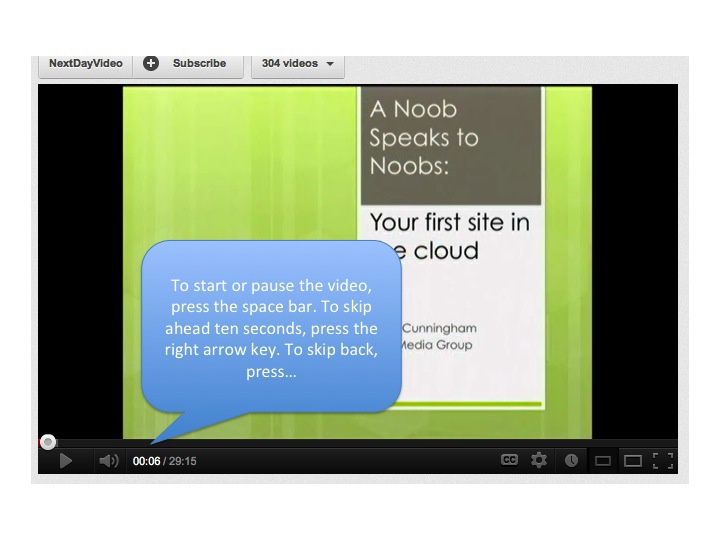
The Flash object should have text cues for the screen reader so the user will know how to navigate. Any instructions for special keys should be spelled out for the user as soon as she hits the Flash object, so she can start using it immediately. For example, in Figure 1-12, the user has come upon a slide show. Before reading the text of the slides, the user should be instructed on how to move to the next slide, move back to the previous slide, reread the current slide, or hear a list of slide titles.
Lastly, consider whether the Flash object needs to be made in Flash at all. With the slides in Figure 1-12, a stunning version could be made out of HTML5, CSS, and JavaScript without needing an extra plug-in to use. Many workplaces and schools block Flash, and some browsers, such as Lynx, cannot work with it at all.
Many developers worry that every Flash application needs to be accessible, but there are exceptions. For instance, a Flash arcade game would be impossible to build for a blind person. Donât rush to conclude that your Flash application doesnât need to be compliant at all, though. Each group has their own issues with Flash, which we will cover in other sections.
Access keys are a tool that allows a user, by hitting certain key combinations, to easily move to certain elements on a web page, or go to set pages within a website. Almost all modern browsers support access keys (see Table 1-2).
Table 1-2. Browsers that support access keys
| Browser | OS | Version |
|---|---|---|
| Chrome | Mac, Windows, Linux | 3+ |
| Firefox | Mac, Windows, Linux | 2+ |
| Internet Explorer | Windows | 8+ |
| Safari | Mac, Windows | 3+ |
| Opera | Mac, Windows, Linux | All |
| Konqueror | Mac, Windows, Linux | All |
An access key is added to a website by adding an attribute to an anchor tag. For example, letâs say a developer wants to add an access key so that a user can easily move to the next blog article. Example 1-18 shows how they might do this.
Now, when the user uses ânâ with his access keys, heâll automatically be sent to the next page.
At the moment, the only official standard for access keys is from the UK, though international standards are emerging as more and more sites are choosing to use access keys, or are using frameworks that come with access keys already set up, like Plone or vBulletin. See Table 1-3 for some common access keys.
Table 1-3. Common access keys
| Key | Action |
|---|---|
| 1 | Home Page |
| 2 | Skip to content |
| 3 | Site Map |
| 4 | Search field focus |
| 5 | Advanced Search |
| 6 | Site navigation tree |
| 9 | Contact information |
| 0 | Access Key details |
As a side note, another popular convention is to assign the numbers to the navigation items on the global navigation, with one being the first item, and zero being the last. Why is zero last? The order has less to do with the numbersâ numerical order, and more to do with their order on the keyboard. Most keyboards list zero at the end of the numbers row, so thatâs the order thatâs used for navigation items.
If you wanted to make your main navigation accessible with access keys, it might end up looking like the code in Example 1-19.
Example 1-19. A main menu with access keys
<ul>
    <li><a href = "/" accesskey = "H">Home</a></li>
    <li><a href = "/products/" accesskey='1'>Products</a></li>
    <li><a href = "/store/" accesskey='2'>Store</a></li>
    <li><a href = "/contact-us/" accesskey='3'>Contact Us</a>
</ul>
Note how the first navigation item is set to H, rather than a number. This is a stylistic choice, since that could just as easily have been set to 1. What isnât a stylistic choice is the order of the numbers. To many developers, 0 comes before 1. In this case, however, 0 is the last element in the series. If your navigation has more than 10 elements (or 11, including home), this may be a good time to consider making the top level of the site narrower.
One of the most recent developments in accessibility is the acceptance of WAI-ARIA (Web Accessibility Initiative-Accessible Rich Internet Applications) into the W3C standards. Created specifically for rich Internet applications, WAI-ARIA allows disabled users to interact with even the most complex of applications by declaring certain elements on the page to have a specific role.
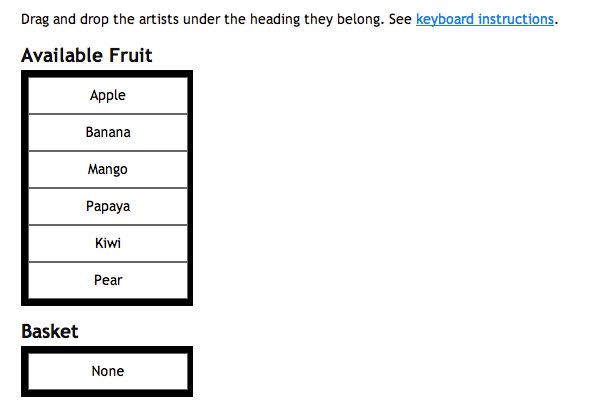
WAI-ARIA works by adding meta-data to an applicationâs HTML tags. Figure 1-13 shows how roles can be added to a drag and drop feature to make it accessible. Normally, the user would have to use a mouse to drag an item from the âAvailable Fruitâ section to the âBasket.â With ARIA enabled, a user who canât use the mouse can move the items around by tabbing to them, hitting enter, then moving to where they want the item to be.
<div id="dragdrop" role="application">
    <h2 id="available">Available produce</h2>
    <ul id="available_list">
        <li class="draggable" role="button">Apple</li>
        <li class="draggable" role="button">Banana</li>
        <li class="draggable" role="button">Mango</li>
        <li class="draggable" role="button">Papaya</li>
        <li class="draggable" role="button">Kiwi</li>
        <li class="draggable" role="button">Pear</li>
    </ul>

    <h2 id="basket">Basket</h2>
    <ul id="basket_list">
        <li class="empty">None</li>
    </ul>
</div>
While a developer can make her own JavaScript for ARIA-enabled applications, itâs worth noting that many frameworks already have ARIA built in, either fully or for specific widgets. YUI, Google Web Toolkit, and jQuery are several that either include or are planning to include WAI-ARIA.
A full introduction to ARIA would be a book in itself, so this section will be only an introduction to some of the things ARIA can do.
A particularly sticky issue for screen readers is websites that update without reloading the page. Many sites will include live feeds or post alerts. These updates might be of vital importance to the user (for example, a bank warning that the user is about to be timed out) or might be of little consequence (like a Twitter widget that updates automatically).
WAI-ARIA includes several items that alert the screen reader
that something has changed and suggests how urgent the update is. The
status
Example 1-20. The status role
<p role="status" aria-life="assertive">You will be logged out in thirty seconds.</p>
alertalertdialogdiv that has just been updated and can take input
from the user. Alerts are assumed to be assertive, but can be set to
be passive as well.
Example 1-21. The alertdialog role
<!-- From http://test.cita.uiuc.edu/aria/alertdialog/alertdialog1.php -->

<div role="application">

    <div id="guess1" class="guess">

      <h2>Number Guessing Game</h2>

      <p class="input">
        <label id="guess1_label" for="guess1_text">Guess a number between 1 and 10</label>
        <input type="text" id="guess1_text" size="3" aria-labelledby="guess1_label" aria-invalid="false">
      </p>

      <p class="input">
        <input class="button" id="guess1_check" type="button" value="Check My Guess">
        <input class="button" id="guess1_again" type="button" value="Play Again">
      </p>
    <div id="alert1" role="alertdialog" tabindex="-1" aria-hidden="true" aria-labeledby="alert1_title"><p id="alert1_title" class="title">Alert Box</p><p id="alert1_message">No Message</p><input id="alert1_close" type="button" value="Close"></div></div>
</div>
A marquee
The navigationnavigation
Example 1-22. The navigation role
<ul id="navigation2" role="navigation" aria-labelledby="nav2_label">
  <li class="nobullet"><a href="http://www.uiuc.edu/">undergrads</a></li>
  <li><a href="http://www.uiuc.edu/">Graduates</a></li>
  <li><a href="http://www.uiuc.edu/">Parents</a></li>
  <li><a href="http://www.uiuc.edu/">Alumni</a></li>
  <li><a href="http://www.uiuc.edu/">Faculty / Staff</a></li>
  <li><a href="http://www.uiuc.edu/">Employers</a></li>
</ul>
The navigation
Often a navigation will have drop-down elements. In this case,
itâs useful to give these elements a
treetreegrid
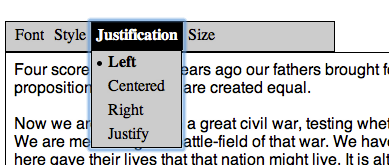
Web applications often include menus. Giving these items a
menumenubar
<ul id="mb1" class="menubar" role="menubar" title="Styling Menu" aria-controls="st1">
  <li id="mb1_menu1" role="menuitem" tabindex="0" aria-haspopup="true" class="">
    Font
    <ul id="fontMenu" class="menu" role="menu" aria-hidden="true" style="display: none; ">
      <li id="sans-serif" role="menuitemradio" tabindex="-1" aria-controls="st1" aria-checked="true" class="checked">
          Sans-serif
      </li>
      <li id="serif" role="menuitemradio" tabindex="-1" aria-controls="st1" aria-checked="false">
          Serif
      </li>
      <li id="monospace" role="menuitemradio" tabindex="-1" aria-controls="st1" aria-checked="false">
          Monospace
      </li>
      <li id="fantasy" role="menuitemradio" tabindex="-1" aria-controls="st1" aria-checked="false">
          Fantasy
      </li>
    </ul>
    ...
</ul>
Another common tool on interactive websites is a timer, whether
used for a game or for forms that are set to time out. WAI-ARIA
includes a timer
As stated before, this is but a small sample of the items contained in the WAI-ARIA specifications. As more libraries have adopted the standard, more resources have been created. More resources are in Table 1-4.
Table 1-4. WAI-ARIA resources
| Website | URL | Description |
|---|---|---|
| Official WAI-ARIA documentation | http://www.w3.org/TR/wai-aria/ | The technical documentation for WAI-ARIA |
| Mozillaâs ARIA documentation | https://developer.mozilla.org/en/Accessibility/ARIA/ | Mozillaâs documentation on how to use ARIA. Includes examples for almost every role. |
| Yahoo! Accessibility | http://yaccessibilityblog.com/library/tag/aria/ | Blog posts on developing with ARIA |
| Operaâs Introduction to WAI-ARIA | http://dev.opera.com/articles/view/introduction-to-wai-aria/ | Multilingual introduction to WAI-ARIA |
| The Paciello Groupâs ARIA blog entries | http://www.paciellogroup.com/blog/category/wai-aria/ | Discussion about the uses for ARAI, as well as future development |
Since nearly all operating systems come with their own screen readers, technically, you already have the tools to test your website. Using a screen reader takes practice, however, and can be impractical for testing existing sites in a timely manner.
A wealth of automated testing tools exist that can test an entire site. They come in all flavors, from free to the enterprise, as well as those that run as web applications to ones that you host locally. Which one you choose will come down to your needs and budget. See Table 1-5 for some common automated testing tools.
Table 1-5. Common automated testing tools
| Tool | Description | Approximate cost |
|---|---|---|
| Cynthia Says | Web-based | Free |
| WAVE | Web-based | Free |
| Compliance Sheriff | Desktop | Varies |
| Rational Rose | Server- and desktop-based | Varies |
There are severe limits to automated testing, though. For one, automated tests canât make judgment calls. While we know that spacer images should never be given alt text, almost every automated tool out there that sees images without alt text will fail the site. They also might fail to see that when you styled a header with an image containing text, you failed to match the text the screen reader would read and the text a browser would display. An automated tool will probably not pick up that a content editor copied the captions for images into the alt text.
Another thing an automated tool will often not be able to do is judge the flow of your content. Most will note that youâre using headers, but not have any issues if youâre not using them correctly (for instance, styling a header to be a section divider). This is something that someone will have to experience firsthand to determine if the page is truly friendly to a screen reader.
As useful as automated testing is, it canât give you the whole picture of what your site is like for a person using a screen reader. Using a screen reader can take quite a bit of practice, but there are some workarounds. One, a Firefox add-on called Fangs will render any page as it might be seen by a screen reader. The text, rather than the spoken word, is given to the tester, allowing her to read through the data to see if the order is still logical, and to ensure that all data is being represented.
One thing the Fangs cannot do is test more complex applications, like a video player. For this, a tester would want to actually use a screen reader. Screen readers can feel very alien to a user whoâs used to using his eyes to seek out information, rather than using sound and key strokes. The idea here, though, isnât to be as fast as a daily user. The idea is to make sure that more intricate functionality is in tact for people using a screen reader.
Screen readers are different for every OS, but they do follow some basic principles, so testing in every screen reader will probably not be necessary. In general, all screen readers:
List out headers for the user
Read alt tags for images
List links on a page
Use access keys
Read out tables in the column:content format
Will not read out
display:noneorvisibility:hidden
Covering the above points, at a minimum, will still make a site much more usable by a blind user.
Get Accessibility Handbook now with the O’Reilly learning platform.
O’Reilly members experience books, live events, courses curated by job role, and more from O’Reilly and nearly 200 top publishers.
