Chapter 1. AIR Basics
AIR is a runtime that can be installed on computers that are running Windows, Mac, or Linux (at the time of writing, Linux support is currently in beta).
After installing AIR (free from http://get.adobe.com/air/), users can install and run AIR applications, which are packaged as files with the extension .air. What this means to you, the developer, is that you can deploy a single .air file to any operating system that has AIR installed without making any changes—one of the greatest benefits of AIR. You can truly write code once and then deploy your application across multiple operating systems.
AIR provides multiple development pathways for you to create AIR applications. The free Adobe AIR software development kit (SDK) contains command-line tools and code templates for creating an AIR application and is downloadable from http://www.adobe.com/products/air/. With the AIR SDK, you can create Hypertext Markup Language (HTML)/JavaScript AIR applications or create an application with a precompiled Flash or Flex SWF file. In addition, Adobe provides integrated support for developing AIR applications in Adobe Flash, Flex, and Dreamweaver. A few other development environments also provide support for developing AIR applications including Aptana Studio, which provides comprehensive support for developing JavaScript AIR applications.
Although multiple development pathways exist for an AIR application, the following core concepts span each of these environments:
Each application contains an application descriptor file, which is an Extensible Markup Language (XML) file containing the settings for the application.
Each platform allows a developer to preview an application using the AIR Debug Launcher (
adl) and also to package the AIR application as an installable .air file.Each AIR application must be signed with a certificate. This certificate can be a self-signed certificate or a commercial certificate. Applications are signed and packaged by using the AIR Developer Tool (
adt). An unsigned AIR package file can also be exported. This file is referred to as an intermediate file and has an extension of .airi. This allows the developer to pass the application along to someone else for signing.
This chapter discusses the key topics you will need for your platform: how to create a new AIR application, how to debug an application, and how to sign and package a completed AIR application for distribution.
Creating and Running an AIR Application with Flex Builder 3
Solution
Use the built-in support for AIR application development in Flex Builder 3.
Discussion
Flex Builder 3 has built-in support for creating AIR applications. In many ways, working with an AIR application is similar to working with a Flex application.
Note
Be sure that you have the latest updates for Flex Builder 3 before authoring AIR 1.5 applications. To check for updates, select Help→Search for Flex Builder Updates.
Creating a New AIR Application
To create a new AIR application project within Flex Builder, you first must create a new project. From the File menu, choose New→Flex Project. If you don’t see this option, you may need to choose Other and then select Flex Project from the resulting list.
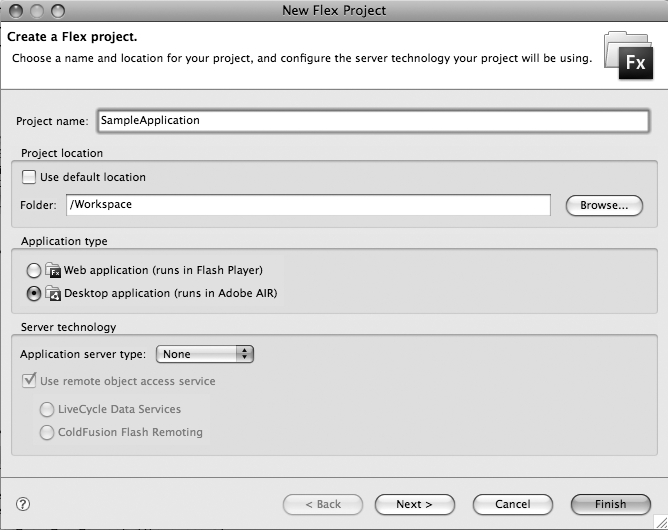
When the New Flex Project dialog box appears (Figure 1-1), you will notice an option to make this a Flex web application or a Flex-based AIR application. Be sure that the option for an AIR application is selected, and then click the Next button to proceed through the wizard-like interface.
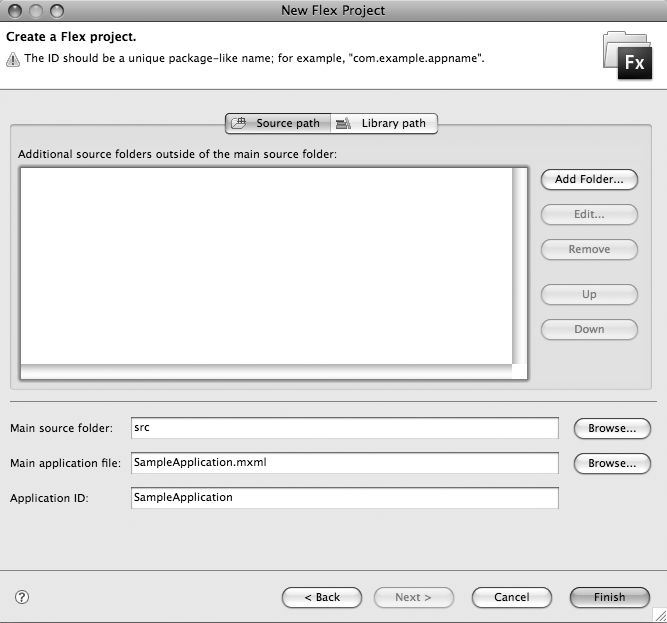
As you proceed through the dialog box, you can set the application ID and default application MXML filename, as shown in Figure 1-2 (for more information on setting your application ID, see Targeting a Specific Version of AIR). The application ID will be prepopulated in the application descriptor file for your AIR application once you’ve created the project.
When you click Finish, Flex Builder creates a new project that includes the application MXML file as well the application descriptor XML file.
Running and Debugging Your AIR Application
In Flex Builder, you can run an AIR application by
selecting the application and clicking the Run button. Flex Builder
takes care of calling adl and
passing in your application descriptor file. Likewise, you can debug
your application by clicking the Debug button. All the regular
debugging tools are available to AIR applications.
Flex developers also have another advantage when it comes to AIR development. The profiler within Flex Builder also works seamlessly with AIR applications, so by selecting your AIR Application project and then clicking the Profiler button, you can determine what system resources are being used by your application.
Creating and Running an AIR Application with Flash
Solution
Use the support for AIR application development in Flash CS3 or Flash CS4.
Discussion
Both Flash CS3 and CS4 will require an update to create AIR 1.5 applications. You will first need to ensure that you have the latest version of Flash. To check for updates, select Help→Updates.
Note
The updates for Flash CS3 and CS4 will be made available shortly after the release of AIR 1.5.
Creating a New AIR Application
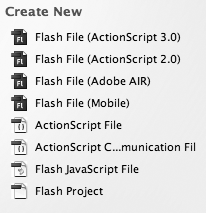
To create a new AIR application in Flash, select Flash File (Adobe AIR) under the Create New heading on the opening screen (Figure 1-3). This creates a new Flash file that is configured for Adobe AIR.
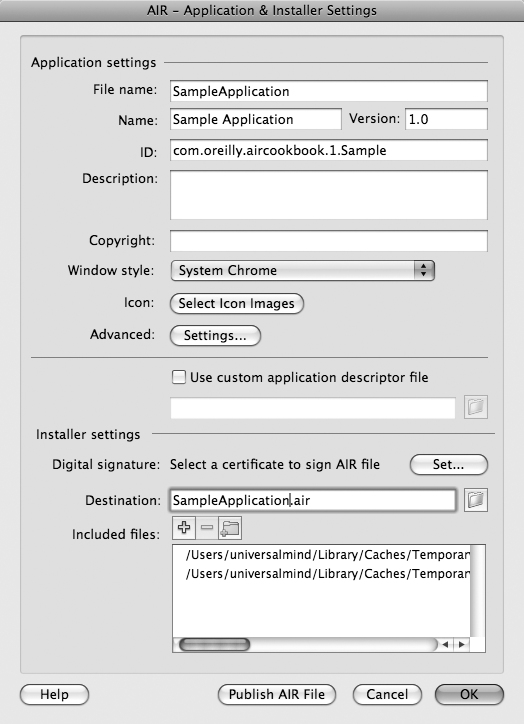
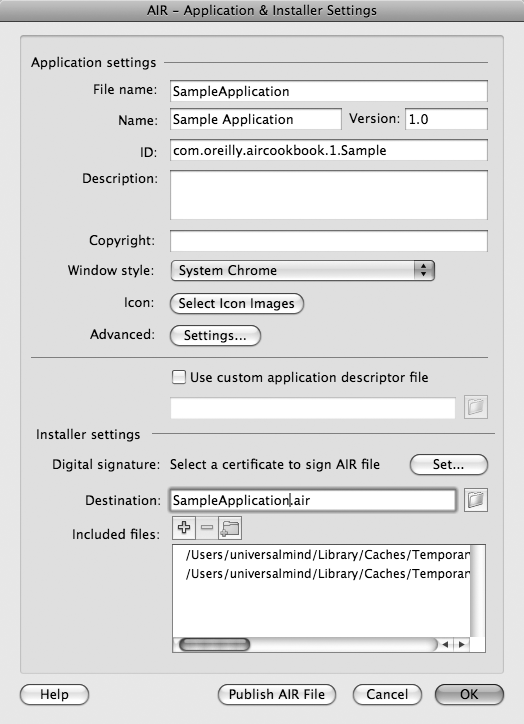
After you’ve created the file, save the Flash file. Next, you will be able to adjust the application settings, which will be reflected in the application’s application descriptor file. You can find these settings in the Commands→AIR – Application and & Installer Settings menu in Flash CS3. In Flash CS4, you’ll find this in the File→AIR Settings menu. Choosing either opens the AIR – Application & Installer Settings dialog box (Figure 1-4).
Running and Debugging Your AIR Application
After you create an AIR application in Flash, you can run your application just as you would run a Flash movie. If you choose Control→Test Movie, your AIR application should launch in a new window. Just as with normal Flash development, the Flash debugger is available to debug your AIR application. To debug your AIR application, choose Debug→Debug Movie.
Creating and Running an AIR Application with HTML and JavaScript
Solution
Use the application descriptor file template and the command-line tools included with the free Adobe AIR SDK to create and run an HTML/JavaScript AIR application.
Discussion
Several HTML/JavaScript development environments include built-in support for working with Adobe AIR applications including Adobe Dreamweaver and Aptana Studio. Regardless of your development environment, you can test and package AIR applications using the command-line tools included with the free Adobe AIR SDK. This lets you use any development environment that you are already comfortable using.
Creating a New AIR Application
A JavaScript AIR application consists of a minimum of two files: the application descriptor file, which defines the application settings, and a main HTML file that contains the content for the application. The AIR SDK contains a template for the application descriptor file, and you can copy this into the same directory as your main content HTML file. Chapter 2 in this book contains details on configuring this file for your application.
These two files are the only required files, but you will want to include a few additional files. AIRAliases.js provides aliases to the AIR APIs, and AIRIntrospector.js provides a debugging environment for your AIR application. You can find both of these files in the frameworks directory of the AIR SDK. You can copy both of these files into the same directory as your main content HTML file. They will also need to be included in the head of your HTML file:
<script type="text/javascript" src="AIRAliases.js"></script>
<script type="text/javascript" src="AIRIntrospector.js"></script>
Be sure to include the AIRAliases.js file before any code that
uses the AIR APIs. If you do
not, you will need to use the fully qualified name of the API
names. For example,
if you do not include the AIRAliases.js file, you must type window.runtime.flash.display.NativeWindow
instead of air.NativeWindow.
Running Your AIR Application
To run your newly created AIR application, you can use
the adl command-line tool from the
AIR SDK; you can find this file in the bin directory of the AIR SDK.
This doesn’t create a distributable .air file, but it lets you run the
application in your development environment. To run the application,
you need to pass your application descriptor file as an argument of
adl:
adl application.xml
This assumes the application files are in the same directory as
your application descriptor file. If you entered it correctly, you
should see your application open in a new window. Although it is easy
to use the adl command, the
developer environments mentioned earlier can make this process even
easier.
Debugging an AIR Application with JavaScript
Solution
Use the AIR application Introspector that is included with the Adobe AIR SDK.
Discussion
Many JavaScript developers are used to debugging their applications with tools such as the live code environment in Dreamweaver CS4 or browser-based tools such as Firebug during their development process. Because AIR exists outside the browser, these traditional tools for debugging JavaScript applications are not available. As an alternative, Adobe includes the Adobe AIR Introspector for JavaScript applications in the Adobe AIR SDK. The Introspector provides a debugging experience similar to traditional JavaScript debugging tools.
To include the AIR Introspector in an application, you first need to include the AIRIntrospector.js file in your project. You can find this file in the frameworks folder in the Adobe AIR SDK. You then need to include this file in your root document file:
<script type="text/javascript" src="AIRIntrospector.js"></script>
You now have access to the full features of the AIR Introspector
within your application, and while running your application, you can
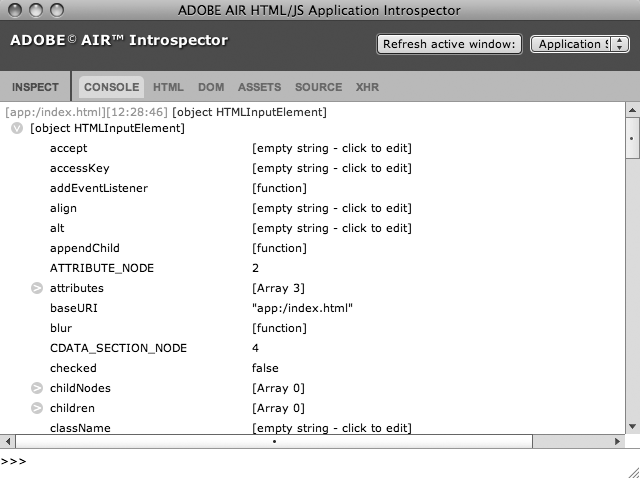
press F12 to launch the debugging window (Figure 1-5). In addition, the
methods for writing to the Introspector console are now available in the
air.Introspector object.
Logging to the Introspector Console
The Console tab within the Introspector gives you the
ability to trace both simple and complex objects. It has five main
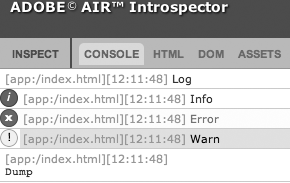
methods for writing data to the console: log, warn, info, error, and dump (Figure 1-6).
The methods log, warn, info, and error all work the same, but they display a
different icon depending on the method. These methods let you view and
edit complex data, because the console receives a reference to the
actual object you pass into it.
The console displays an object with all its properties, and you can click each property and edit its value.
The dump method provides
similar functionality, but it provides a copy of the data. Because of
this, the data is not editable, but rather it gives you a snapshot of
the state of the data at a given point.
Viewing the DOM and Application Source
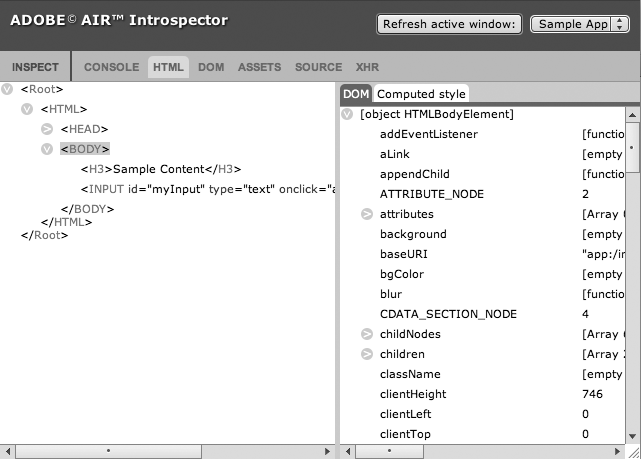
Three of the tabs within the Introspector let you view Document Object Model (DOM) and source information. The HTML tab lets you view the DOM in a tree (Figure 1-7). Click an item within the tree to see all its properties in the pane on the right.
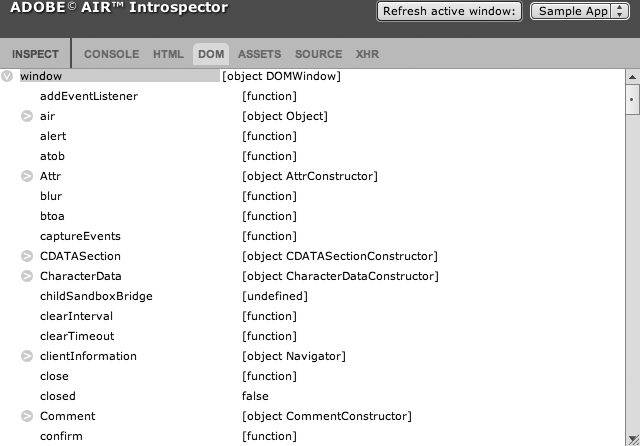
The DOM tab lists all the DOM properties (Figure 1-8). To edit them, click a property, and change its value.
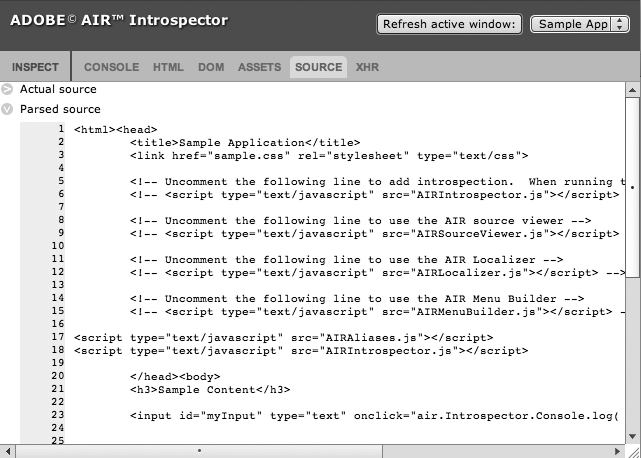
The Source tab lets you view both the actual and parsed source for your application as well as the source of your application files (Figure 1-9).
Visually Inspecting Application Elements
The Introspector also lets you visually inspect application elements. You can enter Inspect mode by clicking the Inspect button in Introspector. While in Inspect mode, you can mouse over an application element. The elements will appear with a yellow background and outline. In this mode, when you click an element, it is selected in HTML view, and you can interact with the element’s properties.
Monitoring Network Communication
If you use XMLHTTPRequest within your application, you
can monitor each of these requests on the XHR tab. This tab works in a
similar manner to traditional debugging tools that let you view
responseText and responseXML from your requests.
Note
In addition to the AIR Application Introspector, AIR 1.5 allows for step-debugging of HTML/JavaScript applications. For more information see the Adobe AIR 1.5 SDK.
Signing and Exporting an AIR Application
Solution
Sign your AIR application with a self-signed certificate with your AIR development tool, and then export the application as an .air file.
Discussion
AIR applications must be signed to be installable. This provides a level of security that is needed for desktop applications. For developers coming from web applications, using certificates may seem scary. However, AIR makes the certificate process easy, and the development environments for AIR provide easy ways to generate certificates and sign applications.
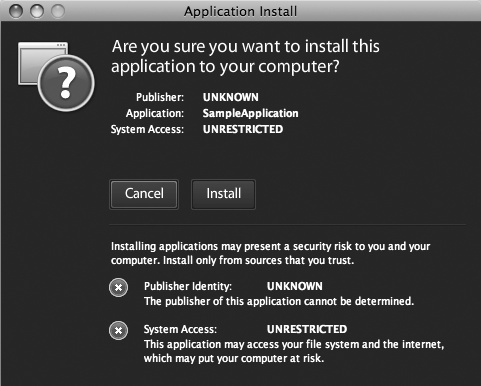
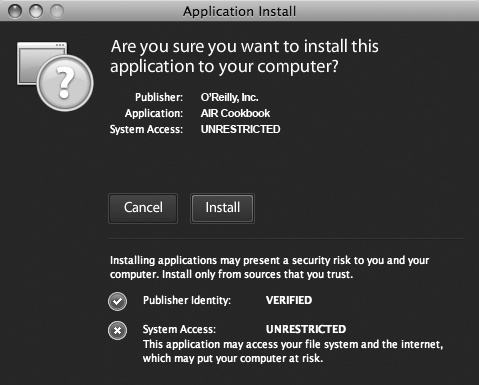
No matter which development environment you are using, the certificate process requires two steps: creating a certificate and signing your application with that certificate. You can use a single certificate multiple times with multiple applications, but you have to sign the application each time it is packaged into an installable AIR application. Figure 1-10 illustrates the installation dialog box with a self-signed certificate.
When signing with a self-signed certificate, the publisher listed in the installer is not verified. To have the publisher value verified, you will need to use a trusted certificate authority (you can find a list of supported certificates in Signing an AIR File with a Trusted Certificate).
Signing and Exporting in Flex Builder
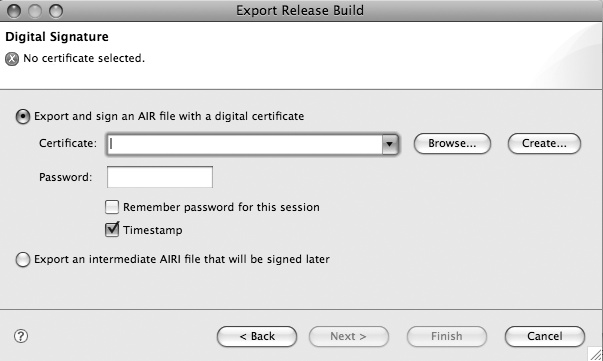
When you attempt to package and export your AIR application in Flex Builder, you will be asked which certificate you will be using to sign your application. Also, an alternate option lets you export an AIR application as an unsigned package. This type of packaged file has the extension .airi, and this type of package is not installable. To export an installable application, you need to select the first option: “Export and sign an AIR file with a digital certificate” (Figure 1-11).
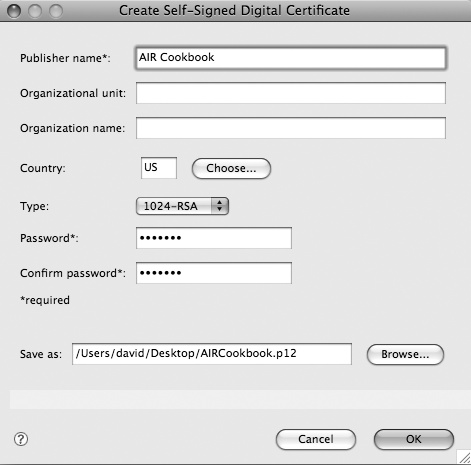
The Export Release Build dialog box also gives you the option to create a certificate if you do not already have one. If you click the Create button, you will be presented with a new dialog box that enables you to create a new certificate (Figure 1-12). This dialog box requires you to enter a publisher name, a password, and the location where you want to save your certificate. You can enter a unique identifying piece of information for the publisher name. You need to remember the password that is entered when creating your certificate, because you must enter this value each time you sign an application. Be sure to remember where you save your certificate, because you can use it to sign all your AIR applications. Be sure to also back up your certificate.
Once you click the OK button, you will be taken to the Export Release Build dialog box, and the information for your certificate will be populated in the Certificate field. You will need to enter your password in the Password entry field. You can also click the “Remember password for this session” check box so you will not have to enter the password each time you export this AIR application. Once Flex Builder is closed and reopened, you will have to reenter the password. Once the password has been entered, you can proceed through the dialog box and export your AIR application as an installable AIR file.
Signing and Exporting in Flash
You can find the certificate settings for a Flash AIR application in the AIR – Application & Installer Settings dialog box (Figure 1-13), which you can launch by selecting File→AIR Settings in your AIR application. If you are using Flash CS3, you can select Command →AIR Application & Installer Settings.
Before you export your AIR application, you must select a certificate. Click the button next to the Digital Signature field to set the digital certificate for your application.
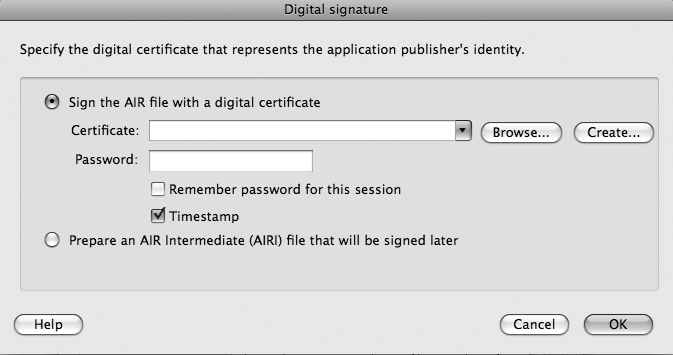
Next, you are prompted either to select a certificate for the application or to prepare the application as an unsigned .airi file, which can be signed later (Figure 1-14). In this case, be sure the first option is selected. If you do not already have a certificate, click the Create button.
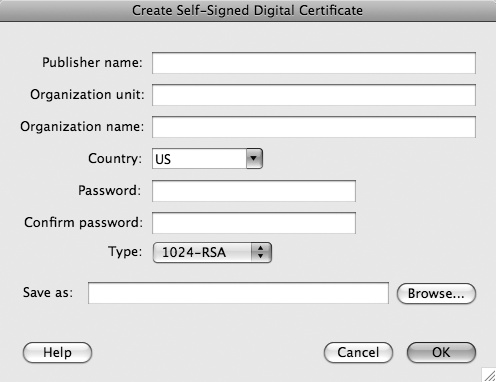
You are now prompted to enter the information for your new certificate. You need to fill in every field in the Create Self-Signed Digital Certificate dialog box (Figure 1-15). You need to remember where you store the certificate as well as the password associated with this certificate. The password needs to be entered each time the certificate is used to sign an AIR application.
After the certificate is created and selected, you need to enter your password. After this is complete, you are returned to the AIR – Application & Installer Settings dialog box. At this point, you are able to export your application as an AIR installable package by clicking the Publish AIR File button.
Signing and Exporting with the AIR SDK
You can use the Adobe AIR SDK command-line tools to generate a certificate, sign an AIR application, and export the application as an installable .air file. These command-line tools are actually what power these features in Flash and Flex Builder. You can find the command-line utilities in the bin directory of the AIR SDK.
The first step in exporting your application is to create a new
self-signed certificate if you do not already possess one. You
accomplish this by using the adt
command-line utility. If you use this command with the -certificate option, you can generate
certificates. You
also need to pass in the certificate name, the key type for the
certificate, the output filename, and the password for the
certificate. For example:
adt -certificate -cn SampleCertificate 2048-RSA sampleCert.p12 password
In this example, the -certificate switch tells adt you want to create a new certificate.
Next, the -cn switch tells it you
want to use SampleCertificate as
the common name for the certificate. Next, the key type is set to
2048-RSA, but you could use
1024-RSA as well. Finally, the
output pathname and password are passed in. After you run this
command, a sampleCert.p12 file
appears in your current directory.
You can also use the adt
utility to sign and package your application. You need to pass in your
application descriptor XML file as well as your certificate to
generate a packaged and installable .air file. Consider this example:
adt -package -storetype pcks12 -keystore ../sampleCert.p12 sampleApp.air application.xml .
In this example, the AIR application is signed using a
certificate with a filename of sampleCert.p12 in the parent directory. The
storetype is defined as pcks12. The application will be exported as
sampleApp.air in the current
directory. Next, the application descriptor file, application.xml, from the current directory
is passed into adt. The last items
that are passed into adt are the
files that need to be compiled with the application. In this case, a
period signifies that everything in the current directory and its
subdirectories are included. Individual files could also be listed and
separated with a space.
Note
Be sure not to include your certificate file in your AIR application. The can result in security concerns and is an unsafe practice. To avoid this, be sure to not store a certificate in the same directory as your application files.
After you run this command, you will have in your current directory a sampleApp.air file that is signed with the certificate you created. This will be an installable AIR file that you can distribute.
Signing an AIR File with a Trusted Certificate
Solution
Obtain a trusted certificate from one of the vendors selling code-signing certificates for AIR applications.
Discussion
Signing an AIR application with a commercial certificate is the same process as signing an AIR application with a self-signed certificate. The only difference is the certificate used. The two companies that currently offer trusted certificates that can be used with AIR are VeriSign and Thawte.
It is important to note that the certificates used with AIR are code-signing certificates. These certificates are different from certificates used with secure web servers. Currently, the following types of certificates are supported for signing AIR applications:
VeriSign
Microsoft Authenticode Digital ID
Sun Java Signing Digital ID
Thawte
AIR Developer Certificate
Apple Developer Certificate
JavaSoft Developer Certificate
Microsoft Authenticode Certificate
Note
Additional certificate options will be available for AIR 1.5. At the time this book went to press, this list had not been finalized.
You can use one of these certificates to sign your AIR application. This causes the installer to appear differently, demonstrating that the publisher of the application has been verified. The name of the publisher will also be displayed (Figure 1-16).
You can read more about code-signing certificates for AIR at these addresses:
Understanding Synchronous and Asynchronous Programming in AIR
Problem
You need to determine which programming method is appropriate for working with the local database and the file system in your AIR application.
Solution
Weigh the benefits of both synchronous and asynchronous programming for your specific situation.
Discussion
Most developers who have worked in Flash or JavaScript are used to a synchronous programming model. This just means that each line of code is executed and completed before moving to the next line. In most situations, this works fine; however, in some circumstances, this is not ideal.
Both the file system API and the API for the SQLite embedded database have synchronous and asynchronous methods for many pieces of functionality. The following examples specifically highlight the benefits of each model in relation to the file system API. (The file system API is covered in Chapter 9.)
Advantages of Synchronous Programming
One main advantage to synchronous programming is having less code that is less complex. This can be a big advantage when working with a prototype or wireframe application. Consider this ActionScript example:
var myFile:File = File.documentsDirectory.resolvePath("textFile.txt");
var fileStream:FileStream = new FileStream();
fileStream.open(myFile, FileMode.READ);
var fileData:String = fileStream.readUTFBytes(fileStream.bytesAvailable);
fileStream.close();
In this example, the open
method of the FileStream class is
completed before moving on to the next line. In most cases, this is
not a problem, but what if the file is a very large file? With
synchronous programming, the application is frozen while this open
method is executing, so no user interaction is possible until this
method has finished executing.
Advantages of Asynchronous Programming
Asynchronous programming provides the best experience for the
user. You have more code and have to respond to specific events, but
the user can still interact with the application. The following code
block has the same functionality as the code in the synchronous
sample, but in this case it uses the asynchronous versions of the
FileStream class’s open method, openAsync:
var myFile:File = File.documentsDirectory.resolvePath("textFile.txt");
var fileStream:FileStream = new FileStream();
fileStream.addEventListener(Event.COMPLETE,handleComplete);
fileStream.openAsync(myFile,FileMode.READ);

function handleComplete(event:Event):void {
    var data:String = fileStream.readUTFBytes(fileStream.bytesAvailable);
    fileStream.close();
}
In this case, the code continues to execute after the openAsync method, but an event listener
needed to be added to the instance of the FileStream class. This let the application
know when the method had finished executing. Although this may seem
like only a little extra code, the amount of extra code needed can
increase exponentially when asynchronous method calls are chained
together.
Note
Throughout this book, you will see that a majority of the examples are asynchronous. This has been done on purpose. First, as mentioned earlier, it provides the best experience for the end user. Second, if a developer can program asynchronously, transitioning to synchronous programming is easy. However, the reverse is not true. All the examples could be easily converted to synchronous programming if needed.
Get Adobe AIR 1.5 Cookbook now with the O’Reilly learning platform.
O’Reilly members experience books, live events, courses curated by job role, and more from O’Reilly and nearly 200 top publishers.
