Chapter 8: Working with Painting and Retouching Tools
In This Chapter
- Working in the Swatches panel
- Getting to know foreground and background colors
- Introducing painting and retouching tools
- Using the Content-Aware feature
- Discovering blending modes
- Saving presets for tools
This chapter explains how to use the painting and retouching tools in Photoshop. Have fun and be creative! Because Photoshop is pixel based, you can retouch your images and also create incredible imagery with the painting tools. Smooth gradations from one color to the next, integrated with blending modes and transparency, can lead from super-artsy to super-realistic effects. In this chapter, you discover fundamental painting concepts, and we show you how to use retouching tools to eliminate wrinkles, blemishes, and scratches. Don't you wish you could do that in real life?
Using the Swatches Panel
Use the Swatches panel to store and retrieve frequently used colors. The Swatches panel enables you to quickly select colors and gives you access to many other color options. By using the panel menu, where you see the cursor in Figure 8-1, you can select from a multitude of color schemes, such as Pantone or web-safe color sets. These color systems are converted to the color mode in which you're working.
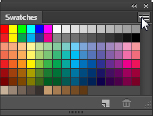
Figure 8-1: Click the panel menu to access additional color options.
To sample and store a color for later use, ...
Get Adobe Creative Cloud Design Tools All-in-One For Dummies now with the O’Reilly learning platform.
O’Reilly members experience books, live events, courses curated by job role, and more from O’Reilly and nearly 200 top publishers.

