In addition to the video track and audio tracks in each timeline, the DVD specification also provides for up to 32 subtitle tracks, each containing text or graphics overlays that can appear over the video as it is played. Each of the 32 subtitle tracks can contain different overlays, synched to the video playback so that they appear at a specified timecode and are displayed for a specific amount of time.
The DVD specification actually supports both subtitle and menu button highlights using the same subpicture overlay mechanism. With this method, Encore stores a graphics overlay plane that can be optionally displayed on top of, or even blended with, the background video. Unfortunately, subpictures provide a very limited selection of colors: four colors (actually three colors because one is used to mark areas that are transparent), plus the opacity blending percentage. An example of how a subpicture overlay works is shown in Figure 4-20.
On the plus side, subpictures are stored as graphics, not text, which means that subtitles do not have to contain only text; they can also be graphics, or a combination of both text and graphics. In addition, they do not have to appear at the bottom of the frame: they can be positioned anywhere in (and even completely covering) the entire frame. This can open up interesting possibilities for mixing overlay planes, well beyond plain text annotations on top of video.
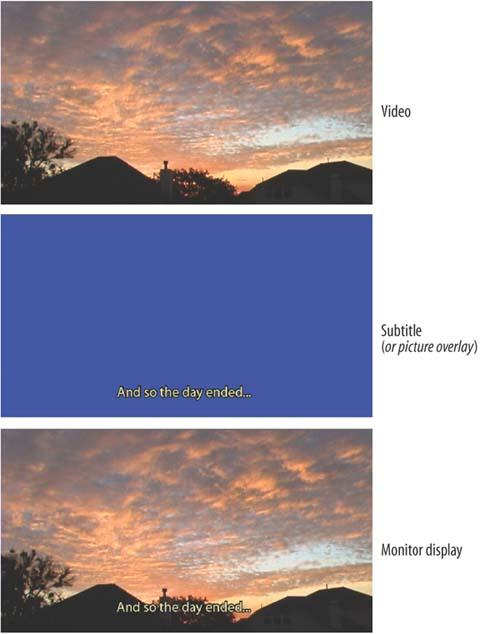
Figure 4-20. Overlays, such as those for subtitles, consist of only a group of four colors. In the middle frame, we see the colors used: yellow for the text, black for the text drop shadows, hazel for antialiasing on the letters, and blue to mark the transparent areas.
Encore provides an easy method for doing simple subtitles: just type them directly into the Monitor window. In addition, if you need more sophisticated mechanisms for complex projects, you can import an entire track of subtitles from an external script file. But let’s start by entering the text manually.
The simplest way to enter subtitles in a timeline is to type text directly into the Monitor window. To enter subtitles directly into a timeline, do the following:
Make sure the Timeline window is active. In addition, make sure that the correct timeline is showing by clicking the desired timeline tab.
Create a subtitle track if there isn’t one already. You can do this by choosing Timeline → Add Subtitle Track (or use the right-click context menu) to add a new track below the horizontal splitter bar.
Choose the target track. Make sure the subtitle icon is selected next to the track that you want to use, ensuring that it will be the one edited in the Monitor window.
Position the timeline playhead. Position the timeline playhead at the timecode where you want to start displaying the subtitle.
Be sure that the subtitles are not outside of the safe areas. Adjust the Zoom Level of the Monitor window so that the entire window is visible, and choose View → Show Safe Area (or click the Show Safe Area button next to the zoom value) to display the safe area guides to show the visible region of the frame when displayed on televisions.
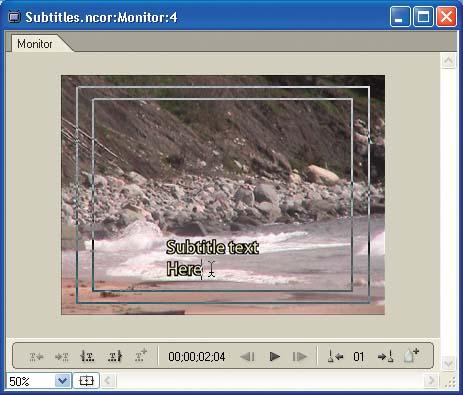
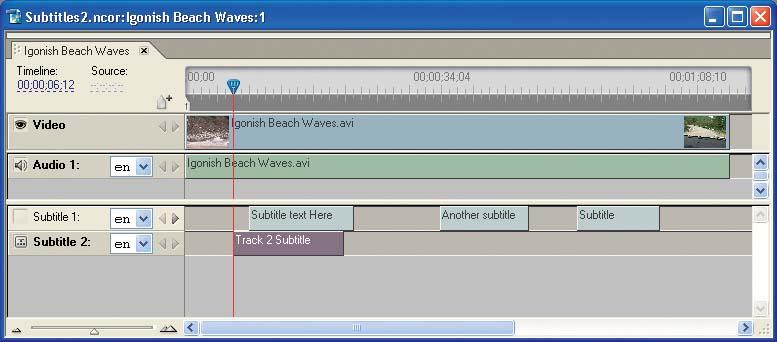
Enter the subtitle text. Select the Text tool from the toolbox, and move the cursor to the Monitor window. The cursor shape changes to a text I-beam within a dotted box. The horizontal line near the bottom of the I-beam marks the position of the text baseline, the line on which the type rests. Then click and start typing text, and press ESC or click the Selection tool when done. Encore adds a new subtitle clip in the selected subtitle track with a default duration. See Figure 4-21.
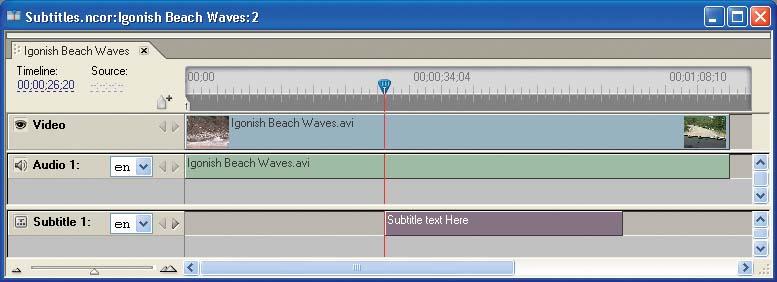
Note that Encore adds the subtitle to the track in the timeline with a default duration of two seconds, as shown in Figure 4-22. To change the default duration for subsequent new subtitles, choose Edit → Preferences → Timelines and change the Default subtitle length.
Create more subtitles as needed. If you need to create another subtitle, move the timeline playhead to another open space on the subtitle track, and type the new text in the Monitor window. In this way, you can enter a series of subtitles to appear in sequence over the video when the timeline is played on the DVD.
Warning
As you are entering and editing subtitles, make sure the track icon is selected and the timeline playhead is positioned over the associated area of the subtitle track in the Timeline window. The text, and associated bounding box, will not be visible in the Monitor window if the playhead is beyond the edges of the subtitle in the track.
Once you have finished entering the subtitle, it is displayed on the Monitor window with a blue bounding box with square handles. You can reposition the text with the Selection tool by dragging it with the Selection tool, or resize it with the handles. You can also edit subtitle text as usual: click with the Text tool within the text area to add new text, or click and drag over the characters to select and replace the text.
When manually typing in subtitles, you can enter multiple lines of text in a single block by pressing Enter between each line. Alternatively, you can click and drag with the Text tool to define a bounding box for the subtitle, and then enter multiple lines up from the bottom of the box—each line of text will move up when its allotted space is exceeded. If you need to, you also can use the Vertical Text tool to enter text vertically down the screen.
Encore allows you to type in only one subtitle at any given time within a single subtitle track. If you want to add more text in a different area of the screen, you’ll need to expand the bounding box of the subtitle and position your text accordingly.
At first glance, you may not like the font or position of your subtitles. Don’t worry. Encore provides the Character palette to set text styles and layout properties. Much like a word processor (and similar to Photoshop), you can set character properties before typing to apply them to a new subtitle, or select individual characters to restyle and reformat text in an existing subtitle. Just be sure to select the corresponding subtitle track in the Timeline window, and position the playhead over the subtitle that you want to edit so that it is displayed in the Monitor window.
Note
The Color field in the Character palette is not available for subtitles—it will always appear as a neutral color. Because DVD subtitles are actually implemented as subpicture overlays, the colors must be defined using a limited set of palettes, as described in the upcoming “Color sets” section.
In addition, you cannot set the anti-aliasing options for subtitles. This is because only one color is available for use with anti-aliasing, and Encore cannot calculate percentages of colors to blend with the background.
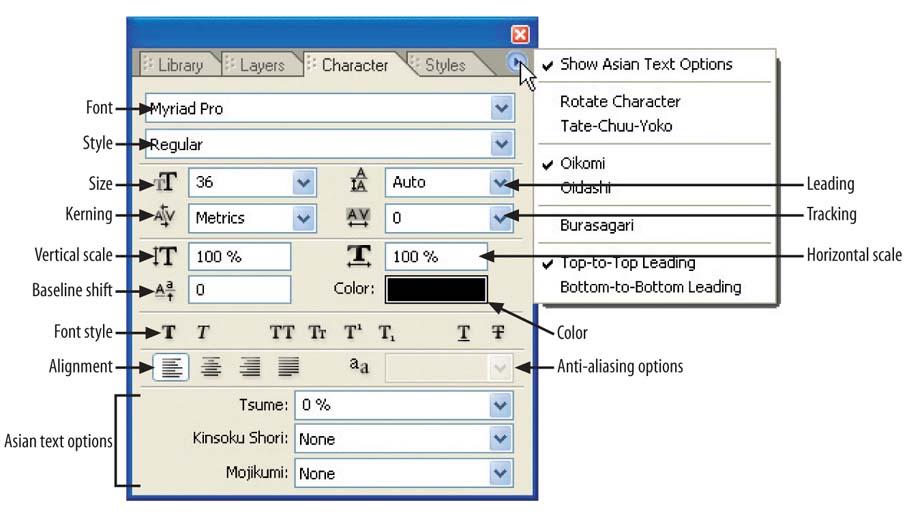
The Character palette contains several groups of fields to set typographic properties (see Figure 4-23). To edit Asian text, use the palette wing menu to choose Show Asian Text Options to display the additional fields at the bottom of the palette. See Chapter 5 for more details on the Character palette.
Here is a description of the less obvious properties.
- Kerning
Kerning is the narrowing of space between two compatible letters (such as “A” followed by “V”) so that they take up less space on the screen.
- Vertical scale
Vertical scale lets Encore know, in terms of a percentage, how much to vertically stretch or squish the letters.
- Baseline shift
This value indicates how much to shift up, in pixels, the lowercase letters from the baseline.
- Leading
Leading is simply the amount of space between lines. Pronounced like the metallic element (i.e., "leading,”) the term comes from the use of a thin strip of metal used to measure space between lines on a printing press.
- Tracking
Tracking indicates the average amount of space between all letters in a line. Note that this isn’t the same as kerning, which specifies the distance between only compatible letters.
- Horizontal scale
Just like vertical scale, horizontal scale lets Encore know, in terms of a percentage, how much to horizontally stretch or squish the letters.
- Color
This indicates the base color of the subtitle. You cannot configure this option here because subtitles use color sets, which we’ll discuss shortly.
- Anti-aliasing Options
This indicates how Encore should handle anti-aliasing of the text. Again, you cannot configure this option here because Encore uses only one color to assist with anti-aliasing. Hence, the option is always disabled.
Remember, you can scale the subtitles by using the blue bounding box surrounding the text. Choose the Selection tool on the Tool palette and drag one of the square handles to resize horizontally and/or vertically. Note that this updates the corresponding fields in the Character palette (see Figure 4-24).
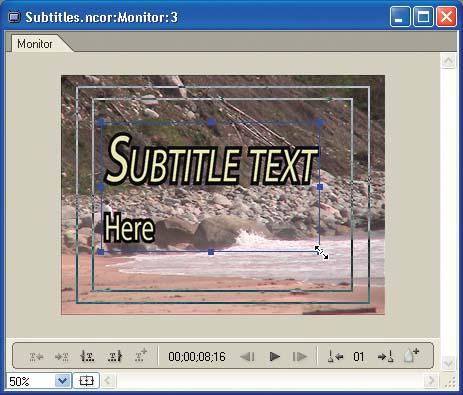
Figure 4-24. Drag the text bounding box to resize the subtitles, or set text properties in the Character palette.
As is common in Encore, you can set the properties of multiple items at the same time. So, for example, to set consistent text properties across a group of subtitle clips, select the clips in the Timeline window (using Ctrl-click), and then make your modifications to the Character palette. Any attributes that you then modify in the Character palette will be applied to all the selected subtitle clips.
As we mentioned earlier, the same DVD subpicture overlay plane is used for both subtitles over video and highlights over buttons on menus. But the overlay is very limited, supporting only 2-bit, four-color images. The overlays are stored as full-screen color-mapped images, with the pixel values used as an index into a group of actual color values. Because one of the four values is used for transparency (to show through the contents of the video track), subtitles actually are limited to only three colors. The three colors that are chosen are called a color group.
However, each timeline can have up to three different groups of three visible colors (for a total of 9 colors). This is called a color set in Encore. Any subtitle clip in the timeline can reference any of the three groups in the timeline’s color set. This provides up to nine colors for use in subtitles per timeline, which allows some variation for highlighting special occurrences of words, but not enough variation to have custom colors for each of the 32 possible subtitle tracks.
When you type subtitle text directly in the Monitor window, or import text from a text script file, Encore actually renders the text characters into the final subtitle overlay image based on your selected text formatting attributes. In this case, Encore uses the three colors for the following purposes as it creates the text:
- Fill color
The main body of the character
- Stroke color
The surrounding outline to highlight the character against the background
- Anti-alias color
An additional color typically used to fill in along diagonal edges to reduce the visibility of stair-stepping along rectangular pixels.
You specify a color set and group when you create subtitles in the Timeline properties palette. However, you can change a timeline’s color set or a clip’s color group at any time. Because the text (or images) of the subtitles are color-mapped, it’s easy to change the color values used in a color set and quickly update the look of your subtitles over an entire project.
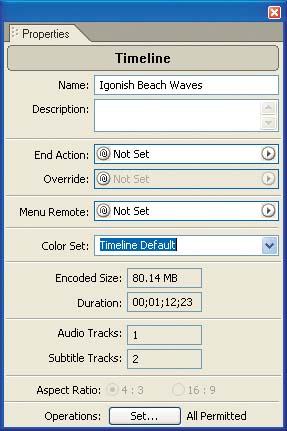
To define or change the color set used for a timeline, use the Properties palette for the timeline (see Figure 4-25). To display the properties for the timeline, click to select the timeline in the Project window, or click an empty area in the Timeline window.
To select the color group for an individual subtitle clip (or group of clips), select the clip(s) in the Timeline window and display the Properties palette, as shown in Figure 4-26. For text subtitles that Encore is rendering, you also can specify the weight of the stroke outline around the body of the text, and the alignment of the text within the bounding box.
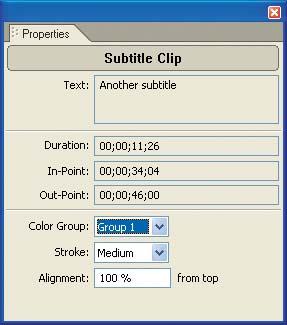
Figure 4-26. Use the Properties palette for an individual subtitle clip to change the color group and text properties.
To define the color sets used for timelines, choose Timeline → Edit Timeline Color Sets. Encore displays the Timeline Color Set dialog, showing the three color groups defined for each color set (see Figure 4-27).
With this dialog, you can edit the default color set, or click the New Color Set button to create a new color set to use with the project. In addition, the two diskette icons near the top center will allow you to export or import a color set into a file (with a .cs extension), which you can then import into another Encore project. Also, note the checkboxes that say Create Anti-alias color from Fill and Stroke. This can be a lifesaver in terms of coming up with a good anti-alias color for your subtitle text color set—I don’t recommend creating your own unless you have to.
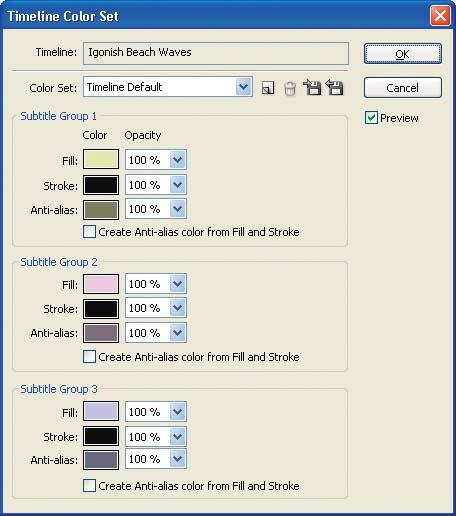
Figure 4-27. Use the Timeline Color Set dialog to define the color sets used to display subtitle overlays.
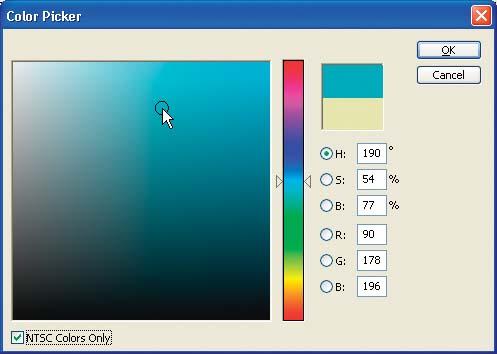
Try entering new color values as desired for each subtitle group, and use the Opacity drop-down menu to select an associated opacity value for blending with the video track (0% is fully transparent). To set a color value, click the associated color swatch to display the Color Picker dialog, as shown in Figure 4-28.
The Color Picker is a fairly standard dialog, but we should check the NTSC Colors Only box at the bottom-left of the dialog. This is an important option if you’re working with NTSC. You can use this to limit the color selection to NTSC-safe colors that are possible to display on NTSC televisions. Otherwise, you may accidentally use colors that are “too white” or “too black” to be broadcast over NTSC.
To choose a new color, slide the triangle indicators on the color spectrum bar to choose the base color hue range. Then click in the color field to select a saturation and brightness within that hue. Or, type numeric values directly into the HSB or RGB fields. The current selection and original color appear in the color swatches at the top right of the dialog.
After you create all the subtitles for a single track, you may need to repeat the process to add additional subtitle tracks, say, in another language. A simple cut and paste can help you here. However, there are three things to remember:
Be sure to activate the subtitle track you want to view in the Monitor window by selecting the subtitle track icon at the left edge of the associated track. The Monitor window always displays the contents of the marked audio and subtitle tracks, at the timecode of the current position of the playhead.
The Properties and Character palettes, on the other hand, always display the attributes of the currently selected object (or multiple objects), independent of what is being displayed in the Monitor window (see Figure 4-29).
To both view a subtitle and edit its properties, you must select the icon for the track and position the playhead over the subtitle clip (to view it in the Monitor window) and then select it in the Timeline window (to view its settings in the Properties and Character palettes). To make the currently selected tracks visible in the Timeline (if they are scrolled out of view), choose Timeline → Bring Tracks Into View.
As with audio tracks, the subtitle track that is actually displayed with a DVD can be selected in several different ways, by either the DVD author or the viewer. When previewing your DVD projects in Encore, you can choose the default audio and subtitle language under Edit → Preferences → Preview.
To tag subtitle or audio tracks with a language code, click the drop-down Language menu to the right of the track name on the timeline and choose one of the predefined DVD language codes. However, be sure to remember that, like audio tracks, a DVD player always references subtitle tracks by number, not by the language settings set in Encore. So, if you create a playlist with more than one timeline, and each timeline has two or more subtitle tracks (e.g., text commentary or alternate language), be sure to use the same numbered audio track for each type of subtitle throughout the timelines.
Entering subtitles directly in the Monitor window works well for quickly adding or modifying a few subtitles, but it’s a labor-intensive process for more complex titles. Consequently, Encore can import subtitle scripts, as well as plain text files with a list of timecodes, durations, and associated text (or images) to be displayed.
Scripts have tremendous advantages. They can be prepared offline, independently from the DVD authoring process, and can be imported from special-purpose captioning tools. They can be imported quickly into Encore to add subtitles to an entire track in one operation. They are plain text, and therefore easy to edit, making it easy to make corrections and just reimport if needed. Scripts also go beyond plain text to support overlay images, which provide the option of arbitrary text and graphics overlays that also can be prepared offline.
To update the subtitles in an existing project, you can import a script into a track that already contains subtitles. If the timecodes overlap, the imported subtitles will replace the old entries in the track. Otherwise, the original entries will be retained in the track.
Encore can import three types of subtitle script files:
Plain text script files (similar to entering text in the Monitor window)
As well as two image-based formats:
Image Script Files
FAB format image script files
For all three formats, you also still need to specify the color sets used to display the overlaid subtitles.
Encore can import script files in any text file (TXT) that is saved in ASCII, ANSI, or Unicode (UTF-8, UTF-16) formats. Script files containing any Unicode characters must be saved in Unicode format. The simplest script file format is a list of the text to be displayed, with the associated start and stop timecodes.
The general format for text scripts is:
Subtitle-Number Start-Timecode End-Timecode Subtitle-Text
Each subtitle starts on a new line, prefixed by the sequential subtitle number. Subtitles with multiple lines of text can be continued on following lines. For example:
	1 00;00;01;02	00;00;03;12		This is subtitle 1
	2 00;00;05;13	00;00;07;25		This is subtitle 2 Subtitle 2 includes a
		second line
	3 00;00;09;27	00;00;13;23		This is subtitle 3
Much like typing text into the Monitor window, and unlike the image script formats, text scripts contain the plain text characters that Encore will render into the subtitle overlay. When you import the text scripts, Encore will prompt to position and format the text. Once the script is imported, you can further edit each subtitle in the Monitor window, or apply formatting in the Character palette much like we did earlier.
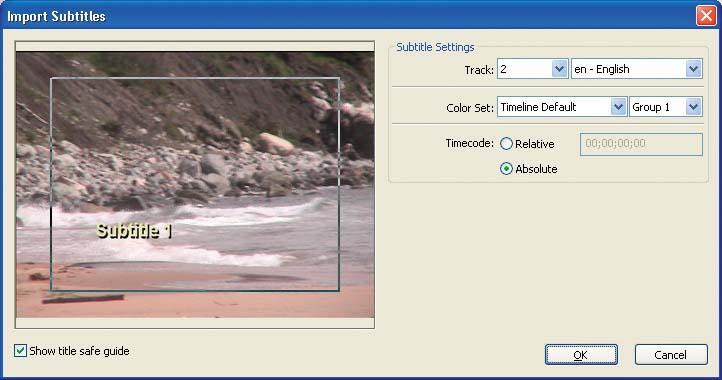
To import subtitles from a text script file, choose Timeline → Import Subtitles → Text Script (or use the right-click context menu). Encore displays an Open dialog to select the subtitle file, and then displays the Import Subtitles (Text Script) dialog (see Figure 4-30). This very busy dialog combines the subtitle import settings with the text attributes to be used in rendering the imported text. Here are the options of the Import Subtitles dialog in more detail:
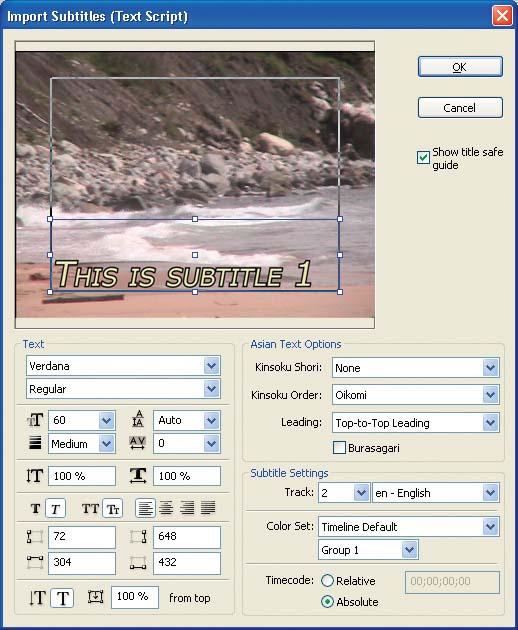
Figure 4-30. Use the Import Subtitles (Text Script) dialog to specify the layout and formatting of imported subtitle text.
- Show title safe guide
You can check the show title safe guide box to show an overlay rectangle of the safe area for title text.
- Text settings fields
Use the text settings fields to specify the text attributes, similar to the Character palette. You can also specify the stroke weight surrounding the text characters. Encore updates the sample text in the preview window accordingly.
- Bounding box
Drag and resize the blue text bounding box to position the subtitle text within the frame, or edit the left, right, top, and bottom edge values at the bottom of the text settings area. Select horizontal or vertical orientation, and the alignment relative to the edge of the text box.
- Asian text options
Use the Asian text options for Asian text to specify character and line break handling and alignment.
- Subtitle settings
Use the subtitle settings to specify the destination track, language, and color set. If you select a subtitle track before importing, Encore defaults to inserting the subtitles in that track, but you can specify any destination track, or that a new track should be created.
- Timecode option
Use the timecode option to import the subtitles with the absolute timecode values defined in the script file, or to have Encore adjust the values relative to a specified starting timecode value. This is useful when the video clip has been trimmed and is out of sync with the subtitle timecodes, which may be specified in terms of the original captured video file.
Once you have configured the format for all the imported subtitles, click the OK button (or press Enter) to import the entire list of subtitles from the script file into the destination track.
As you’ll remember from the timecode displays in both the Timeline and Monitor windows, Encore uses different timecode formats for NTSC and PAL projects.
NTSC projects use drop-frame timecode, indicated by semicolons between the timecode numbers:
hh;mm;ss;ff (hours; minutes; seconds; frames)
PAL projects use non-drop-frame timecode, indicated by colons between the timecode numbers:
hh:mm:ss:ff (hours, minutes, seconds, frames)
If the timecode format in a subtitle script file does not match the project it is imported into, Encore will convert the value to the correct time for that format. Be careful to keep track of the timecode format when logging and editing your media files, or the subtitle scripts may be out of sync with the video and audio tracks. Encore also will convert timecode values if they are out of range. If an imported timecode value has a minutes, seconds, or frames value higher than 59, 59, or 29 (NTSC)/24 (PAL), respectively, the number will be converted to a legal timecode value.
Besides the text subtitle script files, Encore supports importing two other script file formats for importing subtitles as overlay images: Image Script and FAB format image script. (Although Encore simply calls the latter Image-based subtitles). Instead of specifying the text to be rendered and over-layed, these two formats include links to image files that contain the subtitle over-lays for each frame. As a result, the subtitle content can include graphics as well as text. The image file formats that Encore supports for subtitles are shown in Table 4-6.
When you import image-based subtitle scripts, the input images can have up to three colors (just as with the manually entered subtitles, that’s four colors, with one reserved for defining the transparent background area).
Table 4-6. Subtitle file formats supported by Adobe Encore
|
Format |
Comments |
|---|---|
|
Standard Windows image file format. Uncompressed, and therefore results in large files. | |
|
Popular Web image file format for graphics (logos, icons, animations), but not photos. Lossless compression, with limited color range (256 colors or less). | |
|
Popular compressed image file format for full-color natural imagery (photos, scanned images). Lossy compression, but with variable rates to trade off quality and size. | |
|
Newer format for lossless compression. Superior replacement for GIF, but not as widely supported. | |
|
Widely supported format for high-quality images, especially in desktop publishing, and for scanners and fax. Supports multiple compression formats. |
Once the scripts are imported into Encore, you must map the color values in the input images to the colors assigned in the timeline color sets.
The two script formats differ in terms of where the folder containing the image files is located, and whether the position of the subtitles can be set individually for each frame (you can use images smaller than full-frame). Again, because the DVD format uses color-mapped subpicture overlays for subtitles, the colors in the imported images must be mapped to a color set.
The general format for Image Inc. subtitle scripts is:
	Display Area (Left-Position Top-Position Right-Position Bottom-
	Position)
	Directory Image-Folder-Path
	Subtitle-Number Start-Timecode End-Timecode Image-File-Name
	Subtitle-Number Start-Timecode End-Timecode Image-File-Name
The first two lines define global settings for all the frames: the position of the images within the frames, and the folder in which the image files are stored (which must be an absolute path). These are followed by the list of subtitles, each starting on a new line, prefixed by the sequential subtitle number, and specifying the corresponding image file. For example:
	Display_Area (000 000 720 480)
	Directory C:\Project\Subtitles\Images\
	1	00;00;01;02 00;00;03;12 Subtitle_001.tif
	2	00;00;05;13 00;00;07;25 Subtitle_002.tif
The general format for FAB subtitle scripts is (all on one line):
	Image-File-Name Start-Timecode End-Timecode
	Left-Position Top-Position Right-Position Bottom-Position
Each subtitle starts on a new line, without any sequential subtitle number, and specifying the corresponding image file and pixel offset in that frame. The folder containing the image files will be specified when you import the script file. For example:
	Subtitle_001.tif 00;00;01;02 00;00;03;12 000 000 720 480
	Subtitle_002.tif 00;00;05;13 00;00;07;25 000 000 720 480
To import subtitles from an Image script or a FAB images script file, do the following.
Select the script to import. Choose Timeline → Import Subtitles → FAB Images Script or Timeline → Import Subtitles → Image Script, respectively. Encore displays an Open dialog to select the subtitle file. For the FAB format, Encore displays a Browse for Folder dialog to specify the folder containing the image files for each frame referenced in the script (the Image script format includes the folder information in the script file itself).
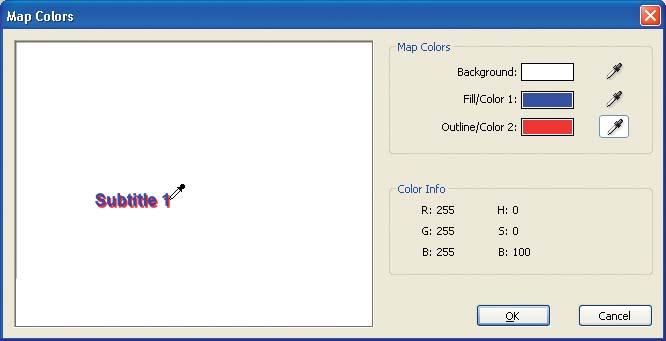
Map the colors to the subtitles. Encore then displays the Map Colors dialog to specify how the colors in the input images should be mapped using the DVD color sets. The subtitle overlay images can have only three colors, one of which is transparent. The colors in the input images are used only to identify the color-mapped regions, and are replaced by the colors specified in the selected color set when the subtitle is displayed.
In the Map Colors section, the background is the transparent color of the overlay image, the areas where the video track shows through. By convention, Fill/Color 1 and Outline/Color 2 are used for the body and the outline of the subtitle text, respectively. However, because these are image files, and can contain graphics as well as text, you can use these two colors in any way you want. If the subtitle overlay is smaller than the size of the frame, Encore will also make the area outside the image transparent as well.
Select the color value in the input image to be used for each of the three map colors, as shown under Color Info. Click the color chip to display the Color Picker, or click the eyedropper tool, position the cursor over a corresponding area of the imported image, and click to select the color at that location (see Figure 4-31).
Choose the import settings. After you specify the Map Colors, Encore displays the Import Subtitles dialog (see Figure 4-32). Unlike when you import a text script format, the position of the subtitles on the frame has already been specified in the script file, and there is no need to specify text attributes because you are importing the final rendered image, and not text characters. You need to specify only the destination track, color set, and timecode processing, and then you can import the subtitles.
Get Adobe Encore DVD: In the Studio now with the O’Reilly learning platform.
O’Reilly members experience books, live events, courses curated by job role, and more from O’Reilly and nearly 200 top publishers.

