So far, each framework that was reviewed in this chapter is an MVC-based architectural framework. They try to achieve the goal of separating the data flow into different tiers or classes based on the assumption that this would simplify the project management. In Flex project teams, these frameworks help to ensure that the person who creates the view doesn’t need to know where its model is. Why? Is this a real-world situation or an artificial prerequisite that results in additional overhead in your application?
Clear Toolkit is not an architectural framework; it is a set of open source Flex components and utilities that may be called an application framework. As opposed to architectural frameworks, application frameworks don’t just have a goal to organize developer’s code into tiers, but rather offer a set of enhanced classes and methodologies to make application developers more productive. Good examples of application frameworks are Microsoft Foundation Classes, Ruby on Rails, Swing Application Framework (JSR-296), and Powersoft Foundation Classes.
You can download all or some of the Clear Toolkit components at http://sourceforge.net/projects/cleartoolkit/, and see the interface in Figure 1-10.
The main goals of Clear Toolkit are:
To make software developers write less code by offering automatic code generation
To give enterprise developers a set of smart data-driven components (e.g., advanced data grid and form, explained in Chapter ) that would help developers in achieving the first goal—to write less code
The first version of this free and open source toolkit was developed by Farata Systems in 2006. It wasn’t branded as Clear Toolkit back then, but the authors of this book were using these components internally in multiple consulting projects. Two years later, we decided to document these tools so that other Flex developers could also benefit from them.

The components library is packaged in a clear.swc file that includes a number of
enhanced Flex components such as Datagrid, ComboBox, et al. Also included are:
- Clear Data Builder
An Eclipse plug-in that can generate CRUD applications for BlazeDS or LCDS based on a SQL statement or a Java data transfer object (DTO)
- DTO2Fx
A utility that automatically generates ActionScript classes based on their Java peers
- Log4Fx
An advanced logger (Eclipse plug-in) that is built on top of the Flex logging API but automates and make the logging process more flexible and user-friendly
- Fx2Ant
A generator of optimized Ant build scripts for Flash Builder projects
Clear Toolkit 3.2.1 includes the following additions:
Flex UI controls to support PDF generation on the client
A data synchronization solution for AIR/BlazeDS applications
This section demonstrates how to use CDB to generate an application working with Café Townsend employees. In Chapter , you’ll learn how to enhance some of the Flex components and work with those that are already included in clear.swc.
We haven’t included a diagram for the Café application generated
by Clear Data Builder (CDB), because it just uses a DataCollection object with an encapsulated
Flex RemoteObject—no additional
singletons, proxies, commands, or delegates are needed.
Before taking a deep dive into yet another version of Café Townsend, remember that neither Mate nor PureMVC support autosynchronization of the data offered by Data Management Services that are included in LiveCycle Data Services.
Using Employee.xml as a data
source simplifies the explanation of the framework’s basics, but in
real-world situations, more often than not, you need to persist the data
on the server. If you’ve added a new employee, adding a new value object
to an ArrayCollection in memory is
not enough. You need to persist it in a medium that survives computer
reboots and electrical blackouts.
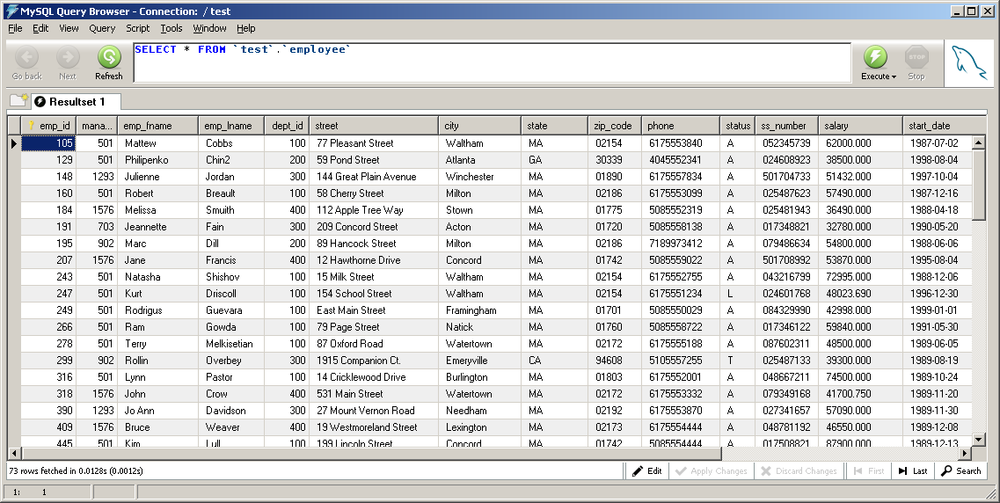
Clear Data Builder offers automatic code generation for both retrieval and persistence of the data, and to illustrate this, we’ll be populating Café Townsend’s employee list not with the data from an XML file but from a MySQL Server employee table stored in DBMS (Figure 1-11).
At the time of this writing, the latest version of CDB is 3.2.1; it requires Eclipse JEE, which comes with productivity plug-ins for web developers. You can download Eclipse JEE at http://www.eclipse.org/downloads/. Installing Eclipse JEE is just a matter of unzipping the downloaded file to a folder on your hard disk.
Installation of the plug-in version of Flex Builder 3 is also easy. Just go to http://www.adobe.com/products/flex/features/flex_builder/ and select the plug-in version of Flex Builder.
Get a free CDB license at the Clear Toolkit website. The latest CDB installation instructions can be found in the CDB User Guide.
Note
To ensure that you have the latest instructions for installing CDB and running a sample application, we highly recommend that you read the appropriate section of the CDB User Guide.
To generate this version of Café, you’ll also need to download and install three more pieces of software:
The binary edition of Adobe BlazeDS 3.0; unzip it into some folder, for example, C:\blazeds
Apache Tomcat 6 (select Windows Service Installer from the Core Downloads section at http://tomcat.apache.org/download-60.cgi)
In addition, you must create a sample database called test using the SQL script provided in the
accompanying files for this chapter. Create a user called
dba with the password sql and
grant this user full access to the test database.
Note
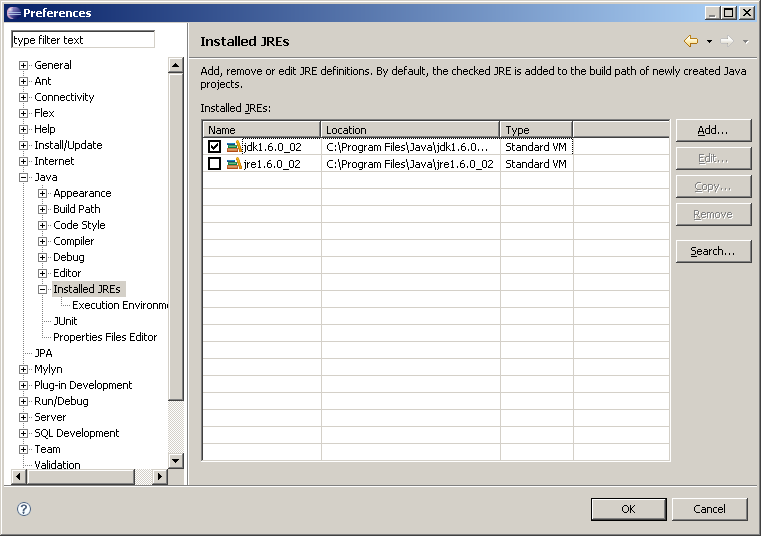
Important: CDB requires JDK 1.5 or later (note: JDK, not JRE). Select the Eclipse menu Window → Preferences → Java → Installed JREs and point it to your JDK installation directory, as shown in Figure 1-12.
The last preparation step is installing DBMS—we use MySQL
Community Server. During the installation, we’ve entered
dba as a user ID and sql as a
password.
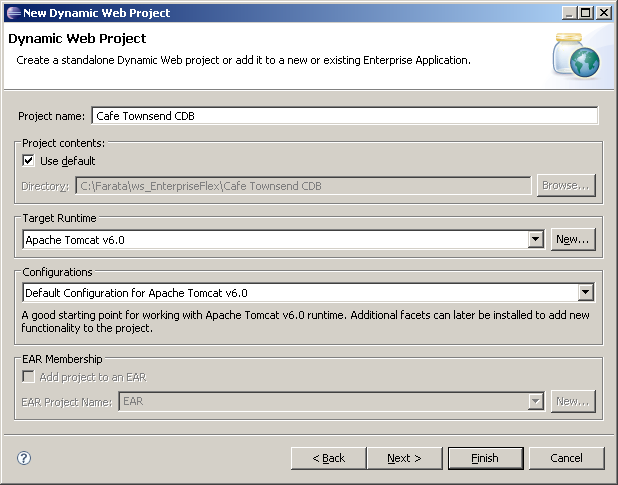
The first step in creating an Eclipse Dynamic Web Project is to start Eclipse JEE integrated development environment (IDE) and create a new instance of the Tomcat 6 server (File → New → Other → Server). Create a new Dynamic Web Project in Eclipse (File → New → Other → Web → Dynamic Web Project) and name it Café Townsend CDB. Specify the Target Runtime as Apache Tomcat 6.0 in the Dynamic Web Project configuration screen (Figure 1-13).
Note
If you use Eclipse 3.4 or later, click the Modify button in the Configurations section (not shown) and select the checkboxes in the MyFlex section to include MyFlex facets required for proper code generation.
Click the Next button. Select the Clear Data Builder and Flex Web Project facets as shown in Figure 1-14, then click Next.
In the next window, leave unchanged the next screen that suggests RIA_CRUD as a context, WebContent as a content directory, and src as a directory for the Java code; then click Next.

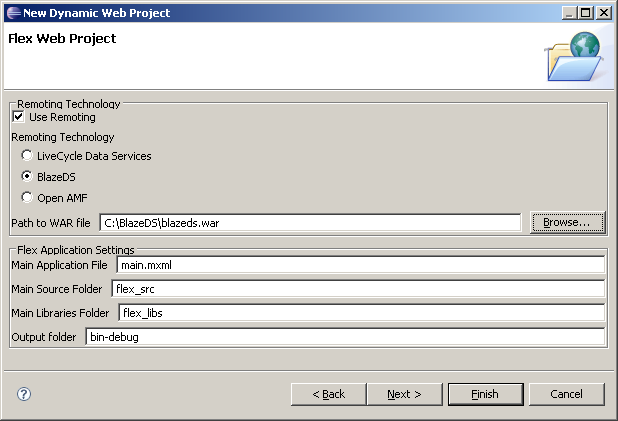
Specify that you are going to use BlazeDS on the server side, and specify the location of your blazeds.war, which in this case is C:\BlazeDS\blazeds.war (Figure 1-15). Click Next.
Specify that the application will be deployed under Tomcat, and select and configure the database connection (Figure 1-16). Important: your database server has to be up and running. Select the database DBMS, the driver, specify any name for your connection pool, and enter the URL of your database. By default, MySQL Server runs on port 3306, and the name of our sample database is test.

Don’t forget to press the Test Connection button to ensure that there are no problems in that department. If you don’t see a message about successful connection, ensure that you’ve started an instance of MySQL Server and that it runs on the same port specified in the screen shown in Figure 1-16. Also, make sure that the test database exists.
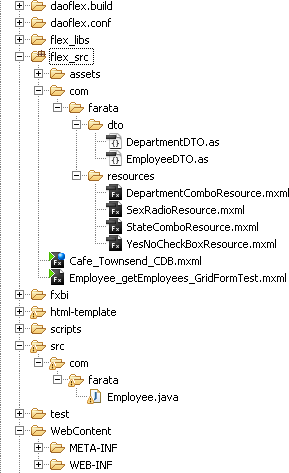
Click the Finish button, and the new Dynamic Web Project will be created. This project will contain both Flex and Java code. The DTO objects were autogenerated by CDB. The resources folder contains special resource files, explained in Chapter . The folder script has SQL scripts required to create a sample test database for various DBMSs (Figure 1-17).
All these goodies were created based on the class Employee.java, explained next.
Now you need to create a small abstract class Employee with defined method signatures that
are to be used for retrieval of the employee data. Right-click on the
folder Java
Resources:src, select New
→ Class, enter the package name
com.farata, and select the abstract
checkbox.
The code of the generated Java class Employee will look like this:
package com.farata;

public abstract class Employee {

}
Specify the data location within CDB. For our Café project, we will add to Employee.java a couple of method signatures, annotated (we use doclets) with SQL statements that will bring the data. We’ll need to specify what table is to be updated and the primary key there. For example, we’ll define where to get the data on employees and departments (see Example 1-24).
Example 1-24. Employee.java
package com.farata;
import java.util.List;
/**
 * @daoflex:webservice
 *  pool=jdbc/test
 */
public abstract class Employee{
 /**
 * @daoflex:sql
 * pool=jdbc/test
 * sql=:: select * from employee
 * ::
 * transferType=EmployeeDTO[]
 * keyColumns=emp_id
 * updateTable=employee
 */

 public abstract List getEmployees();
 /**
 * @daoflex:sql
 * sql=:: select * from department
 * ::
 * transferType=DepartmentDTO[]
 */
 public abstract List getDepartments();

}
Double colons are used to specify the start and the end of the
SQL statement. CDB can help you with the syntax—just right-click
inside the curly braces in the class Employee, and you’ll see the menu shown in
Figure 1-18.
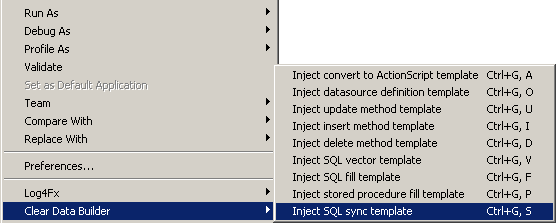
You can select “Inject SQL sync template” if you need to generate code that can read and update the data, or “Inject SQL fill template” if you are planning to create a read-only application. CDB will insert commented code that will help you write similar code on your own.
Now we can go to Eclipse’s Project menu and select the Clean option, which will start the CDB code generation and build process. The Clean process invokes the Ant build script located under the folder daoflex.build. The only proper outcome of this process is the message BUILD SUCCESSFUL in Eclipse console. If you do not see this message, most likely you’ve done something wrong or in the wrong order.
After this build, the Java DTO and data access classes are generated and deployed in our Tomcat servlet container.
Now run the Ant script daoflex-build.xml located in the daoflex.build directory. You can find the generated Java code in the folder .daoflex-temp\gen. If you don’t see this folder immediately, refresh your Eclipse project.
Technically, you do not need to keep these source files, as they are going to be jarred by the CDB build process and deployed in the lib directory of your servlet container under WEB-INF\lib in the files daoflex-runtime.jar, services-generated.jar, and services-original.jar.
On the client side, CDB has generated the EmployeeDTO.as, which is an ActionScript peer of the generated EmployeeDTO.java.
To deploy the application, add the project Café Townsend CDB to the configured Tomcat server, using the Server view of the Eclipse JEE IDE. Right-click in the Server view on Tomcat Server, select Add or Remove Projects, and add the project Café Townsend CDB to the Configured Projects panel. Start the server by using its right-click menu.
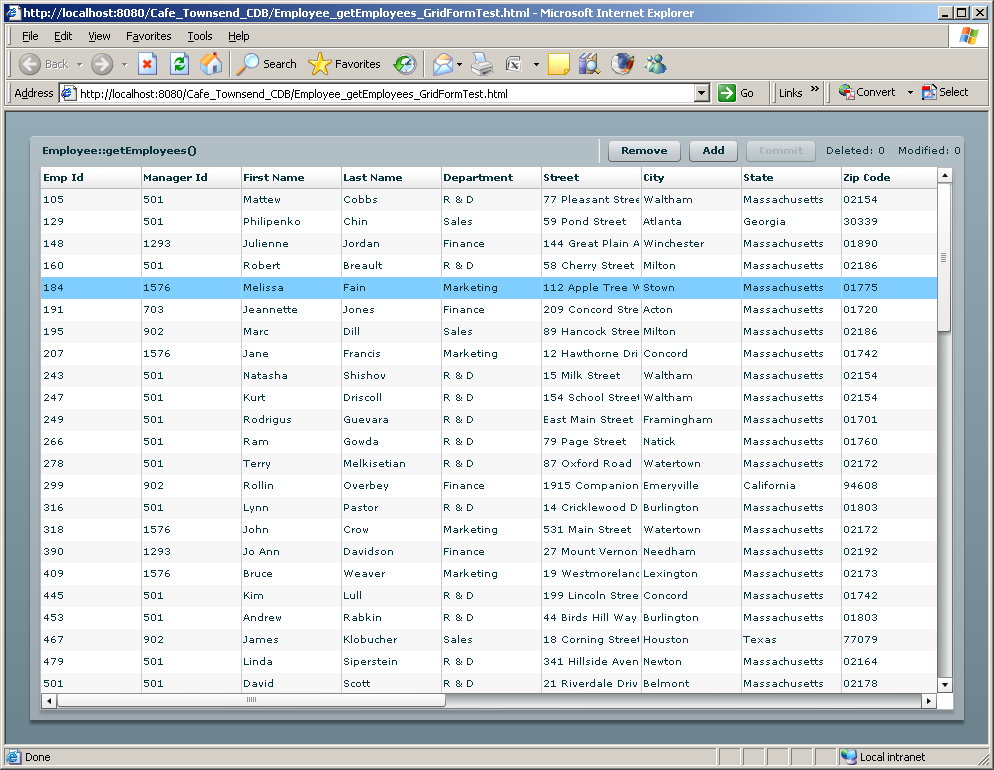
CDB also generates a number of reference client Flex applications, which can be used as the frontend of our Café application. We’ll use the one called Employee_getEmployees_GridFormTest.mxml, which not only creates a data grid, but also generates master/detail support and opens a form view when the user selects and double-clicks on a grid row.
Switch to Flex perspective, copy Employee_getEmployees_GridFormTest.mxml from test/rpc/com/farata/ to flex_src, and set it as the default application (right-click menu).
Create one small MXML file to support population of the Departments drop-down using the function
getDepartments() that we’ve
declared in Employee.java, as shown previously in
Example 1-24.
Programming with resource files will be explained in Chapter . For now, just create a new MXML file called DepartmentComboResource.mxml in the directory flex_src/com/farata/resources (see Example 1-25).
Example 1-25. DepartmentComboResource.mxml
<?xml version="1.0" encoding="utf-8"?>
<resources:ComboBoxResource
   xmlns="com.farata.resources" xmlns:mx="http://www.adobe.com/2006/mxml"
   xmlns:resources="com.theriabook.resources.*"
   width="160"
   dropdownWidth="160"
   destination="com.farata.Employee"
   keyField="DEPT_ID"
   labelField="DEPT_NAME"
   autoFill="true"
   method="getDepartments"
   >
</resources:ComboBoxResource>
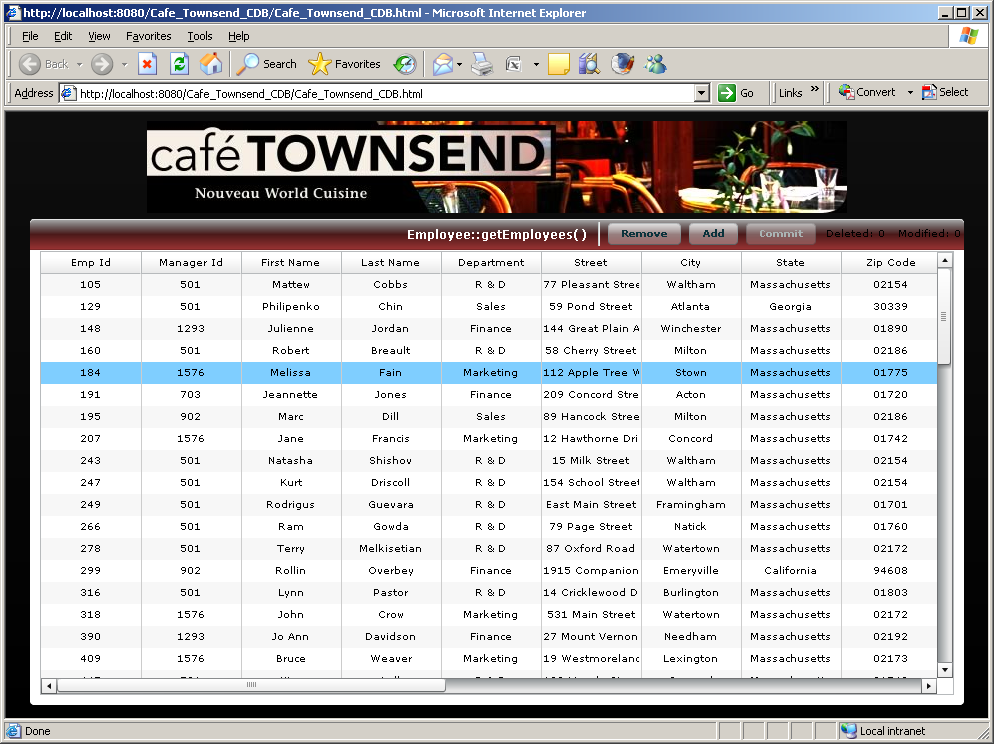
Compile and run Employee_getEmployees_GridFormTest.mxml. Figure 1-19 shows the resulting output window.
This window has been automatically generated based on the Java
class Employee shown in Example 1-24. If you select and double-click any row in
this grid, you’ll see details in a form window (Figure 1-20).
A very solid foundation for Café Townsend is ready, and the only code you had to write was shown in Examples 1-24 and 1-25.
Example 1-26 provides the code snippet of the generated Employee_getEmployees_GridFormTest.mxml.
Example 1-26. The code fragment of Employee_getEmployees_GridFormTest.mxml
<?xml version="1.0" encoding="UTF-8"?>
<mx:Application xmlns:mx="http://www.adobe.com/2006/mxml"
   xmlns:lib=" http://www.faratasystems.com/2008/components"
         creationComplete="onCreationComplete()">

<mx:ViewStack id="vs" height="100%" width="100%" >
<mx:Canvas height="100%" width="100%">
 <mx:Panel title="Employee::getEmployees()" width="100%"
                           height="100%">
 <lib:DataGrid doubleClick="vs.selectedIndex=1" doubleClickEnabled="true"
     horizontalScrollPolicy="auto" width="100%" id="dg"
     dataProvider="{collection}" editable="true" height="100%">
   <lib:columns>
    <lib:DataGridColumn dataField="EMP_ID" editable="false"
                        headerText="Emp Id"/>
    <lib:DataGridColumn dataField="MANAGER_ID" editable="false"
                        headerText="Manager Id"/>
   <lib:DataGridColumn dataField="EMP_FNAME" editable="false"
                        headerText="First Name"/>
   <lib:DataGridColumn dataField="EMP_LNAME" editable="true"
                         headerText="Last Name"/>
   <lib:DataGridColumn dataField="DEPT_ID" editable="false"
    headerText="Department"
       resource="{com.farata.resources.DepartmentComboResource}"/>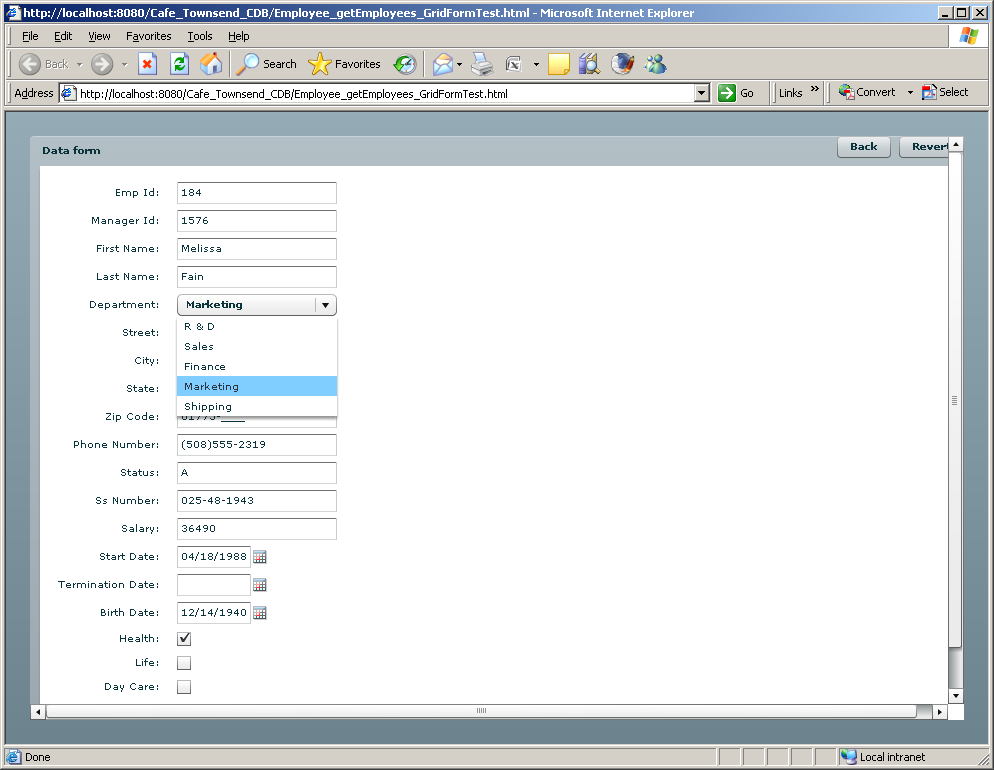
To make some of the columns editable, change the editable attribute of these DataGridColumns to true.
The code in Example 1-26 uses the
DataGrid object from the Clear
Toolkit component library clear.swc. The Department column (and the drop-down in
Figure 1-19) has been
populated by the function getDepartments() declared in Employee.java without the need to do any
additional coding on your part.
The server-side code is deployed under the Tomcat server. While generating this project, CDB has added a library, clear.swc, to the build path. It includes a number of handy components that enhance the standard controls of the Flex framework and a number of classes simplifying communication with the database layer.
The following autogenerated code illustrates another example of
a useful component from clear.swc. It uses a DataCollection object, which is a subclass
of the Flex class ArrayCollection.
You can read more about DataCollection in Chapter 6.
Look at the code in the onCreationComplete() function shown in Example 1-27. DataCollection is a smart,
data-aware class that combines the functionality of Flex’s ArrayCollection and RemoteObject, and some functionality of the
Data Management Services without the need for LCDS. Just set the
values in the DataCollection
properties destination and the
method to call, and call its method
fill() or sync(). No need to define the RemoteObject with result and fault
handlers, as no server-side configuration is required.
Example 1-27. Using DataCollection object from clear.swc
<mx:Button label="Fill" click="fill_onClick()"/>
<mx:Button label="Remove" click="collection.removeItemAt(dg.selectedIndex)"
enabled="{dg.selectedIndex != -1}"/>
<mx:Button label="Add" click="addItemAt(Math.max(0,dg.selectedIndex+1)) "/>
<mx:Button label="Commit" click="collection.sync()"
enabled="{collection.commitRequired}"/>
...

   import com.farata.dto.EmployeeDTO;

  Bindable]
   public var collection:DataCollection ;
   [Bindable]
   private var log : ArrayCollection;

   private function onCreationComplete() : void {
      collection = new DataCollection();
      collection.destination="com.farata.Employee";
      collection.method="getEmployees";
      //getEmployees_sync is the default for collection.syncMethod
      log = new ArrayCollection();
      collection.addEventListener( CollectionEvent.COLLECTION_CHANGE,
                                 logEvent);
      collection.addEventListener("fault", logEvent);
      fill_onClick();
   }
   private function fill_onClick():void {
      collection.fill();
   }

   private function addItemAt(position:int):void   {
      var item:EmployeeDTO = new EmployeeDTO();
      collection.addItemAt(item, position);
      dg.selectedIndex = position;
   }

  private function logEvent(evt:Event):void {
      if (evt.type=="fault") {
         logger.error(evt["fault"]["faultString"]);
      } else {
         if (evt.type=="collectionChange") {
            logger.debug(evt["type"] + " " + evt["kind"]);
         } else {
            logger.debug(evt["type"]);
         }
      }
   }
To finalize Café Townsend, we’ll steal (copy) the assets folder from the original Café to display the logo on top, apply the styles defined in main.css, and make just a couple of cosmetic changes:
Remove the
Applicationtag from Example 1-26, moving the declaration of namespaces and thecreationComplete()event to its MXML tagViewStack(you’ll also need to remove three references to the autogenerated variablevsthat was referring to thisViewStack):<mx:ViewStack height="100%" width="100%" xmlns:mx="http://www.adobe.com/2006/mxml" xmlns:lib="http://www.faratasystems.com/2008/components" creationComplete="onCreationComplete()">Create a small application Café_Townsend_CDB to include the styles, the logo, and the main view (see Example 1-28).
Example 1-28. Café_Townsend_CDB.mxml
<?xml version="1.0" encoding="utf-8" standalone="no"?>
<mx:Application xmlns:mx="http://www.adobe.com/2006/mxml" xmlns:views="*"
                  backgroundColor="#000000" layout="vertical">
   <mx:Style source="assets/main.css"/>
   <mx:Image source="assets/header.jpg" width="700"/>
   <views:Employee_getEmployees_GridFormTest selectedIndex="0"/>
</mx:Application>
Compile and run the application, just to ensure that Café Townsend CDB looks as good as possible (Figure 1-21).
The entire process of creating Café Townsend with Clear Data Builder has been prerecorded, and you can find this screencast in the Demos section at http://www.faratasystems.com.
Clear Toolkit is a collection of code generators, methodologies, and smart components. Its components may be used either as an alternative to architectural frameworks or together with them. If you are a development manager starting a Flex project with a team that has at least one senior Flex architect, using Clear Toolkit is the productive way to go.
If you have to deal with a number of junior developers, consider
using the Mate framework with some of the Clear Toolkit components,
e.g., enhanced DataGrid, DataForm, and a number of enhanced UI
controls. Besides, having a good reporter, logger, Ant script, and DTO
generators is quite handy regardless of whether you use architectural
frameworks.
The pros are:
It offers a library of enriched Flex components (supergrid, data-aware components, etc.).
It automatically generates code, which minimizes the amount of code to be written by application developers.
It offers data synchronization functionality in free BlazeDS, similar to Data Management Services from LCDS.
Its components can be used à la carte on an as-needed basis.
It automates creation of Ant build scripts.
It automates creation of ActionScript data transfer objects.
The cons are:
Get Agile Enterprise Application Development with Flex now with the O’Reilly learning platform.
O’Reilly members experience books, live events, courses curated by job role, and more from O’Reilly and nearly 200 top publishers.

