Chapter 1. Getting Started
The famous “Hello, World” pattern came about back in 1978 when Brian Kernighan and P.J. Plauger wrote a “recipe” on how to get started in any new programming language and environment. Their idea was that, if you could get a computer program to print out “Hello, World,” then you had mastered how to use the system in general: how to create/edit a program’s source code, compile/translate/process it into a runnable program as needed, and run it. And once you’d done that you could, with elaboration, make the computer do anything! This chapter is affectionately dedicated to these fine gentlemen, and to everyone who has ever struggled to get started in a new programming paradigm.
This chapter is a smorgasbord of “how to get started” recipes. We show you how to create and build an Android app using almost no tooling, using Gradle and using Android Studio. Nobody will regularly use all these techniques—it’s easier using Android Studio—but we chose to cover them all because some readers will like each way of doing things. Feel free to pick and choose, and try different ways of working on your application!
1.1 Understanding the Android Application Architecture
Ian Darwin
Discussion
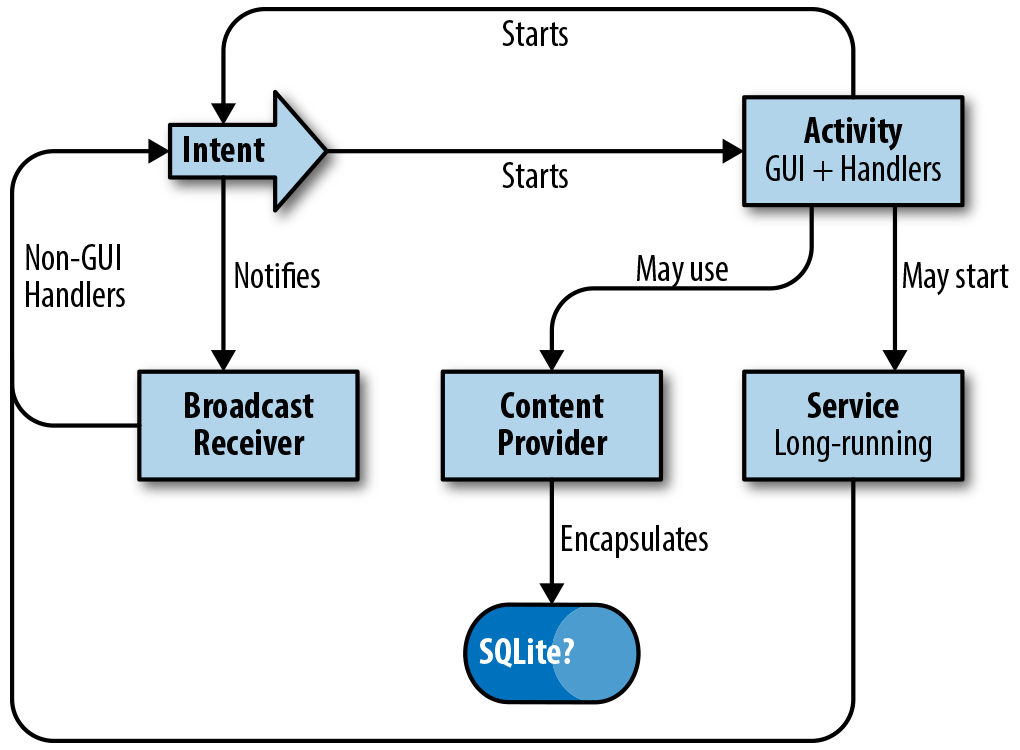
An Android application consists of one or more of the following components, written as Java classes:
-
An Activity comprises the visual components (“views”) for one screen as well as the code that displays data into that screen and can respond to user events on that screen. Almost every application has at least one
Activityclass. -
A Service is a component that has no user interface, and can run for a longer period of time than an Activity. Two main uses for Services are for long-running tasks (such as a music player), and running medium-length tasks without tying up the user-interface thread.
-
Broadcast receivers are less common, and are used to respond to system-wide events such as the network losing or regaining connectivity, the battery running low, the system rebooting, and so on.
-
Content providers are also relatively rare, and are used when one application needs to share its data with other applications; they can also be used with sync adapters.
-
Sync adapters synchronize data with cloud services; the best-known examples are the Contacts and Calendar apps on the device, which can easily be synchronized to your Google account.
Your code does not create these objects using the new operator, as in conventional Java, but
requests the invocation of Activities, Services, etc., using an Intent, an object that specifies your intention to have
something done. Intents can start Activities within your application (by class name), start Activities
in other applications (by specifying content type and other information), start Services, and request
other operations. The interactions among these components are outlined in Figure 1-1.
Of these, the Activity is the most basic component, and the place you need to start
when learning to develop Android applications.
1.2 Understanding the Android Activity Life Cycle
Ian Darwin
Discussion
Your Android application runs in its own Unix process, so in general it cannot directly affect any other running application. The Android Runtime interfaces with the operating system to call you when your application starts, when the user switches to another application, and so on. There is a well-defined life cycle for Android applications.
An Android app can be in one of three states:
-
Active, in which the app is visible to the user and is running.
-
Paused, in which the app is partly obscured and has lost the input focus (e.g., when a dialog is in front of your Activity).
Your app will be transitioned among these states by Android calling the following methods on the current Activity at the appropriate time:
voidonCreate(BundlesavedInstanceState)voidonStart()voidonResume()voidonRestart()voidonPause()voidonStop()voidonDestroy()
You can see the state diagram for this life cycle in Figure 1-2.
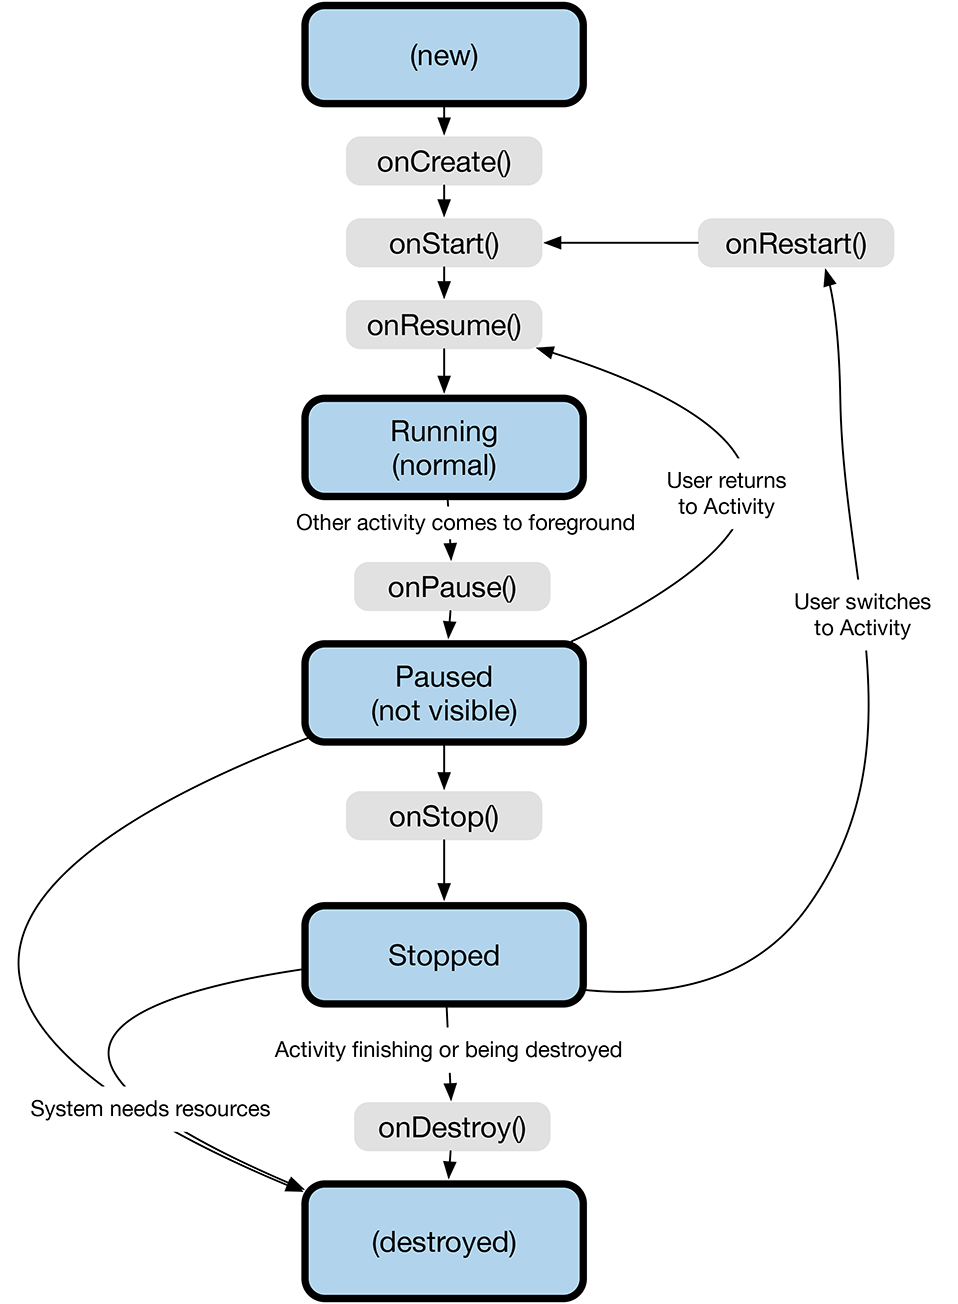
Figure 1-2. Android life-cycle states
The system’s call to onCreate() is how you know that the Activity has been started. This is where you normally do constructor-like work such as setting up the “main window” with setContentView(), adding listeners to buttons to do work (including starting additional Activities), and so on. This is the one method that even the simplest Android Activity needs.
Note that most applications today base their UI on Fragments. A Fragment is a part of the UI for an Activity. For example, in the early days of Android a typical list-detail application would use two Activities, one for the list and one for the detail. This is still allowed, of course, but has the drawback that, on a tablet or a large-screen phone in landscape mode, it isn’t possible to have both views side-by-side. An Activity can be divided into multiple Fragments (see Recipe 6.7), which solves this problem. A Fragment can only exist inside an Activity. The Fragment life cycle is similar to that of the Activity, but has a few additional methods.
You can see the invocations of the various life-cycle methods by creating a dummy project and overriding all the life-cycle methods with log “debug” statements (see also Recipe 3.10):
@OverridepublicvoidonPause(){Log.d(TAG,"In method onPause()");}
1.3 Learning About Android Releases
Ian Darwin
Discussion
Android has gone through many versions in its lifetime. Each version has a version number, a code name, and an API level. The version number is a conventional versioning system like 2.1, 2.3.3, 3.0, 4.0, 4.1, 5.0, 6.0, and so on. When the first digit of the version changes, it’s a big deal with lots of new APIs; when the second digit changes, it’s more evolution than revolution (and occasionally a new code name); and if only the third digit changes, it’s a minor change. The API levels are numbered monotonically. The code names are alphabetical and always refer to sweet foods. API levels 1 and 2 did not officially have code names.
Note that the Android system is backward-compatible in the usual sense: an app built for an older release will run on a newer version of Android, but not vice versa (unless special care is taken; see Recipe 1.13). An app built for 1.5 should run without recompilation on Android 7, for example. But an app written for and compiled on Android 7 will probably use API calls that don’t exist on the 1.5 phone, so the phone will, in fact, refuse to install the newer app, unless you use some versioning and compatibility tricks that we’ll touch on later (Recipe 1.13). The major versions of Android are summarized in Table 1-1.
| Version number | API level | Name | Datea | Major change/Notes | CM version |
|---|---|---|---|---|---|
1.0 |
1 |
2008-09-23 |
|||
1.1 |
2 |
2009-02-09 |
|||
1.5 |
3 |
Cupcake |
2009-04-30 |
3 |
|
1.6 |
4 |
Donut |
2009-09-15 |
4 |
|
2.0 |
5 |
Eclair |
2009-10-26 |
5 |
|
2.1 |
7 |
Eclair |
2010-01-12 |
||
2.2 |
8 |
Froyo |
2010-05-20 |
6 |
|
2.3 |
9 |
Gingerbread |
2010-12-06 |
Long the most widely-used version |
7 |
2.3 |
10 |
Gingerbread |
|||
3.0 |
11 |
Honeycomb |
2011-02-22 |
Tablets only; source code release delayed |
|
3.1 |
12 |
Honeycomb |
2011-05-10 |
||
3.2 |
13 |
Honeycomb |
2011-07-15 |
||
4.0 |
14 |
Ice Cream Sandwich |
2011-10-19 |
Merge tablet and phone support |
9 |
4.0.3 |
15 |
Ice Cream Sandwich |
2011-12-16 |
||
4.1.2 |
16 |
Jelly Bean |
2012-07-09 |
10 |
|
4.2.2 |
17 |
Jelly Bean |
2012-11-13 |
10.1 |
|
4.3 |
18 |
Jelly Bean |
2013-07-24 |
10.2 |
|
4.4 |
19 |
KitKat |
2013-10-31 |
Co-marketing deal with Nestlé (makers of KitKat chocolate bar) |
11 |
5.0 |
21 |
Lollipop |
2014-11-10 |
12 |
|
6.0 |
23 |
Marshmallow |
2015-10-05 |
13 |
|
7.0 |
24 |
Nougat |
2016-08-22 |
14.0 |
|
7.1 |
25 |
Nougat |
14.1 |
||
a Date information sourced from Wikipedia. | |||||
The final column, “CM version,” shows the main version numbers of CyanogenMod, long the leading “alternate distribution” or “community build” of Android. Based on the Android Open Source Project, “CM” was much beloved by many open source fans because it was independent of Google, allowed easier “root” access, and so on. As this edition of this book was going to press, CyanogenMod, Inc. decided to terminate its support for CyanogenMod, leading the community to fork the project and rename it to LineageOS. There are many other community builds of Android. One focusing on security is CopperheadOS. Several others are built by people frequenting XDA Developers groups. Several commercial outfits claim to offer community builds, too; a web search will find these.
Of course, this table will continue to grow as new versions are released, and Android continues to grow.
1.4 Learning the Java Language
Ian Darwin
Solution
Lots of resources are available for learning Java. Most of them will teach you what you need, but will also mention some API classes that are not available for Android development. Avoid any sections in any resource that talk about topics listed in the lefthand column of Table 1-2.
| Java API | Android equivalent |
|---|---|
Swing, applets |
Android’s GUI; see Chapter 6. |
Application entry point |
See Recipe 1.2. |
J2ME/Java ME |
Most of |
Servlets/JSP/JSF, Java EE |
Designed for server-side use. |
Discussion
Here are some books and resources on Java programming:
-
Java in a Nutshell by David Flanagan (O’Reilly). This is a good introduction for programmers, particularly those who are coming from C/C++. The book has grown from an acorn to a coconut in size through its various editions, to keep up with the growth of Java SE over its lifetime.
-
Head First Java by Kathy Sierra and Bert Bates (O’Reilly). This provides a great visual-learner-oriented introduction to the language.
-
Thinking in Java by Bruce Eckel (Prentice-Hall).
-
Learning Java by Patrick Niemeyer and Jonathan Knudsen (O’Reilly).
-
“Great Java: Level 1,” by Brett McLaughlin (O’Reilly). This video provides a visual introduction to the language.
-
Java: The Good Parts by Jim Waldo (O’Reilly).
-
Java Cookbook, which I wrote and O’Reilly published. This is regarded as a good second book for Java developers. It has entire chapters on strings, regular expressions, numbers, dates and times, structuring data, I/O and directories, internationalization, threading, and networking, all of which apply to Android. It also has a number of chapters that are specific to Swing and to some EE-based technologies.
-
Java Testing for Developers, a video series I did on how to test out Java code as you develop it; covers both dynamic testing (with JUnit and many others) and static testing (with tools such as PMD and FindBugs).
Please understand that this list will probably never be completely up-to-date.
See Also
I maintain a list of Java resources online at http://www.darwinsys.com/java/.
O’Reilly has many of the best Java books around; there’s a complete list at http://oreilly.com/pub/topic/java.
1.5 Setting Up Android Studio
Daniel Fowler, Ian Darwin
Problem
Using build tools is OK, but coding with a plain-text editor is too slow to be your regular development stream. You want to choose an integrated development environment (IDE) to use for your Android projects: Android Studio is the definitive tool, and the only one we now cover in this book. This recipe provides a concise guide to setting up that IDE.
Solution
The use of the Android Studio IDE is recommended by Google for developing Android apps. Configuring the IDE is not a single-shot install; several stages need to be completed. This recipe provides details on those stages.
Discussion
The Android Studio integrated development environment (IDE) is provided for free by Google to develop applications. Studio comes with the Android Software Development Kit (SDK), which provides essential programs to develop Android software. To set up a development system you will need to download and run the installers for:
-
The Java Standard Edition Development Kit (JDK), if not already installed
-
Android Studio
Installing the JDK, if necessary
Go to the Java download page. Click the Java icon to access the JDK downloads:

The list of JDK downloads will be shown. Click the Accept License Agreement radio button; otherwise, you will not be allowed to continue. You’ll want to download and run one of the latest JDKs present; as of this writing, they are Java 8 builds whose version string ends in 8u121, but that will surely change by the time you read this. Choose the download appropriate for your operating system: Windows x86 or 64-bit.exe, MacOS .dmg, Linux .rpm or .tgz, and so on. Accept any security warnings that appear, but only if you are downloading from the official Java download web page.
When the download has completed, run the installer and go through all the screens, clicking Next until the installer has finished. You should not need to change any options presented. When the JDK installer has completed, click the Finish button. A product registration web page may load; you can close this or you can choose to register your installation.
For Android use, you do not need to download any of the “demos or samples” from this site.
Install Android Studio
Go to the Android Studio download page.
The installation process can take some time as the installer will download additional files. Click the Download Android Studio button, accept the terms and conditions, and begin the download by clicking a second Download Android Studio button. On MS Windows, the default is a file with a name like android-studio-bundle-X.X-windows.exe, which is over 1 GB and includes both the IDE and the Android SDK. If you already have the Android SDK installed, select Other Download Options and you will see the page in Figure 1-3, where you have a choice of that file or one without the SDK bundle, with a name like android-studio-ide-X.X-windows.exe. For macOS there is only the unbundled file, android-studio-ide-X.X-mac.dmg, where X.X is Studio’s build number (this may not match the displayed version number; e.g., Android Studio 2.0 has a build number of 143.2739321). On Windows, accept the Windows User Account Control dialog.
On some 64-bit versions of Windows the installer may require the JAVA_HOME environment variable to be set. Use the Control Panel to access the System settings, and open the “Advanced systems settings” section. The Advanced tab on the System Properties dialog should be visible. Click the Environment Variables button to add a new JAVA_HOME system variable, and set it to the path of the Java JDK (e.g., C:\Program Files\Java\jdk1.8.0; enter the correct path for your system).
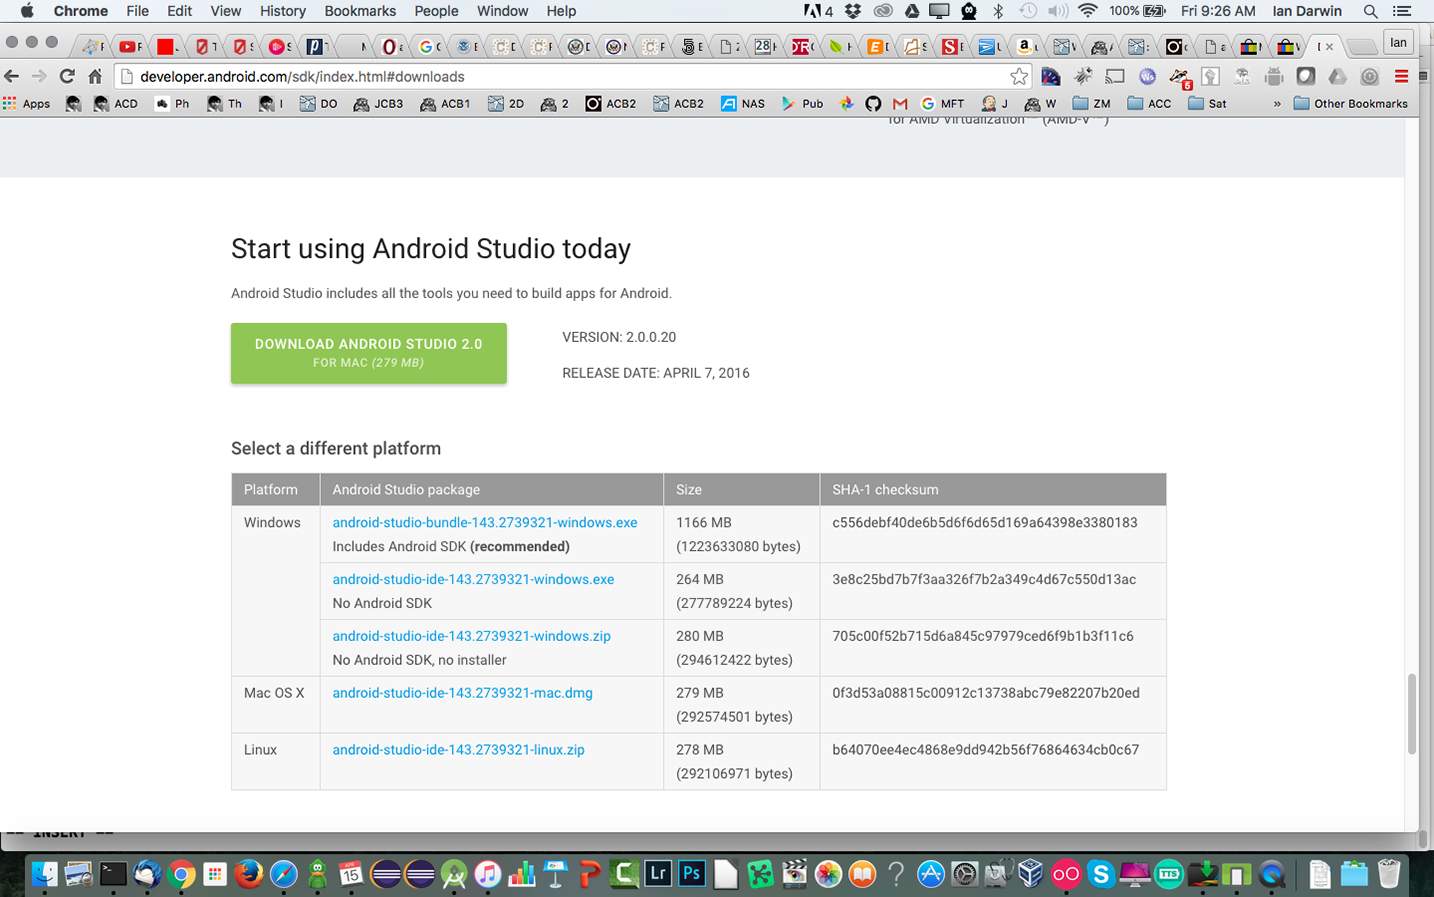
Figure 1-3. Android Studio download page
Proceed through the installer’s dialogs. The installer configures Studio and the Android SDK (if you installed the bundle version), and downloads an initial Android Virtual Device (AVD). The default install location for the Android SDK is under the logged-in user’s AppData\Local directory on Windows, or $HOME/android-sdk-nnn under macOS or Linux. You may want to select an easier-to-remember and shallower location (e.g., C:\AndroidSDK).
After installing Studio, further configuration (and downloading of the SDK if necessary) occurs when it is first run. Allow access through your desktop system’s configuration if required. Further SDK packages will be downloaded. As well, each time Studio runs it checks for updates and may display a message if updates are needed. Aside from updates to Studio itself, the Android SDK and additional SDK packages are best updated via the Android SDK Manager program (see Recipe 1.6).
Once that’s done, Studio is now configured to build and debug Android apps. See Recipe 3.1 to configure an Android emulator; then try a “Hello, World” app as a sanity check. Or plug a real Android device into the computer’s USB port and use its settings to turn on USB Debugging.
Tip
For a few Windows users Studio may not start the first time, and a DLL error is displayed. Installing the Microsoft Visual C++ 2010 SP1 Redistributable Package has been known to clear the error.
See Also
1.6 Installing Platform Editions and Keeping the SDK Updated
Daniel Fowler
Discussion
Android itself is constantly evolving, and therefore so is the Android Software Development Kit. The ongoing development of Android is driven by:
-
Google’s research and development
-
Phone manufacturers developing new and improved handsets
-
Addressing security issues and possible exploits
-
The need to support new devices
-
Support for new hardware interfaces
-
Fixing bugs
-
Improvements in functionality (e.g., a new JavaScript engine)
-
Changes in the underlying Linux kernel
-
Deprecation of redundant programming interfaces
-
New uses (e.g., Android Wear, Android Auto)
-
The wider Android development community
Tip
The following discussion is illustrated with screenshots from Android Studio, but the same tooling
can be invoked by invoking the command-line tool named simply android.
Installation of the IDEs and the Android SDK has been covered elsewhere; see Recipe 1.5 or the developer documentation. When Android Studio is run it will check for updates to both Studio and the SDK. A message is displayed when updates are available. Most updates will be performed via the SDK Manager program. If you OK the update, Studio will close and the SDK Manager will run. If you don’t want to update when the upgrade is offered, you can access the SDK Manager later from within Studio (see Figure 1-4) or directly from the Android SDK install location.

Figure 1-4. SDK Manager toolbar icon
The following steps work through the update process.
In Studio, selecting SDK Manager from the toolbar or via the Tools → Android menu shows the Android SDK settings, which shows what packages are installed or available (see Figure 1-5).
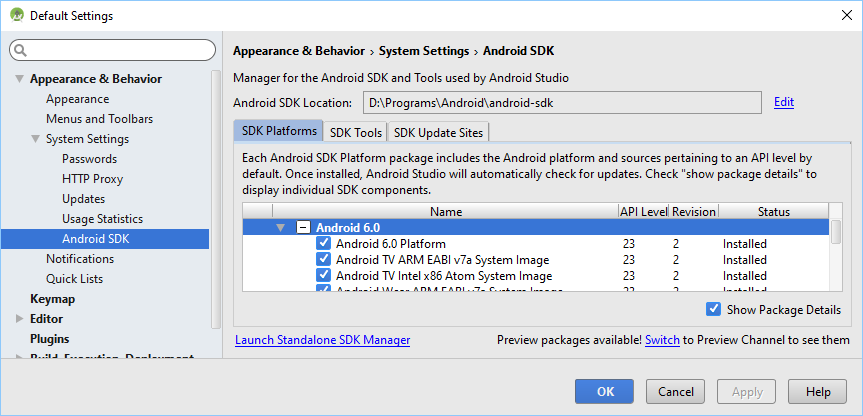
Figure 1-5. Android SDK settings, showing current installation status
To actually make changes, click the Launch Standalone SDK Manager link, which runs the external SDK Manager program shown in Figure 1-6. The Android SDK is divided into several packages. The SDK Manager automatically scans for updates to existing packages and will list new packages. Available updates will be shown in a list (alongside available optional packages).
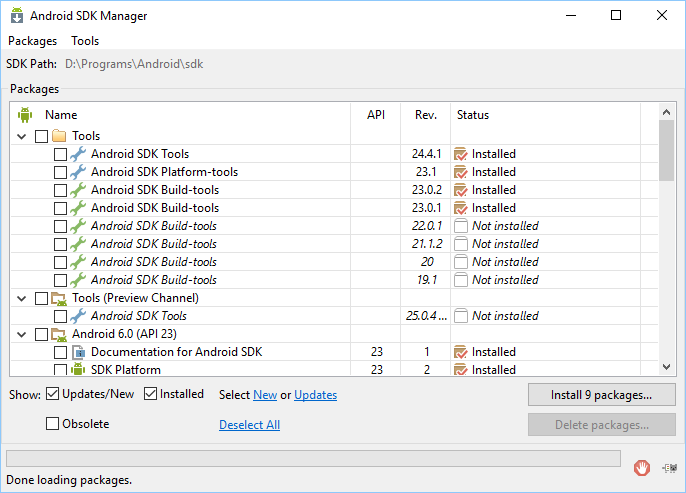
Figure 1-6. Standalone SDK Manager
Available updates will be checked ready for download and installation; uncheck the ones not required. (Unless you’re short on disk space, you can have as many of the API packages installed as you wish.) Then click the “Install x packages” button. If an update or package has license terms that require accepting, they will be listed. Highlight each package to read the license terms, and then accept or reject the package using the radio buttons. (Rejected packages will be marked with a red cross.) Alternatively, highlight the parent package and click Accept All to accept everything that is available. All packages and updates ready to download and install will be shown with a green tick. Click Install; while the download and installation is progressing, you can view the log by clicking the log icon in the bottom right of the Android SDK Manager dialog (see Figure 1-7).
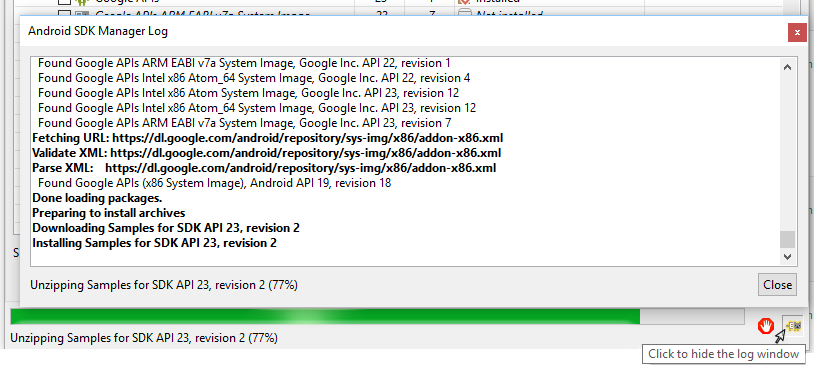
Figure 1-7. Android SDK update log
Any errors during the download and installation will be shown in red in the log dialog. Updates that affect the Android Debug Bridge (ADB) will result in a request to restart ADB; click Yes to restart it. Obsolete packages will have been deleted during the download and installation. When all packages have been updated and you’ve had a chance to inspect the log, you can close the log dialog, if open, and the Android SDK Manager dialog.
Android is an evolving platform, so checking for updates every few weeks allows you to work with the latest tools and APIs.
See Also
Recipe 1.5, The Android Studio User Guide documentation on installation.
1.7 Creating a “Hello, World” App Using Android Studio
Ian Darwin
Solution
Install Java, Android Studio, and one or more SDK versions. Create your project and start writing your app. Build it and test it under the emulator, all from within the IDE.
Discussion
Before you can create your application with Android Studio, you have to install these two packages:
-
Android Studio itself
-
One or more Android SDK versions
For details on installing these items, please refer to Recipe 1.5.
Once you’ve done that, click on “Start a new Android Studio project” from the Welcome screen (Figure 1-8), which appears when you don’t have any projects open.
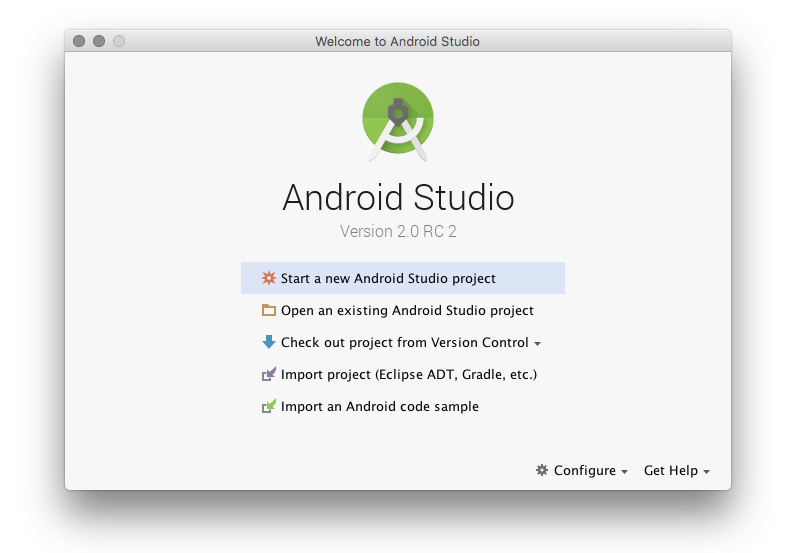
Figure 1-8. Studio Welcome screen
On the Create New Project screen (Figure 1-9), choose the application name and Java code package.
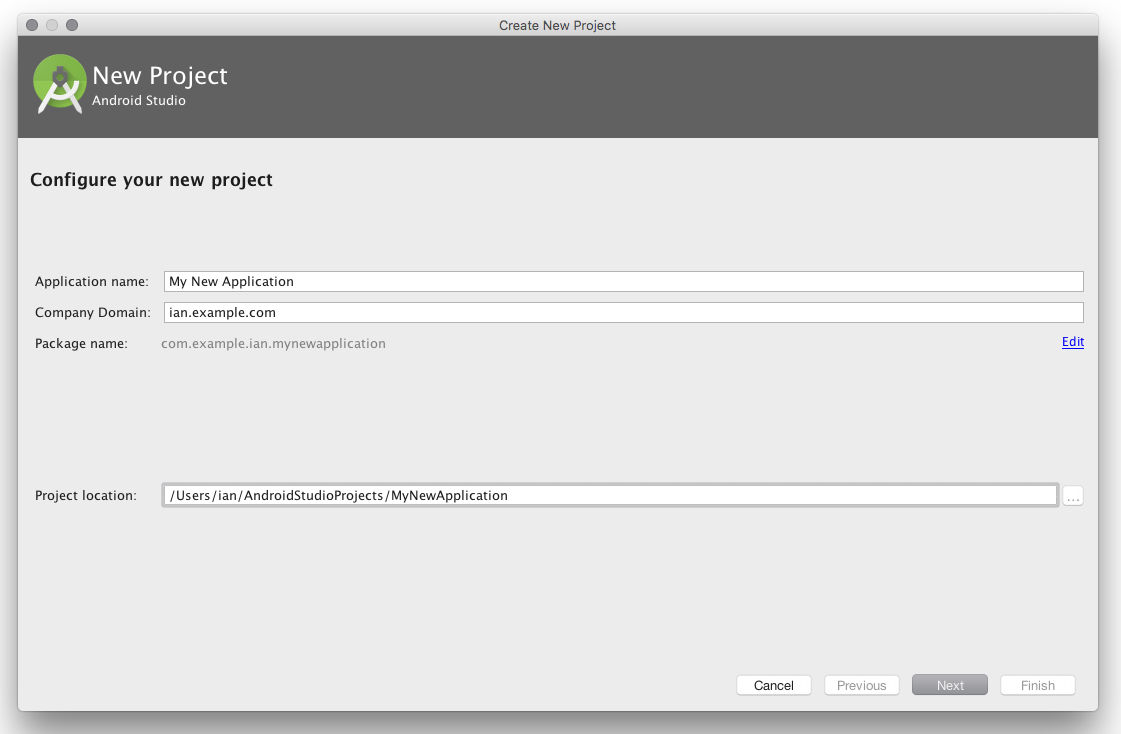
Figure 1-9. Studio New Project screen
On the next page of the same dialog, you can specify what kinds of devices (phone/tablet, Android Wear, Android TV, etc.) your project is going to target and, for mobile devices, the minimum and target SDK API levels (Figure 1-10).
Almost every Android application has at least one Activity class defined, and the “Hello, World” app is no exception.
You can either pick Empty Activity (in which case you’ll have to add some code) or Basic Activity; we went with the latter (Figure 1-11).
The next page asks you to pick names for your Activity and its layout file (Figure 1-12). For a single-Activity app, the defaults are fine.
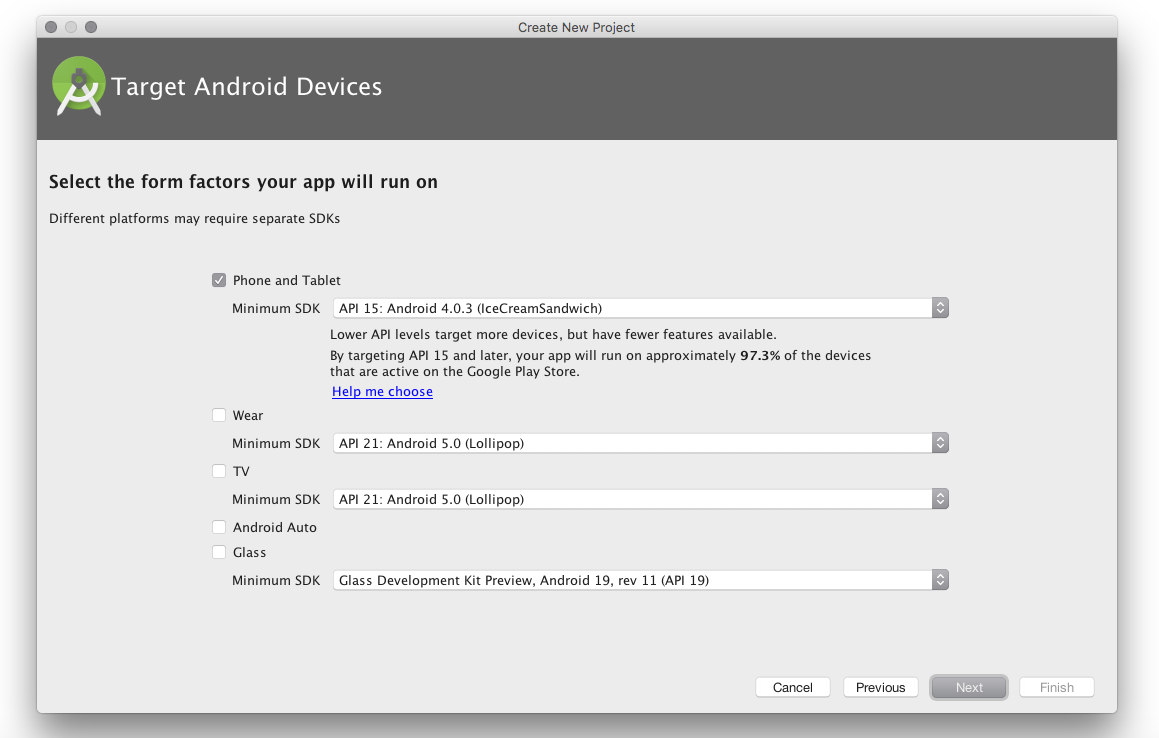
Figure 1-10. Studio device and target APIs
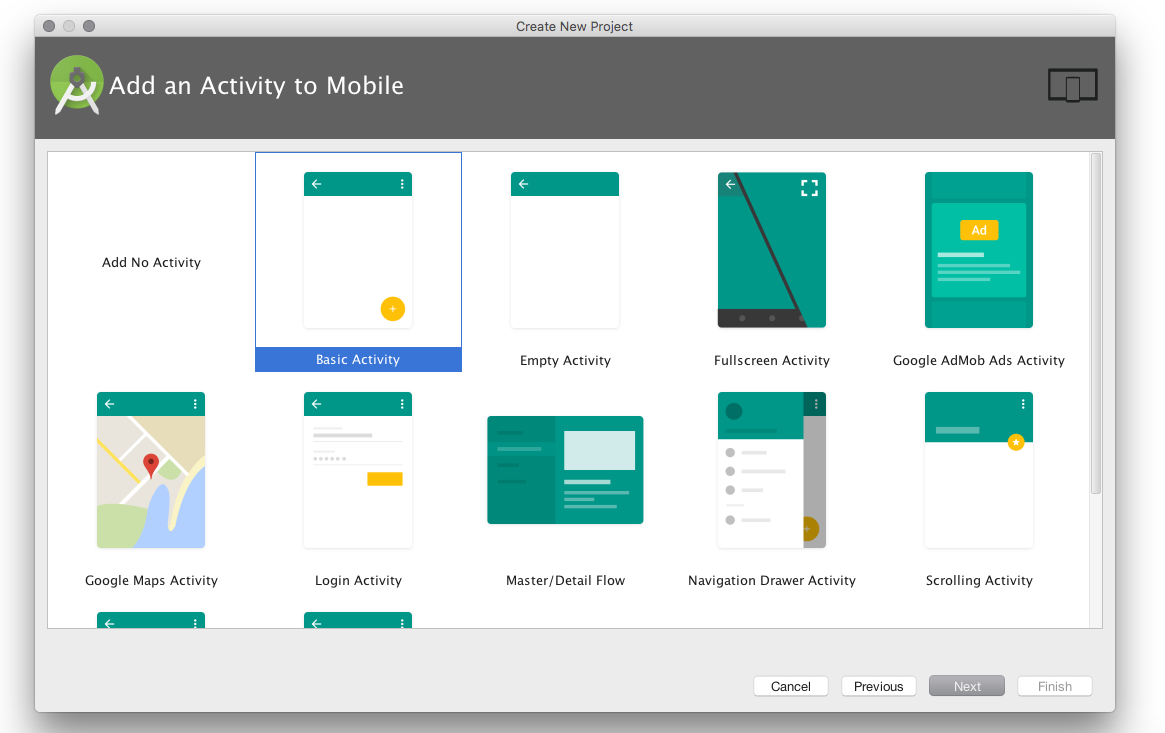
Figure 1-11. Defining the Activity class
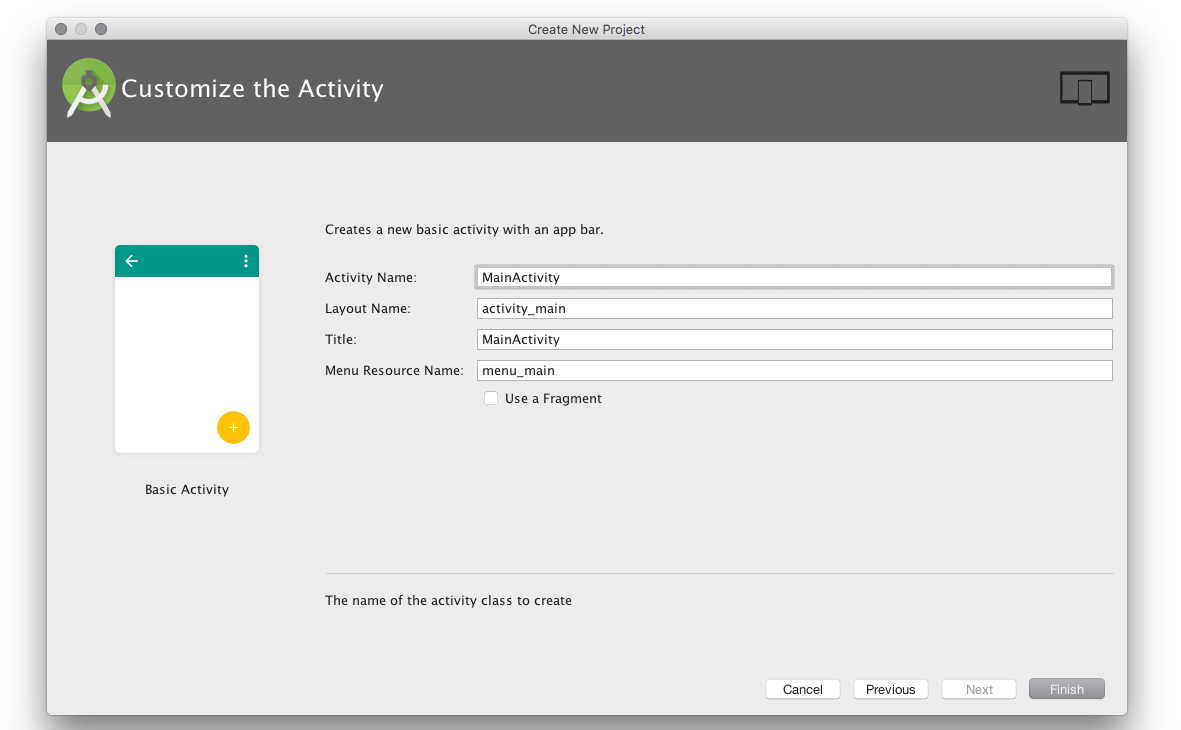
Figure 1-12. Studio customizing the Activity
After chugging for a while, Studio will create your project and give you a blank view of it, since you haven’t told it how to display the project (Figure 1-13).
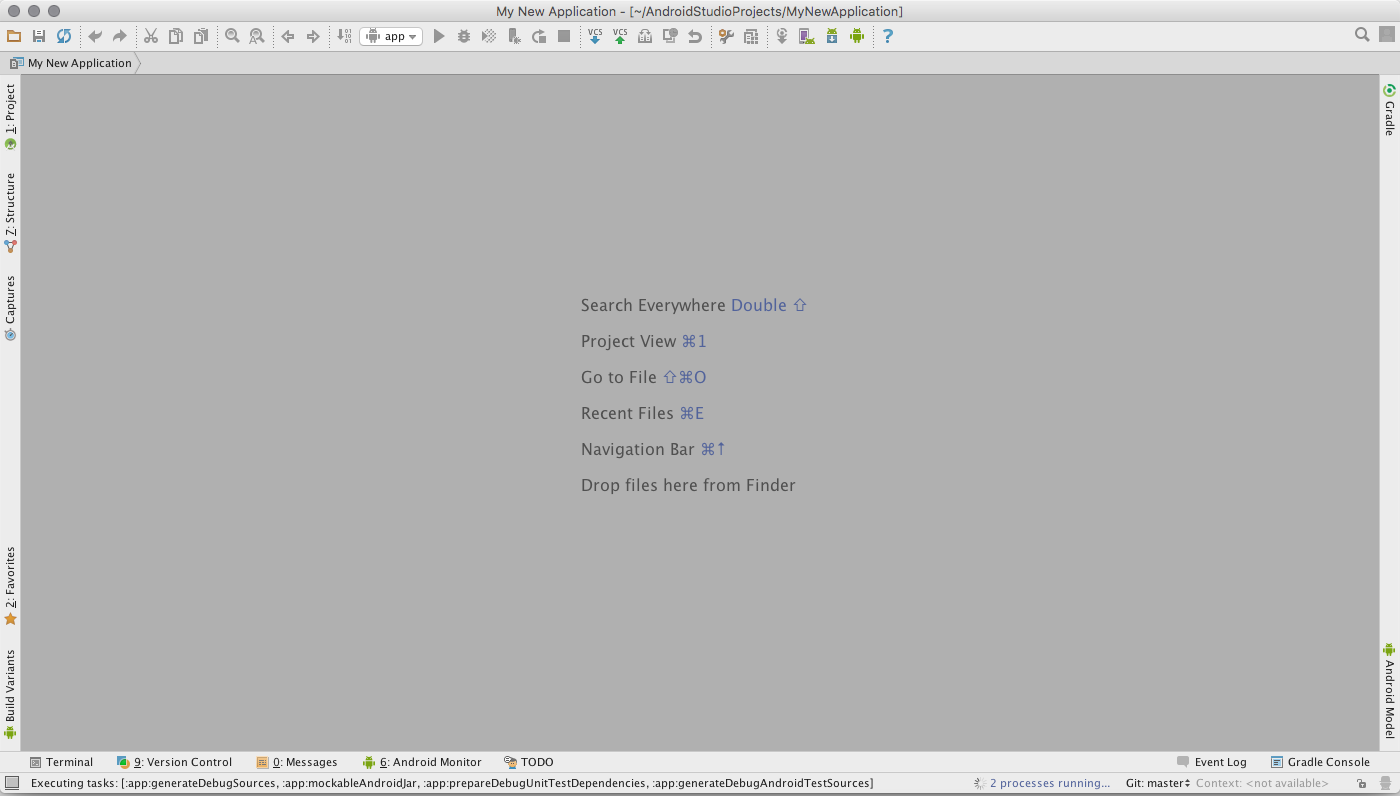
Figure 1-13. Studio blank view
Click the sideways label 1. Project at the upper left of the main window. Drill down into App → Java → package-name/MainActivity, or whatever you called the Activity. Have a brief look at the provided Java code (Figure 1-14).
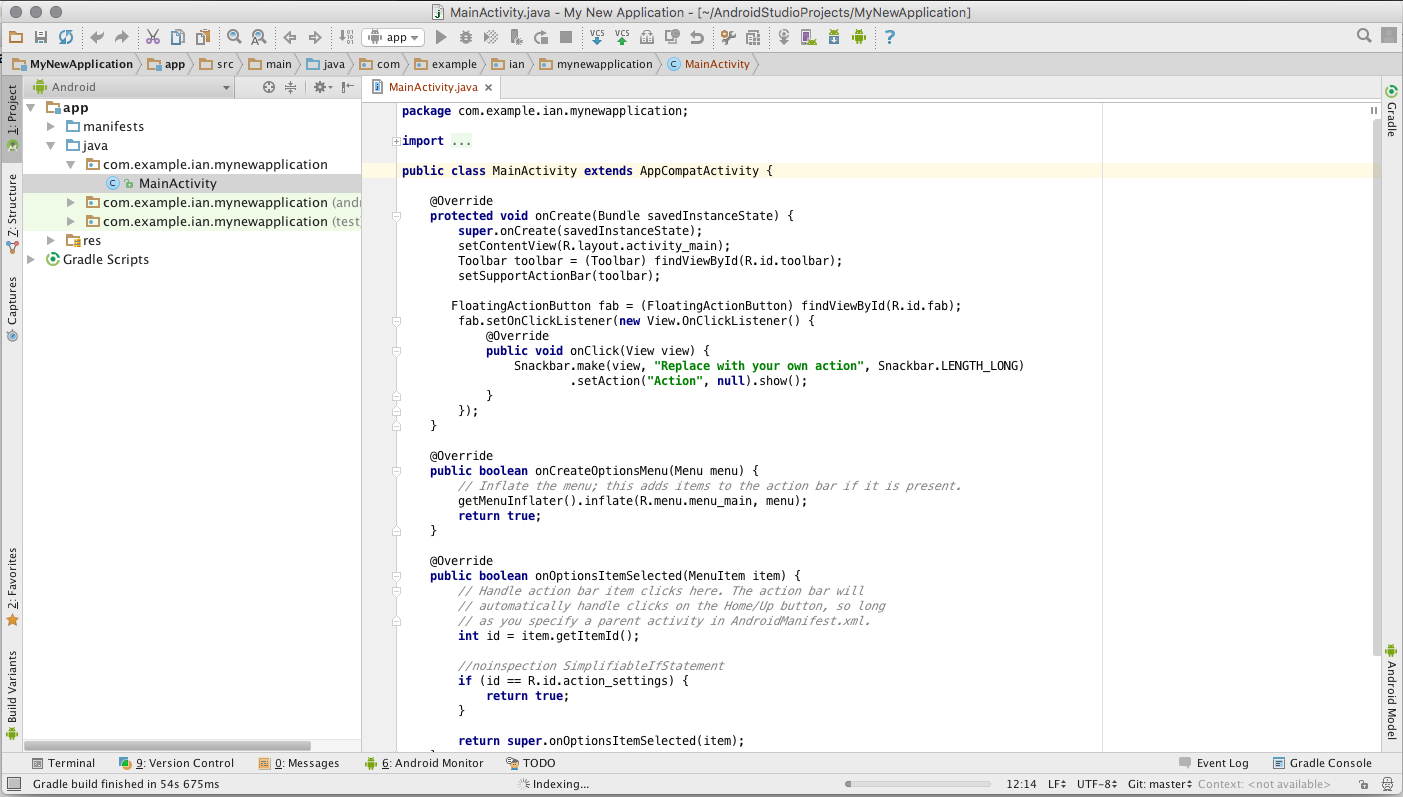
Figure 1-14. Studio-generated Activity
If you don’t see a graphic representation of your Activity soon, expand Res → Layout and double-click content_main.xml. You should see a visual UI editor (Figure 1-15).
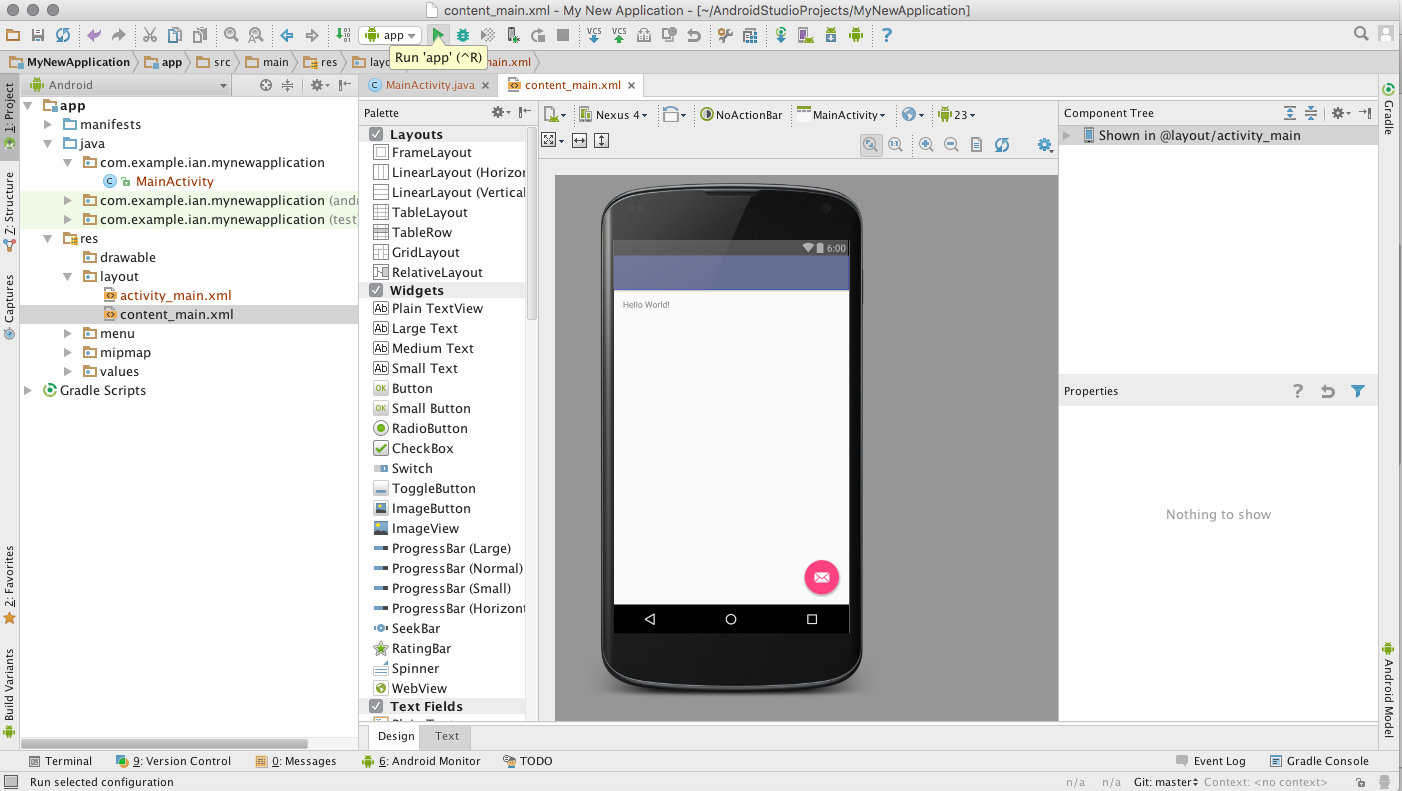
Figure 1-15. Studio layout editor
Note that the Studio Layout Editor isn’t really running your application, just interpreting the user interface layout. To actually run it, click the Run button in the middle of the top toolbar. In the process of starting the app, Studio will ask you which AVD (emulator) to use. Eventually the application should appear in its own emulator window (Figure 1-16).
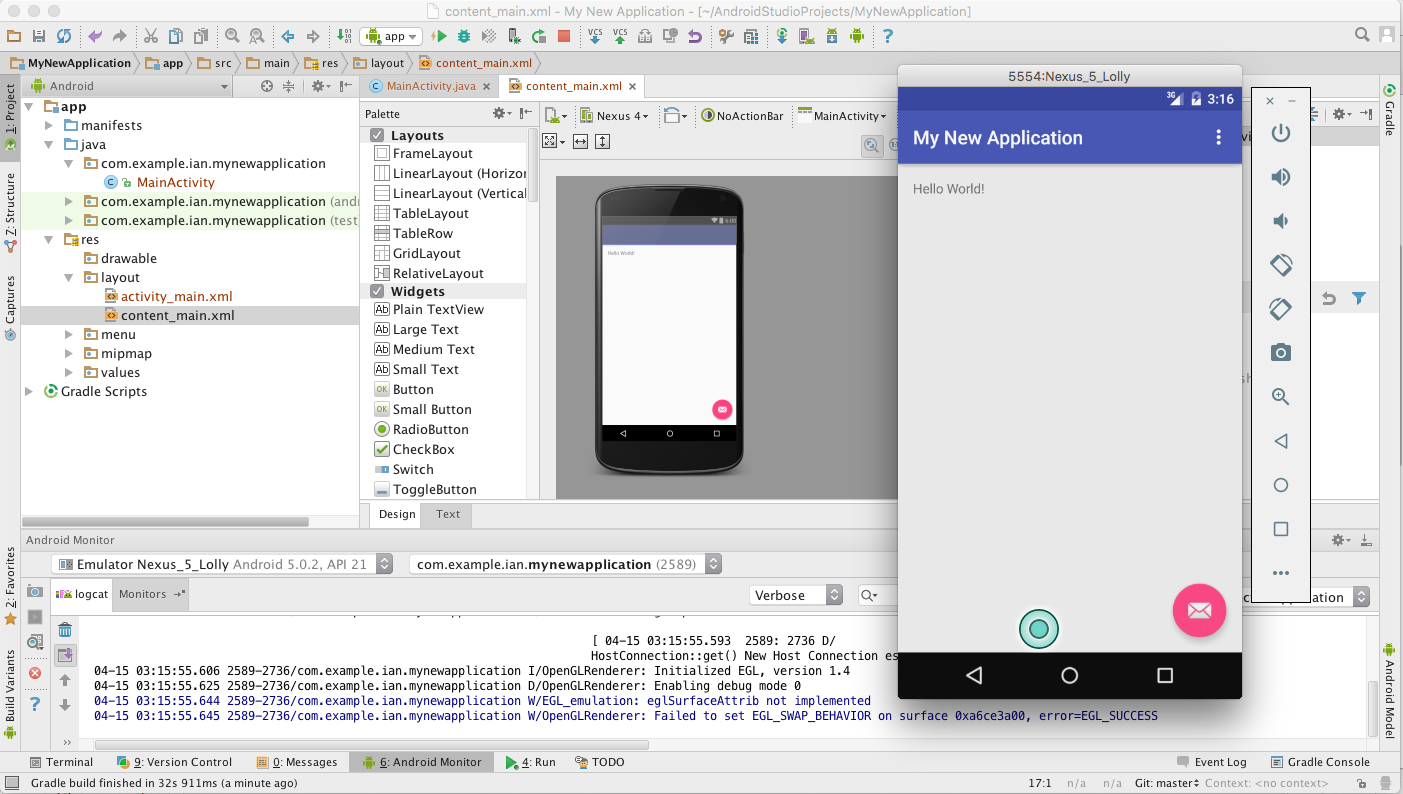
Figure 1-16. Studio running an app in AVD
1.8 Using the Kotlin Language in Building Android Apps
Problem
You’ve heard that Kotlin requires less “typing” than Java and want to try it out.
Solution
Using Android Studio, create a New Project and ensure that you check the “Include Kotlin Support” box (see Figure 1-17). Click through the remaining screens to create the project. Behold: your main activity class is written in Kotlin instead of Java!
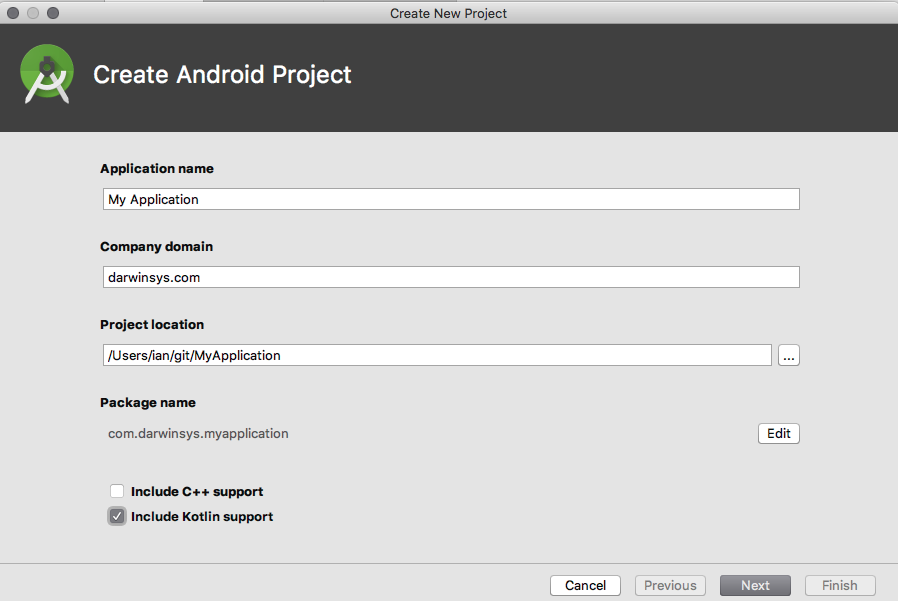
Figure 1-17. Creating a project with Kotlin support
Discussion
Kotlin is one of several newer programming languages that simplify Java. Kotlin has the advantage of compiling directly to JVM bytecode, so that anything which can be done in Java, can be done (probably more easily) in Kotlin. Here, for example, is most of the main code from a basic “Hello World” Android app generated by Android Studio’s New Project wizard:
package com.darwinsys.myapplication

import android.os.Bundle
import android.support.design.widget.Snackbar
import android.support.v7.app.AppCompatActivity
import android.view.Menu
import android.view.MenuItem

import kotlinx.android.synthetic.main.activity_main.*

class MainActivity : AppCompatActivity() {

    override fun onCreate(savedInstanceState: Bundle?) {
        super.onCreate(savedInstanceState)
        setContentView(R.layout.activity_main)
        setSupportActionBar(toolbar)

        fab.setOnClickListener { view ->
            Snackbar.make(view, "Replace with your own action", Snackbar.LENGTH_LONG)
                    .setAction("Action", null).show()
        }
    }

    override fun onCreateOptionsMenu(menu: Menu): Boolean {
        // Inflate the menu; this adds items to the action bar if it is present.
        menuInflater.inflate(R.menu.menu_main, menu)
        return true
    }
    ....
}
Since you’ve read this far in the book we’ll assume you know Java and Android well enough to understand most of this code. Note the following:
-
Lots of types and declarations are inferred.
-
Use “:” instead of
extends. -
You don’t have to declare the return type of functions (or even whether they’re void) when overriding, as that information is inferred by the compiler. Just use the override keyword (not an added-on Annotation as in Java), and the
funkeyword to define a function, returning a value if needed. -
Where does
fabcome from? It is only declared in the layout XML file:<android.support.design.widget.FloatingActionButton android:id="@+id/fab" ... />
Yet the Kotlin code is able to access it. That’s pretty neat, and symptomatic of the kinds of things that Kotlin and Android Studio working together can do to make your life easier.
For more information, check out some of the following:
-
Kotlin Programming Language home page
-
Kotlin and Android at the official Android Developers site
1.9 Converting an Eclipse ADT Project to Android Studio
Ian Darwin
Discussion
Note that, at the time of writing, this works for ADT projects but not for AndMore projects.
To convert an ADT project to Studio, close any previous projects, or start Android Studio if it’s not running. Select “Import project” from the Welcome screen (Figure 1-18).
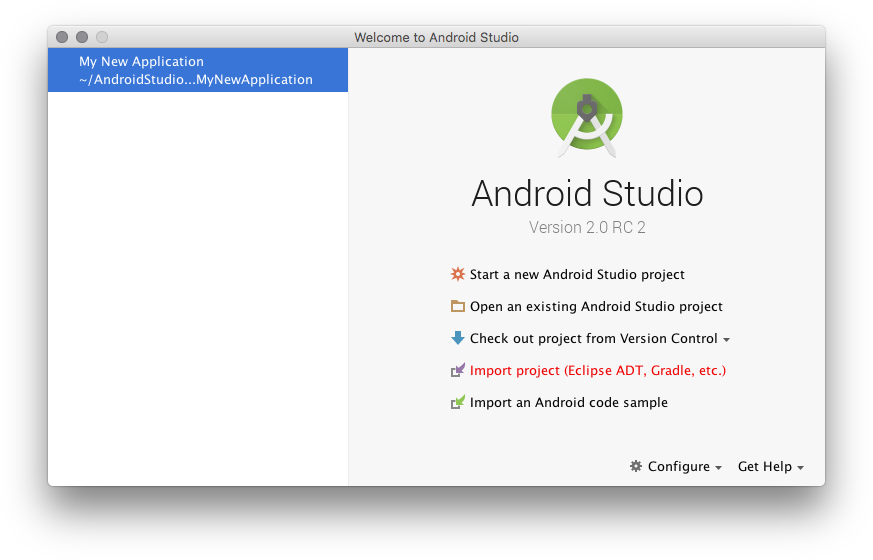
Figure 1-18. Studio: Starting to convert a project
In the dialog that pops up, navigate to the root of the Eclipse folder. This will normally have res and src folders underneath it, assuming that standard ADT layout was used (Figure 1-19).

Figure 1-19. Studio: Location of project to convert
Now you get to pick a new location for the converted project (Figure 1-20). The default is good for starting, unless you or your organization has a policy on where to place projects.
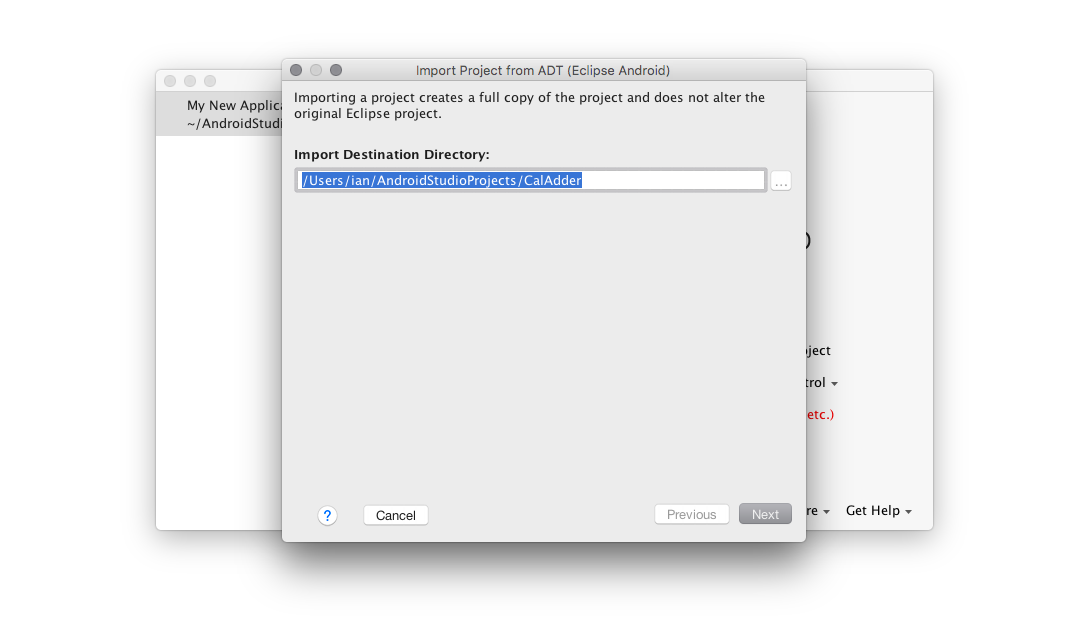
Figure 1-20. Studio: Location to convert the project into
Note that you must pick a different location from where the Android project exists, which totally destroys the project history—your Git or CVS or Subversion history ends at the current state of the application under Eclipse, and a new history will begin with it under Studio. For people who think Studio is the best thing since the motor car, this will seem like a good thing. For those of us who understand that Studio is just another tool in a long series, it will seem like an aberration, or at least an annoyance. I have files on GitHub whose revision dates precede the existence of both Java IDEs and GitHub (and at least one repository whose creation predates the existence of Java), and I wouldn’t want to lose that history. It’s annoying because it could be done better, by more comprehensive integration with tools such as Git. However, it is what it is. If you want to keep the history, you can work around this as described in Recipe 1.10, instead of following the recipe you are now reading.
After you’ve specified the import directory more options will appear, related to replacing JARs with references to standard ones (Figure 1-21). Again, the defaults are usually what you want.
Finally, the converted project will appear (Figure 1-22). The editor window is filled with a summary of what happened. If it looks similar to the one here, it has probably succeeded.
You should now be able to run the project by selecting the “app” module and pressing the green Run button.

Figure 1-21. Studio: Options for converting the project
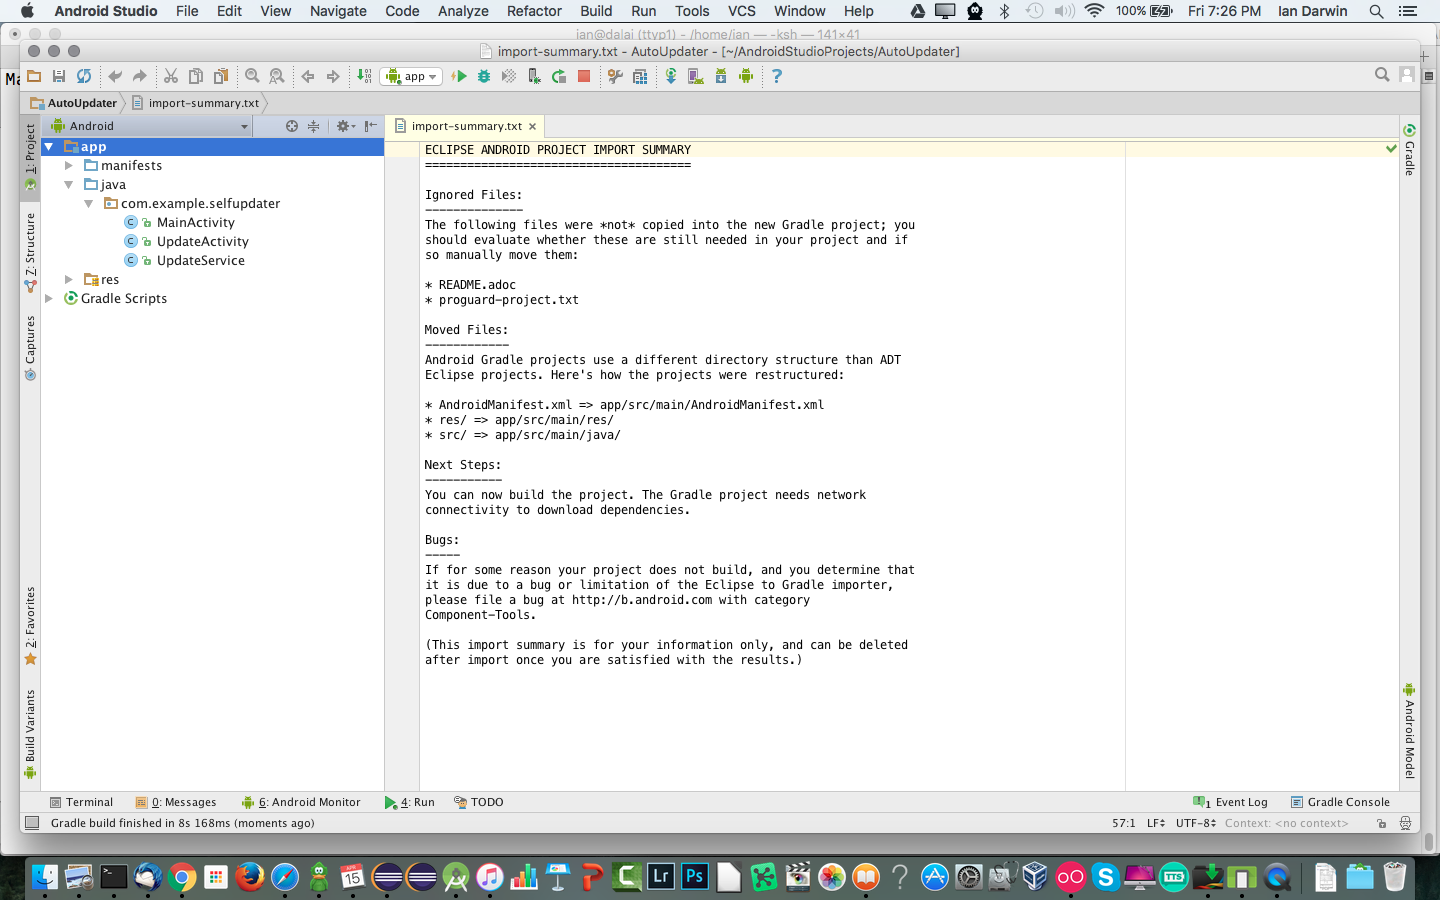
Figure 1-22. Studio: The converted project
1.10 Preserving History While Converting from Eclipse to Android Studio
Ian Darwin
Problem
As shown in Recipe 1.9, the Android Studio import mechanism creates a new project in a new directory, causing a break in your revision control history. You want instead to convert a project permanently from Eclipse to Android Studio, but without losing years of valuable source control history.
Solution
One approach is to use the source control program’s “move” command to restructure the project in place, into a form that Studio/Gradle can understand.
Discussion
The process will vary greatly depending on which source code management (SCM) system you use. One of the oldest widely used SCMs was CVS, the Concurrent Versions System. CVS did not support moving of files, so if your project is still in CVS (or RCS or SCCS, two even older SCMs) you will want to convert it into Git first, and learn to use Git, if you really want to preserve history. I know this process can work well because my public GitHub repositories contain some files with modification dates a full 10 years before Git was written. Accordingly, this example assumes you have your Eclipse Android project in the Git SCM. And I’ll describe the steps in the form of Unix/Linux/macOS command-line steps because that’s the most concise format. Understand that this is only general guidance; your mileage will certainly vary!
You will also want to have a variety of both Eclipse and Android Studio projects to compare with
and to copy missing bits from; the examples from this book (see “Getting and Using the Code Examples”, or git clone https://github.com/IanDarwin/Android-Cookbook-Examples) would be a good resource to have at hand.
Plan A: Moving files around
I used this approach to convert a privately funded Android app, consisting of 30 Java files and numerous resource files, from Eclipse format to Android Studio format; I got it going in an hour or two, with its revision history intact.
First, create a copy, so that if the conversion messes up too badly you can delete the whole thing and start over (a Git purist might argue that you should just use a branch, but this is my way of doing it):
$ cp -r ~/git/myproject /tmp/myproject
$ cd /tmp/myproject
Now you need to convert the structure of the project. Eclipse used a simple src folder, whereas modern build tools like Maven and Gradle (Recipe 1.7) use a structure like src/main/java. If you have standalone (pure Java, non-Android) unit tests, they may be in a folder called test, which has to become src/test/java. Also, the resources folder (res) and the Android manifest file have to move to src/main:
$ rm -fr bin build gen target # Start with a cleanup
$ mkdir -p src/main/java
$ mkdir -p src/test/java
$ git mv src/com src/main/java
$ git mv test/com src/test/java/
$ git mv res src/main/
$ git mv AndroidManifest.xml src/main/
$ rmdir test
The next step is to convert the dependency information in your .classpath or pom.xml file into the build.gradle file:
$ cat ../__SomeExistingStudioProject__/build.gradle pom.xml > build.gradle
$ vi build.gradle # Merge the dependencies by hand
$ git rm -f pom.xml
$ git add build.gradle
Create a local.properties file containing the path to the Android SDK on your dev machine, using a command like one of the following:
$ cp ../__SomeExistingStudioProject__/local.properties .

$ echo 'sdk.dir=/Users/ian/android-sdk-macosx' > local.properties
Now you will need to copy a few files from an existing Android Studio project: at least gradlew (for Unix/Linux/macOS) and/or gradlew.bat (for Windows cmd.exe).
If your project doesn’t have a .gitignore file, create one, and add the local.properties file to it:
$ echo local.properties >> .gitignore
Now try building the project, either by typing gradlew build or by opening it in Android Studio.
Then hack at it until it works.
When you’re comfortable, git commit. When you’re really happy, git push.
Plan B: Moving files into a new project
An alternative approach would be as follows. I have not tested this myself, but it seems simpler:
Create a new project using the Studio New Project wizard.
Copy files from your existing project into the new project, using the earlier move commands as a guide.
Copy your revision history into the new project, which won’t have one yet:
$ cp -r oldProject/.git newProject/.git
After verifying that the project is reasonably sane, save the changes, assuming that Git will recognize the moved files (it usually will):
$ git commit -m "Reorganize project for Android Studio"
Hack at it as needed until it works properly.
git commitany last-minute changes, andgit push.
1.11 Controlling Emulators/Devices Using Command-Line ADB
Rachee Singh
Solution
Use the ADB command-line tool to install the .apk file onto the running emulator; you can also use this tool to install an .apk file onto a connected Android device, uninstall an .apk from such a device, list running/connected devices, etc.
Discussion
To install the .apk file, follow these steps:
-
Find the location on your machine where you have installed the Android SDK. In the Android SDK directory, go to the tools directory.
-
In the tools directory, look for an executable named adb. If it is not present, there should be an adb_has_moved.txt file. The contents of this file merely state that adb is present in the platform-tools directory instead of the tools directory.
-
Once you have located the adb program, either
cdto that location in a terminal (Linux) or command prompt (Windows), or, add that directory to yourPATH, however that’s done on your operating system. -
Use the command
adb install location of the .apk you want to install. If you get “command not found” on macOS or Linux, try using./adbinstead of justadb.
This should start the installation on the device that is currently running (either an emulator that is running on your desktop, or a physical Android device that is connected). You can also use adb to uninstall, but here, you must use the package name: e.g., adb uninstall com.example.myapp.
If you have more than one connected device or running emulator, you can list them with adb devices:
$ adb devices
List of devices attached
emulator-5554    device
ZX1G000BXB    device

$
In this listing, the ZX entry is a Nexus device, and one emulator is running.
When you only have one device connected or one emulator running, you can simply use adb -d … or adb -e …, respectively.
There are also command-line options that let you refer to an emulator by its port number (port numbers are displayed at the top of the emulator window; they are the TCP/IP communications ports that start at 5554 and increment by 2 for each running emulator) or by its device serial number for a real device.
The emulator in the preceding adb devices output is listening on TCP port 5554 for connections from adb.
One more thing you can do: adb shell gets you a Unix command-line shell on the device, which can be useful for developers to have access to. Unless your device is “rooted” it will run as a nonprivileged user, but at least you can look around, copy public files, etc.
After the installation finishes, you should see the icon of the application you just installed in the application drawer of the Android device/emulator. In this example we installed the HelloMaven application, so the HelloMaven app icon appears near the lower left of Figure 1-23.
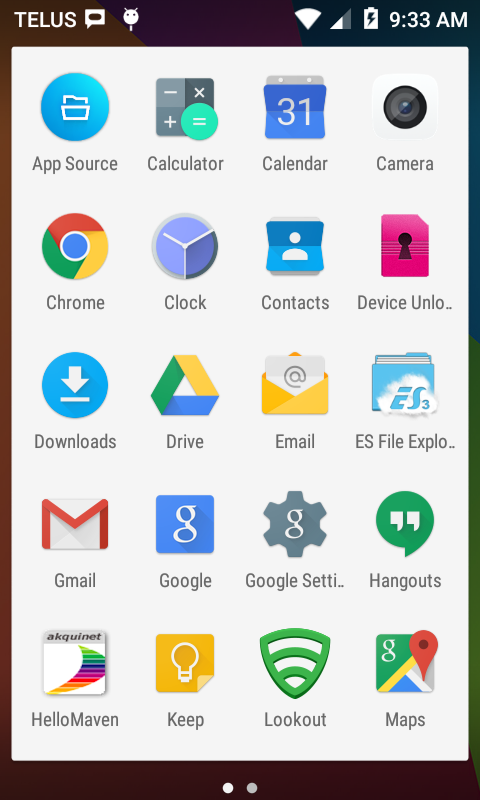
Figure 1-23. The HelloMaven app icon in the app drawer after installation completes
The adb command with no arguments, or invalid arguments, prints a very long “help text,” which lists all its options.
1.12 Referencing Libraries to Implement External Functionality
Rachee Singh
Solution
There are several solutions:
-
Use Gradle to build your project. Just list a Gradle dependency, and your build tool will download and verify it.
-
Depend on a module (Studio) or a library project.
-
(last resort) Download the JAR file for the library that you require and add it to your project.
Discussion
We describe here various mechanisms for downloading and including JAR files into your projects. We do not discuss the burden of responsibility for licensing issues when including third-party JAR files; that’s between you and your organization’s legal department. Please be aware of, and comply with, the license requirements of JAR files that you use!
List the dependency
Few developers want to download JAR files explicitly, when tools like Maven and Gradle will handle dependency management for them. To use an external API, you need only find the correct “coordinates” and list them. The coordinates consist of three parts:
-
A group ID, which is often based on the JAR developer’s domain name and project name, such as
com.darwinsys,org.apache.commons, etc. -
An artifact ID, which is the name of the particular project from the developer, such as
darwinsys-api,commons-logging-api, etc. -
A version number/string, such as
1.0.1,1.2.3-SNAPSHOT,8.1.0-Stable, etc.
These three parts are combined into a form like this for Maven in build.xml:
<dependency><groupId>commons-logging</groupId><artifactId>commons-logging-api</artifactId><version>1.1</version></dependency>
For Gradle you use a shorter form in build.gradle:
compile 'commons-logging:commons-logging-api:1.1'
Once the dependency is in your build file, just build your project! If the JAR you need hasn’t been downloaded already, the build tool will download it and save it in a private repository, so you never have to download it again until you change the version number you’re depending on.
For more on Gradle, see https://gradle.org.
Note that in the future, if you develop an API that might be useful to others and are willing to make it available, and have a community around it or other ways of getting the word out about it, you are encouraged to give back to this pool of software; see http://central.sonatype.org to contribute your JAR.
Depend on a module or project
In Android Studio, right-click in the Project pane (upper left of screen) and select Open Module Settings. Choose the Dependencies tab.
Click the Add button (the “+” sign in the lower left).
Choose Library to use an existing library, File for a JAR file, or Module for a module in your project.
Suppose you want to depend on my darwinsys-api JAR file, and have it downloaded from Maven Central
so you don’t have to keep track of the file. Select the Library choice. Enter darwinsys in the search box, and press Enter. After a second or two, you should see the list of darwinsys projects.
Click the darwinsys-api entry (the first one in Figure 1-24).
If you need to add more libraries, repeat the Add process. When done, click OK.
The build files will be updated and the dependency downloaded, and it will be available
on your classpath.
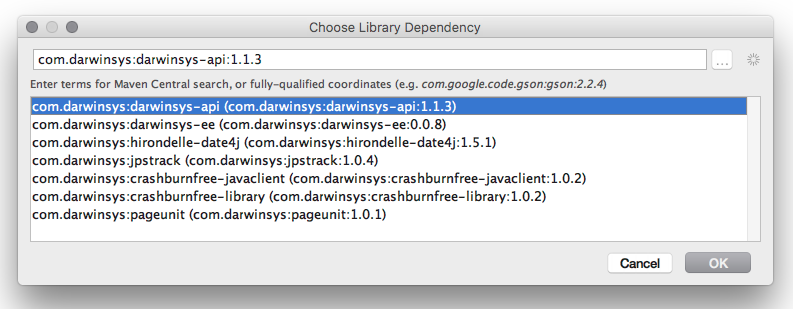
Figure 1-24. Adding a dependency in Android Studio
1.13 Using New Features on Old Devices via the Compatibility Libraries
Ian Darwin
Solution
Use the compatibility libraries—that’s what they’re there for.
Discussion
Android is a wonderful system for users—new features are added with every release. But there’s a problem—older devices don’t get the latest version of Android. Manufacturers at the low end (low-budget devices) might not ever issue an update to their devices. At the higher end (so-called “flagship” devices), users usually get 2 or 3 years of updates from the manufacturer. But manufacturers (and cell phone carriers) expect users to update often, like car manufacturers who come out with new models every year to embarrass owners into buying upgrades they don’t really need.
The downside of this for us as developers is that some features that have been added in modern versions, such as Android 7, will not exist on some users’ devices. If you don’t take this into account, you may wind up calling methods that exist in modern versions but not in the library on every user’s device. This will, of course, end badly.
The solution is the compatibility libraries. These provide replacement versions of common classes (such as Activity)
that use only features found on the older Android version, but provide the functionality of newer versions.
Now, you might think that old versions fade away quickly, but a look at the Android Versions dashboard reveals this to be true only from a certain point of view (Figure 1-25).
Notice that Froyo, API 8, is at 0.1%, which is the threshold for inclusion. Thus you’d expect it to disappear any day now, but in fact, it’s been at 0.1% for several months. There are an estimated 1.5 billion Android devices. So 0.1% of that means there are still a million and a half active users of Froyo devices. For Gingerbread there are still 25 million active devices. If you’re prepared to overlook 26 million potential customers, fine. But even then it’s not that simple—there are features that were added in Android 4, 5, 6, … How do you keep track of what features are in what versions? For the most part, you don’t need to. That is, if you use the compatibility libraries!
If you create a new project using Android Studio, the project will by default use the compatibility library.
If you are working on a project that doesn’t have “compat” support, you can add it easily.
One way is to add the library manually by editing your build file to include the library with coordinates
(see Recipe 1.12) com.android.support:design:24.1.1; add this to pom.xml for Maven or app/build.gradle
for Android Studio (you may have to do a “Refresh” or “Project Sync” afterward).
In Android Studio you can also select the “app” module and select Module Properties → Dependencies, click Add,
and select the latest version of the compatibility library.
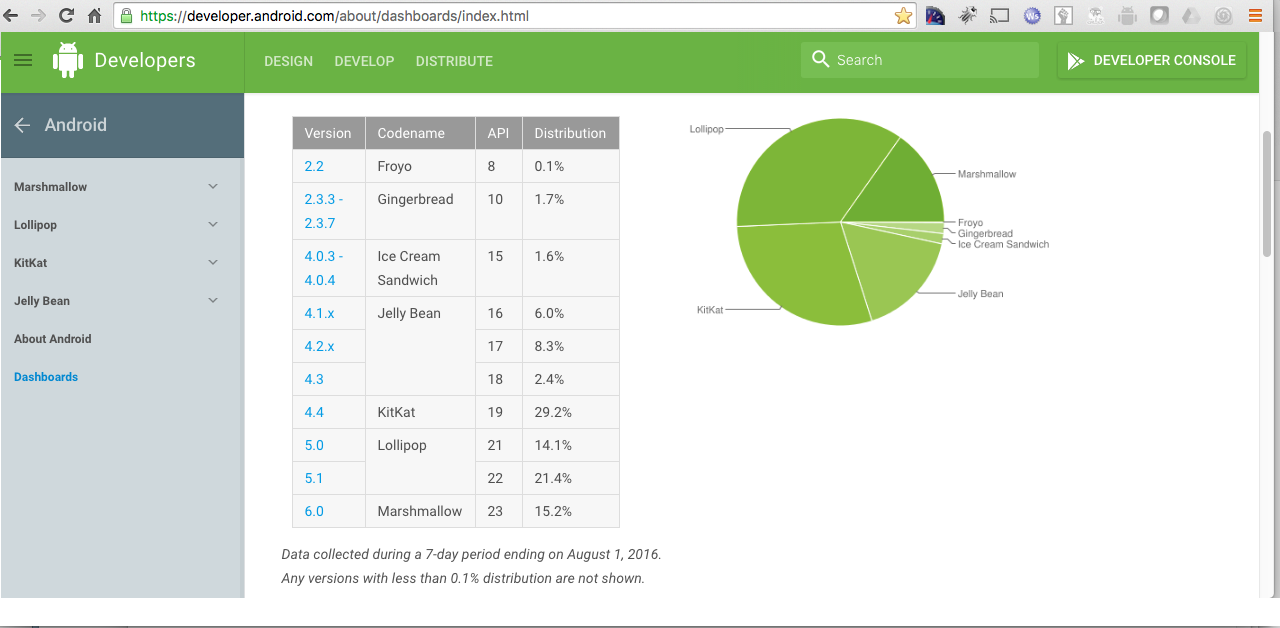
Figure 1-25. Android Platform Versions dashboard (as of August 2016)
Then, the most important change is to ensure that your Activities—any that will need the latest facilities—are based on AppCompatActivity rather than the regular Activity:
publicclassMainActivityextendsAppCompatActivity{...}
There are some other places where the “appcompat” libraries enter into the view of the coder; we will mostly call these out in place in the rest of this book.
1.14 Using SDK Samples to Help Avoid Head Scratching
Daniel Fowler
Solution
Looking at existing working code will help. The Android SDK has sample programs that you can pick apart to see how they work.
Discussion
The Android SDK comes with many sample applications that can be useful when trying to code up some functionality. Looking through the sample code can be instructive. Once you have installed the Android SDK, several samples become available. In Android Studio, you can examine the list, and make a runnable copy of one, using the Import Sample wizard (File → Import Sample). The available samples change over time; part of the list as of late 2016 is shown in Figure 1-26. Some of the samples feature screenshot previews, as does the Camera app currently selected. All the samples are individual repositories that can also be directly downloaded from Google Samples.
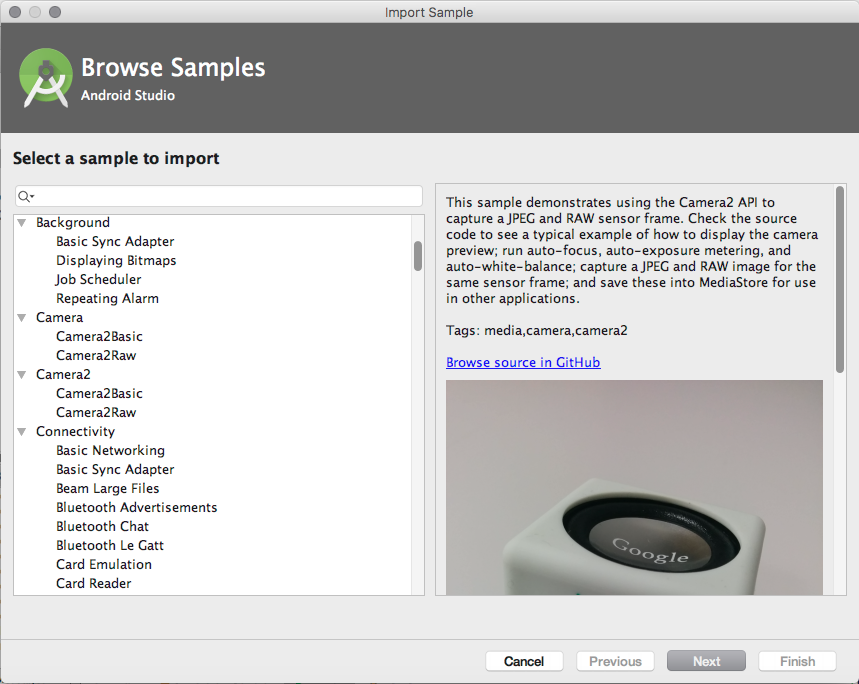
Figure 1-26. Google Android samples
To open a sample project, just select it in the list, and click Next. You will be given the option to change the application’s name and where it is stored. Click Finish and the project will be created.
After a short time, the sample will open as a project, and you will be able to browse the source code to see how it is all done.
See Also
The samples at Google Samples; Android Developers; and this cookbook, of course.
You can also search the web for additional programs or examples. If you still can’t find what you need, you can seek help from Stack Overflow, using “android” as the tag, or from the Internet Relay Chat (IRC) channel #android-dev on Freenode.
1.15 Taking a Screenshot/Video from the Emulator/Android Device
Rachee Singh, Ian Darwin
Discussion
Capturing screenshots
There are several methods of recording screen captures. Modern versions of the Android emulator or AVD feature a toolbar with a camera button, which works as long as the emulated device is based on API 14 or higher. This is shown in Figure 1-27.
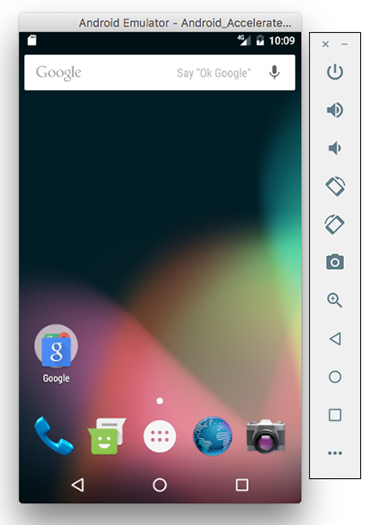
Figure 1-27. Android emulator camera button
Pictures taken with this technique are stored on your desktop computer rather than on the device:
$ ls -lt ~/Desktop | head -2
total 12345
-rw-r--r--    1 ian  staff    254317 Nov  6 10:05 Screenshot_1478444709.png
open ~/Desktop/Screenshot_1478444709.png
$
On a Mac, the open command will normally cause the file to be opened (obvious, eh?)
in the user’s chosen image handling application (Preview by default).
If you are running on a real device, use the built-in hardware feature for screen capture. This varies per device, but on many commercial devices long-pressing both the Power and Volume Down (or Volume Up and Volume Down), buttons at the same time will work—you’ll hear a camera sound, and on modern devices you’ll see a notification. You then have to locate and pull the file from your device, either using the Android Device Monitor in the IDE or from the command line, as shown here:
$ adb -d ls /sdcard/Pictures/Screenshots
$ adb -d pull /sdcard/Pictures/Screenshots/Screenshot_20160820-104327.png x.png
copy it someplace safe
$ adb -d shell rm /sdcard/Pictures/Screenshots/Screenshot_20160820-104327.png
This gets a listing (ls) of files in the Screenshots folder (whose location may
vary slightly on different devices or versions) from the physical device (-d).
Using -d avoids you having to shut down your running emulators or specify
the device’s long name. Then we pull the file from the device to the desktop machine,
picking a meaningful name for it in the process. After backing it up, we return
here and remove (rm) the file from the device.
You don’t have to do this, but if you don’t it will get harder
and harder to find the images, as the ls output will get longer and longer, and it’s not displayed in any useful order.
It is believed that Android 7.1 will allow you to take a “partial screenshot” by starting in a similar fashion (perhaps pressing Power + Volume Up?), then dragging to select a region on the screen; the code exists but this is an unannounced feature, so we’ll have to see whether it becomes available.
To use the DDMS Device Screen Capture feature, follow these steps:
-
Run the application in the IDE and go to the DDMS view (Window menu → Open Perspective → Other → DDMS or Window menu → Show View → Other → Android → Devices); the former is shown in Figure 1-28).
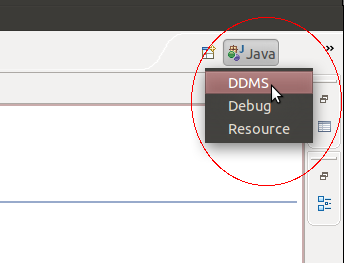
Figure 1-28. Starting DDMS view
-
In the DDMS view, select the device or emulator whose screen you want to capture.
-
In the DDMS view, click the Screen Capture icon (see Figure 1-29).
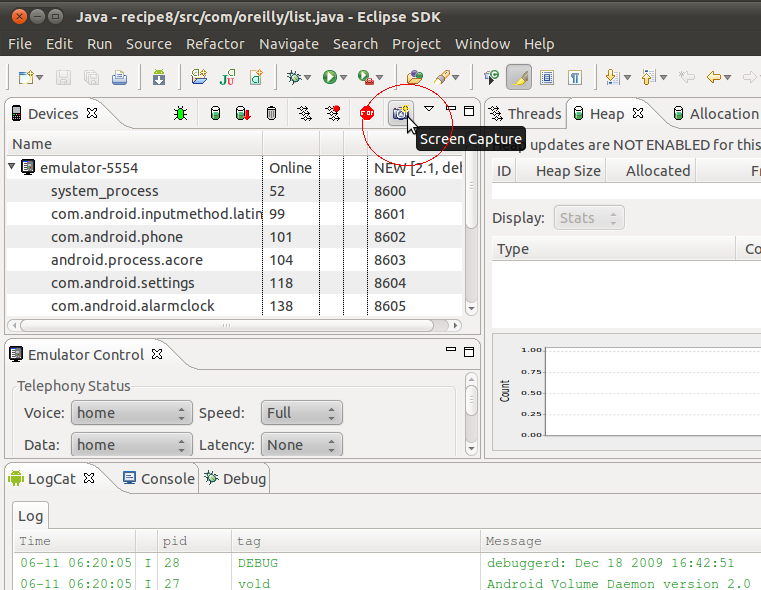
Figure 1-29. Device Screen Capture
-
A window showing the current screen of the emulator/Android device will pop up. It should look like Figure 1-30. You can save the screenshot and use it to document the app.
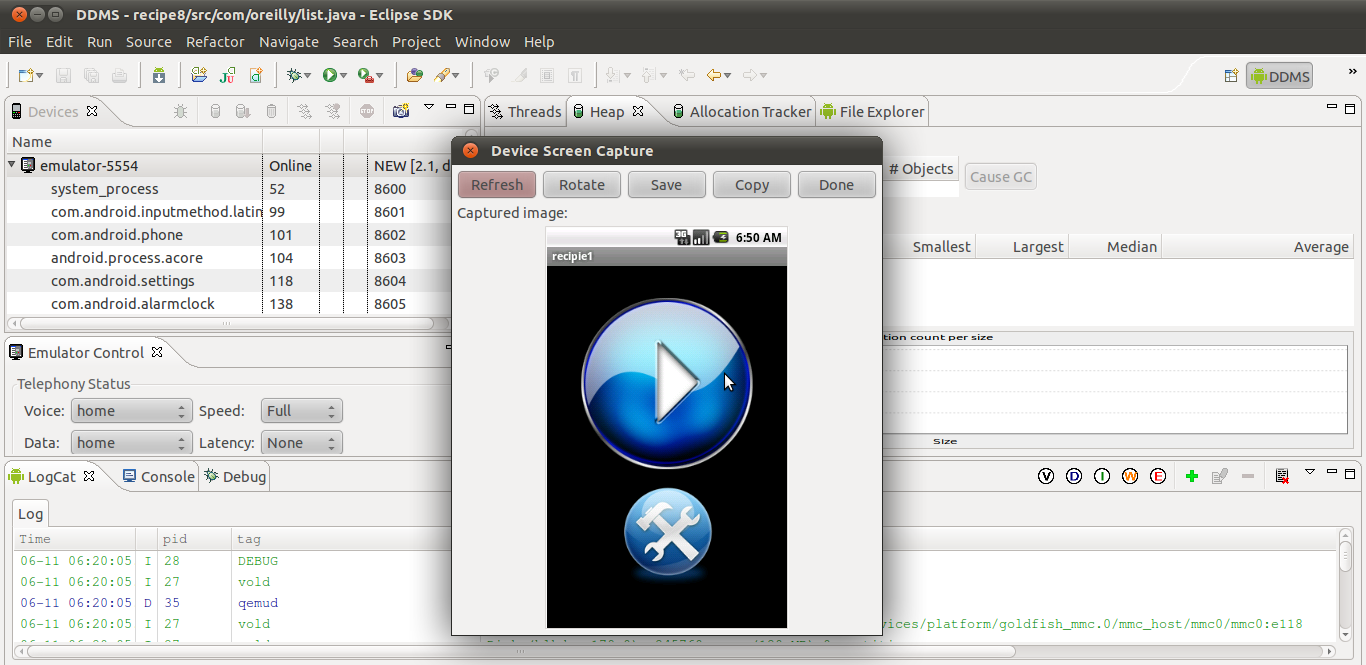
Figure 1-30. The screenshot
Alternatively, to do this at a command-line level, use adb.
You will have to use adb shell to run the “mount” command
to find a writable directory on your particular device, since most Android versions do not feature the
otherwise-universal /tmp folder. Once that’s done, use adb shell to run the screencap
program on the device, then “pull” the file down to your desktop, as shown here:
$ adb shell screencap -p /mnt/asec/pic.png # Now in a file on the device
$ adb -e pull /mnt/asec/pic.png            # Now in a file on my dev machine
[100%] /mnt/asec/pic.png
$ ls -l pic.png                            # Make sure!
-rw-r--r--@ 1 ian  staff  59393 Jun 21 17:30 pic.png
$ adb shell rm /mnt/asec/pic.png           # Free up storage on the device
$ # ... now do something with pic.png on the developer machine
If you create your screenshot with the on-device key sequence
(usually pressing and holding Power and Volume Down
at the same time), the screenshot will be created in a fixed directory with a datestamp
in the name; you can then “list” (ls) the directory and pull the file down
and rename it to a better name:
$ adb -d ls /sdcard/Pictures/Screenshots
000041f9 00001000 57c62dd8 .
000041f9 00001000 578f7813 ..
000081b0 000a231c 55760303 Screenshot_20150608-170256.png
000081b0 0001176d 55760308 Screenshot_20150608-170303.png
000081b0 0006b9b4 557a1619 Screenshot_20150611-191328.png
000081b0 0001968a 55869982 Screenshot_20150621-070121.png
... and a bunch more ...
$ adb -d pull /sdcard/Pictures/Screenshots/Screenshot_20160714-093303.png
[100%] /sdcard/Pictures/Screenshots/Screenshot_20160714-093303.png
$ mv Screenshot_2016-07-14-09-33-03.png SomeBetterName.png
$
The datestamp portion of the filenames is, in case it isn’t obvious, in the ISO international standard order—year, month, and day, then a dash (-), then hour, minute, and second—though not quite in the ISO format.
Capturing screen video
To record your device’s screen for documentation or screencast purposes, you need to run the screenrecord program on the device,
which creates a file there, then use adb pull or other means to bring the file over to your desktop system.
Remember that both your desktop computer and your device have a similar hierarchical filesystem (if you run Unix, including macOS, or Linux,
the filesystem structure is almost identical, since Android is based on Linux, and Linux began as a copy of Unix).
Just keep in mind which filenames are on which computer!
The adb command communicates with the device and runs a “shell” or command interpreter, which we use to run the screenrecord
command on the device, capturing output into a temporary file in the /sdcard directory:
$ adb shell screenrecord /sdcard/tmpFileName.mp4
Now you can interact with the application to show the bug or feature that you want to document.
When you are done, stop the adb command, e.g., with Ctrl-C in the terminal window.
Then pull the temporary file from the /sdcard folder on the device to some convenient place
on your desktop (you can assign it a better name at the same time if you like, such as myScreencastSegment.mp4):
$ adb pull /sdcard/tmpFileName.mp4 myScreencastSegment.mp4
You can then view or post-process the video using whatever tools you have on your desktop system. Figure 1-31 shows a simple video, recorded and downloaded in this way, playing on my desktop.
Once the video is safely on your desktop (and backed up!), you’ll probably want to remove the file from your device so you don’t run out of disk space:
$ adb rm /sdcard/tmpFileName.mp4
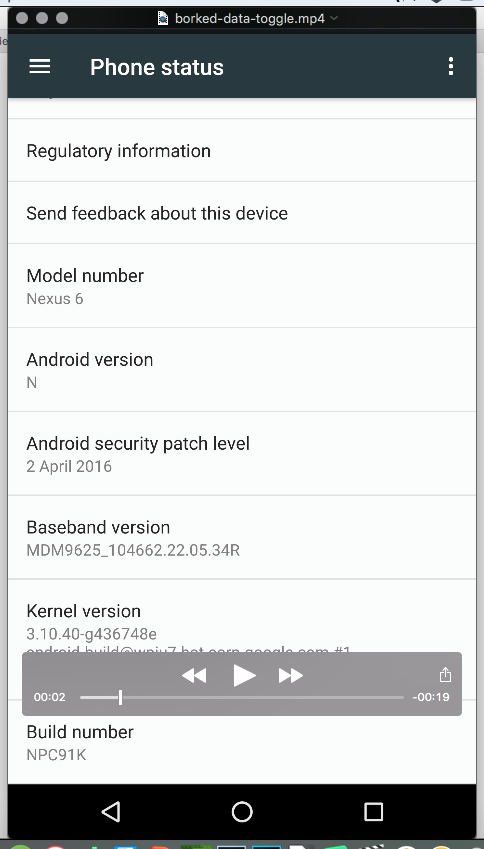
Figure 1-31. Captured video playing
See Also
The Android Studio User Guide documentation on the
screencap tool
and screenrecord tool.
1.16 Program: A Simple CountDownTimer Example
Wagied Davids
Solution
Android comes with a built-in class for constructing CountDownTimers. It’s easy to use, it’s efficient, and it works (that goes without saying!).
Discussion
The steps to provide a countdown timer are as follows:
-
Create a subclass of
CountDownTimer. This class’s constructor takes two arguments:CountDownTimer(long millisInFuture, long countDownInterval). The first is the number of milliseconds from now when the interval should be done; at this point the subclass’sonFinish()method will be called. The second is the frequency in milliseconds of how often you want to get notified that the timer is still running, typically to update a progress monitor or otherwise communicate with the user. Your subclass’sonTick()method will be called with each passage of this many milliseconds. -
Override the
onTick()andonFinish()methods. -
Instantiate a new instance in your Android Activity.
-
Call the
start()method on the new instance created!
The example Countdown Timer program consists of an XML layout (shown in Example 1-1) and some Java code (shown in Example 1-2). When run, it should look something like Figure 1-32, though the times will probably be different.
Example 1-1. main.xml
<?xml version="1.0" encoding="utf-8"?><LinearLayoutxmlns:android="http://schemas.android.com/apk/res/android"android:orientation="vertical"android:layout_width="fill_parent"android:layout_height="fill_parent"><Buttonandroid:id="@+id/button"android:text="Start"android:layout_width="fill_parent"android:layout_height="wrap_content"/><TableLayoutandroid:padding="10dip"android:layout_gravity="center"android:layout_width="fill_parent"android:layout_height="wrap_content"><TableRow><TextViewandroid:id="@+id/timer"android:text="Time: "android:paddingRight="10dip"android:layout_width="wrap_content"android:layout_height="wrap_content"/><TextViewandroid:id="@+id/timeElapsed"android:text="Time elapsed: "android:paddingRight="10dip"android:layout_width="wrap_content"android:layout_height="wrap_content"/></TableRow></TableLayout></LinearLayout>
Example 1-2. Main.java
packagecom.examples;importandroid.app.Activity;importandroid.os.Bundle;importandroid.os.CountDownTimer;importandroid.view.View;importandroid.view.View.OnClickListener;importandroid.widget.Button;importandroid.widget.TextView;publicclassMainextendsActivityimplementsOnClickListener{privateMalibuCountDownTimercountDownTimer;privatelongtimeElapsed;privatebooleantimerHasStarted=false;privateButtonstartB;privateTextViewtext;privateTextViewtimeElapsedView;privatefinallongstartTime=50*1000;privatefinallonginterval=1*1000;/** Called when the Activity is first created. */@OverridepublicvoidonCreate(BundlesavedInstanceState){super.onCreate(savedInstanceState);setContentView(R.layout.main);startB=(Button)this.findViewById(R.id.button);startB.setOnClickListener(this);text=(TextView)this.findViewById(R.id.timer);timeElapsedView=(TextView)this.findViewById(R.id.timeElapsed);countDownTimer=newMalibuCountDownTimer(startTime,interval);text.setText(text.getText()+String.valueOf(startTime));}@OverridepublicvoidonClick(Viewv){if(!timerHasStarted){countDownTimer.start();timerHasStarted=true;startB.setText("Start");}else{countDownTimer.cancel();timerHasStarted=false;startB.setText("RESET");}}// CountDownTimer classpublicclassMalibuCountDownTimerextendsCountDownTimer{publicMalibuCountDownTimer(longstartTime,longinterval){super(startTime,interval);}@OverridepublicvoidonFinish(){text.setText("Time's up!");timeElapsedView.setText("Time Elapsed: "+String.valueOf(startTime));}@OverridepublicvoidonTick(longmillisUntilFinished){text.setText("Time remain:"+millisUntilFinished);timeElapsed=startTime-millisUntilFinished;timeElapsedView.setText("Time Elapsed: "+String.valueOf(timeElapsed));}}}
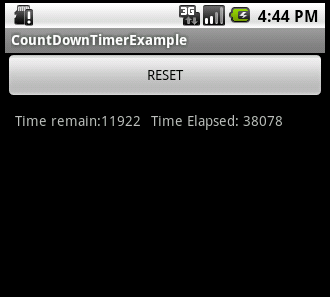
Figure 1-32. Timer reset
Source Download URL
The source code for this example is in the Android Cookbook repository, in the subdirectory CountDownTimerExample (see “Getting and Using the Code Examples”).
1.17 Program: Tipster, a Tip Calculator for the Android OS
Sunit Katkar
Problem
When you go with friends to a restaurant and wish to divide the check and tip, you can get into a lot of manual calculations and disagreements. Instead, you want to use an app that lets you simply add the tip percentage to the total and divide by the number of diners. Tipster is an implementation of this in Android, to show a complete application.
Solution
This is a simple exercise that uses the basic GUI elements in Android, with some simple calculations and some event-driven UI code to tie it all together.
Discussion
Android uses XML files for the layout of widgets. In our example project, the IDE generates a main.xml file for the layout. This file has the XML-based definitions of the different widgets and their containers.
There is a strings.xml file, which has all the string resources used in the application. A default icon.png file is provided for the application icon.
Then there is the R.java file, which is automatically generated (and updated when any changes are made to any XML resource file). This file has the constants defined for each layout and widget. Do not edit this file manually; the SDK tooling does it for you when you make any changes to your XML files. In our example we have Tipster.java as the main Java file for the Activity.
Creating the layout and placing the widgets
The end goal is to create a layout similar to the one shown in Figure 1-33. For this screen layout we will use the following layouts and widgets:
TableLayout-
This lays out
Viewcomponents in tabular form. Analogous to the HTMLTabletag paradigm. TableRow-
This defines a row in the
TableLayout. It’s like the HTMLTRandTDtags combined. TextView-
This
Viewprovides a label for displaying static text on the screen. EditText-
This
Viewprovides a text field for entering values. RadioGroup-
This groups together “radio buttons,” only one of which can be pressed at a time (named by analogy with the station selection button on a car radio).
RadioButton-
This provides a radio button, for use in a group.
Button-
This is a regular button.
View-
We will use a
Viewto create a visual separator with certain height and color attributes.
Familiarize yourself with these widgets, as you will be using these quite a lot in applications you build. When you go to the Javadocs for the given layout and widget components, look up the XML attributes. This will help you correlate the usage in the main.xml layout file and the Java code (Tipster.java and R.java) where these are accessed.
Also available is a visual layout editor in the IDE, which lets you create a layout by dragging and dropping widgets from a palette, like any form designer tool. However, it’s probably a good exercise for you to create the layout by hand in XML, at least in your initial stages of learning Android. Later on, as you learn all the nuances of the XML layout API, you can delegate the task to such tools.
The layout file, main.xml, has the layout information (see Example 1-3). A TableRow widget creates a single row inside the TableLayout, so you use as many TableRows as the number of rows you want. In this tutorial we will use eight TableRows—five for the widgets up to the visual separator below the buttons, and three for the results area below the buttons and separator.
Example 1-3. /res/layout/main.xml
<?xml version="1.0" encoding="utf-8"?><!--Using TableLayout to have HTML table-like control over layout--><TableLayoutandroid:id="@+id/TableLayout01"android:layout_width="fill_parent"android:layout_height="fill_parent"android:stretchColumns="1"xmlns:android="http://schemas.android.com/apk/res/android"><!--Row 1: Text label placed in column zero, text field placed in column two and allowed to span two columns. So a total of 4 columns in this row--><TableRow><TextViewandroid:id="@+id/txtLbl1"android:layout_width="wrap_content"android:layout_height="wrap_content"android:layout_column="0"android:text="@string/textLbl1"/><EditTextandroid:id="@+id/txtAmount"android:layout_width="wrap_content"android:layout_height="wrap_content"android:numeric="decimal"android:layout_column="2"android:layout_span="2"/></TableRow><!--Row 2: Text label placed in column zero, text field placed in column two and allowed to span two columns. So a total of 4 columns in this row--><TableRow><TextViewandroid:id="@+id/txtLbl2"android:layout_width="wrap_content"android:layout_height="wrap_content"android:layout_column="0"android:text="@string/textLbl2"/><EditTextandroid:id="@+id/txtPeople"android:layout_width="wrap_content"android:layout_height="wrap_content"android:numeric="integer"android:layout_column="2"android:layout_span="2"/></TableRow><!--Row 3: This has just one text label placed in column zero--><TableRow><TextViewandroid:id="@+id/txtLbl3"android:layout_width="wrap_content"android:layout_height="wrap_content"android:text="@string/textLbl3"/></TableRow><!--Row 4: RadioGroup for RadioButtons placed at column zero with column span of three, thus creating one radio button per cell of the table row. Last cell number 4 has the textfield to enter a custom tip percentage--><TableRow><RadioGroupandroid:id="@+id/RadioGroupTips"android:orientation="horizontal"android:layout_width="wrap_content"android:layout_height="wrap_content"android:layout_column="0"android:layout_span="3"android:checkedButton="@+id/radioFifteen"><RadioButtonandroid:id="@+id/radioFifteen"android:layout_width="wrap_content"android:layout_height="wrap_content"android:text="@string/rdoTxt15"android:textSize="15sp"/><RadioButtonandroid:id="@+id/radioTwenty"android:layout_width="wrap_content"android:layout_height="wrap_content"android:text="@string/rdoTxt20"android:textSize="15sp"/><RadioButtonandroid:id="@+id/radioOther"android:layout_width="wrap_content"android:layout_height="wrap_content"android:text="@string/rdoTxtOther"android:textSize="15sp"/></RadioGroup><EditTextandroid:id="@+id/txtTipOther"android:layout_width="fill_parent"android:layout_height="wrap_content"android:numeric="decimal"/></TableRow><!--Row for the Calculate and Rest buttons. The Calculate button is placed at column two, and Reset at column three--><TableRow><Buttonandroid:id="@+id/btnReset"android:layout_width="wrap_content"android:layout_height="wrap_content"android:layout_column="2"android:text="@string/btnReset"/><Buttonandroid:id="@+id/btnCalculate"android:layout_width="wrap_content"android:layout_height="wrap_content"android:layout_column="3"android:text="@string/btnCalculate"/></TableRow><!--TableLayout allows any other views to be inserted between the TableRow elements. So insert a blank view to create a line separator. This separator view is used to separate the area below the buttons which will display the calculation results--><Viewandroid:layout_height="2px"android:background="#DDFFDD"android:layout_marginTop="5dip"android:layout_marginBottom="5dip"/><!--Again TableRow is used to place the result textviews at column zero and the result in textviews at column two--><TableRowandroid:paddingBottom="10dip"android:paddingTop="5dip"><TextViewandroid:id="@+id/txtLbl4"android:layout_width="wrap_content"android:layout_height="wrap_content"android:layout_column="0"android:text="@string/textLbl4"/><TextViewandroid:id="@+id/txtTipAmount"android:layout_width="wrap_content"android:layout_height="wrap_content"android:layout_column="2"android:layout_span="2"/></TableRow><TableRowandroid:paddingBottom="10dip"android:paddingTop="5dip"><TextViewandroid:id="@+id/txtLbl5"android:layout_width="wrap_content"android:layout_height="wrap_content"android:layout_column="0"android:text="@string/textLbl5"/><TextViewandroid:id="@+id/txtTotalToPay"android:layout_width="wrap_content"android:layout_height="wrap_content"android:layout_column="2"android:layout_span="2"/></TableRow><TableRowandroid:paddingBottom="10dip"android:paddingTop="5dip"><TextViewandroid:id="@+id/txtLbl6"android:layout_width="wrap_content"android:layout_height="wrap_content"android:layout_column="0"android:text="@string/textLbl6"/><TextViewandroid:id="@+id/txtTipPerPerson"android:layout_width="wrap_content"android:layout_height="wrap_content"android:layout_column="2"android:layout_span="2"/></TableRow><!--End of all rows and widgets--></TableLayout>
TableLayout and TableRow
After examining main.xml, you can gather that TableLayout and TableRow are straightforward to use. You create the TableLayout once, then insert a TableRow. Now you are free to insert any other widgets, such as TextView, EditView, and so on, inside this TableRow.
Do look at the attributes, especially android:stretchColumns, android:layout_column, and android:layout_span, which allow you to place widgets the same way you would use a regular HTML table. I recommend that you follow the links to these attributes and read up on how they work for a TableLayout.
Controlling input values
Look at the EditText widget in the main.xml file at ![]() . This is the first text field for entering the “Total Amount” of the check. We want only numbers here. We can accept decimal numbers because real restaurant checks can be for dollars and cents—not just dollars, so we use the
. This is the first text field for entering the “Total Amount” of the check. We want only numbers here. We can accept decimal numbers because real restaurant checks can be for dollars and cents—not just dollars, so we use the android:numeric attribute with a value of decimal. This will allow whole values like 10 and decimal values like 10.12, but will prevent any other type of entry.
Similarly, ![]() uses
uses android:integer because you can’t eat dinner with half a guest!
This is a simple and concise way to control input values, thus saving us the trouble of writing validation code in the Tipster.java file and ensuring that the user does not enter nonsensical values. This XML-based constraints feature of Android is quite powerful and useful. You should explore all the possible attributes that go with a particular widget to extract the maximum benefit from this XML shorthand way of setting constraints. In a future release, unless I have missed it completely in this release, I hope that Android allows for entering ranges for the android:numeric attribute so that we can define what range of numbers we wish to accept.
Since ranges are not currently available (to the best of my knowledge), you will see later on that we do have to check for certain values like zero or empty values to ensure that our tip calculation arithmetic does not fail.
Examining Tipster.java
Now we will look at the Tipster.java file, which controls our application. This is the main class that does the layout and event handling and provides the application logic. The IDE creates the Tipster.java file in our project with the default code similar to that shown in Example 1-4.
Example 1-4. Code snippet 1 of TipsterActivity.java
packagecom.examples.tipcalc;importandroid.app.Activity;publicclassTipsterextendsActivity{/** Called when the Activity is first created. */@OverridepublicvoidonCreate(BundlesavedInstanceState){super.onCreate(savedInstanceState);setContentView(R.layout.main);}}
The Tipster class extends the android.app.Activity class. An Activity is a single, focused thing that the user can do. The Activity class takes care of creating the window and then laying out the UI. You have to call the setContentView(View view) method to put your UI in the Activity, so think of Activity as an outer frame that is empty and that you populate with your UI.
Now look at the snippet of the Tipster.java class shown in Example 1-5. First we define the widgets as class members. (Look at ![]() through
through ![]() in particular for reference.) Then we use the
in particular for reference.) Then we use the findViewById(int id) method to locate the widgets. The ID of each widget, defined in your main.xml file, is automatically defined in the R.java file when you clean and build the project in Eclipse. (By default, Eclipse is set to build automatically, so the R.java file is instantaneously updated when you update main.xml.)
Each widget is derived from the View class and provides special GUI features, so a TextView provides a way to put labels on the UI, while EditText provides a text field. Look at ![]() through
through ![]() in Example 1-5. You can see how
in Example 1-5. You can see how findViewById() is used to locate the widgets.
Example 1-5. Code snippet 2 of TipsterActivity.java
publicclassTipsterextendsActivity{// Widgets in the applicationprivateEditTexttxtAmount;privateEditTexttxtPeople;privateEditTexttxtTipOther;privateRadioGrouprdoGroupTips;privateButtonbtnCalculate;privateButtonbtnReset;privateTextViewtxtTipAmount;privateTextViewtxtTotalToPay;privateTextViewtxtTipPerPerson;// For the ID of the radio button selectedprivateintradioCheckedId=-1;/** Called when the Activity is first created. */@OverridepublicvoidonCreate(BundlesavedInstanceState){super.onCreate(savedInstanceState);setContentView(R.layout.main);// Access the various widgets by their ID in R.javatxtAmount=(EditText)findViewById(R.id.txtAmount);// On app load, the cursor should be in the Amount fieldtxtAmount.requestFocus();txtPeople=(EditText)findViewById(R.id.txtPeople);txtTipOther=(EditText)findViewById(R.id.txtTipOther);rdoGroupTips=(RadioGroup)findViewById(R.id.RadioGroupTips);btnCalculate=(Button)findViewById(R.id.btnCalculate);// On app load, the Calculate button is disabledbtnCalculate.setEnabled(false);btnReset=(Button)findViewById(R.id.btnReset);txtTipAmount=(TextView)findViewById(R.id.txtTipAmount);txtTotalToPay=(TextView)findViewById(R.id.txtTotalToPay);txtTipPerPerson=(TextView)findViewById(R.id.txtTipPerPerson);// On app load, disable the Other Tip Percentage text fieldtxtTipOther.setEnabled(false);
Addressing ease of use or usability concerns
Our application must try to be as usable as any other established application or web page. In short, adding usability features will result in a good user experience. To address these concerns, look at Example 1-5 again.
First, look at ![]() where we use the
where we use the requestFocus() method of the View class. Since the EditText widget is derived from the View class, this method is applicable to it. This is done so that when our application loads, the Total Amount text field will receive focus and the cursor will be placed in it. This is similar to popular web application login screens where the cursor is present in the Username text field.
Now look at ![]() where the Calculate button is disabled by calling the
where the Calculate button is disabled by calling the setEnabled(boolean enabled) method on the Button widget. This is done so that the user cannot click on it before entering values in the required fields. If we allowed the user to click Calculate without entering values in the Total Amount and No. of People fields, we would have to write validation code to catch these conditions. This would entail showing an alert pop-up warning the user about the empty values. This adds unnecessary code and user interaction. When the user sees the Calculate button disabled, it’s quite obvious that unless all values are entered, the tip cannot be calculated.
Now look at ![]() in Example 1-5. Here, the Other Tip Percentage text field is disabled. This is done because the “15% tip” radio button is selected by default when the application loads. This default selection on application load is done via the main.xml file, in the following statement:
in Example 1-5. Here, the Other Tip Percentage text field is disabled. This is done because the “15% tip” radio button is selected by default when the application loads. This default selection on application load is done via the main.xml file, in the following statement:
android:checkedButton="@+id/radioFifteen"
The RadioGroup attribute android:checkedButton allows you to select one of the RadioButton widgets in the group by default.
Most users who have used popular applications on the desktop as well as the web are familiar with the “disabled widgets enabled in certain conditions” paradigm. Adding such small conveniences always makes an application more usable and the user experience richer.
Processing UI events
Like popular Windows, Java Swing, Flex, and other UI frameworks, Android provides an event model that allows you to listen to certain events in the UI caused by user interaction. Let’s see how we can use the Android event model in our application.
First let’s focus on the radio buttons in the UI. We want to know which radio button the user selected, as this will allow us to determine the tip percentage in our calculations. To “listen” to radio buttons, we use the static interface OnCheckedChangeListener(). This will notify us when the selection state of a radio button changes.
In our application, we want to enable the Other Tip Percentage text field only when the Other radio button is selected. When the “15% tip” or “20% tip” button is selected, we want to disable this text field. Besides this, we want to add some more logic for the sake of usability. As we discussed before, we should not enable the Calculate button until all the required fields have valid values. In terms of the three radio buttons, we want to ensure that the Calculate button gets enabled for the following two conditions:
-
The Other radio button is selected and the Other Tip Percentage text field has a valid value.
-
The “15% tip” or “20% tip” radio button is selected and the Total Amount and No. of People text fields have valid values.
Look at Example 1-6, which deals with the radio buttons. The source code comments are quite self-explanatory.
Example 1-6. Code snippet 3 of TipsterActivity.java
/** Attach an OnCheckedChangeListener to the* radio group to monitor radio buttons selected by user*/rdoGroupTips.setOnCheckedChangeListener(newOnCheckedChangeListener(){@OverridepublicvoidonCheckedChanged(RadioGroupgroup,intcheckedId){// Enable/disable Other Tip Percentage fieldif(checkedId==R.id.radioFifteen||checkedId==R.id.radioTwenty){txtTipOther.setEnabled(false);/** Enable the Calculate button if Total Amount and No. of* People fields have valid values.*/btnCalculate.setEnabled(txtAmount.getText().length()>0&&txtPeople.getText().length()>0);}if(checkedId==R.id.radioOther){// Enable the Other Tip Percentage fieldtxtTipOther.setEnabled(true);// Set the focus to this fieldtxtTipOther.requestFocus();/** Enable the Calculate button if Total Amount and No. of* People fields have valid values. Also ensure that user* has entered an Other Tip Percentage value before enabling* the Calculate button.*/btnCalculate.setEnabled(txtAmount.getText().length()>0&&txtPeople.getText().length()>0&&txtTipOther.getText().length()>0);}// To determine the tip percentage choice made by userradioCheckedId=checkedId;}});
Monitoring key activity in text fields
As I mentioned earlier, the Calculate button must not be enabled unless the text fields have valid values. So we have to ensure that the Calculate button will be enabled only if the Total Amount, No. of People, and Other Tip Percentage text fields have valid values. The Other Tip Percentage text field is enabled only if the Other radio button is selected.
We do not have to worry about the type of values—that is, whether the user entered negative values or letters—because the android:numeric attribute has been defined for the text fields, thus limiting the types of values that the user can enter. We just have to ensure that the values are present.
So, we use the static interface OnKeyListener(). This will notify us when a key is pressed. The notification reaches us before the actual key pressed is sent to the EditText widget.
Look at the code in Examples 1-7 and 1-8, which deal with key events in the text fields. As in Example 1-6, the source code comments are quite self-explanatory.
Example 1-7. Code snippet 4 of TipsterActivity.java
/** Attach a KeyListener to the Tip Amount, No. of People, and Other Tip* Percentage text fields*/txtAmount.setOnKeyListener(mKeyListener);txtPeople.setOnKeyListener(mKeyListener);txtTipOther.setOnKeyListener(mKeyListener);
Notice that we create just one listener instead of creating anonymous/inner listeners for each text field. I am not sure if my style is better or recommended, but I always write in this style if the listeners are going to perform some common actions. Here the common concern for all the text fields is that they should not be empty, and only when they have values should the Calculate button be enabled.
Example 1-8. Code snippet 5 from KeyListener of TipsterActivity.java
/* * KeyListener for the Total Amount, No. of People, and Other Tip Percentage * text fields. We need to apply this key listener to check for the following * conditions: * * 1) If the user selects Other Tip Percentage, then the Other Tip Percentage text * field should have a valid tip percentage entered by the user. Enable the * Calculate button only when the user enters a valid value. * * 2) If the user does not enter values in the Total Amount and No. of People fields, * we cannot perform the calculations. Hence we enable the Calculate button * only when the user enters valid values. */privateOnKeyListenermKeyListener=newOnKeyListener(){@OverridepublicbooleanonKey(Viewv,intkeyCode,KeyEventevent){switch(v.getId()){caseR.id.txtAmount:caseR.id.txtPeople:btnCalculate.setEnabled(txtAmount.getText().length()>0&&txtPeople.getText().length()>0);break;caseR.id.txtTipOther:btnCalculate.setEnabled(txtAmount.getText().length()>0&&txtPeople.getText().length()>0&&txtTipOther.getText().length()>0);break;}returnfalse;}};
At ![]() in Example 1-8, we examine the ID of the
in Example 1-8, we examine the ID of the View. Remember that each widget has a unique ID, defined in the main.xml file. These values are then defined in the generated R.java class.
At ![]() and
and ![]() , if the key event occurred in the Total Amount or No. of People field, we check for the value entered in the field. We are ensuring that the user has not left both fields blank.
, if the key event occurred in the Total Amount or No. of People field, we check for the value entered in the field. We are ensuring that the user has not left both fields blank.
At ![]() we check if the user has selected the Other radio button, and then we ensure that the Other text field is not empty. We also check once again if the Total Amount and No. of People fields are empty.
we check if the user has selected the Other radio button, and then we ensure that the Other text field is not empty. We also check once again if the Total Amount and No. of People fields are empty.
So, the purpose of our KeyListener is now clear: ensure that all text fields are not empty and only then enable the Calculate button.
Listening to button clicks
Now we will look at the Calculate and Reset buttons. When the user clicks these buttons, we use the static interface OnClickListener(), which will let us know when a button is clicked.
As we did with the text fields, we create just one listener and within it we detect which button was clicked. Depending on the button that was clicked, the calculate() or reset() method is called. Example 1-9 shows how the click listener is added to the buttons.
Example 1-9. Code snippet 6 of TipsterActivity.java
/* Attach listener to the Calculate and Reset buttons */btnCalculate.setOnClickListener(mClickListener);btnReset.setOnClickListener(mClickListener);
Example 1-10 shows how to detect which button is clicked by checking for the ID of the View that receives the click event.
Example 1-10. Code snippet 7 of TipsterActivity.java
/*** ClickListener for the Calculate and Reset buttons.* Depending on the button clicked, the corresponding* method is called.*/privateOnClickListenermClickListener=newOnClickListener(){@OverridepublicvoidonClick(Viewv){if(v.getId()==R.id.btnCalculate){calculate();}else{reset();}}};
Resetting the application
When the user clicks the Reset button, the input text fields should be cleared, the default “15% tip” radio button should be selected, and any results calculated should be cleared. Example 1-11 shows the reset() method.
Example 1-11. Code snippet 8 of TipsterActivity.java
/*** Resets the results text views at the bottom of the screen and* resets the text fields and radio buttons.*/privatevoidreset(){txtTipAmount.setText("");txtTotalToPay.setText("");txtTipPerPerson.setText("");txtAmount.setText("");txtPeople.setText("");txtTipOther.setText("");rdoGroupTips.clearCheck();rdoGroupTips.check(R.id.radioFifteen);// Set focus on the first fieldtxtAmount.requestFocus();}
Validating the input to calculate the tip
As I said before, we are limiting what types of values the user can enter in the text fields. However, the user could still enter a value of zero in the Total Amount, No. of People, or Other Tip Percentage text fields, thus causing error conditions like divide by zero in our tip calculations.
If the user enters zero, we must show an alert pop-up asking the user to enter a nonzero value. We handle this with a method called showErrorAlert(String errorMessage, final int fieldId), which we will discuss in more detail later.
First, look at Example 1-12, which shows the calculate() method. Notice how the values entered by the user are parsed as double values. Now notice ![]() and
and ![]() where we check for zero values. If the user enters zero, we show a pop-up requesting a valid value. Next, look at
where we check for zero values. If the user enters zero, we show a pop-up requesting a valid value. Next, look at ![]() , where the Other Tip Percentage text field is enabled because the user selected the Other radio button. Here, too, we must check for the tip percentage being zero.
, where the Other Tip Percentage text field is enabled because the user selected the Other radio button. Here, too, we must check for the tip percentage being zero.
Example 1-12. Code snippet 9 of TipsterActivity.java
/** * Calculate the tip as per data entered by the user. */privatevoidcalculate(){DoublebillAmount=Double.parseDouble(txtAmount.getText().toString());DoubletotalPeople=Double.parseDouble(txtPeople.getText().toString());Doublepercentage=null;booleanisError=false;if(billAmount<1.0){showErrorAlert("Enter a valid Total Amount.",txtAmount.getId());isError=true;}if(totalPeople<1.0){showErrorAlert("Enter a valid value for No. of People.",txtPeople.getId());isError=true;}/* * If the user never changes the radio selection, then it means * the default selection of 15% is in effect. But it's * safer to verify */if(radioCheckedId==-1){radioCheckedId=rdoGroupTips.getCheckedRadioButtonId();}if(radioCheckedId==R.id.radioFifteen){percentage=15.00;}elseif(radioCheckedId==R.id.radioTwenty){percentage=20.00;}elseif(radioCheckedId==R.id.radioOther){percentage=Double.parseDouble(txtTipOther.getText().toString());if(percentage<1.0){showErrorAlert("Enter a valid Tip percentage",txtTipOther.getId());isError=true;}}/* * If all fields are populated with valid values, then proceed to * calculate the tip */if(!isError){DoubletipAmount=((billAmount*percentage)/100);DoubletotalToPay=billAmount+tipAmount;DoubleperPersonPays=totalToPay/totalPeople;txtTipAmount.setText(tipAmount.toString());txtTotalToPay.setText(totalToPay.toString());txtTipPerPerson.setText(perPersonPays.toString());}}
When the application loads, the “15% tip” radio button is selected by default. If the user changes the selection, we assign the ID of the selected radio button to the member variable radioCheckedId, as we saw in Example 1-6, in OnCheckedChangeListener.
But if the user accepts the default selection, radioCheckedId will have the default value of –1. In short, we will never know which radio button was selected. Of course, we know which one is selected by default and could have coded the logic slightly differently, to assume 15% if radioCheckedId has the value –1. But if you refer to the API, you will see that we can call the method getCheckedRadioButtonId() only on the RadioGroup and not on individual radio buttons. This is because OnCheckedChangeListener readily provides us with the ID of the radio button selected.
Showing the results
Calculating the tip is simple. If there are no validation errors, the Boolean flag isError will be false. Look at ![]() through
through ![]() in Example 1-12 for the simple tip calculations. Next, the calculated values are set to the
in Example 1-12 for the simple tip calculations. Next, the calculated values are set to the TextView widgets from ![]() to
to ![]() .
.
Showing the alerts
Android provides the AlertDialog class to show alert pop-ups. This lets us show a dialog with up to three buttons and a message.
Example 1-13 shows the showErrorAlert() method, which uses this AlertDialog to show the error messages. Notice that we pass two arguments to this method: String errorMessage and int fieldId. The first argument is the error message we want to show to the user. The fieldId is the ID of the field that caused the error condition. After the user dismisses the alert dialog, this fieldId will allow us to request the focus on that field, so the user knows which field has the error.
Example 1-13. Code snippet 10 of TipsterActivity.java
/*** Shows the error message in an alert dialog** @param errorMessage* String for the error message to show* @param fieldId* ID of the field which caused the error.* This is required so that the focus can be* set on that field once the dialog is* dismissed.*/privatevoidshowErrorAlert(StringerrorMessage,finalintfieldId){newAlertDialog.Builder(this).setTitle("Error").setMessage(errorMessage).setNeutralButton("Close",newDialogInterface.OnClickListener(){@OverridepublicvoidonClick(DialogInterfacedialog,intwhich){findViewById(fieldId).requestFocus();}}).show();}
When all this is put together, it should look like Figure 1-33.
Conclusion
Developing for the Android OS is not too different from developing for any other UI toolkit, including Microsoft Windows, X Windows, or Java Swing. Of course Android has its difference, and, overall, a very good design. The XML layout paradigm is quite cool and useful for building complex UIs using simple XML. In addition, the event handling model is simple, feature-rich, and intuitive to use in code.
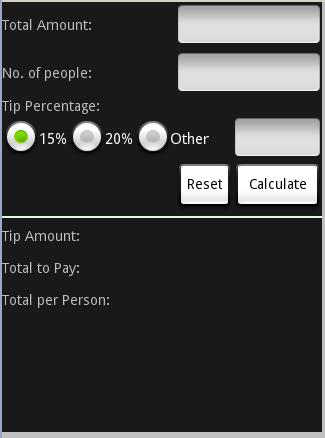
Figure 1-33. Tipster in action
See Also
Source Download URL
The source code for this example is in the Android Cookbook repository, in the subdirectory Tipster (see “Getting and Using the Code Examples”).
Get Android Cookbook, 2nd Edition now with the O’Reilly learning platform.
O’Reilly members experience books, live events, courses curated by job role, and more from O’Reilly and nearly 200 top publishers.

