Adding Images to Your Application
Up to this point you've been able to work without adding any new images to your application. Now you need to put some stuff on the screen! Although looking at text is fun and all, the real interesting components are added through input mechanisms and images. In the following sections, I demonstrate how to include images in your application.
Placing an image on the screen
First, add the brightness mode state images to the application so you can use them later. These are the widget image state icons shown in Figure 8-2, earlier in this chapter. First you need (uh, yeah) the images. You can create your own images, or you can download mine from this book's companion website.
Adding images to your project is simple. You simply drag them over and then reference them in the project.
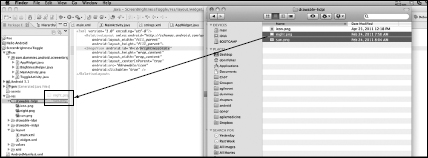
Drag the images into the res/drawable-hdpi folder in the Eclipse project, as shown in Figure 8-5.
Figure 8-5: Dragging the image file into the res/drawable-hdpi folder.
Notice that you see two states of the widget: daytime and evening, as shown earlier in Figure 8-2.
When you dragged the images into Eclipse, the ADT recognized that the project file structure changed. At that time, the ADT rebuilt the project because the Build Automatically selection is enabled in the Project menu. This regenerated the gen folder, where the R.java file resides. The R.java file now includes a ...
Get Android™ Tablet Application Development For Dummies® now with the O’Reilly learning platform.
O’Reilly members experience books, live events, courses curated by job role, and more from O’Reilly and nearly 200 top publishers.

