Chapter 1. Introduction to AngularJS
Our ability to create amazing web-based apps is incredible, but the complexity involved in making these apps is similarly incredible. We on the Angular team wanted to relieve the pain involved with developing AJAX applications. At Google, we’d worked through the hard lessons of building large web applications like Gmail, Maps, Calendar, and several others. We thought we might be able to use these experiences to benefit everyone.
We wanted writing web apps to feel more like the first time we wrote a few lines of code and stood back in amazement at what we’d made happen. We wanted the coding process to feel more like creating and less like trying to satisfy the strange inner workings of web browsers.
At the same time, we wanted an environment that helped us make the design choices that make apps easy to create and understand from the start, but that continue to be the right choices to make our apps easy to test, extend, and maintain as they grow large.
We’ve tried to do this in the Angular framework. We’re very excited about the results we’ve achieved. A lot of credit goes to the open source community around Angular who do a fantastic job supporting each other and who have taught us many things. We hope you’ll join our community and help us learn how Angular can be even better.
Some of the larger and more involved examples and code snippets are available on a GitHub repository for you to look at, fork, and play with at our GitHub page.
Concepts
There are a few core ideas that you’ll use throughout an Angular app. As it turns out, we didn’t invent any of these. Instead, we’ve borrowed heavily from successful idioms in other development environments and implemented them in a way that embraces HTML, browsers, and many other familiar web standards.
Client-Side Templates
Multi-page web applications create their HTML by assembling and joining it with data on the server, and then shipping the finished pages up to the browser. Most single-page applications—also known as AJAX apps—do this as well, to some extent. Angular is different in that the template and data get shipped to the browser to be assembled there. The role of the server then becomes only to serve as static resources for the templates and to properly serve the data required by those templates.
Let’s see an example of what assembling this data and template on the browser looks like in Angular. We’ll take the obligatory Hello, World example, but instead of writing “Hello, World” as a single string, let’s structure the greeting “Hello” as data that we could change later.
For it, we’ll create our template in hello.html:
<htmlng-app><head><scriptsrc="angular.js"></script><scriptsrc="controllers.js"></script></head><body><divng-controller='HelloController'><p>{{greeting.text}}, World</p></div></body></html>
And our logic in controllers.js:
functionHelloController($scope){$scope.greeting={text:'Hello'};}
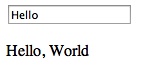
Loading hello.html into any browser will then produce what we see in Figure 1-1:
There are a few interesting things to note here in comparison with most methods in widespread use today:
- There are no classes or IDs in the HTML to identify where to attach event listeners.
-
When
HelloControllerset thegreeting.textto Hello, we didn’t have to register any event listeners or write any callbacks. -
HelloControlleris a plain JavaScript class, and doesn’t inherit from anything that Angular provides. -
HelloControllergot the$scopeobject that it needed without having to create it. -
We didn’t have to call the
HelloController’s constructor ourselves, or figure out when to call it.
We’ll look at more differences soon, but it should be clear already that Angular applications are structured very differently than similar applications were in the past.
Why have we made these design choices and how does Angular work? Let’s look at some good ideas Angular stole from elsewhere.
Model View Controller (MVC)
MVC application structure was introduced in the 1970s as part of Smalltalk. From its start in Smalltalk, MVC became popular in nearly every desktop development environment where user interfaces were involved. Whether you were using C++, Java, or Objective-C, there was some flavor of MVC available. Until recently, however, MVC was all but foreign to web development.
The core idea behind MVC is that you have clear separation in your code between managing its data (model), the application logic (controller), and presenting the data to the user (view).
The view gets data from the model to display to the user. When a user interacts with the application by clicking or typing, the controller responds by changing data in the model. Finally, the model notifies the view that a change has occurred so that it can update what it displays.
In Angular applications, the view is the Document Object Model (DOM), the controllers are JavaScript classes, and the model data is stored in object properties.
We think MVC is neat for several reasons. First, it gives you a mental model for where to put what, so you don’t have to invent it every time. Other folks collaborating on your project will have an instant leg up on understanding what you’ve written, as they’ll know you’re using MVC structure to organize your code. Perhaps most importantly, we’ll claim that it delivers great benefits in making your app easier to extend, maintain, and test.
Data Binding
Before AJAX single-page apps were common, platforms like Rails, PHP, or JSP helped us create the user interface (UI) by merging strings of HTML with data before sending it to the users to display it.
Libraries like jQuery extended this model to the client and let us follow a similar style, but with the ability to update part of the DOM separately, rather than updating the whole page. In AngularJS, we merge template HTML strings with data, then insert the result where we want it in the DOM by setting innerHtml on a placeholder element.
This all works pretty well, but when you want to insert fresher data into the UI, or change the data based on user input, you need to do quite a bit of non-trivial work to make sure you get the data into the correct state, both in the UI and in JavaScript properties.
But what if we could have all this work done for us without writing code? What if we could just declare which parts of the UI map to which JavaScript properties and have them sync automatically? This style of programming is called data binding. We included it in Angular because it works great with MVC to eliminate code when writing your view and model. Most of the work in moving data from one to the other just happens automatically.
To see this in action, let’s take the first example and make it dynamic. As is, the HelloController sets the model greeting.text once and it never changes from then on. To make it live, let’s change the example by adding a text input that can change the value of greeting.text as the user types.
Here’s the new template:
<htmlng-app><head><scriptsrc="angular.js"></script><scriptsrc="controllers.js"></script></head><body><divng-controller='HelloController'><inputng-model='greeting.text'><p>{{greeting.text}}, World</p></div></body></html>
The controller, HelloController, can stay exactly the same.
Loading it in a browser, we’d see the screen captured in Figure 1-2.
If we replace Hello with Hi in the input field, we’d see the screen captured in Figure 1-3.
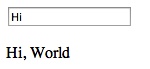
Without ever registering a change listener on the input field, we have a UI that will dynamically update. The same would be true for changes coming to and from the server. In our controller, we could make a request to our server, get the response, and set $scope.greeting.text to equal what it returns. Angular would automatically update both the input and the text in the curly braces to that value.
Dependency Injection
We mentioned it before, but it bears repeating that there’s a lot going on with HelloController that we didn’t have to write. For example, the $scope object that does our data binding is passed to us automatically; we didn’t have to create it by calling any function. We just asked for it by putting it in HelloController’s constructor.
As we’ll find out in later chapters, $scope isn’t the only thing we can ask for. If we want to data bind to the location URL in the user’s browser, we can ask for an object that manages this by putting $location in our constructor, like so:
functionHelloController($scope,$location){$scope.greeting={text:'Hello'};// use $location for something good here...}
We get this magical effect through Angular’s dependency injection system. Dependency injection lets us follow a development style in which, instead of creating dependencies, our classes just ask for what they need.
This follows a design pattern called the Law of Demeter, also known as the principle of least knowledge. Since our HelloController’s job is to set up the initial state for the greeting model, this pattern would say that it shouldn’t worry about anything else, like how $scope gets created, or where to find it.
This feature isn’t just for objects created by the Angular framework. Any objects or services that you end up creating can also be injected in the same way.
Directives
One of the best parts of Angular is that you can write your templates as HTML. You can do this because at the core of the framework we’ve included a powerful DOM transformation engine that lets you extend HTML’s syntax.
We’ve already seen several new attributes in our templates that aren’t part of the HTML specification. Examples include the double-curly notation for data binding, ng-controller for specifying which controller oversees which part of the view, and ng-model, which binds an input to part of the model. We call these HTML extension directives.
Angular comes with many directives that help you define the view for your app. We’ll see more of them soon. These directives can define what we commonly view as the template. They can declaratively set up how your application works or be used to create reusable components.
And you’re not limited to the directives that Angular comes with. You can write your own to extend HTML’s template abilities to do anything you can dream of.
An Example: Shopping Cart
Let’s look at a slightly larger example that shows off a bit more of Angular. Let’s imagine that we’re going to build a shopping app. Somewhere in the app we’ll need to show the user’s shopping cart and let him edit it. Let’s skip straight to that part.
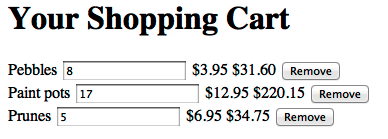
<htmlng-app><head><title>Your Shopping Cart</title></head><bodyng-controller='CartController'><h1>Your Shopping Cart</h1><divng-repeat='item in items'><span>{{item.title}}</span><inputng-model='item.quantity'><span>{{item.price | currency}}</span><span>{{item.price * item.quantity | currency}}</span><buttonng-click="remove($index)">Remove</button></div><scriptsrc="angular.js"></script><script>functionCartController($scope){$scope.items=[{title:'Paint pots',quantity:8,price:3.95},{title:'Polka dots',quantity:17,price:12.95},{title:'Pebbles',quantity:5,price:6.95}];$scope.remove=function(index){$scope.items.splice(index,1);}}</script></body></html>
The resulting UI looks like the screenshot in Figure 1-4.
The following is a brief tour of what’s going on here. The rest of the book is dedicated to a more in-depth explanation.
Let’s start at the top:
<htmlng-app>
The ng-app attribute tells Angular which parts of the page it should manage. Since we’ve placed it on the <html> element, we’re telling Angular that we want it to manage the whole page. This will often be what you want, but you might want to place it on a <div> within the app if you’re integrating Angular with an existing app that uses other methods to manage the page.
<bodyng-controller='CartController'>
In Angular, you manage areas of the page with JavaScript classes called controllers. By including a controller in the body tag, I’m declaring that CartController will manage everything between <body> and </body>.
<divng-repeat='item in items'>
The ng-repeat says to copy the DOM inside this <div> once for every element in an array called items. On every copy of the div, it will also set a property named item to the current element so we can use it in the template. As you can see, this results in three <div>s each, containing the product title, quantity, unit price, total price, and a button to remove the item entirely.
<span>{{item.title}}</span>
As we showed in the “Hello, World” example, data binding via {{ }} lets us insert the value of a variable into part of the page and keep it in sync. The full expression {{item.title}} retrieves the current item in the iteration and then inserts the contents of that item’s title property into the DOM.
<inputng-model='item.quantity'>
The ng-model definition creates data binding between the input field and the value of item.quantity.
The {{ }} in the <span> sets up a one-way relationship that says “insert a value here.” We want that effect, but the application also needs to know when the user changes the quantity so it can change the total price.
We’ll keep changes in sync with our model by using ng-model. The ng-model declaration inserts the value of item.quantity into the text field, but it also automatically updates item.quantity whenever the user types a new value.
<span>{{item.price | currency}}</span><span>{{item.price * item.quantity | currency}}</span>
We want the unit price and total price to be formatted as dollars. Angular comes with a feature called filters that lets us transform text, and there’s a bundled filter called currency that will do this dollar formatting for us. We’ll look at filters more in the next chapter.
<buttonng-click='remove($index)'>Remove</button>
This allows users to remove items from their carts by clicking a Remove button next to the product. We’ve set it up so that clicking this button calls a remove() function. We’ve also passed in $index, which contains the iteration number of the ng-repeat, so we know which item to remove.
function CartController($scope) {This CartController manages the logic of the shopping cart. We’ll tell Angular that the controller needs something called $scope by putting it here. The $scope is what lets us bind data to elements in the UI.
$scope.items=[{title:'Paint pots',quantity:8,price:3.95},{title:'Polka dots',quantity:17,price:12.95},{title:'Pebbles',quantity:5,price:6.95}];
By defining $scope.items, I’ve created an array of dummy data to represent the collection of items in the user’s shopping cart. We want to make them available to data bind with the UI, so we’ll add them to $scope.
Of course, a real version of this can’t just work in memory, and will need to talk to a server to properly persist the data. We’ll get to that in later chapters.
$scope.remove=function(index){$scope.items.splice(index,1);}
We want the remove() function available to bind in the UI, so we’ve added this to $scope as well. For the in-memory version of the shopping cart, the remove() function can just delete items from the array. Because the list of <div>s created by ng-repeat is data bound, the list automatically shrinks when items disappear. Remember, this remove() function gets called from the UI whenever the user clicks on one of the Remove buttons.
Up Next
We’ve looked at just the most basic idioms in Angular and some very simple examples. The rest of the book is dedicated to showing off what the framework has to offer.
Get AngularJS now with the O’Reilly learning platform.
O’Reilly members experience books, live events, courses curated by job role, and more from O’Reilly and nearly 200 top publishers.

