Chapter 4. A Hello World App
We’ve talked a lot about building apps in the previous pages and now we’re going to get our hands dirty getting something up and running.
Building Your First App
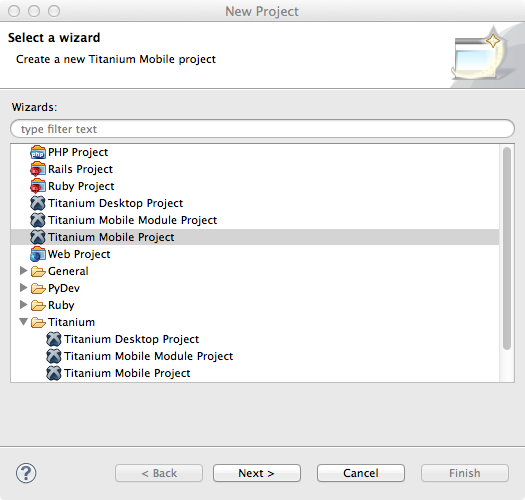
The first thing you do to create an app is to select New Project in Titanium Studio. This presents you with a New Project Wizard that will give you several options to select from (Figure 4-1). The options we’ll focus on for this book will be the mobile ones.
Note
Titanium is capable of creating desktop apps as well as mobile apps. Desktop apps are out of the scope of this book, so we’ll just focus on mobile apps for now. Appcelerator recently “spun off” the Desktop portion of Titanium into its own open source project. This allows Titanium Mobile to focus on the mobile side of cross platform apps.
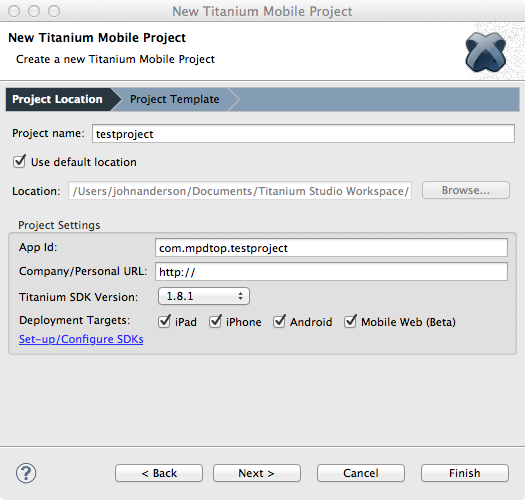
Selecting the Titanium Mobile Project option gives you Figure 4-2. The fields you can fill out here are:
- Project name
This is a unique name you choose for your project.
- Use default location
Leaving this checked will cause Titanium Studio to generate and save your project files in the default location. Unless you have a good reason to store it somewhere else, leave this checked.
- App Id
This is an important piece of information used when you upload your app to the App Store or Android Marketplace. When you start a new app in Apple’s App Store, you have to set this field to the App ID that you are going to use, or have used. I’ve run into some issues when compiling for Android when there is an underscore in the App ID, so it’s best just to use text characters in this field.
- Company/Personal URL
This is a place to associate a URL with your app. Honestly, I’ve hardly ever filled this in and I’m still trying to figure out how this might be useful to anyone. But filling it in doesn’t seem to hurt either.
- Titanium SDK Version
This is an important field. As features are added to the Titanium API, as things change or are deprecated, the API will change. Depending on these changes, your apps may or may not need rewrites and recompiles.
- Deployment Targets
This tells Titanium what devices you will run your app on, and is important so it can generate device-specific code. Options include:
- iPad
Indicates that you want your app to run on an iPad.
- iPhone
Indicates that you want your app to run on an iPhone. If you select both iPhone and iPad, an iOS-universal app will be created.
- Android
Indicates that you want your app to run on an Android device. I have successfully run the same .apk file on an Android Phone running Android 2.2, a Galaxy Tab running 2.3, and a Honeycomb Tablet running 3.0.
- Mobile Web
Indicates that you want to run your project via a mobile web browser. This is a new feature of Titanium Studio and in Beta. It’s interesting to play around with, but at the time of this writing it’s not ready for prime time.
Writing the App
In homage to all the past “Hello World” code samples, I’ll show you how you can get your first Titanium project up and running in just four lines of code that will run on iOS and Android. If you take the following code:
win1=Ti.UI.createWindow({backgroundColor:"white",title:"Hello World"});label1=Ti.UI.createLabel({text:"Hello World",color:"black"})win1.add(label1);win1.open();
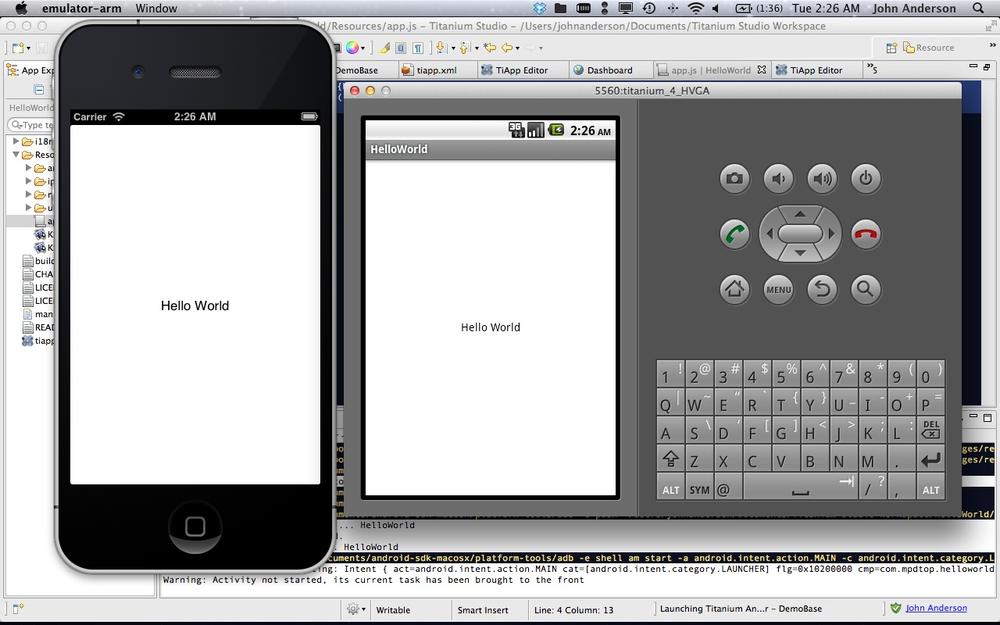
paste it into your Titanium Studio editor, and run it, you’ll be able to see that it creates and runs a native iOS and native Android app (Figure 4-3).
This shows you how easy it can be to get an app running on iOS and Android without having to deal with learning Objective C and Java. The example is pretty straight forward, but let’s go through it line by line.
This line simply creates a native window and assigns it to the
JavaScript variable win1:
win1=Ti.UI.createWindow({backgroundColor:"white",title:"Hello World"});
This line simply creates a native label and assigns it to the
JavaScript variable label1:
label1=Ti.UI.createLabel({text:"Hello World",color:"black"})
We now add the label to the window with the .add method:
win1.add(label1)
And finally we open the window so the UI is visible:
win1.open()
Not bad! It’s fairly exciting as a developer to be able to accomplish something that’s pretty significant (an app running on iOS and Android with four lines of code) with not much effort. However, a Hello World app is just the beginning, so let’s move onto the next step. Next we’ll look at how to create a slightly more sophisticated app using tabs and two separate windows.
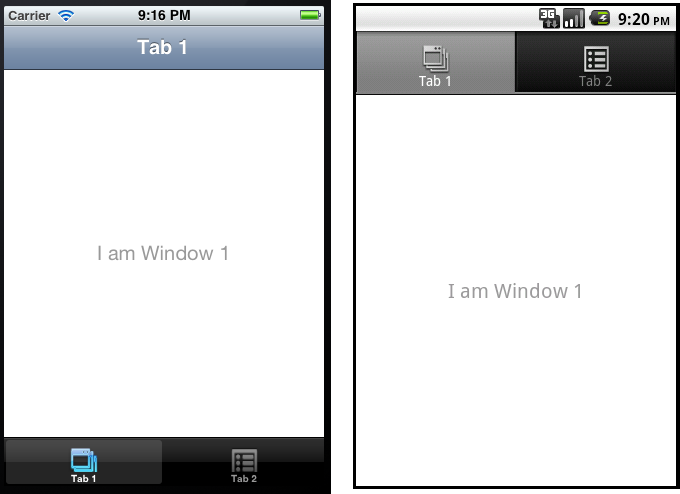
Now we’re ready to throw some more JavaScript at Titanium, using Titanium’s library, and see what Titanium does with it. Our Hello World app will look like Figure 4-4.
// this sets the background color of the master UIView// (when there are no windows/tab groups on it)Titanium.UI.setBackgroundColor('#000');// create tab groupvartabGroup=Titanium.UI.createTabGroup();// create base UI tab and root windowvarwin1=Titanium.UI.createWindow({title:'Tab 1',backgroundColor:'#fff'});vartab1=Titanium.UI.createTab({icon:'KS_nav_views.png',title:'Tab 1',window:win1});varlabel1=Titanium.UI.createLabel({color:'#999',text:'I am Window 1',font:{fontSize:20,fontFamily:'Helvetica Neue'},textAlign:'center',width:'auto'});win1.add(label1);// create controls tab and root windowvarwin2=Titanium.UI.createWindow({title:'Tab 2',backgroundColor:'#fff'});vartab2=Titanium.UI.createTab({icon:'KS_nav_ui.png',title:'Tab 2',window:win2});varlabel2=Titanium.UI.createLabel({color:'#999',text:'I am Window 2',font:{fontSize:20,fontFamily:'Helvetica Neue'},textAlign:'center',width:'auto'});win2.add(label2);// add tabstabGroup.addTab(tab1);tabGroup.addTab(tab2);// open tab grouptabGroup.open();
Let’s go through this program section by section and see what’s going on:
Titanium.UI.setBackgroundColor('#000');
This line simply sets the background color of the app’s “root” view. You won’t be able to see this if you have a Window or Tab Group that is opened on top of this view, and you are almost certainly going to be opening something like that in your app. It’s still good to be aware that this element is present.
Two tabs get created and populated the same way, so we’ll just look at one of them:
// create tab groupvartabGroup=Titanium.UI.createTabGroup();
This line creates an instance of a Native Tab Group and works
equally well on iOS and Android. We use Titanium’s UI object and invoke the createTabGroup method. It assigns the resulting
object to the JavaScript variable tabGroup so that you can reference it later.
Once initialized, the tabGroup object
has all the methods and properties of the TabGroup class:
varwin1=Titanium.UI.createWindow({title:'Tab 1',backgroundColor:'#fff'});
OK, now we’re getting a little fancier. On the previous createTabGroup line, we didn’t pass anything
into the function call. This causes the object (in this case, the tabGroup) to be created using all the default
parameters. That’s not bad, but probably not something you’ll do very
much. Chances are you’re going to want to customize it to some
extent.
In this createWindow call we’re
passing in some parameters...or so it seems—gotcha! We’re actually passing
in just one parameter. This is a pretty important concept to understand so
let’s spend a minute or two on it. Check the parentheses and curly braces
in the call, and you’ll see that we’re passing just one parameter to
createWindow, but it contains two
items—title and backgroundColor—within curly braces. The braces
hold a JSON structure.
JSON (pronounced “JaSON”) is a great little format that is going to make your life a lot easier in JavaScript (and is used by umpteen other systems too). It allows you to represent small or quite complex data structures and pass them around as a single object. A JSON object can be as simple as:
{hello:"world"}
Note that it’s more complex than a JavaScript string, although it contains a string. We won’t go into all the details of JSON right now. It’s just important to realize that when you call just about any Titanium function, you pass in a single parameter that is a JSON object, which in turn contains other objects and values.
Back to our code. Our JSON object contains two parameters, title and backgroundColor, to create a window object
that’s the specified title and background color. It will be assigned to
the variable called win1 so that you
will be able to reference it later on in the app:
vartab1=Titanium.UI.createTab({icon:'KS_nav_views.png',title:'Tab 1',window:win1});
This command creates one of the two tabs in our tab group. The first
thing to notice is how similar the createTab command is to the createWindow command. It also takes a JSON
structure as the single parameter. Another thing to notice is that of the
three JSON items, one is the object reference we created with the createWindow command (window:win1). The other two parameters are
simply strings.
The icon parameter indicates where to find the image for the tab icon. This is a good time to point out that references like this are relative to the Resources directory in your project. Since no other path is provided in the filename, the image is assumed to be in the “root” of the Resources directory. Sometimes it makes sense to create additional folders within the Resources folder to organize your files.
If you would like to do something like this, and have an images folder for your images, the icon parameter needs to reflect the subdirectory, such as images/KS_nav_views.png to indicate you have added an images directory. It’s very much like referencing images in a web page using a relative path:
varlabel1=Titanium.UI.createLabel({color:'#999',text:'I am Window 1',font:{fontSize:20,fontFamily:'Helvetica Neue'},textAlign:'center',width:'auto'});win1.add(label1);
Here we have yet another familiar “create” command, this one
returning a label. As you can see, this one looks similar to the other
two, with a little more information passed in. It’s good to notice here
that sometimes, as with the font attribute here, there will be another
JSON document within the overall input parameter passed to
createLabel. That’s the power of JSON: it allows you to
nest objects within objects within objects. You can represent a very
complex or “rich” object with many attributes and subobjects.
It’s no wonder that many public APIs, such as Google’s and Yahoo’s search APIs, allow the return of data in a JSON format. It also has the benefit of being totally cross platform, like XML, but in a much lighter-weight package. This is actually a key reason that JSON works well with Titanium, and enables it to work well on iOS, Android, and BlackBerry.
Note
JSON makes good on the promise of XML: a cross-platform way to represent complex data in a compact and easy-to-consume way. XML was definitely cross platform, but not necessarily easy to consume. JSON is all that: cross platform, easy to consume, and compact for quick transfer, which makes it great for mobile.
The last thing we’re going to do in this code fragment is add the label to the existing window. This is done with the statement:
win1.add(label1)
It calls the add method of the
win1 object and passes in the label1 object to indicate what is to be added to
the window. This is another pattern you’ll get used to as you build up
complex displays with nested objects: call a method on the parent or
containing window and pass in the child object. Now you should start to
get a feel for creating objects, assigning objects to JavaScript
variables, and then using that variable in other calls to manipulate those
objects.
The code sample continues with nearly identical commands to create the second window with a label, create another tab with that window, and then add a label to the second window. After that is some more assembly of the UI:
tabGroup.addTab(tab1);tabGroup.addTab(tab2);
These two commands are relatively simple, and we see the tabGroup object again. Here we simply add the
two tabs that we created with the addTab method. This is a good time to point out
that many Titanium objects, such as views, support an add method that allows you to add new objects.
The tabGroup object and the NavigationGroup are two exceptions that have
different syntax. Now that we have the two tabs added, there is just one
more thing to do to make our app actually do something that we can
see:
tabGroup.open();
With a simple open method call,
we’re able to finally see our app. This command opens up the Tab Group and
makes it visible with the two tabs. Once it’s visible, you can tap on the
tabs to reveal the appropriate windows. Since we know there is a label on
each window, we can see that the correct window is indeed opening up when
we click the tab.
On iOS, the Title Bar is automatically changed as you tap each tab. When the active window is changed, iOS reads the title of the window and puts that in the Title Bar automatically. This is a specific iOS feature, and you have the iOS view controller to thank for that. When the view controller sees that a new window is loaded up, it reads the title from that window and puts it into the title bar of the Tab Group. View Controllers are a fundamental part of iOS, but it’s one of those things that Titanium takes care of for you, so you don’t have to know every detail about it right away.
Congratulations! You’ve created your first Titanium App, run it in a simulator or two, and walked through the code to see exactly how it works. We’ve seen how it’s fairly easy to create and manipulate Titanium objects in the context of JavaScript, and we’ve seen the role that JSON plays in your Titanium apps.
The Files in Your First Project
OK, now that we’ve got our first app up and running, let’s take a look at some of the files that are created in your project. The first thing to make note of is how your “app” is constructed in JavaScript and which of the basic files are created by default when you start your first project. Go into Titanium Studio and select New Project to bring up a dialog box that has some selections to indicate what type of project you’re going to make.
For this example I’ve selected iPad, iPhone, and Android. Once your project is created, you’ll see some new folders and files. Let’s go through the important ones. All the files that have been created are listed here:
buildfolderCHANGELOG.txtLICENSELICENSE.txtmanifestREADMEResourcestiapp.xml
and you don’t really need to pay attention to most of them right now. The important ones are:
buildfolderResourcesfoldertiapp.xml
The tiapp.xml File
This is an XML file that holds the configuration information for your app. Let’s take a look at it now:
<?xmlversion="1.0"encoding="UTF-8"?><ti:appxmlns:ti="http://ti.appcelerator.org"><deployment-targets><targetdevice="mobileweb">false</target><targetdevice="iphone">true</target><targetdevice="ipad">true</target><targetdevice="android">true</target><targetdevice="blackberry">false</target></deployment-targets><sdk-version>1.8.1</sdk-version><id>com.mpdtop.myfirst</id><name>myfirst</name><version>1.0</version><publisher>johnanderson</publisher><url>http://</url><description>notspecified</description><copyright>2012byjohnanderson</copyright><icon>appicon.png</icon><persistent-wifi>false</persistent-wifi><prerendered-icon>false</prerendered-icon><statusbar-style>default</statusbar-style><statusbar-hidden>false</statusbar-hidden><fullscreen>false</fullscreen><navbar-hidden>false</navbar-hidden><analytics>true</analytics><guid>917b6e5a-25ba-41b8-8e2b-d9c5d1cb5928</guid><iphone><orientationsdevice="iphone"><orientation>Ti.UI.PORTRAIT</orientation></orientations><orientationsdevice="ipad"><orientation>Ti.UI.PORTRAIT</orientation><orientation>Ti.UI.UPSIDE_PORTRAIT</orientation><orientation>Ti.UI.LANDSCAPE_LEFT</orientation><orientation>Ti.UI.LANDSCAPE_RIGHT</orientation></orientations></iphone><androidxmlns:android="http://schemas.android.com/apk/res/android"/><modules/></ti:app>
You can use Titanium Studio to edit this file directly, but you
won’t have access to all the parameters and properties for your project.
That means that the app.xml file contains
information that is not exposed by Titanium’s editor, such as enabling
or disabling analytics, some of the device orientations, etc. To modify
these parameters, you’ll need to edit the file directly using a text
editor. When you create a default project for iPhone and iPad, the
“supported orientations” are set to landscape only for iPhone, and all
orientations for iPad, for some reason. If you want your iPhone app to
be able to support multiple orientations, you’ll need to manually set
that. Since the options are already there for iPad, you’ll just need to
copy and paste them into the iPhone section. For example, the <iphone> section of the tiapp.xml file looks like this by default, if
you selected both iPad and iPhone when you created your project:
<iphone><orientationsdevice="iphone"><orientation>Ti.UI.PORTRAIT</orientation></orientations><orientationsdevice="ipad"><orientation>Ti.UI.PORTRAIT</orientation><orientation>Ti.UI.UPSIDE_PORTRAIT</orientation><orientation>Ti.UI.LANDSCAPE_LEFT</orientation><orientation>Ti.UI.LANDSCAPE_RIGHT</orientation></orientations></iphone>
As you can see, only landscape is indicated for iPhone, but if you want to support multiple orientations for iPhone, you can simply copy the necessary parameters from the iPad section to the iPhone section, resulting in this:
<iphone><orientationsdevice="iphone"><orientation>Ti.UI.PORTRAIT</orientation><orientation>Ti.UI.UPSIDE_PORTRAIT</orientation><orientation>Ti.UI.LANDSCAPE_LEFT</orientation><orientation>Ti.UI.LANDSCAPE_RIGHT</orientation></orientations><orientationsdevice="ipad"><orientation>Ti.UI.PORTRAIT</orientation><orientation>Ti.UI.UPSIDE_PORTRAIT</orientation><orientation>Ti.UI.LANDSCAPE_LEFT</orientation><orientation>Ti.UI.LANDSCAPE_RIGHT</orientation></orientations></iphone>
If you decide to implement modules, you’ll need to modify the
module section and put in a line for each module that you want to
include. A complete tiapp.xml
follows, with the information added to include the tibar barcode scanner module:
<?xmlversion="1.0"encoding="UTF-8"?><ti:appxmlns:ti="http://ti.appcelerator.org"><sdk-version>1.8.1</sdk-version><deployment-targets><targetdevice="mobileweb">false</target><targetdevice="iphone">true</target><targetdevice="ipad">true</target><targetdevice="android">true</target><targetdevice="blackberry">false</target></deployment-targets><id>com.mpdtop.tirunner</id><name>TiR</name><version>1.5</version><publisher>mcowner</publisher><url>http://</url><description>notspecified</description><copyright>2011bymcowner</copyright><icon>appicon.png</icon><persistent-wifi>false</persistent-wifi><prerendered-icon>false</prerendered-icon><statusbar-style>default</statusbar-style><statusbar-hidden>false</statusbar-hidden><fullscreen>false</fullscreen><navbar-hidden>false</navbar-hidden><analytics>true</analytics><guid>87a80c29-8ebb-41b1-95d5-2104d0245d15</guid><iphone><orientationsdevice="iphone"><orientation>Ti.UI.PORTRAIT</orientation><orientation>Ti.UI.UPSIDE_PORTRAIT</orientation><orientation>Ti.UI.LANDSCAPE_LEFT</orientation><orientation>Ti.UI.LANDSCAPE_RIGHT</orientation></orientations><orientationsdevice="ipad"><orientation>Ti.UI.PORTRAIT</orientation><orientation>Ti.UI.UPSIDE_PORTRAIT</orientation><orientation>Ti.UI.LANDSCAPE_LEFT</orientation><orientation>Ti.UI.LANDSCAPE_RIGHT</orientation></orientations></iphone><androidxmlns:android="http://schemas.android.com/apk/res/android"/><modules><moduleversion="0.4.2">tibar</module></modules></ti:app>
Build Folder
The build folder is a folder that holds the generated projects that Titanium produces. When you run your project, Titanium creates a native project that is compiled by the native SDK. The files are located in the build/iphone and build/android directories for iOS and Android platforms, respectively. Sometimes during your development you’ll want to do a “clean build,” meaning that everything is built from scratch. On iOS and Android platforms, you don’t necessarily have to recompile the entire project every time you want to run it.
Android used to require a full build for each and every change you made in JavaScript—“painful” doesn’t adequately express how it felt working in that environment. Recently Appcelerator released a “fastdev” version for Android that gets around this. Instead of doing a full rebuild, you can simply make changes in your app.js or other .js file and your app in the Android simulator will reflect those changes. If you make changes to the app.js file, you’ll need to exit out the of app and restart it in the simulator. If you make it in a different .js file, all you’ll need to do is back up a few screens and go back into whatever screen would use the .js file that you changed. If you change the .js for a login page, you’ll just need to exit out and go back into that login screen, and you’ll see the updated screen without having to restart the whole project.
Note
The easiest way to force a full rebuild is simply to delete the project that was generated. This will prevent Titanium from doing any kind of incremental additions, and it will have no choice but to regenerate the project.
Running Titanium Apps in the iOS simulator is easy to work with. When you make a change you’re able to restart the project and run it in the iOS simulator in a few seconds. This is mainly because all the files don’t need to be rebuilt all the time. This is due to features in iOS, not Titanium, but Titanium benefits greatly from this.
Even though it’s good to be able to take advantage of precompiled classes to speed up development, sometimes you just need to start from scratch and rebuild everything. If you make a change in the tiapp.xml file, Titanium Studio is supposed to pick up on this and rebuild from scratch, but that doesn’t always happen. The easiest way to ensure a full rebuild is to delete the code. Titanium has no choice but to rebuild it all.
Titanium is a great tool and makes incredible things happen. It is still a work in progress, though. Many times I’ll be working on a project and putting in some simple code that I know should work. After a few attempts during which it doesn’t cooperate, I’ll do a full rebuild and 9 out of 10 times that fixes the issues. So, if you find yourself banging your head against the wall with an issue that doesn’t seem to be going anywhere, try a full rebuild before you get too frustrated.
OK, back to the files generated by your first Titanium Project.
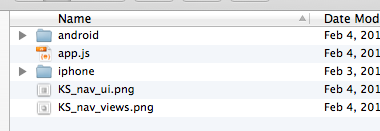
The place you’ll be spending most of your time is in the Resources folder. This contains all the resources that are related to your project. It’s also considered the “root” directory for accessing images from your app. Figure 4-5 shows a default resources directory.
When you first create a project, the Resources folder is pretty sparse. There’s the app.js file (which is where your app starts from), two images, an iphone directory, and an android directory. There are some resources that apply only to iOS or Android, so these folders hold them. For instance, if you look in the android folders, you’ll see an images folder with subfolders to hold splash screens for different screen densities. Similarly, in the iphone directory you’ll see the app icon as well as several splash screens: one for iOS non-retina display, one for iOS retina display, and two for iPad (one in landscape and one for portrait). Resources that will be used on both iOS and Android will go directly in the Resources folder and images that are used on a specific platform will go in one of the platform-specific folders.
Events
Well, we’ve certainly got an app up and running, but what does it do? It displays a nice tab-based UI that contains two windows with a label. Although it looks nice (like any app on the platform you built it for) it doesn’t really do much. It would be nice if it could actually show a little interaction, like a button that would show a message when pressed. Sounds good, let’s do it.
We’re going to get a glimpse now into Titanium Events. Events in Titanium are very similar to events in just about any event-driven programming language. In fact, my first introduction to events was when I was learning Visual Basic back in the day. I made a form, dropped a button on it, and ran it. I clicked it, and nada; nothing happened at all. After thumbing around in the manual (no Internet back then) I found out that I needed to hook a function to the “click” event. I did that, and my event-driven program (no apps yet either) was coming to life.
Note
Events are at the core of Titanium, as they are in many event-driven languages and systems. When invoking an event listener, Titanium almost always passes in an event object as a JSON document that gives you information about the event, what object fired it, etc.
We’re going to do the same thing here. This is to show you how to attach a function call to an event, such as a button click. First thing we need to do is to add some code for the function to be called, add the button, and then hook up the button to the function call. We’ll add the code to our Hello World sample right before the Tab Group open call:
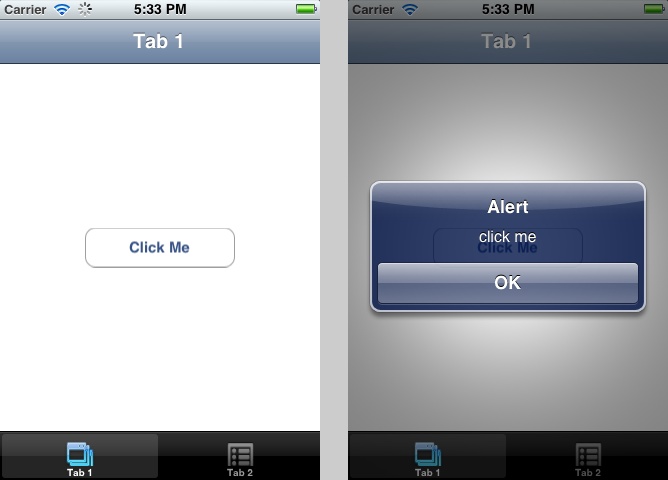
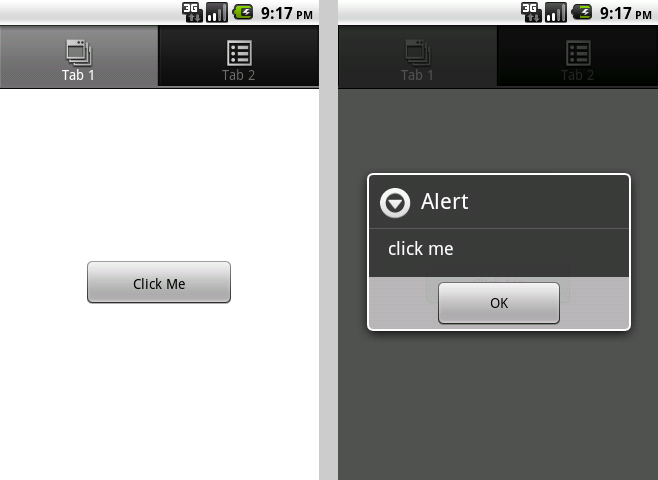
button=Ti.UI.createButton({width:150,height:40,title:"Click Me"})win1.add(button)button.addEventListener('click',function(){alert("click me")});
The first two lines should be easy to figure out, because they are
yet another “create” method plus a familiar add. The other lines attach a function to the
click event of the button we just added to win1. This is as basic as it gets. It’s adding
an inline, anonymous function to the click event. Instead of “click,” you
can specify any event that the button object fires. Since the button is
based on a view, there are more events that you’d expect, but you probably
won’t use much more than the click event.
A more thorough discussion of events comes later in the book. Here I just want to let you know how events figure into the Hello World example and the rest of Titanium. The behavior of the button click is shown in Figures 4-6 and 4-7.
Custom Events
Now that we’ve seen some basic events, we can look at creating our own events. Custom events are just like a built-in event on the listener side. You set up a listener as you would for any other event. The difference is that you also need to fire the event yourself, whereas built-in events are fired automatically.
The point of having a custom event is when you want to broadcast some information to listeners that may have subscribed to this event. It is a bit like calling a subroutine, except you don’t need to know anything about the routine being called, other than the parameters passed into the routine. When you fire a custom event you also pass in the event information as a parameter to the function listening for the event.
The event information that you send when you fire an event should be enough to allow the subscriber to know what’s going on, but you don’t want to overload it with too much information. Generally it’s a good idea to pass the source of the event, so the subscriber can know what object fired the event. Once you have a handle on the event that fired the event, you can generally find out what you need.
One example of a custom event might be on an object that is handling data from a data source of some kind, which has one or more Table Views that are displaying that data. How do you know when the Table View should be updated? Well, the simple answer is that you need to update the Table View when the data source changes. Let’s assume for a minute that there might be more than one table that is showing data from this data source. Also, the data source might not know how many tables are showing this data.
In this example, a custom event is a simple and elegant way to
handle this. The way to handle this would be to have each table that is
displaying information from the data source listen for a custom event,
such as infochanged. This will allow all the Table
Views listening for this event to know the data has changed and refresh
themselves. This makes it easy on the data source as that object doesn’t
have to know how many other objects are utilizing its data.
Custom event handlers are a great way to handle scenarios such as this. They allow you to create events that will be broadcast to any objects that happen to be listening. It doesn’t matter if there are actually listeners or not, you can still broadcast the event. Another way to handle that situation would be to check to see if there are any listeners, and only fire the event if there is actually anything listening on that event.
When you decide that you want to use a custom event, you have to decide what object is going to fire the event. In a scenario like a button click, it’s pretty obvious that the button is going to fire the event, and that’s the object that listeners will listen on, with something like:
button1.addEventListener('click',someRoutine);
The Table View situation I described at the beginning of this
section is a little more obscure. We might have a data layer that is
responsible for handling updates to a file. We also have one or more Table
Views that want to show data from that file and want to be updated when
the information in the file is updated. In this situation we’re going to
use the Ti.App object to fire these
datachanged events. Listeners will then
listen to the Ti.App object as well.
Let’s see how this all works.
If we’re going to be firing an event through the Ti.App object, that’s where the listeners need
to be attached, with some code that listens for the event and the function
that will run when the event is fired:
Ti.App.addEventListener('datachanged',function(evt){alert("the datachanged event has fired");})
We have added a listener with an inline function that will run when
the datachanged custom event has fired.
The inline function will receive whatever data (if any) the event sends in
the evt variable that is passed into
the function. This is usually a JSON variable, which can represent several
items of data in a compact format. It’s a good convention to pass just one
parameter in the form of a JSON document so that, as with other built-in
events, there is just one parameter sent in on the event handler.
In our example, we now have a listener that is ready to receive an event. How do we fire that event? It’s as simple as setting up the listener:
Ti.App.fireEvent('datachanged',{msg:"Something has changed"})
This single line of code sends the datachanged message to whatever listeners might
be set up. That’s it—it really is that simple. Now that we’ve seen the
bare minimum for listening and firing custom events, let’s see how this
shapes up into a slightly more filled out example.
Let’s accomplish something like the scenario I mentioned earlier,
where we have a data source that is driving some Table Views and we want
to keep those Table Views up to date with correct data. To keep track of
when the data changes, we’ll have a function whose job it is to write data
out to a file. This will give us a place to fire the custom event through
the Ti.App object. This function will
then fire the custom datachanged
event:
app={};app.writeToFile=function(filedata){file=Titanium.Filesystem.getFile(Ti.Filesystem.applicationDataDirectory,"filetowatch.txt");if(!file.exists){file.createFile();}file.write(filedata);Ti.App.fireEvent('datachanged',{newdata:filedata});};Ti.App.addEventListener('datachanged',function(evt){Ti.API.info("datachanged event "+JSON.stringify(evt));});app.writeToFile('someddata');
This example defines a function called app.writeToFile that handles writing out the
data to the file that we’re watching, and is also responsible for firing a
custom event when it is called. We then add a listener on that event that
can do whatever updates are necessary when the event fires. The data that
comes into the event is:
{"newdata":"someddata","type":"datachanged"}
This is the "newdata" JSON property that we sent
in on the datachanged event. Titanium also adds the
"type" JSON property, which is simply the name of the
custom event. If you start using many custom events, this property will
let you always know what event fired each notification. This can be handy
if you have the same listener setup on multiple custom events.
Custom events are a nice way to do intra-app communication. It’s an easy way to send information to anyone who has subscribed, or set up listeners to receive events without having to know ahead of time what those listeners are.
Get Appcelerator Titanium: Up and Running now with the O’Reilly learning platform.
O’Reilly members experience books, live events, courses curated by job role, and more from O’Reilly and nearly 200 top publishers.
