Chapter 4. Data Access
Data access is one of the most common tasks that you’re likely to perform when you write web applications. This is made evident by the number of new data controls that ship with Visual Studio 2005. Most visible in ASP.NET 2.0 is the new GridView control, which is a much improved version of the venerable DataGrid control (the older DataGrid control is still supported in ASP.NET 2.0, though). In addition, ASP.NET 2.0 ships with several new data source controls that make it easier to consume a variety of data sources.
Display Data in a Table
If you’ve done serious ASP.NET
programming
you’ve probably used the DataGrid control.
DataGrid is a very powerful and flexible control
for displaying structured data from a data source such as a database.
However, when it comes to manipulating the content of a DataGrid
control, such as editing the rows or simply sorting the columns of a
table, you need to write a moderate amount of code to customize it.
This is where the GridView control comes in handy. Instead of requiring you to write code to perform such common functions as editing or displaying rows in multiple pages, the GridView control now accomplishes the same tasks as the DataGrid control, but with much less coding and work.
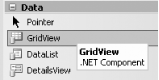
The GridView control can be found in the Toolbox under the Data tab (see Figure 4-1).
Note
Using the new GridView control, you can now do more with less. If you are a DataGrid die-hard, life will never be the same after using the GridView control!
How do I do that?
To see how powerful and configurable the GridView control is, let’s create a page that contains a drop-down listbox and a GridView control. We’ll use the pubs sample database (that comes with SQL Server 2000) together with SQL Server 2005 Express to populate the drop-down listbox with a list of the states where the authors in the database live. When a user selects a state, the GridView control will display the names of all the authors who live there.
Note
You can now sort rows of records based on field names and perform editing and deleting of records in the GridView control, all without writing any code.
Tip
SQL Server 2005 Express does not ship with the pubs and Northwind sample databases, but you can install them by downloading their installation scripts at http://www.microsoft.com/downloads/search.aspx?displaylang=en.
Once the scripts are installed on your system, go to the Visual Studio 2005 command prompt (Start→ Programs→ Microsoft Visual Studio 2005→ Visual Studio Tools→ Visual Studio 2005 Command Prompt) and type in the following to install the pubs and Northwind databases (assuming your installation scripts are stored in C:\):
C:\>sqlcmd -S .\SQLEXPRESS -i instpubs.sqlC:\>sqlcmd -S .\SQLEXPRESS -i instnwnd.sql
Launch Visual Studio 2005 and create a new web site project. Name the project C:\ASPNET20\Chap04-GridView.
Drag and drop the DropDownList control from the Toolbox into the default Web Form.
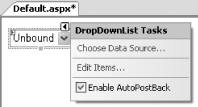
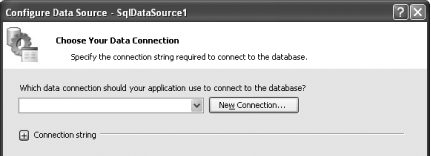
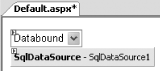
On the DropDownList Tasks menu, click the Choose Data Source... link to select a data source to populate the items in the control (see Figure 4-2).
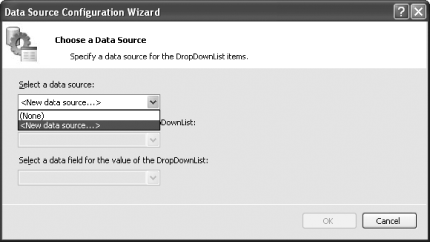
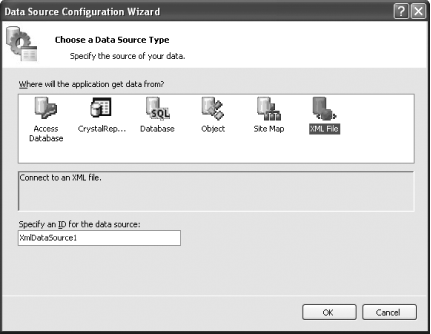
The Data Source Configuration Wizard dialog will appear. In the “Select a data source” drop-down list, select <New data source...> to create a new connection to a data source (see Figure 4-3).
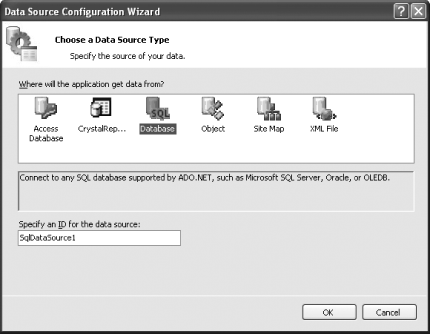
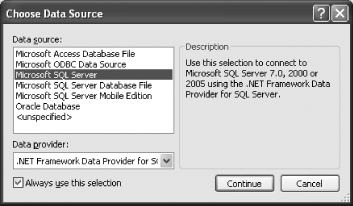
In the “Where will the application get data from” section, select Database and click OK (see Figure 4-4). Use the default name
SqlDataSource1as the ID for the data source.Tip
The Database data source type can connect to any SQL database (such as Oracle), not just SQL Server.
You use the SqlDataSource control to declaratively establish a connection to a SQL data source without writing any code. In the days of ASP.NET 1.x, you had to write elaborate code to access data sources using ADO.NET.
In ASP.NET 2.0, you now have data source controls that encapsulate all the logic needed to access a data source. (I will discuss the rest of the data source controls throughout this chapter.)
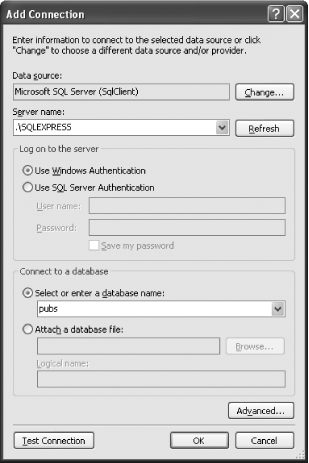
Click the New Connection... button to establish a connection to the database you want to use (see Figure 4-5).
You will be asked to select the type of data source you want to connect to. Select SQL Server to connect to a SQL Server 2005 Express database (see Figure 4-6). Click Continue.
Specify the database server information as well as the database to use (see Figure 4-7). For this example, use the pubs database. Click the Test Connection button to verify that the connection can be established. Click OK.
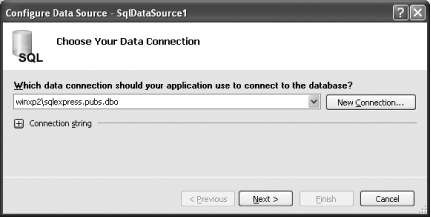
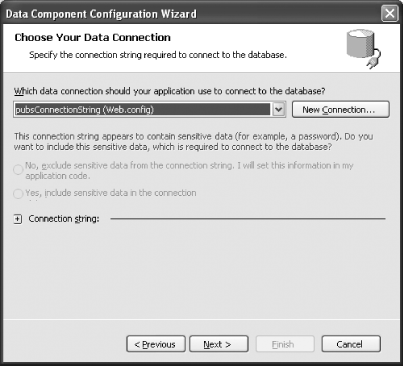
You should now see the data connection that you have selected (winxp2\sqlexpress.pubs.dbo). Click Next (see Figure 4-8).
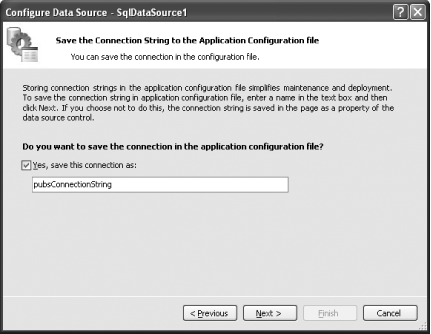
You will be asked if you want to save the database connection in the application configuration file (Web.config). This is the preferred option because it allows you to modify your database server settings without modifying your code. This is especially useful after you have deployed your application. To save the connection string in Web.config, use the suggested
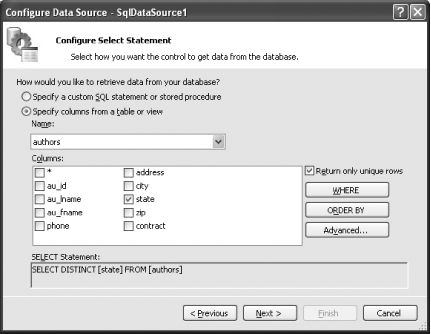
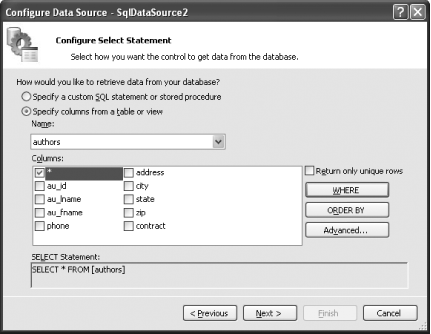
pubsConnectionStringand ensure that the “Yes, save this connection as:” checkbox is selected. Click Next (see Figure 4-9).You can now select the database fields you want to use. You can either specify a custom SQL statement (or use a stored procedure), or make use of the checkboxes to select the fields you want. For this example, select the “Specify columns from a table or view” radio button and select the authors table. Select the state and “Return only unique rows” checkboxes. Click Next (see Figure 4-10).
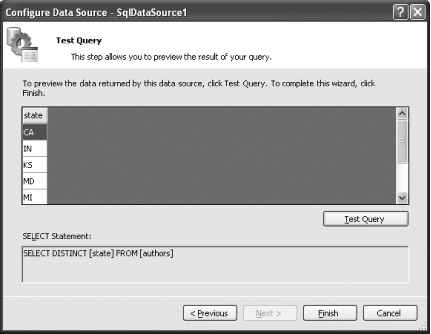
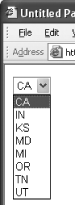
You can now test your query. Click Test Query to see the results returned from your selection. Click Finish (see Figure 4-11). You should now see a list of states.
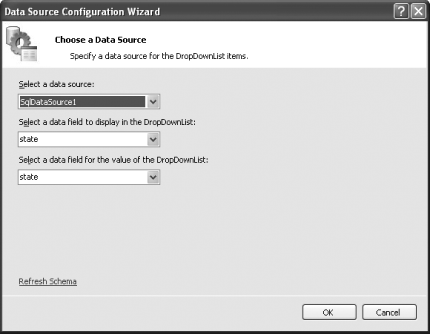
Finally, configure the DropDownList control to use the data source that you have just created. Select
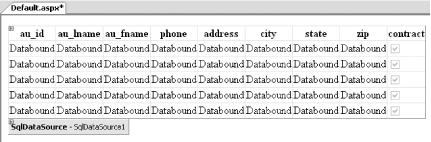
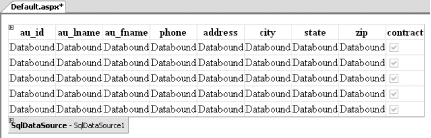
SqlDataSource1as the data source and selectstateas the field to display, as well as the value to use for the DropDownList control. Click OK (see Figure 4-12).Your page should now look like Figure 4-13. A SqlDataSource control is created for you.
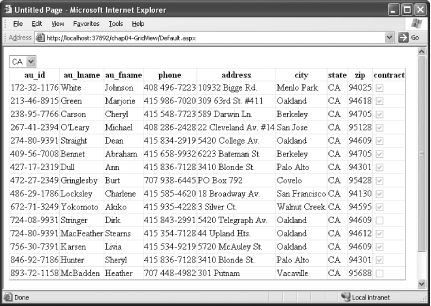
Press F5 to test the application. You should see the DropDownList control displaying a list of states that all the authors live in (see Figure 4-14).
In the next series of steps, you will add a GridView control to the Web Form so that when a state is selected from the DropDownList control, all of the authors that live in that selected state will be displayed in an orderly way.
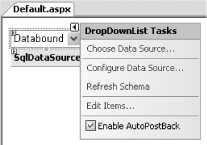
First, check the Enable AutoPostBack checkbox in the DropDownList Tasks menu (see Figure 4-15). Doing so will cause a postback to occur whenever the item in the DropDownList control is changed, so that the GridView control can display the related records.
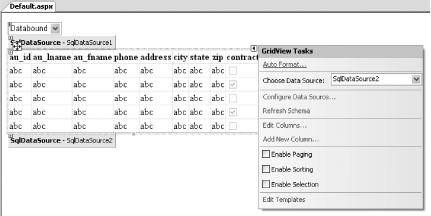
Next, drag and drop a GridView control (found in the Toolbox under the Data tab) onto the form.
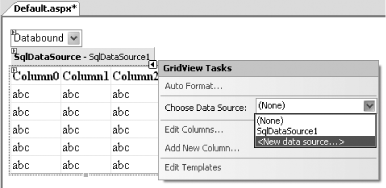
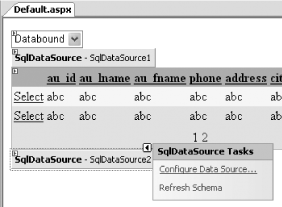
In the GridView Tasks menu, select a new data source (see Figure 4-16). You will configure a new SqlDataSource control to retrieve rows from the pubs table based on the selection in the DropDownList control.
You will be asked to choose the data source type (choose
Database) as well as the database connection to use (use the one configured earlier,pubsConnectionString).You should now see the window shown in Figure 4-17. Check the “Specify columns from a table or view” option and select the asterisk (*) checkbox. You will display all the fields in the authors table. Click the WHERE button to customize the SQL statement to retrieve only authors from a particular state.
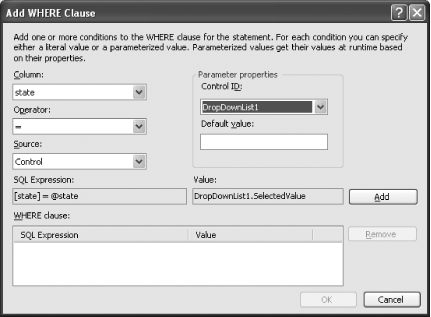
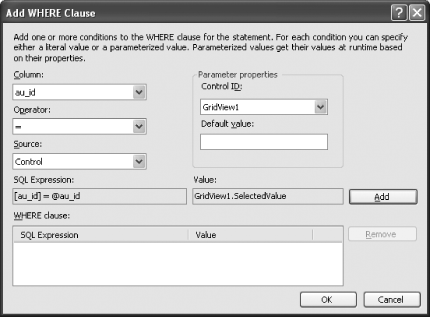
In the Add WHERE Clause window, select the options as shown in Figure 4-18. Basically, you specify that the state field (in the SQL statement) must match the value of the DropDownList control. Click Add and the following SQL expression will be shown in the “WHERE clause” box:
SELECT * FROM [authors] WHERE ([state] = @state)
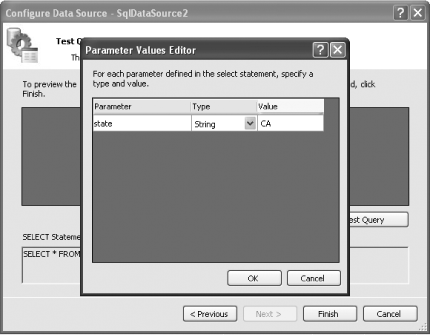
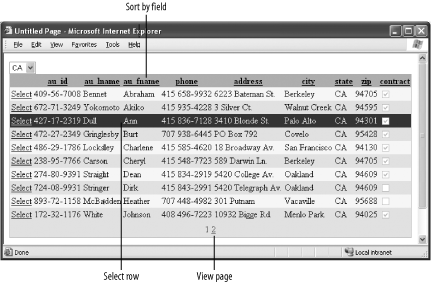
Click OK in the Add WHERE Clause window. You can now test the connection. Click Test Query and you will be prompted to give a value to the state field. Enter
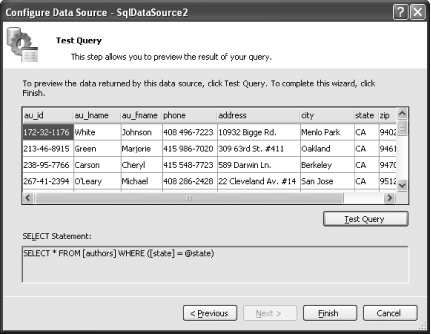
CAto see a list of authors from California (see Figure 4-19).Click Finish to complete the configuration (see Figure 4-20). A new SqlDataSource control (
SqlDataSource2) will be created.Press F5 to test your application. When you select a state from the DropDownList control, the GridView control should display the list of authors who live in that state (see Figure 4-21).
What about...
...configuring the DropDownList control declaratively?
By all means! One of the nice features of ASP.NET 2.0 is that, within the Web.config files, you can declaratively execute all the cool things you can do with its wizards. In fact, after a while, you may find that configuring the controls declaratively is a much more efficient way of developing your application.
So, instead of using the wizard to create a database connection
string for you, you can simply add the <connectionStrings>
element to your Web.config file. The following
connection string, pubsConnectionString, connects
to SQL Server Express 2005 on the local computer and uses integrated
security to access the pubs database:
<?xml version="1.0"?>
<configuration
  xmlns="http://schemas.microsoft.com/.NetConfiguration/
  v2.0">
   <appSettings/>
      <connectionStrings>
         <add name="pubsConnectionString" connectionString=
                   "Data Source=.\SQLEXPRESS;Initial
                    Catalog=pubs; Integrated
                    Security=True" providerName=
                   "System.Data.SqlClient"/>
      </connectionStrings>
   <system.web>
   ...
   ...
   </system.web>
</configuration>
To establish a connection to the pubs database, you can use the SqlDataSource control. You can configure the SqlDataSource control to use the connection string defined in Web.config by specifying the following in the Source View of the form:
<asp:SqlDataSource
     ID="SqlDataSource1" runat="server"
     SelectCommand="SELECT DISTINCT [state] FROM [authors]"
     ConnectionString=
        "<%$ ConnectionStrings:pubsConnectionString %>">
</asp:SqlDataSource>
To display the records in the pubs database, bind a DropDownList control to
the SqlDataSource control through the DataSourceID attribute:
<asp:DropDownList ID="DropDownList1" runat="server"
     DataSourceID="SqlDataSource1"
     DataTextField="state"
     DataValueField="state">
</asp:DropDownList
You can also bind the SqlDataSource and DropDownList controls programmatically, like this:
DropDownList1.DataSource = SqlDataSource1
DropDownList1.DataBind( )
...formatting the GridView control to give it a professional look?
Most certainly. The GridView control comes with a few themes that you can apply. To apply a theme to the GridView control, select the Auto Format... link in the GridView Tasks menu (see Figure 4-22).
Figures Figure 4-23 and Figure 4-24 show the Professional and Sand & Sky themes applied to the GridView control.
Sort and View Records on Multiple Pages
Note
Want to make the GridView control display records in multiple pages? Tick a checkbox and consider it done!
By default, the GridView control will display all the records in its data set on a single page. If you have a large number of records to display, this is not a very elegant way to display your data. For example, you might want to display all the employees in your company. If you have large list of names to display, it is much neater and more efficient to display the list in multiple pages. You might also want the names to be displayed in alphabetical order, or to allow the user to jump to a particular page.
You can now perform all of these functions in the GridView control by simply selecting some checkboxes. There is no need to write lengthy code to do any of these mundane tasks.
How do I do that?
To see how easy it is to configure the GridView control to display records in multiple pages and to allow sorting of fields, you will use the GridView control created in the last lab and configure it to perform these additional functions.
Using the project created in the last lab, you will now configure the GridView control so that the data is displayed in multiple pages.
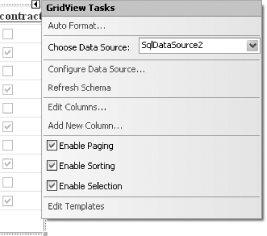
In the GridView Tasks menu of the GridView control, select the following checkboxes (see Figure 4-25):
- Enable Paging
Displays the data in multiple pages
- Enable Sorting
Allows the data to be sorted by fields
- Enable Selection
Enables rows to be selected
Tip
The Enable Selection option is useful when you need to explicitly select a row in the GridView control. For example, you might want to select a row in the GridView control so that the detailed information in the row can be displayed in another GridView control.
If a GridView is configured to allow selection, the SelectedIndexChanged event of the GridView control will be fired when the user selects a row in the control.
The GridView control will now look like the one shown in Figure 4-26.
To make the GridView control look nicer, apply the Sand & Sky theme (via the Auto Format... link in the GridView Tasks menu).
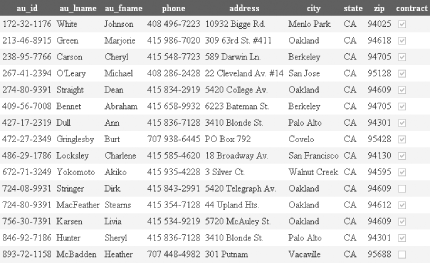
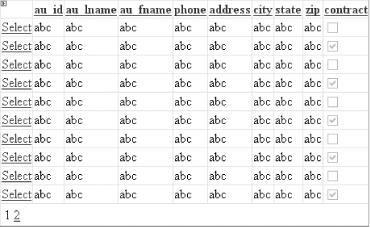
Press F5 to test the application (see Figure 4-27). You can now sort the rows by field (by clicking on the field name in the GridView control), select a particular row (by clicking on the Select link), as well as display the data in multiple pages.
Tip
GridView supports client-side paging and sorting,
all without needing to refresh the page. To do so, set the
EnableSortingAndPagingCallbacks property of the GridView control to
True. This feature uses the Client Callback manager, which is new in
ASP.NET 2.0.
For more information on the Client Callback manager, see Chapter 6.
What about...
...modifying the Paging UI of the GridView control?
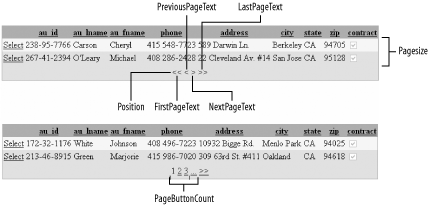
The Paging UI of the GridView control refers to the links that are displayed to allow users to navigate from one page to another. If your GridView control is going to display multiple pages, you can customize the texts displayed in the Paging UI. The Mode property (within the PagerSettings property) of the GridView control allows you to display pages in different formats. The Mode property can take any one of the following values:
-
NextPrevious Displays the Next and Previous symbols; e.g., < >
-
Numeric Displays the page number; e.g., 1 2 3 4 ...
-
NextPreviousFirstLast Displays the Next, Previous, First and Last symbols; e.g., << < > >>
-
NumericFirstLast Displays the page number as well as the First and Last symbols; e.g., << ... 4 5 6 ... >>
The PagerSettings property also exposes the following properties:
FirstPageTextNextPageTextPageButtonCountPositionPreviousPageText
Figure 4-28 shows how the various properties configure the paging UI of the GridView control.
In addition, you can use images for navigation purposes using the following properties (simply set these properties to point to the path containing the images to be used):
FirstPageImageUrlLastPageImageUrlPreviousPageImageUrlNextPageImageUrl
Where can I learn more?
If you want to learn how paging and sorting works in the old
DataGrid, check out the DataGrid Girl site
(http://datagridgirl.com/), a
popular site that covers all things DataGrid. Who
knows, after visiting that site you might be even be more impressed
with the GridView control!
Edit and Delete Records
Apart from simply displaying
records in the GridView control, you can
also allow users to edit or delete records directly while
they’re being viewed. Unlike the old
DataGrid, the new GridView control makes editing
and deleting records very simple. And with the wizards to help you
configure the GridView control, your life as a developer could not be
simpler.
How do I do that?
In the previous lab, you saw how GridView binds to
the SqlDataSource control. You have also seen how rows can be sorted
automatically without requiring you to write code to do it and how
records can be displayed in multiple pages. In this lab,
you’ll go one step further. You will see how you can
configure the GridView control for editing and deleting records.
Using the project built in the previous lab, you will now configure the SqlDataSource2 control (which was bound to the GridView control) so that it supports the editing and deletion of records.
In the SqlDataSource Tasks menu of
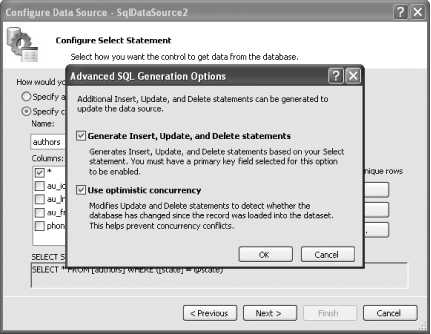
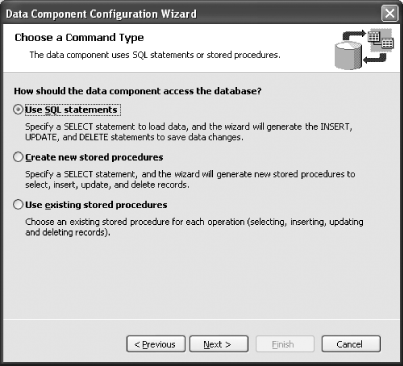
SqlDataSource2, click the Configure Data Source... link (see Figure 4-29).Click Next in the following window and then, in the Configure Select Statement window, click on Advanced . . . . Check the “Generate Insert, Update, and Delete statements” checkbox to generate the appropriate SQL statements to perform modifications to the table (see Figure 4-30). To prevent concurrency conflicts, check the “Use optimistic concurrency” checkbox, too. Click OK.
Back in the Configure Select Statement window, click Next and then Finish in the next window.
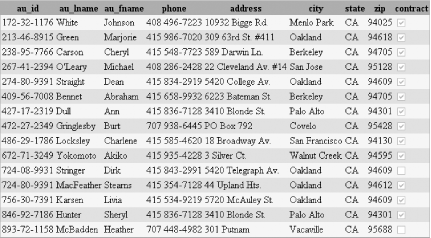
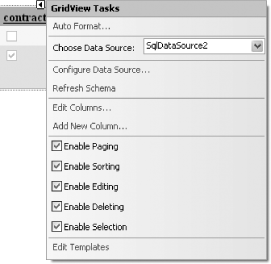
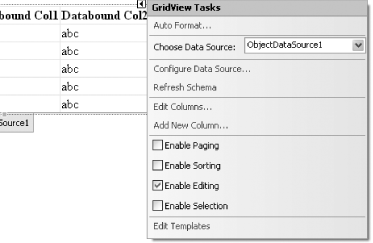
To allow the GridView control to support editing and deleting of records, select the Enable Editing and Enable Deleting checkboxes in the GridView Tasks menu (see Figure 4-31).
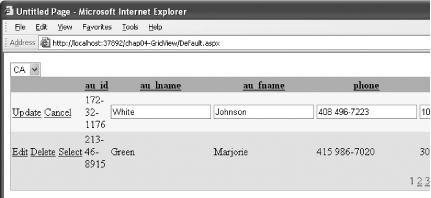
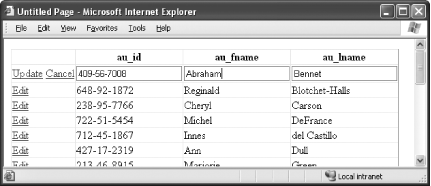
Press F5 to test the application. You will now be able to edit or delete records (see Figure 4-32) by clicking the Edit and Update links.
What about...
...resolving concurrency conflicts?
Recall that in Figure 4-30 you checked the “Use optimistic concurrency” checkbox. By selecting this checkbox, the SqlDataSource control will detect any changes to the table before an update is performed. Consider a case in which two users are both trying to update the same record. If one user has updated the record, the other user will detect that the original values have been changed when he tries to update the same record, and the update will not be successful.
If you switch to Source View, you will notice that the SqlDataSource control has acquired a number of new elements and attributes. In particular, the DeleteCommand, InsertCommand, and UpdateCommand attributes take care of the tasks of deleting, inserting, and editing records in the database. Their syntax is shown in Example 4-1.
DeleteCommand="DELETE FROM [authors]
              WHERE [au_id] = @original_au_id
              AND [au_lname] = @original_au_lname
              AND [au_fname] = @original_au_fname
              AND [phone] = @original_phone
              AND [address] = @original_address
              AND [city] = @original_city
              AND [state] = @original_state
              AND [zip] = @original_zip
              AND [contract] = @original_contract"

InsertCommand="INSERT INTO [authors] ([au_id], [au_lname],
              [au_fname], [phone], [address], [city],
              [state], [zip], [contract]) VALUES (@au_id,
              @au_lname, @au_fname, @phone, @address,
              @city, @state, @zip, @contract)"

UpdateCommand="UPDATE [authors] SET [au_lname] = @au_lname,
              [au_fname] = @au_fname, [phone] = @phone,
              [address] = @address, [city] = @city,
              [state] = @state, [zip] = @zip,
              [contract] = @contract
              WHERE
              [au_id] = @original_au_id
              AND [au_lname] = @original_au_lname
              AND [au_fname] = @original_au_fname
              AND [phone] = @original_phone
              AND [address] = @original_address
              AND [city] = @original_city
              AND [state] = @original_state
              AND [zip] = @original_zip
              AND [contract] = @original_contract"

ConflictDetection="CompareAllValues"
The SQL statements are structured so that they can detect concurrency issues. As an example, consider the UpdateCommand statement. An update can be performed successfully only when the values for the original fields are the same (checked using the @original_fieldname parameter).
To implement the “First-One Wins”
strategy, you need to set the ConflictDetection attribute to
CompareAllValues.
Note
The update conflict resolution strategy in which the first user to update a record wins is called “First-One Wins."
The <updateParameters> element keeps track of the old values of each field:
<UpdateParameters>
  <asp:Parameter Type="String" Name="au_lname" />
  <asp:Parameter Type="String" Name="au_fname" />
  <asp:Parameter Type="String" Name="phone" />
  <asp:Parameter Type="String" Name="address" />
  <asp:Parameter Type="String" Name="city" />
  <asp:Parameter Type="String" Name="state" />
  <asp:Parameter Type="String" Name="zip" />
  <asp:Parameter Type="Boolean" Name="contract" />
  <asp:Parameter Type="String" Name="original_au_id" />
  <asp:Parameter Type="String" Name="original_au_lname" />
  <asp:Parameter Type="String" Name="original_au_fname" />
  <asp:Parameter Type="String" Name="original_phone" />
  <asp:Parameter Type="String" Name="original_address" />
  <asp:Parameter Type="String" Name="original_city" />
  <asp:Parameter Type="String" Name="original_state" />
  <asp:Parameter Type="String" Name="original_zip" />
  <asp:Parameter Type="Boolean" Name="original_contract" />
</UpdateParameters>
Note that the old value of each parameter is prefixed with the string “original_”. You can change this value by setting the OldValuesParameterFormatString property of the SqlDataSource control.
...handling errors in updating?
If you try to update a record in the GridView control and an error occurs, you can trap this error via the RowUpdated event, like this:
Protected Sub GridView1_RowUpdated(_
                  ByVal sender As Object, _
                  ByVal e As System.Web.UI.WebControls. _
                              GridViewUpdatedEventArgs) _
                  Handles GridView1.RowUpdated
   If e.Exception IsNot Nothing Then
      Response.Write("Error in updating record.")
      e.ExceptionHandled = True
   End If
End Sub
Where can I learn more?
To learn how to handle concurrency issues in .NET, check out the article at http://www.15seconds.com/issue/030604.htm.
To learn how to service the event fired by the GridView control before a record is deleted, check out the MSDN Help topic “GridView.RowDeleting Event.”
Display One Record at a Time
Note
The GridView control comes with the companion DetailsView control, which displays one record at a time.
Besides the GridView control, there is another new control that is similar to it but presents a slightly different view. Instead of displaying multiple records on one page, the DetailsView control displays one record at a time. The DetailsView control is located in the Toolbox on the Data tab (see Figure 4-33).
How do I do that?
To see how the DetailsView control differs from the GridView control, you will replace the GridView control created in the previous lab with a DetailsView control. You will also see how the DetailsView control allows new records to be inserted into the database, which is not allowed in the GridView control.
Using the project created in the previous lab, replace the GridView control with the DetailsView control in the default form.
Apply the Mocha theme to the DetailsView control (via the Auto Format... link in the DetailsView Tasks menu).
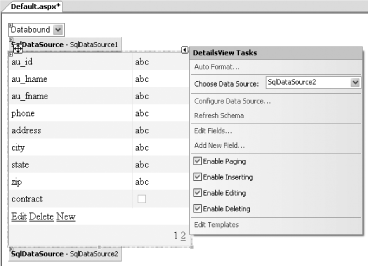
In the DetailsView Tasks menu, select
SqlDataSource2as its data source and select the following checkboxes (see Figure 4-34):Enable Paging
Enable Inserting
Enable Editing
Enable Deleting
The checkboxes available are dependent on how the data source is configured. For example, Enable Editing and Enable Deleting are available only if the data source that is being used supports them. If you have configured your data source to support Inserting as well, there is also an Enable Inserting checkbox.
Press F5 to test the application. Figure 4-35 shows the DetailsView in action. You can also edit and insert new records.
Tip
By default the GridView and DetailsView controls use the field name of the table as header text. For example, you see au_id and au_fname used as the header for both the GridView and DetailsView controls in this and previous labs.
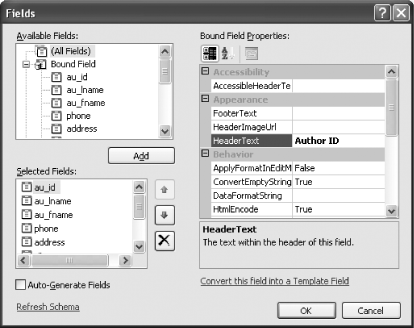
To customize the header text of a DetailsView control, click on the Edit Fields... link in the DetailsView Tasks menu and then configure it in the Fields dialog (see Figure 4-36) via the HeaderText property.
To customize the header text of a GridView control, click on the Edit Columns... link in the GridView Tasks menu and then configure it in the Fields dialog via the HeaderText property.

What about...
...creating a Master/Detail view of records in a table?
The GridView and DetailsView controls together make a good pair of controls for displaying a Master/Detail view of records. For example, the GridView control could display all the employee IDs, and clicking on a particular employee ID could trigger the DetailsView control to display the details of the selected employee.
To create a Master/Detail view, follow these steps:
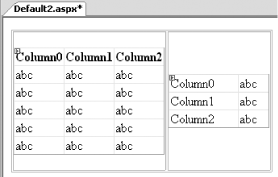
Add a new Web Form to the project and name it Default2.aspx.
Add a 2 1 table to the Web Form (Layout→ Insert Table), and add a GridView control to the left cell of the table and a DetailsView control to the right cell of the table (see Figure 4-37).
Configure the GridView control to bind to a new SqlDataSource control and retrieve the au_id field from the authors table in the pubs database (see the lab Section 4.1 for detailed instruction on how to do this). The Source View of the GridView control and the newly created SqlDataSource control now looks like Example 4-2.
Tip
For this example, I strongly suggest you download the sample code from http://www.oreilly.com/catalog/aspnetadn/.
Example 4-2. Source View of the GridView and SqlDataSource controls<asp:GridView ID="GridView1" runat="server" Width="158px" DataSourceID="SqlDataSource1" AutoGenerateColumns="False" DataKeyNames="au_id" AllowPaging="True" PageSize="4" AllowSorting="True"> <Columns> <asp:CommandField ShowSelectButton="True"> </asp:CommandField> <asp:BoundField ReadOnly="True" HeaderText="au_id" DataField="au_id" SortExpression="au_id"> </asp:BoundField> </Columns> </asp:GridView> <asp:SqlDataSource ID="SqlDataSource1" runat="server" SelectCommand="SELECT [au_id] FROM [authors]" ConnectionString="<%$ ConnectionStrings: pubsConnectionString %>"> </asp:SqlDataSource>Configure the DetailsView control to bind to a new SqlDataSource control and retrieve all the fields from the authors table in the pubs database. In particular, the au_id field is dependent on the record selected in the GridView control (see Figure 4-38).
The Source View of the DetailsView control and the newly created SqlDataSource control should now look like the source shown in Example 4-3.
Example 4-3. Source view of the DetailsView and SqlDataSource controls<asp:DetailsView ID="DetailsView1" runat="server" Height="50px" Width="286px" DataSourceID="SqlDataSource2" AutoGenerateRows="False" DataKeyNames="au_id"> <Fields> <asp:BoundField ReadOnly="True" HeaderText="au_id" DataField="au_id" SortExpression="au_id"> </asp:BoundField> <asp:BoundField HeaderText="au_lname" DataField="au_lname" SortExpression="au_lname"> </asp:BoundField> <asp:BoundField HeaderText="au_fname" DataField="au_fname" SortExpression="au_fname"> </asp:BoundField> <asp:BoundField HeaderText="phone" DataField="phone" SortExpression="phone"> </asp:BoundField> <asp:BoundField HeaderText="address" DataField="address" SortExpression="address"> </asp:BoundField> <asp:BoundField HeaderText="city" DataField="city" SortExpression="city"> </asp:BoundField> <asp:BoundField HeaderText="state" DataField="state" SortExpression="state"> </asp:BoundField> <asp:BoundField HeaderText="zip" DataField="zip" SortExpression="zip"> </asp:BoundField> <asp:CheckBoxField HeaderText="contract" SortExpression="contract" DataField="contract"> </asp:CheckBoxField> </Fields> </asp:DetailsView> <asp:SqlDataSource ID="SqlDataSource2" runat="server" SelectCommand="SELECT * FROM [authors] WHERE ([au_id] = @au_id)" ConnectionString="<%$ ConnectionStrings: pubsConnectionString %>"> <SelectParameters> <asp:ControlParameter Name="au_id" ControlID="GridView1" PropertyName="SelectedValue" Type="String" /> </SelectParameters> </asp:SqlDataSource>Apply the Sand & Sky theme to both the GridView and DetailsView controls.
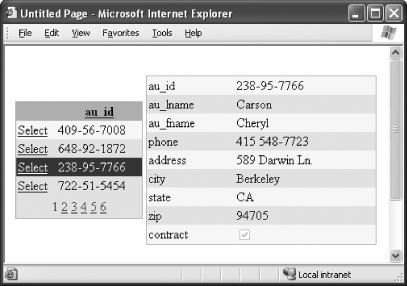
Press F5 to test the application. You should now be able to select a record in the GridView control and see the details of the selected record in the DetailsView control (see Figure 4-39).
Where can I learn more?
One particular operation with the GridView and DetailsView control
that you should take note of is deletion. You
wouldn’t want the user to delete a record mistakenly
without giving him a second chance. The GridView
and DetailsView will gladly delete the record
without any warning (if you have enabled deleting). Before a record
is deleted, it is your duty to ensure that the user is asked to
confirm his action. You can do so via a client-side script. To learn
more
about writing this kind of script,
check out the following sites:
To learn more about the DetailsView control, check out the MSDN Help topic “DetailsView class.”
Cache the Data Source Control
Note
To improve the performance of your application, you should cache the data source control if you are using one.
Performing database access is a time-consuming operation; therefore, it is important that you reduce the number of times you connect to the database. The SqlDataSource control (as well as the AccessDataSource control) supports caching of data. Caching of the data source controls is useful in cases when your data does not change often—for example, when you have pages displaying product listings and information.
How do I do that?
To see how to enable caching of data source controls in your application, you will build an application in this lab that uses a SqlDataSource control to retrieve rows from the authors table in the pubs database and then uses the GridView control to display them. The SqlDataSource control will be cached for 60 seconds before the cache is invalidated.
Launch Visual Studio 2005 and create a new web site project. Name the project C:\ASPNET20\chap04-DataSourceCache.
Drag and drop a GridView control onto the default Web Form and configure it to use a SqlDataSource control to connect to the pubs database in SQL Server 2005 Express (see the lab Section 4.1 for detailed instructions on how to do this). In particular, the au_id, au_fname, and au_lname fields are retrieved. The Source View of the GridView and SqlDataSource control looks like Example 4-4.
Example 4-4. Source View of the GridView and SqlDataSource controls<asp:GridView ID="GridView1" runat="server" DataSourceID="SqlDataSource1" AutoGenerateColumns="False" DataKeyNames="au_id"> <Columns> <asp:BoundField ReadOnly="True" HeaderText="au_id" DataField="au_id" SortExpression="au_id"> </asp:BoundField> <asp:BoundField HeaderText="au_lname" DataField="au_lname" SortExpression="au_lname"> </asp:BoundField> <asp:BoundField HeaderText="au_fname" DataField="au_fname" SortExpression="au_fname"> </asp:BoundField> </Columns> </asp:GridView> <asp:SqlDataSource ID="SqlDataSource1" runat="server" SelectCommand="SELECT [au_id], [au_lname], [au_fname] FROM [authors]" ConnectionString="<%$ ConnectionStrings: pubsConnectionString %>"> </asp:SqlDataSource>To enable caching of the SqlDataSource control, set the CacheDuration (in seconds) and EnableCaching attributes, as shown in the following code snippet:
<asp:SqlDataSource ID="SqlDataSource1" runat="server"
     SelectCommand="SELECT [au_id], [au_lname],
                    [au_fname] FROM [authors]"
     ConnectionString="<%$ ConnectionStrings:pubsConnectionString %>"
     CacheDuration="60"
     EnableCaching="True"
     CacheExpirationPolicy="Absolute" >
</asp:SqlDataSource>
Press F5 to test the application. To verify that the data in the SqlDataSource control is cached, modify one of the rows in the authors table and refresh the page. You will notice that the data in the GridView control is not updated until approximately one minute (60 seconds) later.
The default cache expiration policy is that of
absolute, which means that the data cached by the
data source control will expire x seconds (as
specified in the CacheDuration attribute) after the data source has
been loaded.
What about...
...sliding cache policy?
In the sliding cache policy, the cache will expire if a request is not made within a specified duration. For example, the following code specifies that the cache will have a sliding duration of one minute. If a request is made 59 seconds after the cache is accessed, the validity of the cache would be reset to another minute. Sliding expiration policy is useful whenever you have a large number of items to cache, since this policy enables you to keep only the most frequently accessed items in memory.
<asp:SqlDataSource ID="SqlDataSource1" runat="server"
     SelectCommand="SELECT [au_id], [au_lname],
                    [au_fname] FROM [authors]"
     ConnectionString="<%$ ConnectionStrings:pubsConnectionString %>"
     CacheDuration="60"
     EnableCaching="True"
     CacheExpirationPolicy="Sliding" >
</asp:SqlDataSource>
Where can I learn more?
For a good discussion on implementing page caching in ASP.NET using absolute expiration, check out the article at:
| http://msdn.microsoft.com/library/default.asp?url=/library/en-us/dnpatterns/html/ImpPageCacheInASP.asp. |
You will also learn how to cache fragments of a page in Chapter 6.
Cache Using Dependency
Note
Instead of just invalidating a database cache based on a specific duration, it is much more effective to invalidate a cache if a change is detected in the database.
Specifying duration for a cache is not always a practical approach. For example, you may cache the data from a database for 10 minutes, but due to unforeseen circumstances (such as price fluctuations of stocks reacting to sudden happenings in world events) the data in the database may be updated more than once during the 10-minute interval. In such cases, it would be much better if the cache duration is dependent on the changes of data in the database.
In ASP.NET 2.0, a new SQL Cache Dependency is available that allows you to invalidate your cache whenever certain types of changes are made to the database. You can now be assured that your database cache is always up to date whenever your database changes.
How do I do that?
To use SQL Cache Dependency, you first need to prepare your database (SQL Server 2000 in this example) and its tables for change notification (so that your ASP.NET application can be notified of the changes in the database). You do this by running a utility called aspnet_regsql.exe on the databases and tables that you want to enable for SQL Cache Dependency. Once the database is ready, you will then build an application and use the GridView and SqlDataSource controls to test out SQL Cache Dependency.
To use the aspnet_regsql.exe utility, go to the command prompt and change to the following directory: C:\WINDOWS\Microsoft.NET\Framework\<version>.
The aspnet_regsql.exe utility is a mixed-mode (both graphical and command-based) tool that helps you configure your SQL Server database for use with your ASP.NET application. To see the various options available with it, use:
C:\WINDOWS\Microsoft.NET\Framework\
version>aspnet_regsql /?There are two steps you need to take to enable SQL Cache Dependency:
Enable the database.
Enable the table(s).
To enable a database, use the -ed option (see Sidebar 1-1):
C:\WINDOWS\Microsoft.NET\Framework\
version>aspnet_regsql -S localhost -E -d Pubs -edTo enable the table(s), use the -et option:
C:\WINDOWS\Microsoft.NET\Framework\
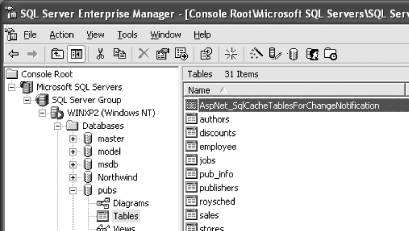
version>aspnet_regsql -S localhost -E -t Authors -d Pubs -etSteps 3 and 4 create a new table in your database:
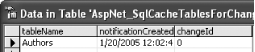
AspNet_SqlCacheTablesForChangeNotification(shown in Figure 4-40).The AspNet_SqlCacheTablesForChangeNotification table has three fields, shown in Figure 4-41, and contains the last modification date of the table you are monitoring (through the notificationCreated field), as well as the total number of changes. Each time your table is modified, the value in the changeId field is incremented; it is this table that is tracked by ASP.NET for SQL Cache Dependency.
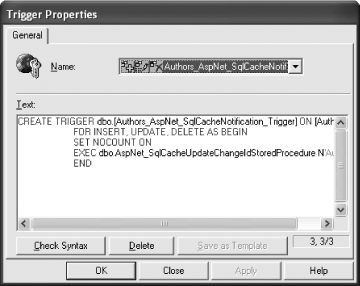
SQL Server knows when to increment the AspNet_SqlCacheTablesForChangeNotification table because a trigger called
AspNet_SqlCacheNotification_Triggerwas installed by aspnet_regsql during the enabling process, and this trigger is invoked whenever the table is modified (see Figure 4-42).Now that the database has been enabled, to test SQL Cache Dependency, launch Visual Studio 2005 and create a new web site project. Name the project C:\ASPNET20\Chap04-SQLCacheDep.
Add the Web.config file to the project by right-clicking the project name in Solution Explorer and then selecting Add New Item.... Select Web Configuration File.
The next step is to add a database connection string in your application. To do so, you need to first modify the Web.config file (note the added code in bold in Example 4-5).
Example 4-5. Modifying Web.config to support SQL Cache Dependency<?xml version="1.0"?> <configuration xmlns="http://schemas.microsoft.com/.NetConfiguration/v2.0"> <appSettings/> <connectionStrings> <add name="PubsDatabase" connectionString="Server=(local);Integrated Security=True; Database=pubs;Persist Security Info=True" providerName="System.Data.SqlClient" /> </connectionStrings> <system.web> <compilation debug="true"/> <authentication mode="Windows"/> <caching> <sqlCacheDependency enabled="true"> <databases> <add name="Pubs" connectionStringName="PubsDatabase" pollTime="10000" /> </databases> </sqlCacheDependency> </caching> </system.web> </configuration>In the Web.config file in Example 4-5, you have specified a connection string that connects to the pubs database. You have also specified the use of SQL Server caching and indicated a polling time of 10 seconds (unit is in milliseconds). This is the time the ASP.NET runtime (a background thread that is spun off for this purpose) polls the database (specifically, the AspNet_SqlCacheTablesForChangeNotification table) for changes. As this table is small, this process is very efficient and will not slow down the system. Hence, it would be good to specify a low number so that the application is always displaying the most up to date data.
Populate the default Web Form with a GridView control. Configure the GridView control to use a SqlDataSource control. In particular, the SqlDataSource control will use the connection string stored in Web.config. The Source View of the
GridViewshould now look something like this:<asp:GridView ID="GridView1" runat="server" DataSourceID="SqlDataSource1" AutoGenerateColumns="False" DataKeyNames="au_id"> ... ... </asp:GridView> <asp:SqlDataSource ID="SqlDataSource1" runat="server" SelectCommand="SELECT * FROM [authors]" ConnectionString="<%$ ConnectionStrings:PubsDatabase %>"> </asp:SqlDataSource>Tip
Refer to the lab Section 4.1, earlier in this chapter, if you are not sure how to configure the GridView control to use a SqlDataSource control.
The default Web Form should now look like Figure 4-43.
Switch to Source View and modify the SqlDataSource control to enable SQL Cache Dependency:
<asp:SqlDataSource ID="SqlDataSource1" runat="server" EnableCaching="true" SqlCacheDependency="Pubs:Authors" SelectCommand="SELECT * FROM [authors]" ConnectionString="<%$ ConnectionStrings:PubsDatabase %>"> </asp:SqlDataSource>Press F5 to test the application. Modify the data in the authors table (using tools such as SQL Enterprise Manager or Query Analyzer), and refresh the web browser. You will notice that the data in the
GridViewwill be updated every 10 seconds (approximately) only if there are changes in the authors table.
What about...
...page output caching?
You can use page output caching together with SQL Cache Dependency. For example, suppose a Web Form has a GridView control bound to a SqlDataSource control. You can specify output caching by using the OutputCache directive:
<%@ OutputCache  Duration="15000"  VaryByParam="none"
    SqlDependency ="Pubs:Authors" %>
Assuming that the SQL Cache Dependency is set to 10 seconds, the
GridView will be refreshed every 10 seconds (if
there are changes). Alternatively, the page will expire every 15
seconds, and any changes would also be reflected when the page gets
refreshed every 15 seconds.
...programmatically enabling a database and its tables for SQL Cache Dependency?
You have seen how to configure SQL Cache Dependency using the aspnet_regsql.exe utility. Besides using the tool, you can programmatically enable a database and table(s) for notification by using the SqlCacheDependencyAdmin class.
The code in Example 4-6 shows how to enable a database and its tables for notifications.
Public Sub EnableNotification(ByVal tableName As String)
    Dim connStr As String = "Server=.\SQLEXPRESS;Integrated
        Security=True;Database=pubs;Persist Security
        Info=True"
    Dim mustEnable As Boolean = True
    Try
        Dim tablesEnabled( ) As String
        '---Retrieve all tables enabled for notifications--
        tablesEnabled = _
           SqlCacheDependencyAdmin. _
            GetTablesEnabledForNotifications(connStr)
        If (tablesEnabled IsNot Nothing) Then
            Dim table As String
            Response.Write("<b>Tables Enabled For " & _
                           "Notification</b><br/>")
            For Each table In tablesEnabled
                Response.Write(table & "<br>")
                If (table.ToString.Equals(tableName)) Then
                    mustEnable = False
                End If
            Next
        End If
    Catch ex As Exception
        mustEnable = True
    End Try
    If mustEnable Then
        '--enables the database for notification
       SqlCacheDependencyAdmin.EnableNotifications(connStr)
        '--enables the table for notification
        SqlCacheDependencyAdmin. _
           EnableTableForNotifications(connStr, tableName)
        Response.Write(tableName & "<br>")
    End If
End Sub
The SqlCacheDependencyAdmin class performs administrative tasks on a SQL Server so that you can enable SQL Cache Dependency. The GetTablesEnabledForNotifications( ) method retrieves all the tables already enabled for notification in the database (as indicated in the connection string) and returns the table names as an array of strings. You then loop through the array of table names to see if the table that you need to enable for notification is found. If the name is in the list, that means the table is already enabled; otherwise, you need to enable it for notifications.
You need to first enable a database and then enable the table for SQL Cache Dependency to work. So, use the EnableNotifications( ) method to enable the database first, and then use the EnableTableForNotifications( ) method to enable the individual tables.
Where can I learn more?
To see how you can implement your own SQL Cache Dependency in .NET 1.1 applications, check out my O’Reilly Network article at http://www.ondotnet.com/pub/a/dotnet/2005/01/17/sqlcachedependency.html.
To learn how you can use caching in ASP.NET 1.x and 2.0 applications, check out my DevX.com article at http://www.devx.com/asp/Article/21751.
For a good discussion on the differences in how SQL Server 2000 and SQL Server 2005 handle SQL Cache Dependency, check out this link: http://beta.asp.net/GuidedTour/s20.aspx.
Encrypt Connection Strings
Instead of saving your database connection string within your application, it is often much better (and easier to maintain) to have your connection strings stored in the Web.config file. In ASP.NET 2.0, Microsoft has taken this further by allowing you to encrypt the connection string that you store in Web.config.
How do I do that?
To see how you can encrypt the connection strings stored in Web.config, you will configure a GridView control to bind to a SqlDataSource control. The connection string used by the SqlDataSource control would be saved in the Web.config file. You will then encrypt the connection strings using the two Protection Configuration Providers available in .NET 2.0.
Launch Visual Studio 2005 and create a new web site project. Name the project C:\ASPNET20\chap04-EncryptConfig.
Populate the default form with a GridView control and configure it to use a SqlDataSource control. Configure the SqlDataSource control to connect to the pubs database and use the authors table. In particular, ensure that the connection string is stored in Web.config.
Tip
Refer back to the lab Section 4.1 if you are not sure how to configure the GridView control to use a SqlDataSource control.
The default form should now look like Figure 4-44.
The Web.config file will now contain the following connection string:
<configuration
   xmlns="http://schemas.microsoft.com/.NetConfiguration/v2.0">
   <appSettings/>
   <connectionStrings>
      <add name="pubsConnectionString" connectionString="Data
                 Source=.\SQLEXPRESS;Initial Catalog=pubs;
                 Integrated Security=True"
           providerName="System.Data.SqlClient" />
   </connectionStrings>
   <system.web>
...
Switch to the code-behind of the default form and add in the Encrypt( ) method. The Encrypt( ) method first retrieves the Web.config file and then applies encryption to the specified section of the file (<connectionStrings>, in this case) using the Protection Configuration Provider indicated (passed in via the protectionProvider parameter).
Imports System.Configuration
Imports System.Web.Security

    Public Sub Encrypt(ByVal protectionProvider As String)
        '---open the web.config file
        Dim config As Configuration = _
           System.Web.Configuration. _
              WebConfigurationManager.OpenWebConfiguration( _
           Request.ApplicationPath)
        '---indicate the section to protect
        Dim section As ConfigurationSection = _
           config.Sections("connectionStrings")
        '---specify the protection provider
        section.SectionInformation.ProtectSection(protectionProvider)
        '---Apple the protection and update
        config.Save( )
    End Sub
Also, add the Decrypt( ) method to decrypt the encrypted connection strings in Web.config:
Public Sub Decrypt( )
    Dim config As Configuration = _
       System.Web.Configuration. _
          WebConfigurationManager.OpenWebConfiguration( _
       Request.ApplicationPath)
    Dim section As ConfigurationSection = _
       config.Sections("connectionStrings")
    section.SectionInformation.UnProtectSection( )
    config.Save( )
End Sub
Tip
Note that the UnProtectSection( ) method, unlike
ProtectSection( ), does not require a provider name. When a section is encrypted, information regarding the provider that performed the encryption is stored in the Web.config file.UnProtectSectionwill use that information to determine which provider to use to decrypt the data.Two protection configuration providers are available for your use:
DataProtectionConfigurationProviderRSAProtectedConfigurationProvider
To test the Encrypt( ) method, call it in the Form_Load event:
Protected Sub Page_Load(ByVal sender As Object, _ ByVal e As System.EventArgs) _ Handles Me.Load Encrypt("DataProtectionConfigurationProvider") '--or-- ' Encrypt("RSAProtectedConfigurationProvider") End SubIf you use the
DataProtectionConfigurationProvider, your connection string will now look like Example 4-7.Example 4-7. Connection string with DataProtectionConfigurationProvider<configuration xmlns="http://schemas.microsoft.com/.NetConfiguration/v2.0"> <protectedData> <protectedDataSections> <add name="connectionStrings" provider="DataProtectionConfigurationProvider" inheritedByChildren="False" /> </protectedDataSections> </protectedData> <appSettings/> <connectionStrings> <EncryptedData> <CipherData> <CipherValue>AQAAANCMnd............WaWSpYkRgVTirQ=</CipherValue> </CipherData> </EncryptedData> </connectionStrings> <system.web> ...If you use the
RSAProtectedConfigurationProvider, your connection string will now look like Example 4-8.Example 4-8. Connection string with RSAProtectedConfigurationProvider... <configuration xmlns="http://schemas.microsoft.com/.NetConfiguration/v2.0"> <protectedData> <protectedDataSections> <add name="connectionStrings" provider="RSAProtectedConfigurationProvider" inheritedByChildren="False" /> </protectedDataSections> </protectedData> <appSettings/> <connectionStrings> <EncryptedData Type="http://www.w3.org/2001/04/xmlenc#Element" xmlns="http://www.w3.org/2001/04/xmlenc#"> <EncryptionMethod Algorithm="http://www.w3.org/2001/04/xmlenc#tripledes-cbc" /> <KeyInfo xmlns="http://www.w3.org/2000/09/xmldsig#"> <EncryptedKey xmlns="http://www.w3.org/2001/04/xmlenc#"> <EncryptionMethod Algorithm="http://www.w3.org/2001/04/ xmlenc#rsa-1_5" /> <KeyInfo xmlns="http://www.w3.org/2000/09/xmldsig#"> <KeyName>RSA Key</KeyName> </KeyInfo> <CipherData> <CipherValue>XzI2CV8F1Pd........oVf1DnuM=</CipherValue> </CipherData> </EncryptedKey> </KeyInfo> <CipherData> <CipherValue>039jWP/......XIvitv0KBQ==</CipherValue> </CipherData> </EncryptedData> </connectionStrings> <system.web> ...The really nice thing about encrypting the Web.config file is that the process of decrypting the required connection string is totally transparent to the developer. Controls and code that need to access the connection string will automatically know how to encrypt the encrypted information. However, if you want to decrypt the Web.config file so that you can make modifications to it, simply call the Decrypt( ) method.
You can check whether a section is protected by using the IsProtected property, like this (you can use this block of code in the Page_Load event, for example):
If Not section.SectionInformation.IsProtected Then
   section.SectionInformation.ProtectSection(protectionProvider)
   config.Save( )
End If
What about...
...programmatically adding a new connection string to an encrypted Web.config file?
The following AddConnString( ) method shows how you can add a new connection string to the Web.config file.
Public Sub AddConnString( )
     '---add a connection string to Web.config
     Dim config As Configuration = _
            System.Web.Configuration. _
               WebConfigurationManager.OpenWebConfiguration( _
            Request.ApplicationPath)
     config.ConnectionStrings.ConnectionStrings.Add _
        (New ConnectionStringSettings("NorthwindConnectionString", _
        "server=.\SQLEXPRESS;database=northwind;integrated security=true"))
     config.Save( )
End Sub
...protecting other sections in Web.config?
You can encrypt almost any section in
Web.config, with the exception of sections
accessed by parts of the unmanaged code in ASP.NET, such as
<httpRuntime> and
<processModel>.
...retrieving connection strings programmatically?
It can be done. To programmatically retrieve a connection string from Web.config, use the following code:
Dim connect As String = _
   ConfigurationManager.ConnectionStrings _
   ("NorthwindConnectionString").ConnectionString
Response.Write(connect)
Where can I learn more?
To learn more about the ProtectedConfigurationProvider class, check out the MSDN Help topic “ProtectedConfigurationProvider Class.”
To understand how Windows Data Protection works, check out http://msdn.microsoft.com/library/default.asp?url=/library/en-us/dnsecure/html/windataprotection-dpapi.asp.
For an introduction to the cryptography classes in .NET, check out my article at http://msdn.microsoft.com/library/default.asp?url=/library/en-us/dnhcvs03/html/vs03l1.asp.
Connect to a Business Object
Note
Unless you are writing a simple web application, you should really encapsulate all your business logic into components and then bind your UI controls (such as the GridView) to the business objects.
A well-designed system uses different tiers for different operations
(such as a three-tier architecture). For example, programmers
frequently encapsulate their business logic in classes separate from
those that handle interactions with the user. In ASP.NET 2.0, you can
expose your data-aware classes to data-bound controls (such as the
GridView) through the ObjectDataSource control.
Doing so will allow changes to be made to either layer (business
logic or UI) without affecting the other.
How do I do that?
To illustrate how you can bind a GridView control to an object through the ObjectDataSource control, you will create a class that encapsulates your data access logic and then use an ObjectDataSource control to bind to it. You will then bind the GridView control to the ObjectDataSource control. When you’re finished, you’ll have a three-tier application.
Launch Visual Studio 2005 and create a new web site project. Name the project C:\ASPNET20\chap04-ObjectDataSource.
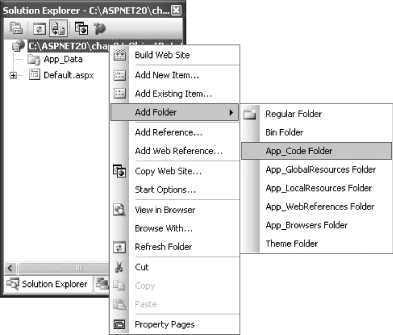
Add a new App_Code folder to your project by right-clicking the project name in Solution Explorer and then selecting Add Folder→ App_Code Folder (see Figure 4-45).
Add a Web.config file to the project by right-clicking the project name in Solution Explorer and then selecting Add New Item→ Web Configuration File.
Add the following connection string to Web.config:
<connectionStrings>
    <add name="pubsConnectionString" connectionString="Data
        Source=.\SQLEXPRESS;Initial Catalog=pubs;
        Integrated Security=True"
        providerName="System.Data.SqlClient" />
</connectionStrings>
Right-click the App_Code folder and select Add New Item.... Select Class and name it Authors.vb.
Code Authors.vb as shown in Example 4-9. The Authors class contains a single method—
getAuthors( )—which returns a data set.Example 4-9. Authors.vbImports System.Data.SqlClient Imports System.Data Imports Microsoft.VisualBasic Public Class Authors Public Function getAuthors( ) As DataSet Dim conn As New SqlConnection( _ ConfigurationManager.ConnectionStrings _ ("pubsConnectionString").ConnectionString) Dim adapter As New SqlDataAdapter( _ "SELECT au_id, au_fname, au_lname FROM Authors", conn) Dim ds As New DataSet adapter.Fill(ds, "Authors") Return ds End Function End ClassAdd a GridView control to the default Web Form. In the GridView Tasks menu, select <New data source...> (see Figure 4-46).
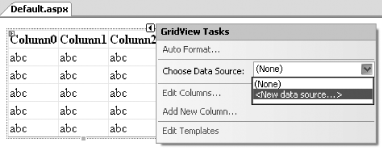
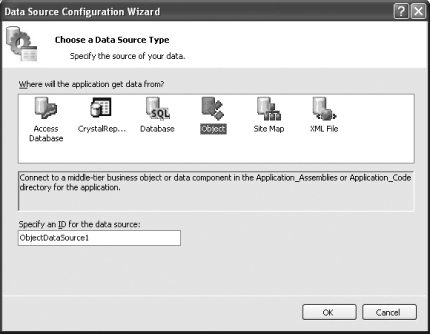
Choose Object as the data source in the window that opens (see Figure 4-47). Use the default ID of
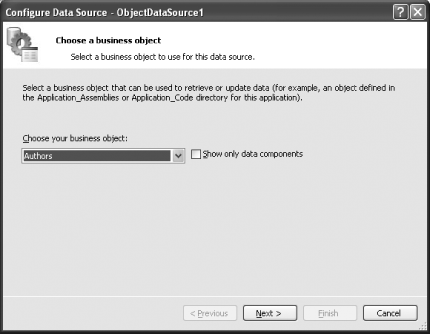
ObjectDataSource1for the data source. Click OK.In the drop-down listbox, select
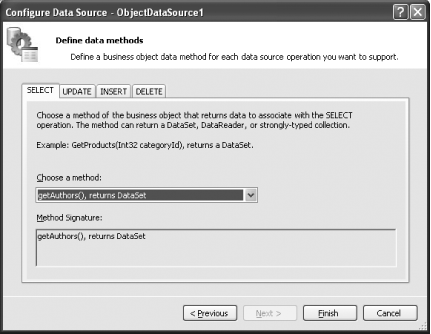
Authorsas the business object (see Figure 4-48). Click Next. You are essentially binding the ObjectDataSource control to the Authors class.In the SELECT tab, select the “getAuthors( ), returns DataSet” method (see Figure 4-49). Click Finish.
To test the application, press F5. You should now see the GridView control populated with records from the Authors table.
What about...
...editing the rows in the GridView control through the ObjectDataSource control?
You can also use the GridView control to update the rows through the ObjectDataSource control.
Add a new method,
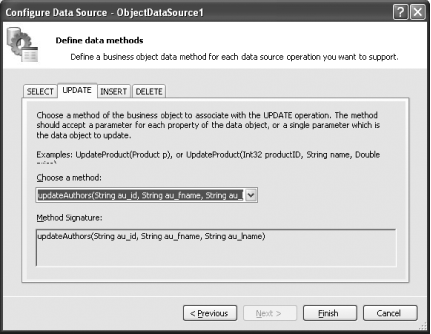
updateAuthors( ), to the Authors class, as shown in Example 4-10.Example 4-10. updateAuthors( )Public Sub updateAuthors(ByVal au_id As String, _ ByVal au_fname As String, _ ByVal au_lname As String) Dim conn As New SqlConnection( _ ConfigurationManager.ConnectionStrings _ ("pubsConnectionString").ConnectionString) Dim adapter As New SqlDataAdapter( _ "SELECT au_id, au_fname, au_lname " & _ "FROM Authors WHERE au_id=@au_id", conn) Dim ds As New DataSet adapter.SelectCommand.Parameters.Add( _ "@au_id", SqlDbType.NVarChar, 11).Value = au_id adapter.Fill(ds, "Authors") With ds.Tables(0).Rows(0) .Item("au_fname") = au_fname .Item("au_lname") = au_lname End With Dim cb As New SqlCommandBuilder(adapter) adapter.Update(ds, "Authors") End SubClick on the Configure Data Source . . . link in the ObjectDataSource Tasks menu of the GridView control (see Figure 4-50).
Click Next, and in the UPDATE tab, select the updateAuthors( ) method (see Figure 4-51). The use of the updateAuthors( ) method is to update the changes made to the
GridViewback to the database. Click Finish.On the GridView control, check the Enable Editing checkbox (see Figure 4-52) so that the
GridViewwill display the Edit links in the leftmost column.Press F5 to test the application. The GridView control is now editable with the changes passed to the updateAuthors( ) method for updating (see Figure 4-53).
...using a data component together with the ObjectDataSource control?
Instead of encapsulating the data access logic within a class, it would be easier if Visual Studio automatically generated all the required logic for standard data access tasks such as selecting, inserting, deleting, and updating. In fact, you can do so using a data component.
Using the same project, right-click the project name in Solution Explorer and select Add New Item.... Select Web Form, and name the form Default2.aspx.
Right-click the project name in Solution Explorer and select Add New Item.... Select Dataset, and name the data set Dataset.xsd.
You will be prompted to save the data set in the special App_Code directory. Click Yes (see Figure 4-54).
The Data Component Configuration Wizard window will appear. Click Next.
Use the project’s existing connection string (
pubsConnectionString, saved in Web.config). Click Next (see Figure 4-55).In the next window, select the “Use SQL statements” option. Click Next (see Figure 4-56).
In the box “What data should the table load?”, enter the following SQL statement:
SELECT au_id, au_fname, au_lname FROM Authors
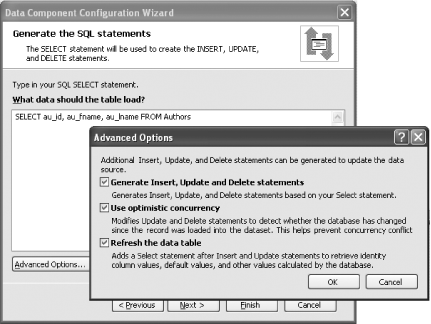
Click the Advanced Options... button and check all three checkboxes (see Figure 4-57). Essentially, you want the Insert, Update, and Delete statements to be generated automatically. You would also use optimistic concurrency to prevent updating conflicts. Click OK and then Next.
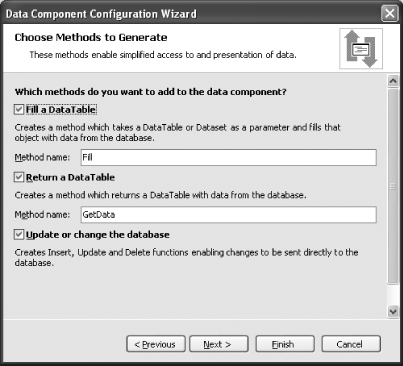
In the next window, check the three checkboxes (see Figure 4-58). In this step, you are selecting the methods to be exposed by the data component. Use the default values and click Next and then Finish.
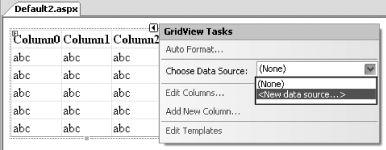
Save the project. Configure the GridView control to use a new data source (see Figure 4-59).
In the next window, select Object as the data source and use the default name of
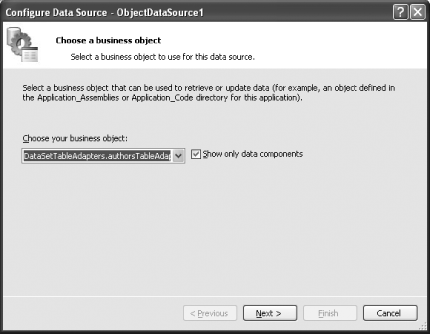
ObjectDataSource1as the ID of the data source. Click OK.Select the business object
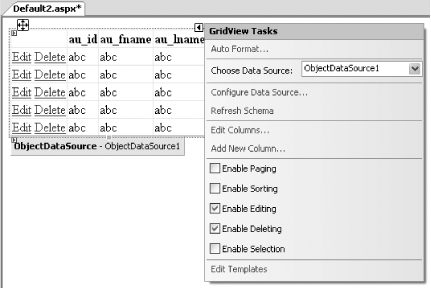
DataSetTableAdapter.authorsTableAdapter(see Figure 4-60). This table adapter is autocompiled based on the data set you added earlier (Dataset.xsd). Click Next.The SELECT, UPDATE, INSERT, and DELETE tabs will all have a method assigned to them (see Figure 4-61). Click Finish.
Finally, check the Enable Editing and Enable Deleting checkboxes in the GridView Tasks menu (see Figure 4-62).
Tip
Due to a design decision made by Microsoft, you need to set the ReadOnly attribute of the au_id field of the GridView control to
false, like this (in Source View):<asp:BoundField ReadOnly="false" HeaderText="au_id" DataField="au_id" SortExpression="au_id"> </asp:BoundField>Note
This is because, by default, the GridView control assumes that primary keys are not updateable, whereas the data component allows primary keys to be updated. Thus the GridView control will not pass primary keys’ values to the data component. So when you try to update the GridView control, you will get an error stating that the ObjectDataSource control could not find an Update method with the correct parameters.
This behavior might change in the final release of Visual Studio 2005.
Press F5 to test the application. You will now be able to edit and delete records in the GridView control.


Where can I learn more?
To learn more about data access in .NET using ADO.NET, check out the following article: http://msdn.microsoft.com/library/default.asp?url=/library/en-us/vbcon/html/vbconFundamentalDataConceptsInVisualStudioNET.asp.
To learn what is new in ADO.NET 2.0, check out the MSDN site at http://msdn.microsoft.com/data/DataAccess/Whidbey/default.aspx.
If you are not familiar with data components, refer to this link for an introduction: http://msdn.microsoft.com/library/default.asp?url=/library/en-us/vbcon/html/vbconadonetdatasetcreationinvisualstudionet.asp.
Connect to an XML Document
Note
Use an XML document easily through the XmlDataSource control. No more lengthy code to write to manipulate XML documents.
Like the SqlDataSource control, the new XmlDataSource control allows you to deal with XML documents without having to write a large amount of code. It is most suited for data binding to controls such as the DataList and TreeView controls.
How do I do that?
In this lab, you will create an RSS reader that consumes an RSS document, and then use the DataList and the XmlDataSource controls to display the news in a human-readable form.
Launch Visual Studio 2005 and create a new web site project. Name the project C:\ASPNET20\chap04-XMLDataSource.
Right-click the project name in Solution Explorer and select Add New Item.... Select XML File and name it RSS.xml.
Populate the RSS.xml document as shown in Example 4-11.
Example 4-11. A sample RSS document<?xml version="1.0"?> <rss version="2.0"> <channel> <title>Liftoff News</title> <link>http://liftoff.msfc.nasa.gov/</link> <description>Liftoff to Space Exploration.</description> <language>en-us</language> <pubDate>Tue, 10 Jun 2003 04:00:00 GMT</pubDate> <lastBuildDate>Tue, 10 Jun 2003 09:41:01 GMT</lastBuildDate> <docs>http://blogs.law.harvard.edu/tech/rss</docs> <generator>Weblog Editor 2.0</generator> <managingEditor>editor@example.com</managingEditor> <webMaster>webmaster@example.com</webMaster> <item> <title>Star City</title> <link>http://liftoff.msfc.nasa.gov/news/2003/news-starcity.asp</link> <description>How do Americans get ready to work with Russians aboard the International Space Station? They take a crash course in culture, language and protocol at Russia's <a href="http://howe.iki.rssi.ru/GCTC/ gctc_e.htm">Star City</a>.</description> <pubDate>Tue, 03 Jun 2003 09:39:21 GMT</pubDate> <guid>http://liftoff.msfc.nasa.gov/2003/06/03.html#item573</guid> </item> <item> <title>The Engine That Does More</title> <link>http://liftoff.msfc.nasa.gov/news/2003/news-VASIMR.asp</link> <description>Before man travels to Mars, NASA hopes to design new engines that will let us fly through the Solar System more quickly. The proposed VASIMR engine would do that.</description> <pubDate>Tue, 27 May 2003 08:37:32 GMT</pubDate> <guid>http://liftoff.msfc.nasa.gov/2003/05/27.html#item571</guid> </item> <item> <title>Astronauts' Dirty Laundry</title> <link>http://liftoff.msfc.nasa.gov/news/2003/news-laundry.asp</link> <description>Compared to earlier spacecraft, the International Space Station has many luxuries, but laundry facilities are not one of them. Instead, astronauts have other options.</description> <pubDate>Tue, 20 May 2003 08:56:02 GMT</pubDate> <guid>http://liftoff.msfc.nasa.gov/2003/05/20.html#item570</guid> </item> </channel> </rss>Drag and drop the DataList control (located in the Toolbox under the Data tab) onto the default form.
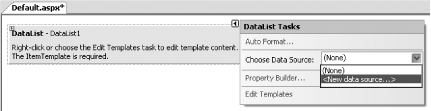
In the DataList Tasks menu of the DataList control, select <New data source . . . > (see Figure 4-63).
Select XML File (see Figure 4-64). Use the default
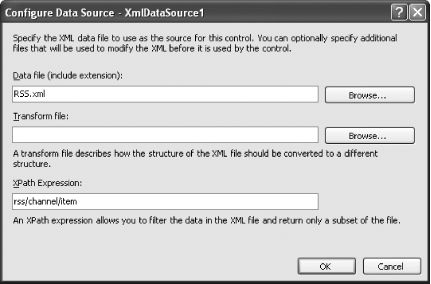
XmlDataSource1as the ID for the XmlDataSource control. Click OK.Enter
RSS.xmlfor the datafile (see Figure 4-65) andrss/channel/itemfor the XPath Expression. Click OK.Switch to Source View for the default Web Form and add in the following code (in bold) to configure the DataList control so that it will display the appropriate sections of the XML file:
<asp:DataList ID="DataList1" runat="server" DataSourceID="XmlDataSource1"> <itemtemplate> <b><%#XPath("title")%> </b><br /> <i><%#XPath("description") %></i> <%#XPath("pubDate")%><br /> <a href='<%#XPath("link") %>'>Link</a><br /> <br /> </itemtemplate> </asp:DataList>
Apply the Sand & Sky theme to the DataList control using Auto Format... in the DataList Tasks menu.
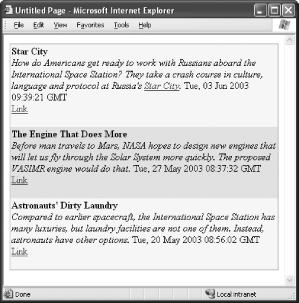
To test the application, press F5, and you now see the XML document formatted as shown in Figure 4-66. Clicking on Link will bring you to the source of the news.
What about...
...loading the RSS document from the Web?
Besides loading an XML document from your local storage, you can also load an XML document from the Web via the DataFile property.
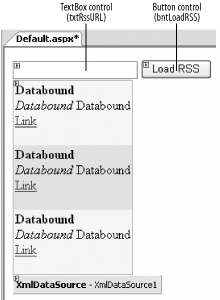
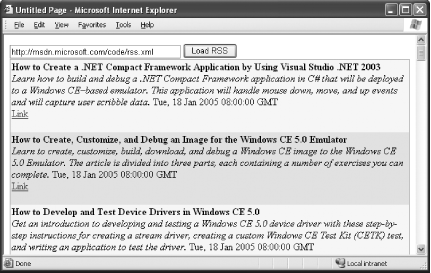
Using the same project created in this section, add a TextBox and Button control to the default Web Form. Name them as shown in Figure 4-67.
In the click event of the Load RSS button, set the DataFile property of the XmlDataSource control to the content of the text box:
Protected Sub btnLoadRSS_Click(ByVal sender As Object, _
                               ByVal e As System.EventArgs) _
                               Handles btnLoadRSS.Click
    XmlDataSource1.DataFile = txtRssURL.Text
End Sub
To test the application, press F5, enter a URL pointing to an RSS feed, and click Load RSS. The RSS feed should be retrieved and displayed in the DataList control (see Figure 4-68).
Where can I learn more?
If you are new to the world of RSS and weblogs, check out my introductory article to weblogs at http://www.oreillynet.com/pub/a/javascript/2002/12/30/weblog_intro.html.
For more information on the XmlDataSource and DataList controls, check out the MSDN Help topics “XmlDataSource Members” and “DataList Members.”
Get ASP.NET 2.0: A Developer's Notebook now with the O’Reilly learning platform.
O’Reilly members experience books, live events, courses curated by job role, and more from O’Reilly and nearly 200 top publishers.

