Chapter 11A. Master Pages in Web Forms
In this lesson I show you how to use master pages in an ASP.NET Web Form application.
MASTER PAGES
To create a new master page, select the Add New Item option from the Project menu to open the Add New Item dialog box. Select the Master Page template from the dialog box and click the Add button (see Figure 11A-1).
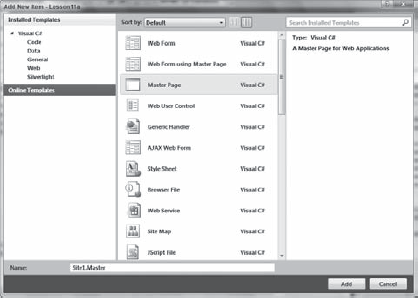
Figure 11A.1. FIGURE 11A-1
This is markup that is generated in the default master page:
<%@ Master Language="C#" AutoEventWireup="true" CodeBehind="Site1.master.cs"Inherits="Lesson11.Site1" %><!DOCTYPE html PUBLIC "-//W3C//DTD XHTML 1.0 Transitional//EN" "http://www.w3.org/TR/xhtml1/DTD/xhtml1-transitional.dtd"> <html xmlns="http://www.w3.org/1999/xhtml">
<head runat="server">
    <title></title>
    <asp:ContentPlaceHolder ID="head" runat="server">
    </asp:ContentPlaceHolder>
</head>
<body>
    <form id="form1" runat="server">
    <div>
        <asp:ContentPlaceHolder ID="ContentPlaceHolder1" runat="server">
        </asp:ContentPlaceHolder>

    </div>
    </form>
<body>
</html>
The default master page looks like a regular page except that it includes an @Master directive at the top of the page instead of an @Page directive, it includes a ContentPlaceHolder server control in its head element and it includes a ContentPlaceHolder server control in its body element. The ContentPlaceHolder server controls are used by the pages that are based on the master page.
Note
A master page can ...
Get ASP.NET 4 24-Hour Trainer now with the O’Reilly learning platform.
O’Reilly members experience books, live events, courses curated by job role, and more from O’Reilly and nearly 200 top publishers.

