Chapter 11B. Master Pages in MVC
In this lesson I show you how to use master pages in an ASP.NET MVC application.
MASTER PAGES
To create a new master page, select the Add New Item option from the Project menu to open the Add New Item dialog box. Select the MVC 2 View Master Page template from the dialog box and click the Add button (see Figure 11B-1).
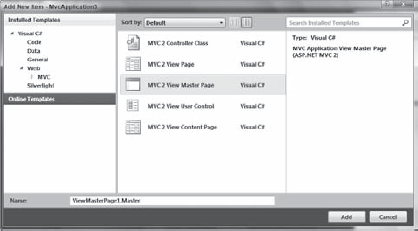
Figure 11B.1. FIGURE 11B-1
This is the markup that is generated in the default master page:
<%@ Master Language="C#" Inherits="System.Web.Mvc.ViewMasterPage" %>

<!DOCTYPE html PUBLIC "-//W3C//DTD XHTML 1.0 Transitional//EN"
    "http://www.w3.org/TR/xhtml1/DTD/xhtml1-transitional.dtd">
<html xmlns="http://www.w3.org/1999/xhtml">
<head runat="server">
    <title>
        <asp:ContentPlaceHolder ID="TitleContent" runat="server" />
</title>
</head>
<body>
<div>
<asp:ContentPlaceHolder ID="MainContent" runat="server">
</asp:ContentPlaceHolder>
</div>
</body>
</html>The default master page looks like a regular page except that it includes an @Master directive at the top of the page instead of an @Page directive, it includes a ContentPlaceHolder control in its head element and it includes a ContentPlaceHolder control in its body element. The ContentPlaceHolder controls are used by the pages that inherit from the master page.
Note
A master page can have as many ContentPlaceHolder controls as your design requires. You are not limited to the two ContentPlaceHolder
Get ASP.NET 4 24-Hour Trainer now with the O’Reilly learning platform.
O’Reilly members experience books, live events, courses curated by job role, and more from O’Reilly and nearly 200 top publishers.

