Chapter 20A. Using GridView in Web Forms
The GridView control is one of the most useful yet complex server controls provided by Web Forms. Nothing like it exists in the MVC framework (unless you write your own). In this lesson I show you how to use the GridView control to display, select, sort, page, and edit data.
FORMATTING THE GRIDVIEW
For this lesson I have created the ADO.NET Entity Data Model shown in Figure 20A-1.
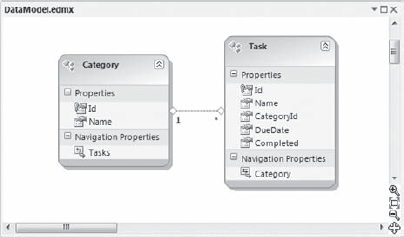
Figure 20A.1. FIGURE 20A-1
This is the markup for a GridView named GridViewTasks:
<asp:GridView ID="GridViewTasks" runat="server"
    DataSourceID="EntityDataSourceTasks">
</asp:GridView>
Note
I cover the DataSourceID later in this lesson.
Figure 20A-2 shows the page that is rendered using the preceding GridView markup.

Figure 20A.2. FIGURE 20A-2
The page shows a grid that lists all of the records in the table. However, the grid looks incredibly plain. The easiest way to jazz up the appearance of a GridView control is to select the AutoFormat option from the GridView Tasks smart tag (see Figure 20A-3) to open the AutoFormat dialog box (see Figure 20A-4). The AutoFormat dialog box allows you to preview a number of professionally designed formats. Click the Apply button to apply the selected format.
Figure 20A.3. FIGURE 20A-3
Figure 20A.4. FIGURE 20A-4
This is the markup for the GridView ...
Get ASP.NET 4 24-Hour Trainer now with the O’Reilly learning platform.
O’Reilly members experience books, live events, courses curated by job role, and more from O’Reilly and nearly 200 top publishers.

