Chapter 4. Virtual Machine Networking
Automating the Network
In Chapter 3 we got our feet wet with creating and updating virtual machines, and as part of that we briefly covered modifying network endpoints by adding and removing them through PowerShell. In this chapter we will dive deeper and learn how to manage more-advanced scenarios such as configuring the load balancer, TCP and HTTP health probes, reserved IP addresses, and of course network security using access control lists (ACLs). We will discuss deploying a virtual machine into a virtual network in Chapter 6.
Handling External Traffic
With Microsoft Azure Virtual Machines, you have a lot of control over how network traffic from the outside world is managed. This control manifests itself in an entity that you can manage through the management portal and is surfaced through the API and ultimately to tools such as PowerShell; that entity is the endpoint.
What exactly is an endpoint? An endpoint is an inbound rule associated with a virtual machine that allows you to tell Microsoft Azure what do with incoming traffic. You can set many properties of the endpoint for different behaviors.
Port Forwarding
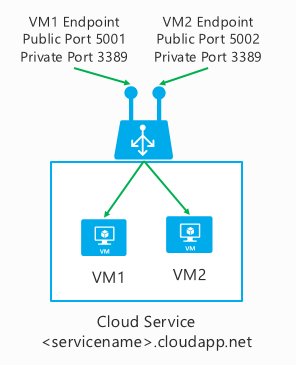
Port forwarding is a simple but powerful concept. An endpoint listens on a public port and forwards traffic to an internal port. The internal and public ports can be the same or different.
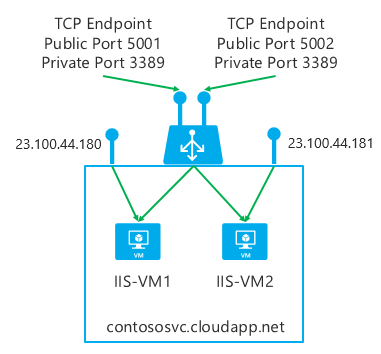
For instance, your cloud service might contain two virtual machines, and each virtual machine is listening on port 3389 for remote desktop. How do you connect to each virtual machine independently, using the single IP address of the cloud service? The answer is to use port forwarding and listen on distinct public ports that are then mapped to each virtual machine’s internal IP address on port 3389, as shown in Figure 4-1.
This technique was demonstrated in Chapter 3 with the line of code shown in Example 4-1 that added the RemoteDesktop endpoint back to the virtual machine configuration.
$vmConfig|Add-AzureEndpoint-Name"RemoteDesktop"`-LocalPort3389`-ProtocolTCP
Since -LBSetName (load-balanced set name) is not specified, this indicates that traffic to the endpoint will apply to only the individual virtual machine to which it has been added and will not be load-balanced.
What is missing in the code from this discussion is the public port. When using the PowerShell cmdlets, if you do not specify the -PublicPort parameter, Microsoft Azure will automatically select an unused port on your behalf. You are still free to specify the -PublicPort parameter if you choose, as long as the public port does not conflict with any other endpoints in the same cloud service.
Load Balancing
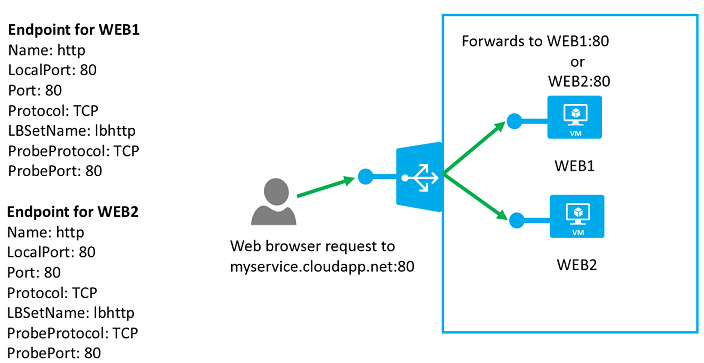
Load balancing is fundamentally the same concept as port forwarding. You are still telling the endpoint to forward traffic from a public port to a private port inside the cloud service. The difference is the load-balanced set argument that tells Microsoft Azure that the private port can be a set of one or more virtual machines (see Figure 4-2).
Let’s again review some of the code from the previous chapter (see Example 4-2).
$vmConfig|Add-AzureEndpoint-Name"HTTP"`-Protocoltcp`-LocalPort80`-PublicPort80`-LBSetName"LBHTTP"`-DefaultProbe
The difference between this endpoint being added and the RemoteDesktop endpoint are the -LBSetName and -DefaultProbe parameters. The -LBSetName parameter tells Microsoft Azure that other virtual machines within the same cloud service could also create an endpoint with the same public port, as long as they also share the same LBSetName without conflict.
If multiple virtual machines share an endpoint with the same public port and LBSetName, Microsoft Azure will load-balance all traffic to the public port to each virtual machine in the set.
The -DefaultProbe parameter specifies that the PowerShell cmdlets should create a simple TCP health probe based on the private port.
Health Probes
The Microsoft Azure load balancer supports health probes for load-balanced endpoints. Health probes are features designed to give you more control and increase your application availability.
You can configure health probes to monitor a TCP endpoint, or if you want more control, you can configure a probe against an HTTP endpoint.
TCP Health Probes
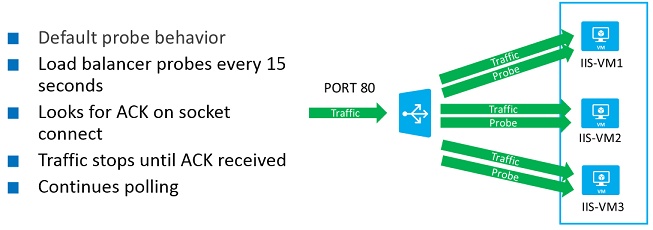
TCP-based endpoints are the simplest to configure. The Microsoft Azure load balancer will attempt a connection on the internal IP and local port for the load-balanced endpoint. If there is no acknowledgement (ACK) to the connection attempt after a configurable time-out period, the load balancer will stop sending traffic to the virtual machine on that endpoint. The health probe does continue to attempt a connection at a configurable interval, and if the virtual machine starts responding to the probe, the load balancer will start sending traffic to it again, as shown in Figure 4-3.
The simplest method of enabling a TCP-based heath probe is to specify the -DefaultProbe parameter on the load-balanced endpoint as it is being added. This will automatically create a TCP-based health probe to which the load balancer attempts to connect on the internal IP and local port.
The health probe can be configured on a separate port from the private port for the endpoint. This allows you to have scenarios where a separate endpoint can be established that just monitors health. For instance, there is no direct protocol support for UDP health probes. If you were to deploy a UDP service, you could also add a TCP-based endpoint to your service that responded for health probe requests.
In this example we will use our imagination and pretend we are configuring the load-balanced endpoint for a UDP-based service that listens on UDP port 5001.
I have modified the previous call to the Add-AzureEndpoint cmdlet to open a UDP-based endpoint that is listening on port 5001 locally and publicly. However, the load balancer will probe the new TCP-based endpoint that you added to your service on port 5051 to ensure that the service is healthy (see Example 4-3).
HTTP Health Probes
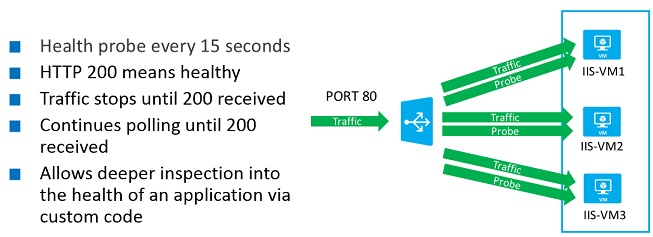
HTTP health endpoints allow you to have programmatic control over whether or not a virtual machine should be served traffic by the load balancer. How do you exert this control? Simply by writing a custom page (ASP, PHP, and so on) that performs whatever validation your application requires (database checks, writing to disk, and so on) and then returns an HTTP 200 for success or any other HTTP response for failure, as shown in Figure 4-4.
When the health probe code is written and deployed on the virtual machine, you simply tell the load-balanced endpoint configuration how to access it on the virtual machine, and Microsoft Azure will take care of the rest. The -ProbePort parameter allows you to have fine-grained control over how to access the probe (see Example 4-4).
$vmConfig|Add-AzureEndpoint-Name"CUSTOMHTTP"`-Protocoltcp`-LocalPort8080`-PublicPort8080`-LBSetName"LBCUSTOMHTTP"`-ProbeProtocolhttp`-ProbePort8080`-ProbePath'/healthcheck.aspx'
Troubleshooting
Since the load balancer is probing the probe endpoint, there is no way to specify authentication. This means you should ensure that the probe path will respond correctly to anonymous requests. Checking your web logs for the probe is a great way to determine if something is not working correctly.
Health Probe Time-outs
You can set two additional parameters when configuring TCP- or HTTP-based health probes, as shown in Table 4-1.
-ProbeTimeIntervalInSeconds | Tells the load balancer how often to probe the endpoint. The minimum value you can set is 5 seconds, and the default value is 15 seconds. |
-ProbeTimeoutInSeconds | Tells the load balancer how long to wait for a response before considering the probe a time-out. The minimum value is 11 seconds, with a default of 31 seconds. |
Depending on the application, these default values may be fine. It is highly recommended to test health probe configurations with the application that they are monitoring to ensure that response times match expectations.
Example 4-5 shows a modified version of the previous example that demonstrates how the values can be set when creating the endpoint.
$vmConfig|Add-AzureEndpoint-Name"CUSTOMHTTP"`-Protocoltcp`-LocalPort8080`-PublicPort8080`-LBSetName"LBCUSTOMHTTP"`-ProbeProtocolhttp`-ProbePort8080`-ProbePath'/healthcheck.aspx'`-ProbeTimeIntervalInSeconds30`-ProbeTimeoutInSeconds62
Updating Endpoints
So far, all of the examples I have used have been focused on adding new endpoints either at virtual machine creation time or once the virtual machine has already been created. Another critical operation is updating an endpoint that already exists.
There are two cmdlets to help you with this task. The first is the Set-AzureEndpoint cmdlet. This cmdlet can be used to update an existing endpoint that is not part of a load-balanced set. This is an important distinction because, as you have seen in the last two sections, an endpoint can be created as a standalone or it can be created as part of a load-balanced set using the Add-AzureEndpoint cmdlet.
Updating an existing endpoint using Set-AzureEndpoint is a multistep operation, as this cmdlet simply modifies the virtual machine configuration and calls the Microsoft Azure API with the updated configuration.
Let’s walk through several of the cmdlets needed to view and modify endpoint configuration. The first step is to return and store the virtual machine configuration as shown in Example 4-6.
$serviceName="[cloud service name]"$vmName="ps-vm1"# Return the VM configuration (contains the endpoint configuration)$vmConfig=Get-AzureVM-ServiceName$serviceName-Name$vmName
Piping the returned configuration to Get-AzureEndpoint allows you to see the endpoint configuration on the virtual machine. You can filter it to show only endpoints of interest as Example 4-7 does, or you can omit the endpoint name or any filters, and the cmdlet will show all of the endpoints on the virtual machine.
$vmConfig|Get-AzureEndpoint|whereLocalPort-eq3389
To modify the endpoint, pipe the $vmConfig object to the Set-AzureEndpoint cmdlet and specify the existing endpoint name and the property you want to change. In this case, the code is changing the public port to 5099 (see Example 4-8).
$vmConfig|Set-AzureEndpoint"RemoteDesktop"-PublicPort5099
The last step is to pipe the updated configuration to the Update-AzureVM cmdlet, as shown in Example 4-9.
If you can use Set-AzureEndpoint for only a non-load-balanced endpoint, how do you modify the configuration of an endpoint in a load-balanced set? Great question! The answer is to use the Set-AzureLoadBalancedEndpoint cmdlet instead.
Why the need for a new cmdlet? As you can see from the previous example, Set-AzureEndpoint works on an entity tied to a specific virtual machine. Imagine that you have 50 virtual machines as part of a load-balanced set. To update one endpoint, you would be required to make 50 round-trips to the Microsoft Azure API. A more efficient approach was needed, and that approach was to introduce an API that allowed a single load-balanced endpoint to be updated, and that API is exposed by the Set-AzureLoadBalancedEndpoint cmdlet.
To demonstrate how to use this cmdlet, I will reuse the HTTP endpoint created earlier in this chapter.
Using the Get-AzureEndpoint cmdlet, I can review the existing properties of the endpoint (see Figure 4-5).
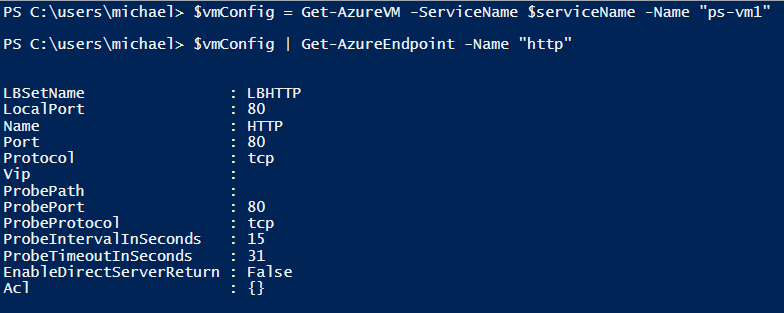
The Set-AzureLoadBalancedEndpoint cmdlet is much simpler, as it is working on a separate entity from the virtual machine configuration. It is a single command that requires only the cloud service name, the load-balanced set name, and of course whatever changes you wish to make to the endpoint.
Example 4-10 modifies the load-balanced endpoint set LBHTTP by changing it from the default probe (a basic TCP probe) to the more advanced HTTP probe.
Access Control
Access control lists (ACLs) are configurable entities available to all virtual machine endpoints, whether they are load-balanced or not. An ACL is a list of rules that allows you to specify whether traffic from a specific network address space is permitted or not. Each ACL can have up to 50 rules, which allows for flexible configurations.
Creating an ACL is straightforward. You just need to call the New-AzureAclConfig cmdlet and store the resulting object in a variable (see Example 4-11).
An ACL on its own is not very useful. To make it useful, the next step is to add rules. To add a rule, use the Set-AzureAclConfig cmdlet with the -AddRule parameter and specify the ACL you are modifying by using the -ACL parameter (see Example 4-12).
Each ACL rule has four properties that can be set, shown in Table 4-2.
Order | ACL rules are processed by the Microsoft Azure packet filter in the order they are specified in the access control list. |
RemoteSubnet | The remote subnet must be specified in CIDR format. This is the network to which the rule is applied. |
Action | Can be either Permit or Deny. If a rule specifies that a specific RemoteSubnet is permitted, the packet filter will deny any other subnets; likewise, if a rule denies a subnet, other subnets are permitted (unless other rules block them). |
Description | A field of text useful for adding a note for later reference on what the rule does. |
Set-AzureAclConfig–AddRule–ACL$acl–Order100–ActionPermit`–RemoteSubnet"175.1.0.0/24"–Description"Allow Management Network"
After this rule is set, any IP that matches the 175.1.0.1/24 subnet will be allowed access (see Table 4-3). Since there are no other PERMIT rules in place, all other traffic will be denied access to the endpoint. You can add multiple rules to an ACL object and build up a much more complex rule table. For instance, to make the previous example accessible from multiple distinct remote subnets, just add a rule to the table when creating or updating the endpoint (see Example 4-13).
Set-AzureAclConfig–AddRule–ACL$acl–Order100–ActionPermit`–RemoteSubnet"175.1.0.0/24"–Description"Allow Management Network"Set-AzureAclConfig–AddRule–ACL$acl–Order200–ActionPermit`–RemoteSubnet"137.135.67.39/32"–Description"Allow Management Server 1"
After these rules are added, clients from the 175.1.0.0/24 network or a client that matches the IP address of 137.135.67.39/32 are allowed access to the endpoint. All others will be rejected by the packet filter.
The new rule table would look like Table 4-4.
| Order | Remote subnet | Endpoint | Permit/Deny |
100 | 175.1.0.0/24 | Remote Desktop | Permit |
200 | 137.135.67.39/32 | Remote Desktop | Permit |
The -Order parameter tells the packet filter the order in which to process the rules. The lower the order, the higher the priority.
Adding and Updating Access Control Lists
Now that you have seen how to create an ACL configuration object and modify it by adding rules to the ACL, the next step is to apply the ACL to an endpoint.
In this example I want to show a real-world use case: restricting access to the RemoteDesktop endpoint by using an ACL.
Example 4-14 declares a variable that contains the IP address that my Internet connection is using to the outside world. You can find this out on your own by browsing to Bing or Google and typing "What is my IP". The IP address is in CIDR format with the network address prefix of /32, which specifies a single IP address.
To try this on your own, create a new PowerShell script using the PowerShell ISE named chapter4setacl.ps1.
# Use the smallest range available (a single IP)# Example: $myip = "12.153.189.234/32"$myip="[my ip address]/32"$serviceName="[cloud service name]"$vmName="ps-vm1"
The next step is to create the access control list configuration object and apply rules to it with the Set-AzureAclConfig cmdlet. Example 4-15 is specifying only a single permit rule that, once applied, allows only the remote subnet specified in the $myip variable access to the RemoteDesktop endpoint.
# Create the ACL configuration object$acl=New-AzureAclConfig# Add my IP address with permitSet-AzureAclConfig-ACL$acl`-AddRulePermit`-RemoteSubnet$myip`-Order100`-Description"Allow RDP"
Since this example is adding an access control list to an existing endpoint, you first need to return the existing configuration of the virtual machine as it contains the existing configurations for all endpoints (see Example 4-16).
# Return the VM configuration (contains the endpoint configuration)$vmConfig=Get-AzureVM-ServiceName$serviceName`-Name$vmName
The first line pipes the configuration object $vmConfig to the Set-AzureEndpoint cmdlet. This cmdlet modifies the endpoint configuration specified by the -Name parameter by adding the $acl object.
The endpoint configuration now has the ACL configuration associated with it. The next line updates the virtual machine configuration with the Update-AzureVM cmdlet (see Example 4-17).
# Update the endpoint configuration by passing in the ACL$vmConfig|Set-AzureEndpoint-Name"RemoteDesktop"-ACL$acl# Update the VM$vmConfig|Update-AzureVM
When you have specified your IP address and the correct cloud service name, you can execute the script by pressing F5, or by highlighting the script and pressing F8.
Example 4-18 shows the full source of the previous example.
# Use the smallest range available (a single IP)# Example: $myip = "12.153.189.234/32"$myip="[my ip address]/32"$serviceName="[cloud service name]"$vmName="ps-vm1"# Create the ACL configuration object$acl=New-AzureAclConfig# Add my IP address with permitSet-AzureAclConfig-ACL$acl`-AddRulePermit`-RemoteSubnet$myip`-Order100`-Description"Allow RDP"# Return the VM configuration$vmConfig=Get-AzureVM-ServiceName$serviceName`-Name$vmName# Update the endpoint configuration by passing in the ACL$vmConfig|Set-AzureEndpoint-Name"RemoteDesktop"-ACL$acl# Update the VM$vmConfig|Update-AzureVM
The previous example shows you how you can add an access control list to an existing endpoint. Specifying the access control list at endpoint creation is a simpler operation. All that is needed is to create and configure the ACL configuration object, and then pass it to the -ACL parameter of the Add-AzureEndpoint cmdlet.
Example 4-19 is a partial example that shows that scenario.
$remoteip="137.117.17.7/32"# Create the ACL configuration object$acl=New-AzureAclConfig# Add IP address with permitSet-AzureAclConfig-ACL$acl`-AddRulePermit`-RemoteSubnet$remoteip`-Order100`-Description"Allow Access"$vmConfig|Add-AzureEndpoint-Name"SQLSERVER"`-Protocoltcp`-LocalPort1433`-PublicPort1433`-ACL$acl### Create virtual machine code here ###
Reserved IP Addresses
Reserved IP addresses allow you to create a named public IP address that does not change. This IP address can be assigned to a cloud service at creation time.
If a cloud service is assigned a reserved IP address, you can safely deallocate all of the virtual machines within it and not worry about the external IP address changing. If you delete a cloud service and all of the virtual machines within it, you can reuse the reserved IP address by creating another cloud service, or delete it altogether.
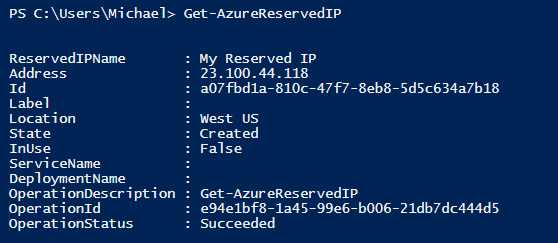
Example 4-20 creates a new reserved IP address using the name "My Reserved IP". A reserved IP address is always created in a specific region, and only cloud services from within the same region can use it. Figure 4-6 shows example output from creating a reserved IP.
$reservedIP="My Reserved IP"$location="[region name]"New-AzureReservedIP-ReservedIPName$reservedIP-Location$location

To view reserved IP addresses in your subscription (see Figure 4-7), you can use the Get-AzureReservedIP cmdlet (see Example 4-21). If you do not specify the name of the reserved IP, the cmdlet will return all of them.
When the reserved IP address has been created, you can then assign it to the cloud service container of your virtual machines at creation time.
To try this on your own, create a new PowerShell script named chapter4reservedip.ps1 and add the code shown in Example 4-22. Ensure that you have created a reserved IP using the New-AzureReservedIP cmdlet and then replace the placeholder values with real values from your subscription.
$serviceName="[cloud service name]"# Specify the admin credentials$adminUser="[admin username]"$password="[admin password]"# Specify the region to create the virtual machine in# Must match the region of the reserved IP$location="[region name]"# Specify your reserved IP name here$reservedIP="[the name of your reserved IP]"# Specify the virtual machine name$vmName="ps-reservedip1"$vmSize="Small"$imageFamily="Windows Server 2012 R2 Datacenter"$imageName=Get-AzureVMImage|where{$_.ImageFamily-eq$imageFamily}|sortPublishedDate-Descending|select-ExpandPropertyImageName-First1# Create a virtual machine configuration object$vm1=New-AzureVMConfig-Name$vmName-InstanceSize$vmSize-ImageName$imageName|Add-AzureProvisioningConfig-Windows`-AdminUsername$adminUser`-Password$password# Specify the reserved IP address for the external VIPNew-AzureVM-ServiceName$serviceName-Location$location`-VMs$vm1`-ReservedIPName$reservedIP
Reserved IPs set at creation
Reserved IP address settings are specified on the virtual machine deployment object. This object is created when the first virtual machine is created within a cloud service and cannot be updated after creation. If you would like to use a reserved IP address with your virtual machines, you must specify it at creation time. If you have existing virtual machines to use a reserved IP with, see Chapter 7, where I discuss importing and exporting virtual machines. This allows you to re-create the virtual machines with new deployment settings with the cost of some minor downtime.
Removing a reserved IP is simple as long as it is not in use. Simply run Remove-AzureReservedIP and specify the name of the IP to delete (see Example 4-23). When the IP is removed, it is gone forever and is not recoverable. There cannot be an existing deployment of virtual machines associated with the reserved IP address when running Remove-AzureReservedIP.
Public IP Addresses
Public IP addresses are specific to a virtual machine instead of being specific to the cloud service, such as reserved IPs (see Figure 4-8).
Using a public IP address puts the virtual machine directly on the Internet and out from behind the load balancer. This means that it is up to you to secure the ports on the virtual machine by using the built-in firewall in Windows Server or one of the various Linux-based solutions.
You can specify a new public IP address at virtual machine provisioning time or after the fact by using the update syntax along with the Set-AzurePublicIP cmdlet.
The partial example shown in Example 4-24 retrieves the current virtual machine configuration using the Get-AzureVM cmdlet and pipes it to the Set-AzurePublicIP cmdlet. The Set-AzurePublicIP cmdlet modifies the configuration to request a public IP using a unique name (in this case, the name of the virtual machine concatenated with -IP).
Get-AzureVM-ServiceName$serviceName-Name$vmName|Set-AzurePublicIP-PublicIPName"$vmName-IP"|Update-AzureVM
The same pattern applies to removing the public IP address from the virtual machine (see Example 4-25).
Summary
In this chapter you have learned how to use the Microsoft Azure PowerShell cmdlets to create and update network endpoints (including health probes), access control lists, reserved IP addresses, and public IP addresses. These are all critical techniques when it comes to automating a new deployment or performing updates across multiple virtual machines. Microsoft Azure virtual networks is another very important feature in the networking stack and will be discussed in Chapter 6. In the next chapter we will stay focused on automating virtual machine configuration and investigate storage in-depth.
Get Automating Microsoft Azure Infrastructure Services now with the O’Reilly learning platform.
O’Reilly members experience books, live events, courses curated by job role, and more from O’Reilly and nearly 200 top publishers.

