Chapter 4. Creating a New Framework for Mesos
A Mesos framework is the conceptual aggregation of a distributed system. But what does that mean to us, as framework developers? How can we actually understand how the structure of the code we write maps onto the Mesos cluster? Let’s review the Mesos architecture, and learn some common patterns in framework design.
Instead of trying to understand everything about Mesos architecture all at once, we’ll look at the simplest case: a framework that only has a scheduler, and no custom executor. This type of framework could spin up workers to process requests coming in on a queue, or it could manage a pool of services.
The Scheduler
The scheduler is the component that interacts directly with the leading Mesos master. A scheduler has four responsibilities:
-
Launch tasks on the received offers.
-
Handle status updates from those tasks, particularly to respond to task failures and crashes.
-
Persist state and manage failovers in order to be highly available.
-
Interact with clients, users, or other systems (since no system runs in a vacuum!).
Some of these responsibilities are implemented purely by interacting with the Mesos API; others must be implemented using the language of choice’s platform. For instance, launching tasks and handling status updates are implemented entirely by Mesos callbacks and API requests. On the other hand, it’s up to you to start a web server (such as Jetty on Java or Flask on Python) to allow clients to interact with the scheduler. High availability usually requires using both Mesos APIs and other libraries to create a solution that is suitable for the problem domain.
But how can we launch tasks if we’re only focusing on the scheduler?
For our convenience, Mesos comes with something called the CommandExecutor, which is specifically designed to make it easy to launch and orchestrate command-line programs and Docker containers.
Let’s take a look at some high-level designs for several common scheduler abstractions: building a pool of servers, a work queue, and a job processor.
First, we’ll look at the pool of servers design. Its architecture is illustrated in Figure 4-1.
Pool of Servers Scheduler
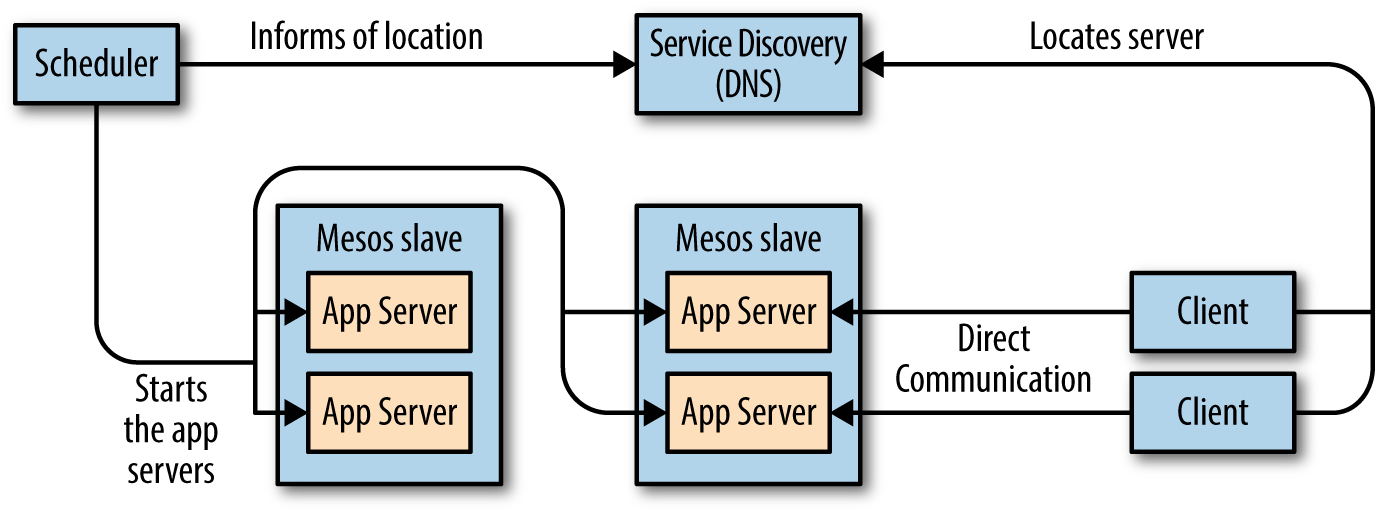
Figure 4-1. Architecture and information flow of a pool of servers scheduler
This scheduler is simply going to ensure that there are always X copies of some application, such as Ruby on Rails, running. To build a pool of servers, our scheduler will have a list of all the servers it wants to be running. Initially, the list will have all the servers in the pending state. As the scheduler receives offers, it will attempt to launch servers, putting them into the staging state. Once the servers start successfully, the scheduler can move them to the running state. If they ever crash, they’ll go back to the initial pending state so that they can be relaunched on a new offer. Note that we need three states here: pending, staging, and running.
You might be tempted to remove the staging state, since, after all, that seems awfully similar to pending—in both cases, the server is not yet started. But here’s the problem: Mesos is an asynchronous system! You could receive many offers between attempting to launch a task and having the task actually start. Thus, the staging state ensures that we only try to launch each server once, and only retry if the launch fails. If you forget to have a staging state, you might encounter a bug in which there are tens or hundreds of instances of a task when there should be only one.
Work Queue Scheduler
The work queue architecture, illustrated in Figure 4-2, allows clients to submit “work items” to a queue, where they’ll eventually be processed by workers. A work queue scheduler will ensure that we always have a sufficient number of workers running, so that there will be a sufficient number of workers to process the queued work items.
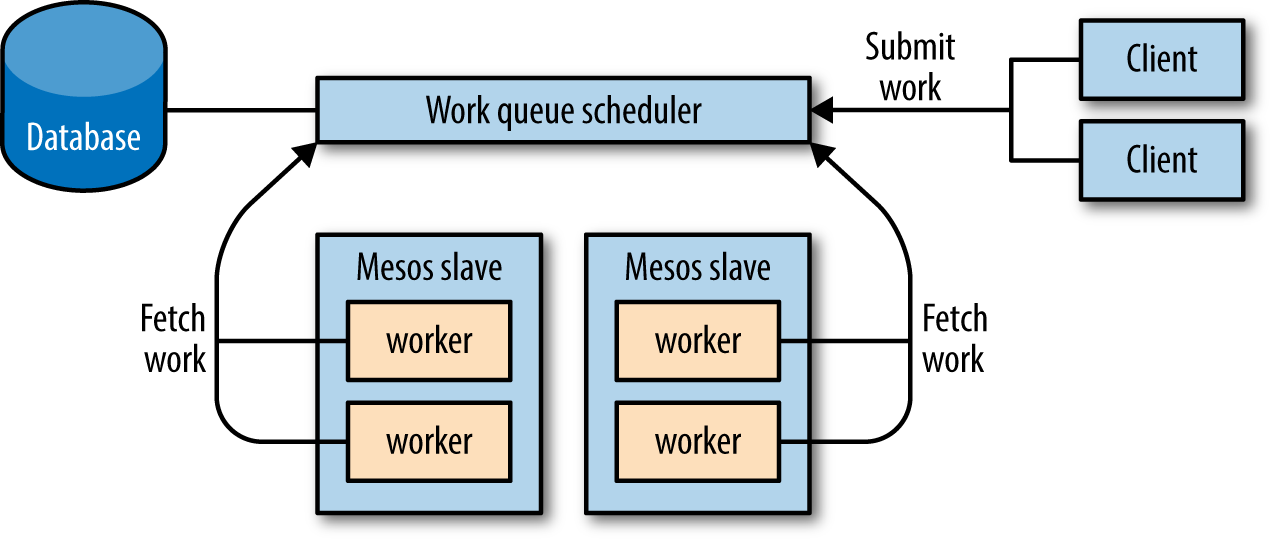
Figure 4-2. Architecture and information flow of a work queue scheduler
To build this scheduler, we’re actually going to cheat and assume that we already have a pool of servers scheduler, as described in the previous section. This way, we simply start the workers as servers in the pool. Therefore, the meat of this system will reside in the workers themselves.
Our workers will retrieve their work items from some known location. This location could be passed to them from the scheduler as a command-line option or environment variable. Each worker will connect to the queue, and then loop forever: retrieve an item, process it, and mark it as done.
The neat thing about considering work queues (and all potential frameworks) in this way is that you don’t even need to write a scheduler—you could just use Marathon or some other pool of services scheduler. Of course, this shifts the implementation of the queue to another system, such as RabbitMQ or Redis. This is a good thing: the Mesos messaging APIs are designed for controlling the applications on the cluster and are not as well suited to other domains, such as transactional logic or high-performance messaging. When developing frameworks for Mesos, you must use appropriate data storage backends—queues, databases, and document stores are all likely useful, depending on the framework you’re building.
Job Processor Scheduler
The final abstraction we’ll consider is the job processor scheduler (Figure 4-3).

Figure 4-3. Architecture and information flow of a job processor scheduler
A job processor will accept a list of jobs from clients and then run those jobs on a cluster; a job is just a command line to invoke, along with the CPU and memory resources it needs. This scheduler will require a slightly more complex state machine, since we’ll also need terminal states for jobs (we’ll call them successful and failed). We’ll also track how many retries have been attempted, so that we can give up on jobs with no hope for success.
This scheduler’s state machine will move jobs from pending to staging when it attempts to launch them on an offer, and from staging to running when the job actually starts running. Handling completion of a task is trickier, though: we’ll want to move the job to successful if it succeeds, to failed if it has exceeded the maximum number of retries, or to pending if it has more retries remaining. Furthermore, we could determine whether the task failed due to a bug in its code, a transient machine failure, or some other issue—this is useful feedback for deciding whether to have the job fail fast, or let it continue to retry.
Now that we’ve seen conceptually how a framework could be implemented with just a scheduler, let’s try our hand at implementing the job processor.
Useless Remote BASH
Before we get started on the job processor, let’s break down the absolute minimal code needed to get a task to launch on Mesos. We’ll call this program Useless Remote BASH,1 as it’ll just run the hardcoded program in a container on the cluster.
Let’s break down this most simple of frameworks into several parts, and see why each part is necessary. In Example 4-1, we can see the imports and class declaration of our new scheduler.
Example 4-1. Imports and class declaration of useless remote BASH
packagecom.example;importjava.nio.file.*;importjava.util.*;importorg.apache.mesos.*;importorg.apache.mesos.Protos.*;publicclassUselessRemoteBASHimplementsScheduler{// We'll discuss the inner bits as we go}
Two things here deserve our attention:
-
We import everything from
org.apache.mesosandorg.apache.mesos.Protos, so that we can use the Mesos APIs. -
Schedulers should implement the
Schedulerinterface, which defines the messages a scheduler can receive as callbacks.
We’ll use the complementary SchedulerDriver class to send messages to Mesos. Example 4-2 is the entry point of our program.
Example 4-2. main of Useless Remote BASH
publicstaticvoidmain(String...args)throwsException{FrameworkInfoframeworkInfo=FrameworkInfo.newBuilder().setUser("").setName("Useless Remote BASH").build();SchedulermySched=newUselessRemoteBASH();SchedulerDriverdriver=newMesosSchedulerDriver(mySched,frameworkInfo,"zk://"+args[0]+"/mesos");driver.start();driver.join();}
In the main function, first, we construct the FrameworkInfo of our framework.
FrameworkInfo is a protobuf that describes the framework to Mesos.
You’ll want to choose a clear name for the framework, so that you can identify your framework in the Mesos UI.
In practice, you’ll want to construct the name to include several pieces of data: which framework this is, as well as other high-level information about the framework, such as whether it’s a dev or prod instance.
It’s entirely up to you what you name your framework, but consider the anecdote in the following sidebar!
Typically, we set the framework’s user to an empty string (""), which means that it will register with Mesos as whichever user is running the scheduler.
In “Roles”, we discussed how the framework’s user can be used for quotas, capacity planning, and security.
Most of the other fields of FrameworkInfo are used to configure high availability, so we’ll postpone discussing those until later.
After we’ve constructed our FrameworkInfo, we can create the driver, which is the component that actually communicates with Mesos.
The driver for the scheduler is an instance of SchedulerDriver; you should stick with the MesosSchedulerDriver that is built with Mesos for now.
In the future, other implementations may be written in order to remove the dependencies on native code.
Unfortunately, the current projects working on this are more trouble than they’re worth for framework developers, as they haven’t reached stability yet.2
The SchedulerDriver takes three arguments: an implementation of the Mesos Scheduler interface, the FrameworkInfo, and the address of the Mesos cluster.
At this point, when we call start(), our driver will connect to the Mesos cluster, register the framework, and begin receiving offers.
Usually, you’ll want to call join() at the end of your main function.
join() blocks until the driver terminates, either from having stop() called on it or because Mesos instructed the driver to stop because the framework failed over.
A Common Pattern for Starting the SchedulerDriver
Often, the last thing our main function does is call start() followed by join().
Because this is so common, you can just call run(), which is essentially start() && join().
Now that we’ve seen how frameworks start up, let’s look at Example 4-3.
This function is an example of how to create a Mesos task that we can launch.
As this is a useless framework, we hardcode what would normally be important parameters: the cpus, mem, and command we want to run.
Example 4-3. makeTask of Useless Remote BASH
publicstaticTaskInfomakeTask(SlaveIDtargetSlave){doublecpus=1.0;doublemem=100.0;Stringcommand="echo hello world";UUIDuuid=UUID.randomUUID();TaskIDid=TaskID.newBuilder().setValue(uuid.toString()).build();returnTaskInfo.newBuilder().setName("useless_remote_bash.task "+id.getValue()).setTaskId(id).addResources(Resource.newBuilder().setName("cpus").setType(Value.Type.SCALAR).setScalar(Value.Scalar.newBuilder().setValue(cpus))).addResources(Resource.newBuilder().setName("mem").setType(Value.Type.SCALAR).setScalar(Value.Scalar.newBuilder().setValue(mem))).setCommand(CommandInfo.newBuilder().setValue(command)).setSlaveId(targetSlave).build();}

First, we make a
TaskID. TheTaskIDmust be unique to the framework, just as theExecutorIDmust be unique to the slave and theSlaveIDmust be unique to the cluster. I typically find it easiest to just use UUIDs appended to any IDs I need to generate, since that way I don’t need to ever worry about the uniqueness constraints that Mesos requires.
Next, we make the
TaskInfo, which is the protobuf that explains how to launch a task. TheTaskInforequires you to set a name for the task. This name is what’s displayed in the UI, and many Mesos tools can interact with it, such as the Mesos CLI. Typically, you’ll want to set the name of the task to include useful specifying information, such as the framework name and any related entity (such as the app in Marathon or job in Hadoop). By writing the name from most general (i.e., framework) to most specific (i.e., instance of the task), you’ll benefit from tools that can provide tab completion and autocompletion of the task names.
A task wouldn’t be useful without any resources:
TaskInfois where you can add all of the resources that the task will consume. The only two resources that you’ll always want to specify arecpusandmem(note the s at the end ofcpus); if your application listens to the network, you should also specifyports. There are many other resource types that Mesos can manage; you can read more about them in “Resources”.
Since this framework is very simple, we set the command so that the Mesos
CommandExecutorwill handle the actual running of our task. We specify our command to theCommandInfothat we provide as the command; its features are discussed in “CommandInfo”. For theCommandExecutor, theTaskIDand theExecutorIDare the same.
Finally, we must tie this
TaskInfoto the offer. Since it’s possible to apply several offers from the same slave to one task (pooling them for more total resources), we specify theSlaveIDof the slave we want the task to launch on rather than theOfferIDs that we want it to use. When we actually calllaunchTasks(), that’s where we’ll link the offers to theTaskInfo(see the note Combining Offers following Example 4-5).
We’ve managed to register our framework, and we’ve learned how to specify a task to launch.
The last step is to actually implement that pesky Scheduler interface.
For this super-basic framework, we’re going to ignore most of the callbacks, as they update us on information we don’t want to react to.
Note that all of the callbacks provide you with a driver; this driver is guaranteed to be the same one you called start() on.
Mesos passes you this as a convenience, since it’s the only way to interact with the cluster, and that’s typically something you’d like to do in response to cluster events. Example 4-4 shows the callbacks we want to log: registered and statusUpdate.
Example 4-4. Scheduler callbacks to log
publicvoidregistered(SchedulerDriverdriver,FrameworkIDframeworkId,MasterInfomasterInfo){System.out.println("Registered with framework id "+frameworkId);}publicvoidstatusUpdate(SchedulerDriverdriver,TaskStatusstatus){System.out.println("Got status update "+status);}
When we have successfully registered with the Mesos masters, we’ll get the registered callback.
When you register a framework for the first time, you don’t specify the FrameworkID; instead, Mesos will assign it for you.
This callback is the only place to learn the assignment of the FrameworkID.
(In Example 4-15 and Example 4-14, we’ll see how we can use this FrameworkID to safely fail a scheduler over to a new instance, so that we can build zero-downtime systems.)
The MasterInfo tells you which port and version the master is running on.
Frameworks can decide which Mesos features are valid to use based on the master’s version.
The statusUpdate callback will soon become very important for our scheduler, as it’s how we track the lifecycle of our tasks: when they start running, and when and why they fail.
Even though we’re not going to do anything with this callback yet, it’s convenient to log when it happens, as that will help us debug our framework and confirm tasks that are actually launching and finishing.
Whenever I build a production framework, I always make sure to enable logging for every statusUpdate callback: those logs have helped me identify and debug issues countless times.
Finally, we get to look at the core of our new framework, as shown in Example 4-5. This callback is how we receive offers from Mesos—offers that are chock-full of juicy resources that we can launch tasks on.
Example 4-5. Implementation of resourceOffers
privatebooleansubmitted=false;publicvoidresourceOffers(SchedulerDriverdriver,java.util.List<Offer>offers){synchronized(this){if(submitted){for(Offero:offers){driver.declineOffer(o.getId());}return;}submitted=true;Offeroffer=offers.get(0);TaskInfoti=makeTask(offer.getSlaveId());driver.launchTasks(Collections.singletonList(offer.getId()),Collections.singletonList(ti));System.out.println("Launched offer: "+ti);}}
In our framework, we first check if we’ve already submitted our task.
If we have, we simply decline all the offers.
If we haven’t submitted our task yet, we construct a
TaskInfofor it with the ID of the slave from the first offer we received.
Combining Offers
launchTasks takes a list of offers, which allows us to combine several offers for the same slave in order to pool those offers’ resources.
It also takes a list of tasks, so that you can launch as many tasks as fit on the given offers.
Note that all the tasks and offers must be for the same slave—the launchTasks will fail if they’re not.
If you want to launch tasks on multiple slaves, simply call launchTasks multiple times.
The other Scheduler callbacks, listed in Example 4-6, can all be ignored for now.
Example 4-6. Ignored callbacks for Useless Remote BASH
publicvoiddisconnected(SchedulerDriverdriver){}publicvoiderror(SchedulerDriverdriver,java.lang.Stringmessage){}publicvoidexecutorLost(SchedulerDriverdriver,ExecutorIDexecutorId,SlaveIDslaveId,intstatus){}publicvoidframeworkMessage(SchedulerDriverdriver,ExecutorIDexecutorId,SlaveIDslaveId,byte[]data){}publicvoidofferRescinded(SchedulerDriverdriver,OfferIDofferId){}publicvoidreregistered(SchedulerDriverdriver,MasterInfomasterInfo){}publicvoidslaveLost(SchedulerDriverdriver,SlaveIDslaveId){}
And there you have it!
You’ve written your first Mesos framework, and it actually does quite a lot.
It can register with the master, create a TaskInfo to express how to launch a task, log status updates, and accept an offer to launch the task.
executorLost Doesn’t Do Anything
Unfortunately, there’s one scheduler callback that isn’t actually implemented or supported by Mesos: executorLost.
If you’d like to be notified about when an executor shuts down, we discuss a solution in “Canary tasks”.
This issue is being pursued in MESOS-313, so future versions of Mesos will implement this callback.
This Framework actually has two problematic bugs: when it accepts the offer to launch a task, it fails to check if the offer is actually big enough.
If the offer was too small, we’ll get a TASK_LOST status update about the task, rather than anything indicating success.
The other bug is that when it accepts the offer, it doesn’t decline the other offers that were potentially received in the resourceOffers callback.
Those other offers will be stuck in a limbo state until they expire, which could be several minutes (or forever, if you didn’t change the default).
They’ll be unavailable to other frameworks in the meantime.
In the coming sections, we’ll improve resourceOffers to fix these issues.
Implementing a Basic Job Processor
Now, let’s extend our framework to be more useful by reading a list of jobs from a JSON file, and then having it launch all of those jobs on Mesos. We’ll start by looking at how we’ll model a job (Example 4-7).
Example 4-7. Job implementation
publicclassJob{privatedoublecpus;privatedoublemem;privateStringcommand;privatebooleansubmitted;privateJob(){submitted=false;}publicTaskInfomakeTask(SlaveIDtargetSlave){UUIDuuid=UUID.randomUUID();TaskIDid=TaskID.newBuilder().setValue(uuid.toString()).build();returnTaskInfo.newBuilder().setName("task "+id.getValue()).setTaskId(id).addResources(Resource.newBuilder().setName("cpus").setType(Value.Type.SCALAR).setScalar(Value.Scalar.newBuilder().setValue(cpus))).addResources(Resource.newBuilder().setName("mem").setType(Value.Type.SCALAR).setScalar(Value.Scalar.newBuilder().setValue(mem))).setSlaveId(targetSlave).setCommand(CommandInfo.newBuilder().setValue(command)).build();}publicstaticJobfromJSON(JSONObjectobj)throwsJSONException{Jobjob=newJob();job.cpus=obj.getDouble("cpus");job.mem=obj.getDouble("mem");job.command=obj.getString("command");returnjob;}// ... snip ...}
As you can see, we have parameterized the CPU, memory, and command arguments.
We’ve moved the
submittedfield into theJob, so that we can track its lifecycle.We’ve moved the
makeTaskfunction into theJobas well, so that it can access all the local fields of theJob.For convenience, we’ve defined a single way to construct a
Job, via the factory methodfromJSON.I’ve left out the getter and setter definitions.
The Job is a container for information about a particular job, like a model class in MVC.
We’ve only added two special methods: fromJSON, which gives us a way to construct the Job with valid starting state, and makeTask, which gives us a way to easily turn it into a TaskInfo without having all the protobuf munging code in our scheduler class.
Next, let’s look at how our main function has evolved. Example 4-8 shows the revised version.
Example 4-8. Revised main for Useless Remote BASH
publicstaticvoidmain(String...args)throwsException{byte[]data=Files.readAllBytes(Paths.get(args[1]));JSONObjectconfig=newJSONObject(newString(data,"UTF-8"));JSONArrayjobsArray=config.getJSONArray("jobs");List<Job>jobs=newArrayList<>();for(inti=0;i<jobsArray.length();i++){jobs.add(Job.fromJSON(jobsArray.getJSONObject(i)));}System.out.println(jobs);// Below here, the function remains almost as beforeFrameworkInfoframeworkInfo=FrameworkInfo.newBuilder().setUser("").setName("Useless Remote BASH").build();SchedulermySched=newUselessRemoteBASH(jobs);SchedulerDriverdriver=newMesosSchedulerDriver(mySched,frameworkInfo,"zk://"+args[0]+"/mesos");driver.start();driver.join();}
This allows us to read the entire contents of a file into memory. We assume that the first argument is still the Mesos cluster, and the second argument is the name of a file that contains the JSON configuration.
We convert the byte array to JSON in this step, so that we can extract the
Jobconfigurations.Finally, we loop over the JSON job descriptors, processing them into
Jobs.This time, we pass an argument to our
Scheduler: the jobs we want it to launch.
Let’s take a look at a sample JSON file of jobs, to get a feel for the schema:
{"jobs":[{"cpus":0.5,"mem":100,"command":"sleep 60; echo hello world"}]}
The JSON file should contain a JSON object with a single key,
jobs. That key’s value should be a list ofJobobjects.Each job object has three properties:
cpus,mem, andcommand, which correspond to the eponymous fields in theJobclass.
Now that we can load jobs up, let’s see how we evolved resourceOffers. The new version is shown in Example 4-9.
Example 4-9. Revised implementation of resourceOffers
publicvoidresourceOffers(SchedulerDriverdriver,java.util.List<Offer>offers){synchronized(jobs){List<Job>pendingJobs=newArrayList<>();for(Jobj:jobs){if(!j.isSubmitted()){pendingJobs.add(j);}}for(Offero:offers){if(pendingJobs.isEmpty()){driver.declineOffer(o.getId());break;}Jobj=pendingJobs.remove(0);TaskInfoti=j.makeTask(o.getSlaveId());driver.launchTasks(Collections.singletonList(o.getId()),Collections.singletonList(ti));j.setSubmitted(true);}}}
Because our
Jobs contain state information (i.e., whether or not they were just launched), we need to first calculate which jobs haven’t yet been launched.This loop allows us to find all the jobs that haven’t been submitted yet, and add them to
pendingJobs.Now, we’re going to try to match jobs to offers.
If we have no more jobs we want to launch, then we can decline the offer.
If we reach this line, we have a job to launch. From here on, the code is similar to our first incarnation.

Remember that we want to mark the job as submitted, or else we could accidentally double-submit the job.
This version of resourceOffers shows us several useful patterns.
Every framework needs to keep track of the running tasks and work that it wants to do in the future.
For most frameworks, it will be most convenient to have a single data structure that tracks all ongoing work.
This data structure will include both running and pending tasks.
Of course, when you actually want to launch a task, you’ll need to calculate the specific set of tasks that are still pending.
In this example, after each resource offer, we compute the set of pending tasks.
Later in this chapter, we’ll look at other architectures for tracking this information.
The other pattern that every framework uses is looping over all the offers, matching offers to pending work until one or the other is exhausted.
But you might be thinking: resourceOffers requires a lot of care, and this framework still fails to handle it effectively!
You’d be absolutely correct, which is why we’re going to look at how to fix that problem now.
Matching Tasks to Offers
As we’ve been alluding to throughout this chapter, the assignment of tasks to offers is fraught with details that must be attended to. For instance, we must ensure that the offer has all the necessary resources for our job, we must attempt to launch as many tasks as we can on each offer, and we must prioritize which task we’ll launch next. The reason we want to match as many tasks as possible to each offer is that if we only match one task per offer, our scheduler will launch tasks at a slow rate. Specifically:

With the default offer interval of 1 second, if you have a five-slave cluster, you’ll only be able to launch at most 60 tasks per minute.
With properly implemented offer handling code, however, you could launch tens of thousands of tasks per minute!
For our example, we’re going to implement the first fit algorithm, since it requires very little code.
Then, we’ll learn about other algorithms, and various considerations therein. Let’s make the following change to our resourceOffers:
...// code unchangeddriver.launchTasks(Collections.singletonList(o.getId()),doFirstFit(o,pendingJobs););...// code unchanged
Instead of directly taking a job, we’re going to compute the first fit of all the pending jobs to the given offer. The solution we find is a List of tasks, since the whole point is that we can launch multiple tasks on a single offer.
doFirstFit’s Semantics
doFirstFit takes an Offer and a list of Jobs and returns a list of TaskInfos that we can launch on the cluster.
Note that doFirstFit is designed to remove all the Jobs that it decides to match from the list of Jobs passed into it.
Obviously, the interesting part is the implementation of doFirstFit (Example 4-10).
The idea of first fit is this: given the amount of space available in an offer, we’ll add tasks that fit in whatever space is left in the offer.
When we decide to add a task, we’ll deduct its space usage from the remaining space.
Once we can’t fit any more tasks into the offer, we’ll remove all the matched Jobs from the list of Job provided as an argument, and we’ll return the TaskInfos that will launch those Jobs.
Example 4-10. First-fit offer packing
publicList<TaskInfo>doFirstFit(Offeroffer,List<Job>jobs){List<TaskInfo>toLaunch=newArrayList<>();List<Job>launchedJobs=newArrayList<>();doubleofferCpus=0;doubleofferMem=0;// We always need to extract the resource info from the offer.// It's a bit annoying in every language.for(Resourcer:offer.getResourcesList()){if(r.getName().equals("cpus")){offerCpus+=r.getScalar().getValue();}elseif(r.getName().equals("mem")){offerMem+=r.getScalar().getValue();}}// Now, we will pack jobs into the offerfor(Jobj:jobs){doublejobCpus=j.getCpus();doublejobMem=j.getMem();if(jobCpus<=offerCpus&&jobMem<=offerMem){offerCpus-=jobCpus;offerMem-=jobMem;toLaunch.add(j.makeTask(offer.getSlaveId()));j.setSubmitted(true);launchedJobs.add(j);}}for(Jobj:launchedJobs){j.launch();}jobs.removeAll(launchedJobs);returntoLaunch;}
We’ll keep track of how many resources are remaining in the offer in these variables.
You must iterate over all the resources in the offer to find the ones whose names match the type of resource you care about, and only then can you extract the value. The reason this cannot be a map is that you can receive multiple resources of the same name; for example, you could receive both reserved and unreserved memory resources from a slave.
Here, we check to see if the offer still has enough resources remaining to launch our task. If it does, we’ll deduct those resources from our method’s internal count, add the
TaskInfoto the list of tasks we will launch, and mark the job as submitted.In order to support
doFirstFitsemantics, we add all jobs we’ll launch to a list, so that we can remove all those elements from the original list of all pending jobs.Jobhas methods that help us track its instances’ progress through their state machine. We’ll go over this in Example 4-11.
First fit is usually the best algorithm to use when matching tasks to offers. You might think that this won’t always utilize offers as efficiently as if you put more work into trying to optimize matching the offers. That’s absolutely true, but consider the following: a cluster either has sufficient or insufficient resources for launching every pending task. If there are plenty of resources, then first fit should always be able to launch every task. If, on the other hand, there are not enough resources, nothing would be able to launch every task. Thus, it’s a good idea to write code to choose which task to run next, so that you can maintain the target quality of service. Only if there are just barely enough resources does more sophisticated packing begin to make sense. Unfortunately for us, this problem—known more generally as the knapsack problem—is a notorious NP-complete problem. NP-complete problems are those problems for which it can be proved that an optimal solution will take an extremely long time to find, and there’s not a clever trick in existence to solve the problem faster.3
Actually, the situation isn’t so bad. In fact, although it’s impossible to solve the packing problem perfectly and quickly, there are several techniques that give “good enough” results and aren’t too tricky to implement. For some frameworks, all tasks will be bottlenecked on a single resource: either CPUs (for compute-bound workloads, like data analysis) or memory (i.e., caches like memcached or Redis). As a result, when we try to pack our resources, we can simplify the packing problem to a single dimension: the most constrained dimension. Once we’ve done this, we can use techniques such as the fully polynomial time greedy approximation scheme for the 0/1 knapsack problem.4
Bridging the Semantic Gap Between Offers and Jobs
Now, we’ve got a pretty cool framework.
It takes a JSON configuration file filled with the jobs we want to run, and it submits those jobs to the Mesos cluster efficiently.
We have a problem, though—what if a job fails?
At the moment, we’ll just see a bit of output in the terminal indicating that the task failed, succeeded, or was lost.
We want to add support for retries: when a job fails, we’ll resubmit it in the hope that it will succeed this time.
Eventually, however, we’ll give up and consider it truly failed.
To this end, we’re going to expand our Job class so that instead of simply having a Boolean property submitted, it will have a JobState:
publicenumJobState{PENDING,STAGING,RUNNING,SUCCESSFUL,FAILED}
We need to increase the number of states a job can be in in order to support retries. Before, we would simply launch unsubmitted jobs. Now, we’ll need to track the exact part of the task lifecycle a job is in, and resubmit it only if it has already failed. Figure 4-4 illustrates the valid state transitions.
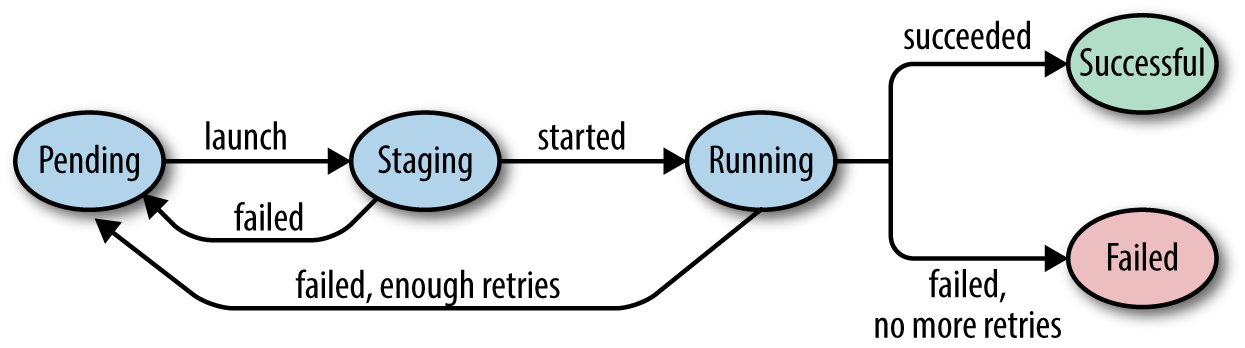
Figure 4-4. Valid transitions of JobState
We’ll also have to expand the Job class to internally keep track of retries and the job’s state. Example 4-11 shows the new methods that will implement the preceding state transition diagram.
Example 4-11. State transition methods for Job
publicclassJob{// previous fields elidedprivateintretries;privateJob(){status=JobState.PENDING;id=UUID.randomUUID().toString();retries=3;}publicvoidlaunch(){status=JobState.STAGING;}publicvoidstarted(){status=JobState.RUNNING;}publicvoidsucceed(){status=JobState.SUCCESSFUL;}publicvoidfail(){if(retries==0){status=JobState.FAILED;}else{retries--;status=JobState.PENDING;}}}
We’ve decided to give every job three retries.
To simplify the implementation of the state changes of the job, we have four functions to move between states: launch(), started(), succeed(), and fail().
These functions will be called, respectively, when we submit the task to Mesos, when it starts, and when it succeeds or fails. Example 4-12 shows how we move between states.
Example 4-12. Enhanced statusUpdate handler
publicvoidstatusUpdate(SchedulerDriverdriver,TaskStatusstatus){synchronized(jobs){// We'll see if we can find a job this corresponds tofor(Jobj:jobs){if(j.getId().equals(status.getTaskId().getValue())){switch(status.getState()){caseTASK_RUNNING:j.started();break;caseTASK_FINISHED:j.succeed();break;caseTASK_FAILED:caseTASK_KILLED:caseTASK_LOST:caseTASK_ERROR:j.fail();break;default:break;}}}}}
Typically, one should store a mapping between the
TaskIDand theJob, rather than doing a linear search.This task status, running, means that we’ve received confirmation that the task was successfully started by the slave.
A finished task is one that completed without reporting any kind of error.
Failed tasks are those that did not complete successfully, and whose termination was initiated through a normal codepath by the task itself. For example, if a task that is supposed to download a file wasn’t able to do so, it should report its status as failed.
Killed tasks are those that did not complete successfully because the scheduler told them to stop. When a scheduler performs preemption or allows a user to request the early termination of a task, that task should report the status killed.
When a task is lost, that means that an unexpected error occurred. That could be due to the slave unexpectedly going offline, or an executor that exited before it sent a
TASK_FINISHED,TASK_KILLED, orTASK_KILLEDmessage.
This is a very rare case, indicating a problem with the task descriptor itself. You can look in the
TaskStatus’smessagefield for details.
Adding High Availability
At this point, our scheduler-only framework is nearly feature-complete. We are loading jobs from configuration files, launching them on Mesos, and automatically restarting them when they fail. Now it’s time to add the final feature: high availability.
High availability means that when the scheduler process fails, the framework as a whole continues to run. This is accomplished via the cooperation of three subfeatures:
-
The scheduler will use leader election so that we can run multiple instances and have a fallback instance automatically take over when the current leader fails.
-
The scheduler must synchronize its state to shared, distributed storage, so that the newly elected leader can pick up where the last one left off.
-
The scheduler must opt into a few Mesos features that will ensure that running tasks are unaffected by scheduler failure.
For this example, we’re going to use ZooKeeper to provide our leader election and distributed storage, since Mesos clusters usually5 come with a ZooKeeper cluster.
Furthermore, we’re going to use the Apache Curator library to interact with ZooKeeper, since it handles many of the challenges of the included ZooKeeper API.6 Since this isn’t meant to be a production-quality framework, we’ll hardcode all our framework’s data to reside under the /sampleframework path in ZooKeeper.
For production-quality frameworks, you should make the location of all data configurable in ZooKeeper. Example 4-13 shows how we add basic leader election to our main function.
Example 4-13. Simple leader election
publicstaticvoidmain(String...args)throwsException{CuratorFrameworkcurator=CuratorFrameworkFactory.newClient(args[0],newRetryOneTime(1000));curator.start();LeaderLatchleaderLatch=newLeaderLatch(curator,"/sampleframework/leader");leaderLatch.start();leaderLatch.await();// The previous main implementation goes here}
Here, we see how to create a new instance of Curator. It takes the address of the ZooKeeper cluster and a
RetryPolicyas arguments. While we are using theRetryOneTimepolicy in this book, this is probably not the right choice for production frameworks. Instead, theExponentialBackoffRetryorBoundedExponentialBackoffRetrypolicies are more robust choices.Note that you must explicitly
start()the Curator framework.7Next, we create a
LeaderLatchfor our framework, which we’ll put under the ZooKeeper path we chose for our framework,/sampleframework.Never forget to
start()Curator components—this is the #1 pitfall.The
await()method on a startedLeaderLatchwill not return until we are the leader.
LeaderLatch Is Nice, but LeaderSelector Is Better
A LeaderLatch is a very easy way to add leader election to an application.
You simply call await(), and when it returns, you’re the leader!
Unfortunately, if you do this, your application will not always behave correctly.
Leaders can be deposed not only when they crash, but also when they are disconnected from the network.
As a result, a properly implemented user of leader election needs to be constantly checking whether it’s still the leader, and then recreating the leader latch after it’s deposed.
A better option for building robust leader election is LeaderSelector, another class in Curator.
LeaderSelector has a listener-based API that notifies you whenever you become the leader or lose leadership.
This book doesn’t use LeaderSelector because it requires substantially more scaffolding code to use.
Unfortunately, it’s not enough to simply allow multiple instances of our framework to elect a leader from amongst themselves.
Our goal is to have the new leader actually become the same framework as before.
To do this, we’ll need to inform Mesos that our scheduler supports failover.
In addition, when the new leader registers, it needs to tell Mesos that it’s the new scheduler for our framework.
In Mesos, schedulers are identified by their FrameworkID, an optional value in the FrameworkInfo.
The FrameworkID must be assigned by Mesos in order to ensure it remains unique for each framework.
Now, we’ll need to actually store the FrameworkID when it’s assigned, so that future leaders can reuse it.
We’re going to store the FrameworkID in the ZooKeeper node id under our /sampleframework path.
When we start up, we’ll first check to see if there’s already a saved FrameworkID; if so, we’ll start up using that.
Otherwise, we’ll operate as before, and allow the Mesos master to assign a FrameworkID (see Example 4-14).
In addition, we will store whatever FrameworkID Mesos informs us we registered with, so that future leaders can reuse that ID.
We can store that FrameworkID unconditionally, since it will never change after the first assignment, and thus is idempotent.8
Example 4-14. Using a stored FrameworkID with FrameworkInfo
FrameworkInfo.BuilderframeworkInfoBuilder=FrameworkInfo.newBuilder().setUser("").setName("Useless Remote BASH");try{byte[]curatorData=curator.getData().forPath("/sampleframework/id");frameworkInfoBuilder.setId(newString(curatorData,"UTF-8"));}catch(KeeperException.NoNodeExceptione){// Don't set the FrameworkID}FrameworkInfoframeworkInfo=frameworkInfoBuilder.setFailoverTimeout(60*60*24*7).build();
We start with our builder, the same as usual.
We attempt to fetch the stored
FrameworkID. If this node doesn’t exist in ZooKeeper, we throw aKeeperException.NoNodeException.If there wasn’t a stored
FrameworkID, we allow Mesos to assign it.We must configure the framework to have a failover timeout, in seconds. In this case, we allow failover to happen for up to a week. This means we’ve got a week to reconnect a new scheduler for this framework after shutting down the previous scheduler. This timeout should be set to help you survive a worst-case scenario when you need enough time to recover the system after a catastrophe. After this timeout, requests to register with the old
FrameworkIDwill be met with an error about registering a finished framework, and all tasks that were running under that framework will be killed.
Now, we need to update our registered scheduler callback to store the FrameworkID. The new version is shown in Example 4-15.
Example 4-15. Storing the FrameworkID
publicvoidregistered(SchedulerDriverdriver,FrameworkIDframeworkId,MasterInfomasterInfo){System.out.println("Registered with framework id "+frameworkId);try{curator.create().creatingParentsIfNeeded().forPath("/sampleframework/id",frameworkId.getBytes());}catch(KeeperException.NodeExistsExceptione){// Do nothing}}
We attempt to store the data of the
FrameworkIDto the predetermined location.If we catch this exception, it means that we’ve already created the node
/sampleframework/id. In this case, we’ll assume that means an earlier leader scheduler already stored the ID, so we’ll do nothing. If you’re using a different store than ZooKeeper, it may be more convenient to simply unconditionally store the ID every time, since it will never change.
Now, we’ve finally got a highly available framework with failover working.
Or at least, we would if the framework had any way to also synchronize its state with regard to which jobs are running.
To do this, we’ll need to add support for serializing and deserializing jobs from ZooKeeper.
We’ll store each job in ZooKeeper at /sampleframework/jobs/$jobid, where $jobid is the id field of the job.
Serialization can be trivially implemented via JSON.
Now that our framework is highly available, we don’t want to always have to provide the set of jobs it should run. In fact, we’d like to have our framework automatically pick up the monitoring of all previously provided jobs on the command line, and also optionally launch new jobs provided on the command line. To do this, we’ll load jobs both from the command line (if provided) and from ZooKeeper, as shown in Example 4-16.
Example 4-16. Loading job data
List<Job>jobs=newArrayList<>();if(args.length>1){byte[]data=Files.readAllBytes(Paths.get(args[1]));JSONObjectconfig=newJSONObject(newString(data,"UTF-8"));JSONArrayjobsArray=config.getJSONArray("jobs");for(inti=0;i<jobsArray.length();i++){jobs.add(Job.fromJSON(jobsArray.getJSONObject(i),curator));}System.out.println("Loaded jobs from file");}//Load jobs from ZKtry{for(Stringid:curator.getChildren().forPath("/sampleframework/jobs")){byte[]data=curator.getData().forPath("/sampleframework/jobs/"+id);JSONObjectjobJSON=newJSONObject(newString(data,"UTF-8"));Jobjob=Job.fromJSON(jobJSON,curator);jobs.add(job);}System.out.println("Loaded jobs from ZK");}catch(Exceptione){// Sample code isn't production ready}
We start by creating the
Listwe’ll store all theJobs in.We only run the original job loading code if a filename was passed on the command line.
The
getChildren()method in Curator allows us to get the names of all the child nodes of a path. These child nodes are saved after most state-changing methods, such aslaunch(),started(), andsucceed().For each job, we’ll fetch the serialized JSON representation from ZooKeeper.
At this point, we can use the original JSON processing code to deserialize the
Job. Note that we must provide everyJobwith a reference to the Curator now, since theJobs must serialize themselves.In real production code, you should probably handle exceptions.
We’ll also need to enhance our Jobs to be able to save their state, as shown in Example 4-17.
Example 4-17. Job serialization
publicclassJob{// Previously defined fields elidedprivateStringid;privatevoidsaveState(){JSONObjectobj=newJSONObject();obj.put("id",id);obj.put("status",(status==JobState.STAGING?JobState.RUNNING:status).toString());// Storing other fields omitted for brevitybyte[]data=obj.toString().getBytes("UTF-8");try{curator.setData().forPath("/sampleframework/jobs/"+id,data);}catch(KeeperException.NoNodeExceptione){curator.create().creatingParentsIfNeeded().forPath("/sampleframework/jobs/"+id,data);}}publicvoidlaunch(){// ... previous code omitted ...saveState();}// started(), succeed(), fail() are modified as above}
We need to include an identifier for each job, so that they can be looked up by a primary key in the database we sync them to.
We’ve added a method to save the state of the
Jobto an external store. In this case, we’re storing the JSON-formatted data to ZooKeeper.We need to make sure to store all the fields to the database.
We always store jobs that are in
STAGINGas if they were running. Since we can’t be sure whether a job in theSTAGINGstate has launched successfully, we’ll assume it succeeded during a failover, so that we’ll either get a newstatusUpdateif it finished in the meantime or aTASK_LOSTafter reconciliation.Curator’s API requires a different method to create a new ZooKeeper node and update its data.
We need to make sure to save the
Job’s state after every status update. Note that the addition ofsaveState()to the last line ofstarted(),succeed(), andfail()is omitted in this code, but this must be done for a working framework.
And there you have it! Our job scheduler is now able to automatically fail over to waiting hot spares without impacting the running jobs or losing track of them—well, almost.
Adding Reconciliation
It turns out that there are still situations in which things can fall out of synchronization: these cases are explained in “Reconciliation During Failover”.
This is the final piece missing from our robust, highly available Mesos scheduler.
Luckily, it’s easy to add reconciliation to a scheduler.
When implementing the statusUpdate() callback, you are mapping the Mesos state events to your framework’s state machine model.
As long as this state machine never moves out of the terminal states (e.g., TASK_LOST, TASK_FINISHED, TASK_KILLED, etc.), reconciliation shouldn’t require additional work.
Typically, you’ll want to run reconciliation periodically; I usually just run it on startup and every 30 minutes thereafter.
Reconciliation is a sort of catchall for any message loss—it ensures that even if some unknown bug or hardware failure causes your framework to fall out of sync with the state of the Mesos cluster, you’ll eventually correct that issue.
To reconcile, we will just generate a list of running tasks, along with the ID of the slave that they’re running on (for an explanation of why, see “Reconciliation During Failover”).
Then, we’ll invoke reconcileTasks().
Mesos will automatically send the responses to the statusUpdate() callback.
If you want to implement special handling of reconciliation-related status updates, you can check if the reason field of the status update is TASK_RECONCILIATION.
We don’t bother with that in our framework, because our framework’s task state machine is robust. Example 4-18 shows how to reconcile the running tasks.
Example 4-18. Reconciliation of running tasks
List<TaskStatus>runningTasks=newArrayList<>();for(Jobjob:jobs){if(job.getStatus()==JobState.RUNNING){TaskIDid=TaskID.newBuilder().setValue(job.getId()).build();SlaveIDslaveId=SlaveID.newBuilder().setValue(job.getSlaveId()).build();System.out.println("Reconciling the task "+job.getId());runningTasks.add(TaskStatus.newBuilder().setSlaveId(slaveId).setTaskId(id).setState(TaskState.TASK_RUNNING).build());}}driver.reconcileTasks(runningTasks);
Although we didn’t show the code for it, we must record the ID of the slave we believe each task is currently running on so that we can perform reconciliation.
At last, we have a complete implementation of a highly available Mesos scheduler that is robust to all kinds of failures: masters can crash, slaves can be disconnected from the network, and the scheduler itself can be killed and restarted. In spite of any of those problems, the framework will endure, continually tracking, monitoring, and ensuring its tasks complete successfully. We accomplished this through several means:
- Jobs over tasks
-
We separated the notion of a job that we’d like to run from the Mesos task. This allowed us to manage retries of a job, since the job’s success or failure wasn’t tied to a single attempt to run it. This conceptual framework works equally well for long-running services: a service is a goal to run some number of instances of a program; a task is an instance, but it could fail and be replaced with another task. If you’re interested in learning more about using goals to handle the reliability of scalable, distributed systems, this idea was pioneered by Joe Armstrong in his thesis on building reliable telephone systems.9
- Persistent framework identity
-
We enabled different schedulers to automatically fail over by storing the identity of our framework: the
FrameworkID. This is the one part of framework management that we must do out-of-band from Mesos, since it must be propagated in spite of failures even within Mesos itself. - Shared job state
-
Whenever we received updates about the state of a job, we synchronized those updates with our distributed store of choice, ZooKeeper. This ensured that newly elected leader schedulers would have the best possible information about the state of the cluster.
- Retries for jobs
-
Sometimes, a Mesos slave machine just doesn’t work: perhaps it was misconfigured, or perhaps another task running on that slave is affecting its neighbors through a type of resource that Mesos can’t isolate. To defend against these cases, we should always retry our actions. However, usually we also want to give up if a job keeps failing, since that may indicate a problem with the job itself.
- Reconciliation
-
Ultimately, things will go wrong that we didn’t predict. In an attempt to handle these events (or at least eventually recover from them automatically), we used the Mesos reconciliation API to periodically attempt to clarify our state. Although even reconciliation won’t handle every such issue, it is the best tool we have for handling unknown unknowns.
Advanced Scheduler Techniques
Although we’ve managed to implement a feature-complete, reliable scheduler, there are many other ways in which we could add features and robustness to our scheduler. In this section, we’ll discuss further improvements that production-quality schedulers should consider implementing.
Distributed Communication
In our Useless Remote BASH, we only handled new jobs when a scheduler that had just become the leader was passed a file containing JSON job descriptors. In real schedulers, we’ll want to be able to receive new jobs at any time. Most commonly, work will be communicated to our scheduler via an HTTP API.
If you decide to allow your scheduler to receive work over HTTP, it’s better if both the leader and hot spare schedulers are all able to process HTTP requests. This can be accomplished in several ways:
- Shared database
-
In this design, the leader and hot spare schedulers all are able to read from and write to a shared database. This way, they can all serve client requests. Whenever a client modifies the database, however, we must ensure that the leading scheduler is notified. Some databases support notifications; if your database doesn’t support this, the leading scheduler can frequently poll the database for updates so that it never lags too far behind the clients’ instructions. The other solution for notifications is to use the leader election subsystem to identify the current leader, and then make a remote procedure call (RPC) to that leader so that it updates itself.
- Redirect modification requests
-
HTTP already supports redirection. In this case, leader and hot spare schedulers can handle read-only requests, but requests that update the state of the framework can simply be redirected to the leading master with a 302 Found response.
- The data is the truth
-
This pattern is similar to the shared database pattern, but rather than providing an HTTP API, clients communicate directly with the data layer, and the scheduler is totally subservient to whatever data is in the data layer. For instance, if you used Redis or RabbitMQ as your data layer, any client could add work to it, and the leading scheduler would periodically poll for new tasks it needs to launch and replicate all status updates to the data layer.
In practice, most framework authors reach for ZooKeeper first. ZooKeeper is a great choice for many types of frameworks, for the following reasons:
-
It provides leader election primitives.
-
It stores arbitrary data.
-
It supports arbitrary transactions.
-
It’s highly available.
-
It can notify clients when data changes.
-
A Mesos cluster already has an instance.
ZooKeeper’s main downside is that it can’t scale to hundreds of thousands of data elements. For that use case, you’ll need to sacrifice the strong consistency it provides for other data stores like Cassandra, Redis, or MySQL.
Forced Failover
At some point, you may want to make a framework that automatically forces failover to a new scheduler. This could be useful in two cases:
-
Your scheduler knows what the current running version is and will trigger a failover if it is a newer version, to simplify the upgrade process.
-
Your scheduler starts out running on the user’s command line, but it actually creates a task on the Mesos cluster that will take over for the command-line tool. For example,
mesos-submit(now deprecated) did this.
If you want to trigger a failover, simply register your new scheduler with the existing FrameworkID.
When Mesos accepts the new scheduler’s registration, it will trigger the error() callback of the old scheduler, with the message Framework failover.
Unfortunately, this message string is the only way to distinguish a purposeful failover from an actual framework error.
Consolidating Offers
One issue that some schedulers run into is offer fragmentation.
Offer fragmentation occurs when multiple frameworks are connected to the Mesos cluster, and one of them launches multiple tasks of similar (but not the same) size.
Usually, the Mesos master can consolidate free resources from each host.
Fragmentation occurs when the master isn’t able to do so.
The root cause is that the various fractions of the resources are repeatedly being offered to different connected frameworks, and thus are never idle long enough to consolidate.
This can manifest as, for example, a host having eight offers with one CPU each, rather than one eight-CPU offer.
To solve this problem, your framework must change the way it handles offers: rather than immediately using or declining offers, it can hold on to them temporarily in order to wait and see if any more offers come in on those hosts.
Remember, when you call launchTasks, you can pass it as many offers for the same slave as you’d like (see the note Combining Offers following Example 4-5).
You can build offer consolidation as a form of middleware for your resourceOffers callback.
Instead of calling your original implementation of resourceOffers, first put all new offers into a map, keyed by slave, so that you can track all the offers for each slave.
Then, you can decide when to remove a group of offers from the map and pass them to your original resourceOffers callback.
When doing this, you should also make sure that you can’t accidentally hold on to an offer forever—you should still try to decline offers after a couple of minutes, to keep the whole cluster operating smoothly.
There are two broad classes of strategies for deciding when you should pass a group of offers along to the original resourceOffers implementation: you can pass along a group when it’s big enough, or when it’s been long enough.
If you choose the big enough strategy, you’ll need to keep track of the biggest task that you need to launch.
Then, when you finally receive enough offers on a single slave to satisfy the task, you can pass along the group of offers to the code that will launch the task.
If you choose the long enough strategy, you’ll also need to choose how long to hold on to an offer (typically, 15–60 seconds).
Then, when an offer is held for longer than the chosen time, you can pass all of that slave’s offers to your original resourceOffers, and hopefully that group will be big enough.
The benefit of the big enough strategy is that you’re guaranteed to launch your task when you find enough offers. The downsides are that you still need to worry about liveness (occasionally declining old offers), and you need to track the size of pending tasks. The strategy becomes even more complicated if you’d like to try to pack multiple tasks into an offer group, as you now need to keep track of many variables: the offers on each slave, the pending tasks, and the different ways those tasks could be packed into the offers.
On the other hand, the long enough strategy is simpler to implement: you don’t need to worry about the task sizes at all; instead, you are assuming that you will eventually receive enough offers during the time window you chose to satisfy any pending task. The downside of this strategy is that it could struggle to launch a very big task, since if you waited longer, you could’ve received the last necessary offer to succeed.
Ultimately, consolidating offers is not necessary until you reach a certain scale on your Mesos cluster. It is, however, good to know how to diagnose this problem, and how to design a solution to it. In production Mesos clusters I’ve operated, we’ve run into this problem and solved it successfully using the long enough strategy.
Fenzo, a Scheduling Library
Fenzo is a library released by Netflix in the summer of 2015. For Java-based schedulers, Fenzo provides a complete solution to offer buffering, multiple task launching, and hard and soft constraint matching. Many, if not most, schedulers would probably benefit from using Fenzo to compute task assignments, rather than writing the offer buffering, packing, and placement routines themselves.
Hardening Your Scheduler
In our example scheduler, we simply retry jobs on the next offer that we receive once they’ve failed. Often, some job won’t run on a particular host due to some uniquely broken aspect of that host. To protect against this type of repeated failure, you should track which hosts a job has failed on, and not retry the job on those hosts. In practice, this protects against all kinds of host misconfiguration.
A job not working on a particular host isn’t the only host-related issue you could encounter. Rarely (but what’s rare at scale?), you’ll get a black hole host: a host that causes every job it runs to fail, often extremely quickly. Black hole hosts will rapidly exhaust all the retries for all the jobs you’re trying to run, resulting in spurious failures that require manual intervention. To handle black hole hosts, you should track how many failures you’ve seen on each host in the past minute. If that number exceeds some predetermined target, then you should stop accepting offers from that host entirely. Some frameworks expect tasks to never fail (like long-running services), so seeing 20 failures from a single host in a minute bodes poorly for it. On the other hand, some frameworks complete thousands of tasks every second; for these, 20 failures on a single host in a minute would be totally normal, and so they’d only blacklist a host after thousands of failures in a short duration. Finally, when implementing a blacklist, make sure that you can receive notifications when hosts are blacklisted, and make sure that those hosts are automatically unblacklisted after a week. If you don’t automatically notify and later unblock these hosts, you could accidentally forget about them and leave those resources idling forever, costing money but not doing any work. Alternatively, you can use an automated system like Satellite to handle this situation for all frameworks.
Framework UI
Usually, frameworks have a web UI, since the browser is such a powerful platform for graphical interfaces.
The FrameworkInfo protobuf has a field called webui_url that should be set to the URL that the UI is available on.
When you set this field, the Mesos UI will make the framework’s name in the UI a link to the provided webui_url.
If you use this feature, you should either ensure that the webui_url is managed behind a load balancer, or update it in the FrameworkInfo every time a new scheduler becomes the leader.
Allocating Ports
We only used scalar resources in our scheduler (i.e., CPUs and memory).
Mesos also supports range-type resources, the most common of which is ports.
Mesos manages the ports on the cluster to ensure that each task that needs to listen on a socket binds to a unique port, and to ensure that tasks that require specific ports won’t start on slaves for which those ports are already in use.
The available ports are encoded as a list of [begin, end] pairs of available ports; to use them, you simply add the subranges you’re interested in as resources.
For example, in Example 4-19 we demonstrate a function, findNPorts, that finds N ports from the given offer and returns the resources that should be added to the TaskInfo that needs those ports.
Example 4-19. Port allocation
publicstaticResourcefindNPorts(Offeroffer,intn){intnumStillNeeded=n;Value.Ranges.Builderranges=Value.Ranges.newBuilder();List<Value.Range>availablePorts=null;for(Resourcer:offer.getResourcesList()){if(r.getName().equals("ports")){availablePorts=r.getRanges().getRangeList();}}while(numStillNeeded>0&&availablePorts!=null&&!availablePorts.isEmpty()){Value.RangeportRange=availablePorts.remove(0);longnumAvail=portRange.getEnd()-portRange.getBegin()+1;longnumWillUse=numAvail>=numStillNeeded?numStillNeeded:numAvail;ranges.addRange(Value.Range.newBuilder().setBegin(portRange.getBegin()).setEnd(portRange.getBegin()+numWillUse-1).build());numStillNeeded-=numWillUse;}if(numStillNeeded>0){thrownewRuntimeException("Couldn't satisfy "+n+" ports");}returnResource.newBuilder().setName("ports").setType(Value.Type.RANGES).setRanges(ranges.build()).build();}
We first find the
Ranges that contain the available ports.We will keep looking for ports as long as there are still available ports and we need them.
We will check the contiguous subranges one at a time.
The contiguous subranges are inclusive; thus, if the subrange is
[10-20], there are actually 11 ports available.When deciding how many ports to use from this subrange, we will never exceed how many we still need or how many are available.
Remember that the range is inclusive, and beware the off-by-one error!
It’s possible that we couldn’t find enough ports; better to blow up than return bad data.
Besides ranges, which can be tricky to work with, Mesos also has set-type resources.
Sets of resources currently only exist when defined on the slave command line.
They are represented as lists in the Resource protobuf, and they’re straightforward to use.
You can learn more about creating custom resource types in “Configuring Custom Resources”.
Checkpointing
Even though we should always strive to implement our frameworks to be robust against all kinds of errors, it’s actually possible to instruct Mesos to checkpoint status updates from tasks onto disk, in case the update coincides with a slave restart.
You can enable this by setting the checkpoint property of the FrameworkInfo to true.
This turns some slave crashes and restarts into unexceptional behavior.
I recommend always doing this, unless you expect to generate large numbers of status updates over short intervals.
Since checkpointing causes every status update to be written to disk, if you make thousands of status updates per second per slave, that would incur thousands of additional disk I/O operations per second per slave, which could degrade cluster performance.
You should benchmark your framework with and without checkpointing if you’re concerned about its performance impact; otherwise, it’s best to always use it.
CommandInfo
The CommandInfo protobuf describes how a process should be launched. We’ll examine CommandInfo’s two sides: fields related to launching a process, and fields related to setting up the environment for the process.
Launching a process
CommandInfo supports two ways to launch a process: through the execv syscall, and via the system’s default shell (such as Dash or Bash).
If you want to launch your process using execv, this will ensure that you can control the arguments to your process very precisely, and not worry about how shells interpret strings.
To launch the process directly, set the value to be the path to the executable, set the arguments to be the args array, and set shell to false.
If you’d like it to be launched via a shell, however (so that you can use shell operators like &&, ||, and | to compose programs), you must set shell to true, and then the entire contents of the value will be invoked by running /bin/sh -c "$value"; arguments are ignored for shell commands.
Configuring the process’s environment
Mesos allows you to control three additional aspects of the process’s environment: the user account that it runs as (via the user field, subject to the ACLs), the environment variables that the process sees (via the environment field, which is just a list of name/value pairs wrapped into a protobuf), and the filesystem state (via URIs).
This last parameter requires additional explanation: it allows you to specify any number of URIs that should be downloaded into the executor sandbox (the current working directory when the executor starts running).
You can choose whether those URIs should be executable, which is useful because you can instruct your CommandInfo to bootstrap and install the application’s binaries directly into the sandbox, obviating the need for a deployment system.
You can also specify whether to extract archive files, as Mesos understands those extensions and can download and unpack the application or additional resources automatically.
The extensions recognized are currently .tgz, .tar.gz, .tbz2, .tar.bz2, .txz, .tar.xz, and .zip.
By default, Mesos supports the URI schemes hdfs://, http://, https://, ftp://, ftps://, and file:// (for use with NFS or other networked POSIX filesystems), as well as any other URI schemes that the installed Hadoop client supports (Hadoop is not a required dependency, though, and hdfs:// will simply fail if it’s not installed).
You can add support for additional means of fetching binary dependencies by modifying src/launcher/fetcher.cpp accordingly.
Tip
The task’s sandbox is always available in the environment variable $MESOS_DIRECTORY.
Summary
In this chapter, we learned how to implement the scheduler component of a Mesos framework. The scheduler is responsible for launching tasks, monitoring those tasks, and interacting with the user. Many frameworks only need to implement a scheduler; all the functionality necessary to build most distributed, scalable, clustered applications can be implemented by orchestrating the launching of worker processes. We looked at a few example framework architectures, such as the pool of servers scheduler, work queue scheduler, and job processor scheduler. Then, we walked through the implementation of a job processor.
To build the job processor scheduler, we had to use a database, ZooKeeper, to persist the state of the application. Even though the scheduler API has many callbacks, we only needed to implement a handful of them to create a working system. We separated the notion of jobs (what the user wants to do) from tasks (code that Mesos runs on the cluster). This separation allowed us to easily build retries into our scheduler. The scheduler also needed a basic optimization, offer packing, in order to avoid being too slow.
Once the scheduler was up and running, we added high availability by combining an external leader election library, Curator, with additional features of the Mesos framework registration API. Unfortunately, once we gained the ability to fail over, we opened ourselves up to the possible loss of task status updates. To resolve this, we implemented task reconciliation, which allowed the scheduler to always behave correctly during planned and unplanned failover scenarios.
After learning how to implement a reliable Mesos scheduler, we discussed additional considerations for production-quality frameworks should. Since we usually have many instances of a scheduler running, and only one is the master, we looked at several designs for how clients can interact with the schedulers. We learned about offer fragmentation, what causes it, and some strategies to ensure that a framework never fails to find big enough offers. Besides CPUs and memory, many frameworks must allocate ports to their tasks: we learned about range-type resources, and how port allocation differs from CPU and memory scalar allocation. Finally, we briefly discussed issues such as building a user interface for a framework, hardening a framework against unknowns, and automating failovers during maintenance.
At this point, you’re fully equipped to write a Mesos framework that can launch and monitor tasks, handle various types of failures and unexpected scenarios, and operate efficiently on your cluster. Next, we’ll learn about how to increase the capabilities of frameworks by implementing custom executors, which will allow things like dynamically resizing containers and allowing tasks to share resources.
1 The name of this framework refers to it hardcoding the command that it runs; as an example of how to work with the Mesos APIs, it is very useful.
2 Some projects to watch for purely native Mesos bindings are Jesos for Java, Pesos for Python, and Go bindings for Go.
3 NP-completeness is out of scope for this book, but you can start with the Wikipedia article.
4 This is also outside the scope of this book; for more information, see the Wikipedia page on the knapsack problem.
5 There’s ongoing work to enable etcd as a ZooKeeper alternative. The issue is tracked on the Apache Mesos Jira as MESOS-1806.
6 The examples in the book are written against Curator 2.7.1, using curator-framework and curator-recipes.
7 Somewhat confusingly, the Apache Curator’s API is also called a framework; however, it’s completely unrelated to Mesos frameworks!
8 Operations that are idempotent have the same effect no matter whether you do them once or a thousand times. When building distributed systems, trying to make as many operations idempotent as possible reduces the chances of race conditions or unpredictable behavior when the network reorders and drops messages.
9 Joe Armstrong, the author of Making reliable distributed systems in the presence of software errors, is also the creator of Erlang. Even though most of us aren’t using Erlang, his ideas about goal-oriented programming and supervision pervade all reliable distributed systems, including Mesos and its close cousin from Google, Borg.
Get Building Applications on Mesos now with the O’Reilly learning platform.
O’Reilly members experience books, live events, courses curated by job role, and more from O’Reilly and nearly 200 top publishers.

