Chapter 5
Development Process for Cross-Platform Apps
IN CHAPTER 4 you walked through the application’s entire user interface and reviewed the wireframes/mockups for it. You reviewed the high-level features of the overall application. The next step is to write some code!
Because the most important piece of functionality for the cross-platform social photo-sharing application that you’re building in this book is integration with the camera, this chapter jumps right into the camera functionality so you can see some immediate value in the product you’re building.
When adding new functionality into Alloy applications, the usual pattern is to introduce new files for all of the components of the Model-View-Controller framework you read about in Chapter 3.
Creating the Project for This Chapter
To create the project you’ll use in this chapter, you need to open Titanium Studio and create a new project. If you are unfamiliar with this approach, review Chapter 2, where new project creation is covered.
Select File ⇒ New ⇒ Titanium Project, as shown in Figure 5-1.
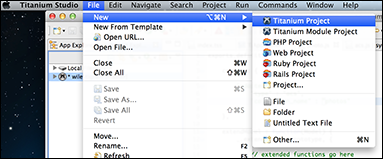
Figure 5-1: Creating a new Alloy project in Titanium Studio.
Figure 5-2 shows the window where you need to enter a project name and application ID. Be sure to check the Automatically Cloud-Enable this Application option. Then click Next.
Figure 5-2: Setting project-specific properties when creating a new project.
Be sure to ...
Get Building Cross-Platform Apps using Titanium, Alloy, and Appcelerator Cloud Services now with the O’Reilly learning platform.
O’Reilly members experience books, live events, courses curated by job role, and more from O’Reilly and nearly 200 top publishers.

