Chapter 4. Building A Game
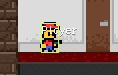
In the following chapter, we are going to build a game called Resident Raver, in which the player controls an unnamed hero who is trying to escape a college dorm overrun by raver zombies. The hero has several weapons at his disposal to help him escape, while also navigating platform-based obstacles. I have gone ahead and created all the assets you will need for the final game.
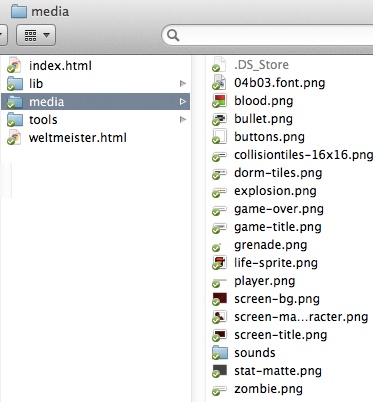
Before moving onto the next section, make sure you copy over the contents of the media folder that is included in the book’s example files folder. This will contain all the assets you will need for the rest of the book. In it you will find sprites, map tiles, and sounds.
It’s okay to replace the default media directory with the one we will be using for this book.
Creating Our First Level
Now that we have learned about creating graphics for our game, we
can start building our first level. Let’s open up Weltmeister and create a
simple level. When you open up Weltmeister for the first time, you will
see that an untitled.js file has been
created for you, but that the level is empty. Before we can even start
creating our level, we will need to add our map tile sprite sheet. Create
a new layer and call it main. This is
where we will start drawing our level. You can create this new layer by
clicking the plus icon on the top right of the screen next to the Layers
label.
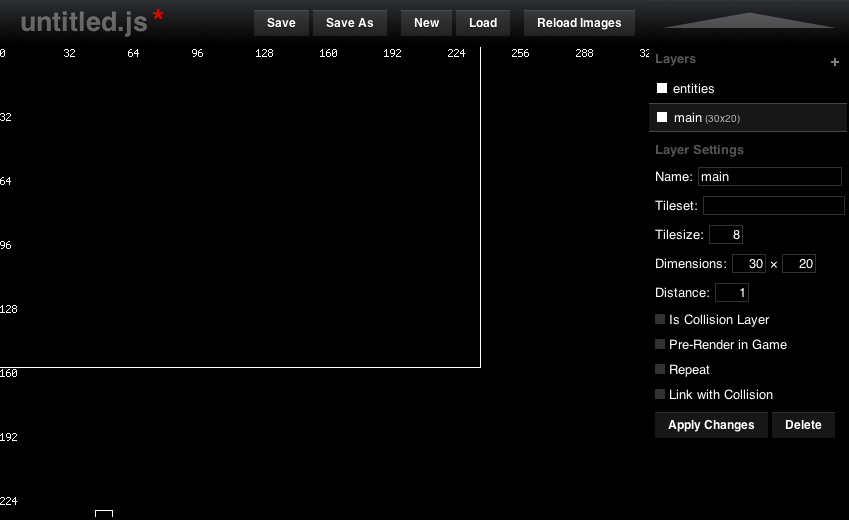
When a new layer is created, its bounding box will be displayed showing the borders of the layer. You can’t draw tiles outside of this box. This is based on the layer’s dimensions, which are configured as part of the layer’s properties. Here is a summary of what each property represents:
- Name
This is the name of the layer. It can be anything you want.
- Tileset
This is the path to the Tileset image file you want to use for this layer. Clicking on this property will bring up a list of directories in your project file.
- Tilesize
This represents the size of each tile in your sprite sheet. By default, it is set to 8.
- Dimensions
This represents how large the layer is. By default, it is set to 30×30 tiles. Since tiles are set to 8 pixels by default, this layer is 240×160 pixels.
- Distance
This is the distance from the camera, similar to Z index in HTML. This is useful for background layers you want to scroll at a different speed than the foreground layers to create a parallax scrolling effect.
- Is Collision Layer
This toggle allows you to use the layer for collision detection, which we will cover later on.
- Pre-Render In Game
This will pre-render your map, which can help increase the performance of your game, especially on mobile devices, but you will not be able to have animated tiles.
- Repeat
This is also a background layer property that allows you to repeat your layer when it scrolls by in the background. Think of this more as a texture that is repeated inside of the layer.
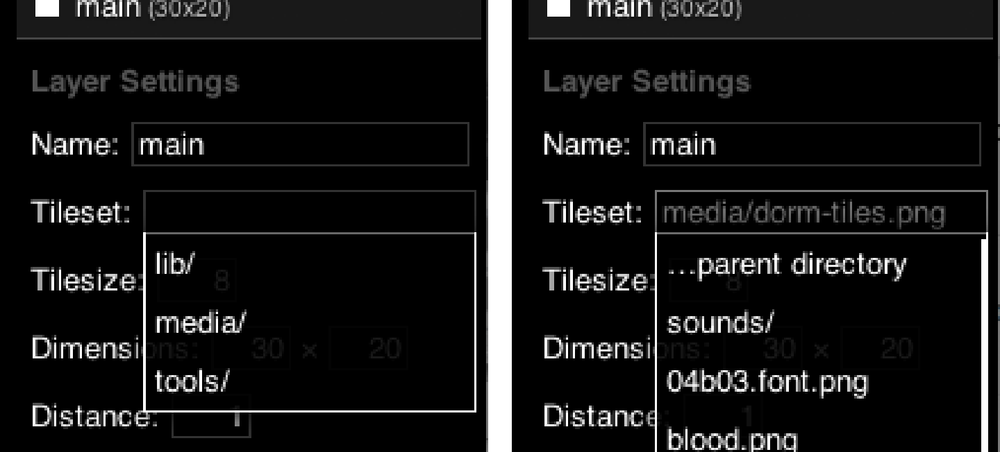
Now we are ready to make our first level. Let’s click on the Tileset
field and select our map tiles. After clicking on the Tileset input field,
you should see the root directory of your project from a drop-down menu,
as seen in Figure 4-3.
Select media, and there you can select dorm-tiles.png. You will also need to set the
Tilesize to 16. Make sure to apply the changes so your selections are
saved.
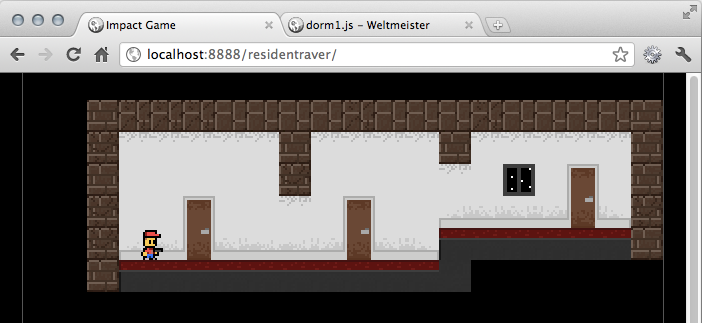
Now, click inside the map editor and press the space bar to bring up the tile painter (Figure 4-4).
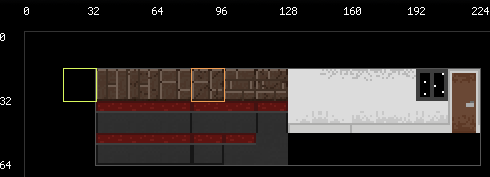
The tile painter is very easy to use. While your tile set is visible, simply select the tile you want to use by clicking it with your mouse. The tile set will disappear and you will now be able to place your selected tile by clicking anywhere in the layer. You can also click and drag to create many tiles of the same artwork. When you want to change tiles, press the space bar again, select a new tile, and resume clicking to place the new tiles.
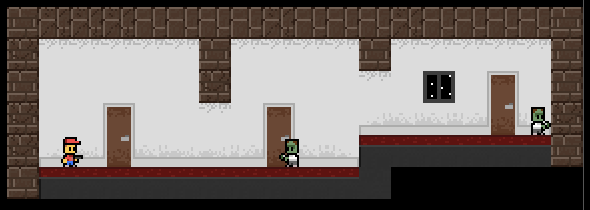
Notice the yellow box at the beginning of your sprite sheet that looks empty? Selecting this allows you to erase tiles you have already painted. Weltmeister automatically creates the empty tile for you so you don’t need to add it to your sprite sheet. Let’s draw the foundation of our level, shown in Figure 4-5.
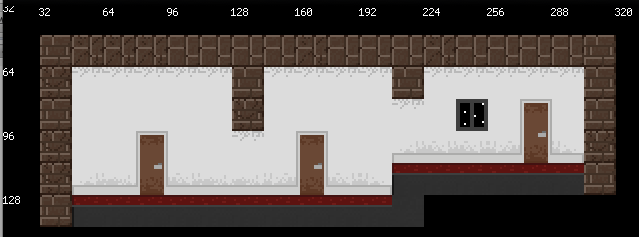
Note
When you start creating your own level, feel free to experiment with the tiles and add some variety to your textures. You don’t have to follow this example 100%, but I wanted to create something that was quick to make and had two different ground heights to it. It’s also important to note that I never start my maps at exactly 0,0, in case I need more space at the top of the lefthand side later on.
I know this level doesn’t look very exciting yet but, don’t worry, we will get into more complex level creation later on.
Saving/Loading Maps in Weltmeister
Save your map by hitting Save at the top of the editor. You will
notice that, by default, Weltmeister wants to put levels in the lib/game/levels/ directory. This is very
important, because this is where Impact will automatically look for your
game’s levels. Later on, we will be able to simply tell Impact to load
your level by name instead of having to pass it the full directory
path.
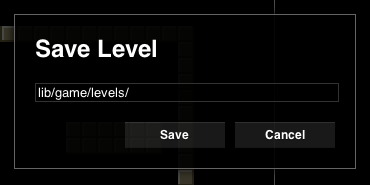
Let’s name our level dorm1.js.
Note that we have to add the .js file
extension to our level. The level file is actually a JSON file. The editor
will give you an error if you forget to add the correct extension.
Note
It’s important to note that you will need to have PHP set up in order to save. The editor itself is built with JavaScript, but the save API uses PHP. This should be handled automatically if you’re using the recommended MAMP or XAMP applications discussed in Chapter 1.
You can also easily load any level you have created by selecting Load from the top menu.
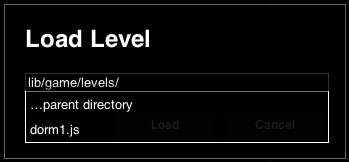
You will see a list of all the maps you have created. By default, Weltmeister automatically attempts to load the last level you were working in.
CollisionMaps
Now that we have our level’s tiles in place we need to set up a
collision layer. This tells Impact what tiles are passable and impassable
to the game’s entities. To set this up, we need to create a new layer
called collision and set the Tilesize
to 16. Now, you can select Is Collision
Layer from the layer options, and a default set of collision
tiles will automatically be loaded for you. Once you have the collision
layer in place, let’s start painting.
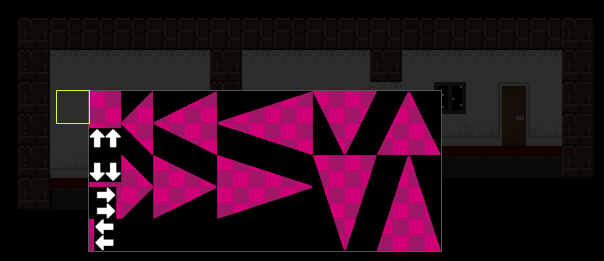
As seen in Figure 4-8, there are a lot of different collision tiles for us to choose from. Most of these tiles help support collisions with slopes. We are going to focus on the first solid tile, which is the pink square in the upper-left corner. Let’s paint on top of our main level’s walls.
Usually, I put the collision layer underneath the main layer. You can reorder layers at any time by simply dragging them around. Now, when we create our player and monsters, Impact will make sure they don’t fall through the floor.
It looks like we are finally ready to start building our game!
The Main Class
When setting up a new Impact project from the template project, you
will see a main.js file in your game
directory. The main class is the entry point to your application and will
contain some of the core logic, such as binding keyboard events and logic
for making the camera follow the player. Most importantly, the main file
also defines and loads any required files or global functions in your
game. Here is the default main.js class
you will start with:
1    ig.module(
2        'game.main'
3    )
4    .requires(
5        'impact.game',
6        'impact.font'
7    )
8    .defines(function(){
9
10        MyGame = ig.Game.extend({
11
12            // Load a font
13            font: new ig.Font( 'media/04b03.font.png' ),
14
15
16            init: function() {
17                // Initialize your game here; bind keys etc.
18            },
19
20            update: function() {
21                // Update all entities and backgroundMaps
22                this.parent();
23
24                // Add your own, additional update code here
25            },
26
27            draw: function() {
28                // Draw all entities and backgroundMaps
29                this.parent();
30
31
32                // Add your own drawing code here
33                var x = ig.system.width/2,
34                y = ig.system.height/2;
35
36                this.font.draw( 'It Works!', x, y, ig.Font.ALIGN.CENTER );
37            }
38        });
39
40
41        });
42
43
44    // Start the Game with 60fps, a resolution of 320×240, scaled
45        // up by a factor of 2
46        ig.main( '#canvas', MyGame, 60, 320, 240, 2 );
47
48    });
49
Let’s take a moment to go through some of the high-level code.
ig.module(
    'game.main'
)
The above code represents the namespace of your game. As you can see, this also defines the name of your main class.
.requires(
    'impact.game',
    'impact.font'
)
The first block of code above defines the class name and, as a result, file name of the module. The second block specifies which classes are needed by the game. Our main class will inherit from the Game class, and the Font class will be used to instantiate a font we’ll use for onscreen text display. These classes will automatically load when your game is run for the first time.
Next, everything in the .defines(function(){ ... }) block of code is
your game logic. As you can see, Game is extended as described, and the
Font class is used to populate a property called font with the font class and its font sprite
sheet:
.defines(function(){

    MyGame = ig.Game.extend({

          // Load a font
          font: new ig.Font( 'media/04b03.font.png' ),
Then, we define some scaffolding code for init(), update(), and draw(). The draw() method is the only one with executable
code in it. The default class needs to re-render the font on each draw
call, so this default code simply gets the x,y position of where the text field should go,
so the engine knows where to draw the font graphic.
Before moving on, there is one more thing that is important to
highlight from the last few lines of the main.js file:
    // Start the Game with 60fps, a resolution of 320×240, scaled
    // up by a factor of 2
    ig.main( '#canvas', MyGame, 60, 320, 240, 2 );
});
This is the code that initializes your game. As you can see, we pass
the ID of the Canvas element to our game’s constructor, a name for our
game instance, and the frame rate and size into the ig.main constructor. The last value of 2 represents the scale of your game. This will
upscale all of your game’s graphics by 2.
Customizing the Main Class
To get started, let’s delete the font code from the draw method, but
make sure you leave this.parent(). We
can also now delete the font variable from the beginning of the
class.
Now with the “It Works!” text removed, the first thing we want our
game to do when it starts is load the level we just created. Change the
.requires(...) block to load the
level:
.requires(
    'impact.game',
    'game.levels.dorm1'
)
Unfortunately, if you refresh your game, nothing is going to
display. We will need to tell the game to load our level. Add the
following code to your init()
method:
init: function() {
    this.loadLevel( LevelDorm1 );
},
Now, refresh your game.
Key Binding
Impact has an easy-to-use input class, ideal for capturing keyboard
input, which can be found in the ig.input namespace. To capture keyboard events,
we will need to bind the key press event to the desired key in the input
class. Let’s put the following code at the beginning of the init() function in main.js, just above our load level code:
// Bind keys
ig.input.bind( ig.KEY.LEFT_ARROW, 'left' );
ig.input.bind( ig.KEY.RIGHT_ARROW, 'right' );
ig.input.bind( ig.KEY.X, 'jump' );
ig.input.bind( ig.KEY.C, 'shoot' );
For our game, we are going to track the left and right arrows along with the X and C keys. This is the first step in setting up controls for your game. In a little while, we’ll set up code to react to the left, right, jump and shoot commands those keys will trigger.
There is a list of constants that contains all the keys Impact can
use in the ig.KEY class. To use them,
simply apply a custom label to a key so that when we poll for input during
game play, we will be able to react to the desired event when each key is
pressed.
Creating the Player Class
The player will be the first entity we build for our game. Entities
are anything that exist in the level that are not part of the map.
Monsters, bullets, doors, triggers, etc., are all considered entities. Our
player class will extend the core entity.js class so it can inherit some basic
behavior to get us started. Let’s begin by creating a new player.js file in the lib/game/entities directory.
Now, add the following code to our file:
1    ig.module(
2        'game.entities.player'
3    )
4    .requires(
5        'impact.entity'
6    )
7    .defines(function(){
8        EntityPlayer = ig.Entity.extend({
9
10        });
11    });
This is the basic structure for creating entities in Impact. As
discussed previously, we define the module name and reference any required
classes, then define the class itself, extending ig.Entity. At this point, however, nothing will
happen if you refresh your game. We still need to set up the player and
add it to the level. To do that, let’s add some properties to this
class.
Using Your Sprite Sheet
Start by setting up an animation sheet. Add the following to the
EntityPlayer code block:
EntityPlayer = ig.Entity.extend({
    animSheet: new ig.AnimationSheet( 'media/player.png', 16, 16 ),
});
This tells our player that it will use player.png in the media folder and that its
tiles are 16×16. We are also going to need to define some values for the
size and offset of the player. We’ll add the following underneath where
we set up our animation sheet:
size: {x: 8, y:14},
offset: {x: 4, y: 2},
flip: false,
The size property represents
the actual size of the player. The offset property describes any change in the
player size needed to make collisions more accurate. In this case, we’re
offsetting the bounding box used for collisions by 4 pixels on the left
and right, and 2 pixels on top and bottom. By making the collision area
smaller than the sprite, we can better account for the transparent space
around the graphic. Finally, we don’t flip the player, so it remains
oriented in its original direction.
Adding Simple Physics
Next let’s set up some physics properties, such as velocity, friction, rate of acceleration in the ground and air, and jump strength.
maxVel: {x: 100, y: 150},
friction: {x: 600, y: 0},
accelGround: 400,
accelAir: 200,
jump: 200,
These properties define how our player can move in the environment. Impact handles all of the physics calculations for us. Once we get the player up and running, you should feel free to tweak these values to see how they affect your game.
Defining Animation Sequences
With the player’s core values out of the way, we can look into
setting up animation sequences. Create an init() method underneath where we defined the
properties in the player class and add the following code to it:
init: function( x, y, settings ) {
    this.parent( x, y, settings );
    this.addAnim( 'idle', 1, [0] );
    this.addAnim( 'run', 0.07, [0,1,2,3,4,5] );
    this.addAnim( 'jump', 1, [9] );
    this.addAnim( 'fall', 0.4, [6,7] );
},
This function passes the x,y
and settings values up to the
parent’s init() method. This is very
important, since entities need to know their starting x,y positions and any settings assigned to
them when being created in the level. You can also pass in additional
values through the level editor, which get attached to the settings object during the construction of the
entities.
As discussed earlier, it’s easy to set up animations. Use the
entity class’s addAnim() method and
pass it an ID (or name) for the animation, along with the duration and
an array for the frames from the sprite sheet. Before we move on, let’s
make sure your player class looks like this:
1    ig.module(
2        'game.entities.player'
3    )
4    .requires(
5        'impact.entity'
6    )
7    .defines(function(){
8        EntityPlayer = ig.Entity.extend({
9            animSheet: new ig.AnimationSheet( 'media/player.png', 16, 16 ),
10            size: {x: 8, y:14},
11            offset: {x: 4, y: 2},
12            flip: false,
13            maxVel: {x: 100, y: 150},
14            friction: {x: 600, y: 0},
15            accelGround: 400,
16            accelAir: 200,
17            jump: 200,
18            init: function( x, y, settings ) {
19                this.parent( x, y, settings );
20                // Add the animations
21                this.addAnim( 'idle', 1, [0] );
22                this.addAnim( 'run', 0.07, [0,1,2,3,4,5] );
23                this.addAnim( 'jump', 1, [9] );
24                this.addAnim( 'fall', 0.4, [6,7] );
25            }
26        });
27    });
At this point, we are ready to switch back over to Weltmeister and
add our player. When you load the editor back up, you should see our
dorm1.js level. If it’s not there,
simply load it up manually. When you load the level, the entities layer
should automatically be highlighted. This layer works just like the
other layers we created, so move over to the Canvas area and press the
space bar to see the list of entities you can add to the level. Right
now, you should see the player from the drop-down menu.
Select the player and add him to the level. You can place him anywhere for now; I put mine on the far left of the level. Also, make sure you hit Save once you are happy with your player’s start position.
It’s also important to note that as of version 1.19 of Impact, you
no longer need to add each entity to your game’s requires block; it is now automatically
handled for you when the level is loaded. Now you are ready to test out
your game. Go to your browser and hit refresh.
You should now see your player in the game, but you will not be
able to move him. Let’s fix that. Go back into the player.js class and add the following update() function:
update: function() {
    // move left or right
    var accel = this.standing ? this.accelGround : this.accelAir;
    if( ig.input.state('left') ) {
          this.accel.x = -accel;
          this.flip = true;
    }else if( ig.input.state('right') ) {
          this.accel.x = accel;
          this.flip = false;
    }else{
          this.accel.x = 0;
    }
    // jump
    if( this.standing && ig.input.pressed('jump') ) {
          this.vel.y = -this.jump;
    }
    // move!
    this.parent();
},
Note
As you continue adding code to your game, always make sure there is a comma to separate new functions, or you may get an error when you try to preview your code.
Now, you are ready to refresh the game and test out moving the
player. As you can see, we can move our player, but he doesn’t animate
or fall off ledges. We are going to need to set the gravity of the game.
We can do this in main.js. Add the
following property to that class:
MyGame = ig.Game.extend({
    gravity: 300,
    init: function() {
Now, if you go back to your game, you will be able to jump and
fall off ledges. When you test it out, though, you will not have a
clean-looking fall animation. Let’s add in some additional code to keep
track of the player’s velocity in order to show the correct animation
such as jump, fall, idle, and run. This should go below our jump code in
the player.js class:
// set the current animation, based on the player's speed
if( this.vel.y < 0 ) {
    this.currentAnim = this.anims.jump;
}else if( this.vel.y > 0 ) {
    this.currentAnim = this.anims.fall;
}else if( this.vel.x != 0 ) {
    this.currentAnim = this.anims.run;
}else{
    this.currentAnim = this.anims.idle;
}
Now, we should be able to jump and run with corresponding
animation, but there is one thing missing. We need a way to tell the
player to flip his animation based on the direction he is running. We
can do this by adding the following code just before the this.parent() call in the player.js update function:
this.currentAnim.flip.x = this.flip;
Now we have a fully functional player. Let’s give it one more test and make sure everything works. At this point, our level is kind of boring—so let’s add a few monsters to the game.
Creating a Monster Class
Creating a monster is similar to creating a player. In fact, we are
going to use the same basic class
code but change its name and namespace. Create a new file called zombie.js in the entities
folder.
Now, copy the following code into the monster class:
1    ig.module(
2        'game.entities.zombie'
3    )
4    .requires(
5        'impact.entity'
6    )
7    .defines(function(){
8        EntityZombie = ig.Entity.extend({
9
10        });
11    });
As you can see, we simply changed the entity name and class name, but everything else is the same as the code we used to start the player class. Now we are ready to add our monster’s animation and set its initial properties:
animSheet: new ig.AnimationSheet( 'media/zombie.png', 16, 16 ),
size: {x: 8, y:14},
offset: {x: 4, y: 2},
maxVel: {x: 100, y: 100},
flip: false,
Now we need to set up the animations just like we did for the
player. This is a simple monster, so there are only a few sprites
representing its animation. Let’s create a new init() method with the following code:
init: function( x, y, settings ) {
    this.parent( x, y, settings );
    this.addAnim('walk', .07, [0,1,2,3,4,5]);
},
With our default animation in place, we can start adding instances of the monster to test the level. Let’s switch over to Weltmeister, select the entities layer, and then add a monster by clicking into the layer and pressing the space bar, just as we did when adding the player. You can then click on the map to add the monster where you want it.
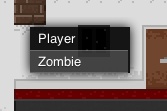
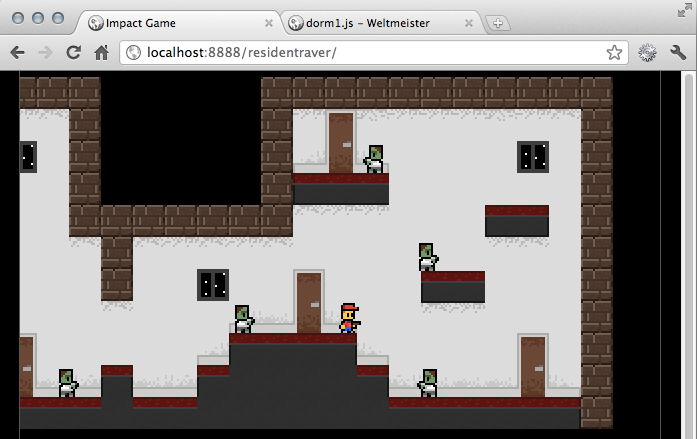
Feel free to add a few of them, as shown in Figure 4-16.
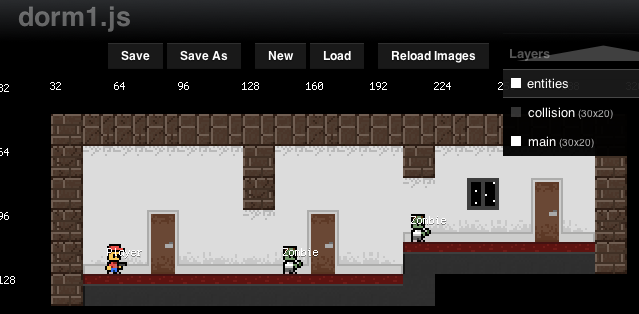
Once you have done this, refresh the game in your browser and you
should see your new monsters. We haven’t added any movement logic yet, so
they don’t do much right now. Let’s add some basic code to make them walk
back and forth, but be smart enough not to fall off ledges. We’ll need to
create an update function that will
handle the basic movement logic or AI (Artificial Intelligence) for our
monster:
update: function() {
    // near an edge? return!
    if( !ig.game.collisionMap.getTile(
          this.pos.x + (this.flip ? +4 : this.size.x −4),
               this.pos.y + this.size.y+1
          )
    ) {
          this.flip = !this.flip;
    }
    var xdir = this.flip ? −1 : 1;
    this.vel.x = this.speed * xdir;
    this.currentAnim.flip.x = this.flip;
    this.parent();
},
This function tests to see if the monster hits anything in the
collision map. If it does, we toggle the value of the class flip property. After testing, the direction and
velocity are updated before this.parent() is called. We will also need to
define the monster’s friction and speed. You can add that toward the top
of the class just under where we define the flip property:
friction: {x: 150, y: 0},
speed: 14,
Refresh the game to take a look at it in action. You will see the monster instances moving around, and when they hit the edge of a ledge, they flip and go the other way.
We just need to add a few more lines of code to clean this up. Add
the following block of code to the end of your defines() function:
handleMovementTrace: function( res ) {
    this.parent( res );
    // collision with a wall? return!
    if( res.collision.x ) {
          this.flip = !this.flip;
    }
},
This helps make sure that if a monster runs into a wall, that it
also turns around. Collisions with walls and the collision map are handled
through the handleMovementTrace
function. Now we have covered all our bases and made sure our zombies will
not fall off ledges or platforms, but we still have one issue. There is no
collision detection between the monster and the player.
Before we get into adding more code to the monster, we need to talk a little bit about entity-based collision detection in Impact.
So far, we’ve handled simple interactions with walls and platforms manually. However, Impact has built-in collision detection that we can use for interaction between our entities. That is, we can focus on setting up collision relationships instead of creating all that collision code from scratch. Let’s look a little closer at how we can use Impact to do this work for us.
Collision Detection
Since Impact has built-in collision detection, we can focus on setting up collision relationships instead of creating all the necessary code from scratch. Impact’s collision detection is based on bounding boxes. A bounding box is an imaginary rectangle around a sprite. If a sprite is 16×16 pixels, the box around it would be the same size. During a bounding box collision text, two entity’s boxes are overlapping. This kind of collision detection is incredibly fast and covers a good portion of the use cases you will probably need.
Note
It is important to note that one of the issues with bounding box
collision is that it doesn’t take into account any transparent space
around your sprite. This is why we had to tweak the size and offset values of our entities to help make our
collision look as clean as possible.
Let’s take a look at how we can add collision detection to entities in our game.
type Property
The .type property allows us to
group entities when doing collision detection. For example, you might
assign all friendly entities to one group, and all enemy entities to
another group. This way, you can set up your file so neither group will
collide with their own types, but friendlies will collide with enemies,
and vice versa. There are three .types
in Impact that you can reference using their constant values:
ig.Entity.TYPE.NONE
ig.Entity.TYPE.A
ig.Entity.TYPE.B
By default, all entities are set to NONE. The other two groups are left open for
your own needs. So, for instance, you can set all friendly entities to
TYPE.A and hostile entities will check
for collisions with TYPE.A only.
checkAgainst Property
The .checkAgainst property tells
an entity which type property to check
for when it collides with another entity. An entity can check for four
types during the collision:
ig.Entity.TYPE.NONE
ig.Entity.TYPE.A
ig.Entity.TYPE.B
ig.Entity.TYPE.BOTH
The default value is always set to NONE. When two entities overlap, the .checkAgainst property of one entity is compared
with the .type property of the other.
If there is a match, the first entity’s check() method is called, and the latter object
with which it collided is sent to the method as a parameter. You can
customize the check() method to respond
to such a collision
This example, which we’ll discuss in greater detail in a moment, shows damage applied after such a collision:
check: function( other ) {
    other.receiveDamage( 10, this );
}
collides Property
The final part of collision detection we need to learn about is the
.collides property. This property
determines how the entity collides with other entities. It’s important to
note that this is independent of the collision map. This is strictly an
entity-to-entity collision event. There are several types of collision
property values:
ig.Entity.COLLIDES.NEVER
ig.Entity.COLLIDES.LITE
ig.Entity.COLLIDES.PASSIVE
ig.Entity.COLLIDES.ACTIVE
ig.Entity.COLLIDES.FIXED
By default, the collides property
is set to NEVER, which ignores all
collisions. FIXED is used for objects
such as walls and platforms that won’t move as a result of a
collision. It’s important to note that entities with a FIXED collides property may still move, just not
when colliding with another entity. Elevators and moving platforms are
good examples of this situation.
The remaining three collides
values determine which entities move after a collision. If two ACTIVE entities collide, they will both move
apart. The same is true when ACTIVE and
PASSIVE entities collide, but the
PASSIVE collides value exists so that
entities of similar types can overlap without causing a resulting
movement. So, when a PASSIVE entity collides with another
PASSIVE entity, neither is moved by the
collision.
Finally, where FIXED describes a
“strong” entity that never moves away from a collision, LITE is used to specify a “weak” entity—one
which always moves away from a collision.
Now that we have covered the collision properties entities have,
let’s start setting up our own player and monster to have collision
detection. Open up the player.js class
and add the following properties:
type: ig.Entity.TYPE.A,
checkAgainst: ig.Entity.TYPE.NONE,
collides: ig.Entity.COLLIDES.PASSIVE,
Here, we are setting up all three collision properties for the
player. We assign the player to TYPE.A,
which will represent our friendly group. Next, we’ll set .checkAgainst to NONE. In our example, we’ll let the monster
handle the collisions and, as shown in the previous section, apply damage
to the player. Finally, we’ll set .collides to PASSIVE. This will prevent overlaps with another
PASSIVE entity moving either entity as
a result of the collision.
Now it’s time to set up our monster. Open up the zombie.js class and add the following:
type: ig.Entity.TYPE.B,
checkAgainst: ig.Entity.TYPE.A,
collides: ig.Entity.COLLIDES.PASSIVE,
We are setting our monster to the enemy group, which is TYPE.B. Since the player belongs to group
TYPE.A, we will check against that
group for collisions. And finally, we also set the enemy .collides property to PASSIVE. This will allow us to react when a
collision is detected with the player, but because both entity .collides properties are set to PASSIVE, Impact won’t automatically move either
of the players due to the collision.
If you tested your game now, it would appear that no collisions
occur. This is because we set the collides property for all entities to
PASSIVE, and Impact won’t adjust the position of either entity after a
collision. We need to add some more code in the monster class to handle
the collision when it is detected. Add the following method to the
zombie.js class:
check: function( other ) {
    other.receiveDamage( 10, this );
}
You may recall during the discussion of the .checkAgainst property that this code applies
damage to the entity the monster collides with. Remember that the
colliding entity is passed to the function as an argument (other). This code executes Impact’s built-in
receiveDamage() method in the player
entity, and passes a value of 10, as well as a reference to the monster,
to the player. The end result is that the player will lose all his health
(10 points, by default).
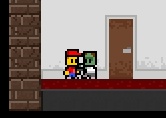
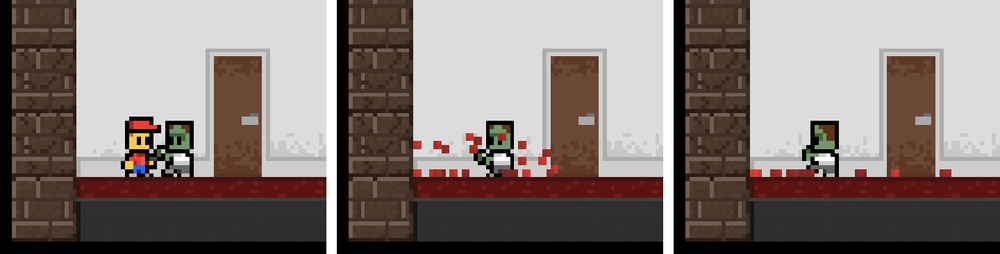
Now, if you test the game, when the player hits a monster, he should be immediately killed. Visually, the player just disappears, since we haven’t created a death animation (see Figure 4-19.
Next, we will discuss health.
Health
Each entity has a health property. By default, this is set to 10.
This value is incredibly useful if you are taking advantage of the
built-in receiveDamage() method to
subtract an entity’s health. To change an entity’s initial health, you can
simply set this value in your class’s properties like so:
health: 20,
If we applied this to our player now, there would be no apparent change. Multiple collisions occur when passive entities overlap, because Impact doesn’t automatically resolve their positions and push the weaker entity away. In the next section, we’ll introduce weapons, and later you can tweak this value in the monster class to get a better result. For now we can just leave it as is.
Weapons
Right now, our player is defenseless. As soon as he hits a monster,
he dies, and there is no way for the player to kill a monster. Well, that
is about to change. One way to add a weapon is to create a new entity
class. Weltmeister will then offer it as an option when placing entities
on the map—convenient if you want to place weapons the player can pick up
during the game. However, if your player will have access to the weapon
throughout the game, you can keep Weltmeister’s menu options simple by
creating an inner class within the player.js file.
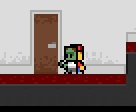
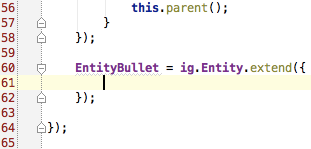
Let’s find the player class’s closing blocks around line 59. Between the two closing block tags is where we will put our inner class:
EntityBullet = ig.Entity.extend({

});
Now you should have your bullet entity just before the end of the
player.js class as shown in Figure 4-20.
Now we are ready to customize our player’s weapon.
As you can see, our EntityBullet
is just like any other entity you have created. It extends ig.Entity, which means it has all the same
inherited properties and methods as our player and monster. Basically, we
are going to spawn a new bullet every time the player presses the fire
button and, based on which way the player is facing, the bullet entity
will move in that direction. When the bullet hits a wall or monster, it
will remove itself and, in the case of a monster, apply damage. Let’s
start by adding a few properties to our bullet:
size: {x: 5, y: 3},
animSheet: new ig.AnimationSheet( 'media/bullet.png', 5, 3 ),
maxVel: {x: 200, y: 0},
This will set up our bullet’s size, graphic, and maximum velocity.
It’s important to note that our bullets don’t have y velocity since they only move horizontally.
Also, we need to make sure our bullet can move faster than the player. We
don’t want to fire our gun and run into or beyond our bullet as it flies
through the air. Next, we will need to set up some collision information
for the bullet:
type: ig.Entity.TYPE.NONE,
checkAgainst: ig.Entity.TYPE.B,
collides: ig.Entity.COLLIDES.PASSIVE,
As you can see, we are going to have our bullet test for TYPE.B entities, and its collides property is
set to passive so it doesn’t displace entities it collides with. Now we
can add our init() method:
init: function( x, y, settings ) {
    this.parent( x + (settings.flip ? −4 : 8) , y+8, settings );
    this.vel.x = this.accel.x = (settings.flip ? -this.maxVel.x : this.maxVel.x);
    this.addAnim( 'idle', 0.2, [0] );
},
Here we are taking the flip value that will be passed into the
EntityBullet via the optional settings
object and applying an offset to the x,y values we pass to the parent method. This
ensures that the bullet starts in the correct position and appears to be
fired from the gun. Next, we set the velocity and acceleration x value to our maximum velocity x value. If the player is facing left, make this
negative. This forces the bullet to fire at its maximum speed instead of
slowly accelerating toward its maximum velocity.
Now we need to test for our collisions. Let’s start by reacting any time the bullet hits something in the collision layer:
handleMovementTrace: function( res ) {
    this.parent( res );
    if( res.collision.x || res.collision.y ){
        this.kill();
    }
},
The handleMovementTrace() gets
called while an entity is moving. This method is associated with the
collision map, so we can detect when an entity hits a wall. We check the
res object parameter if a collision
happens on the x or y values.
check: function( other ) {
    other.receiveDamage( 3, this );
    this.kill();
}
All we need to do now is add some code to our player in order to fire the bullets.
Firing the Weapon
Since inner classes are just like any other class we would create in
Impact, we can simply use the ig.game
built-in spawnEntity() method to create
a new instance of the bullet when the player presses the fire key. Our
player and monster are created during the level parsing process, so we
have not had to manually instantiate an entity yet. The spawnEntity() function helps ensure that when we
create a new entity, it gets added to Impact’s render list. Open up your
player.js class and put the following
code under the jump logic in the update method:
// shoot
if( ig.input.pressed('shoot') ) {
    ig.game.spawnEntity( EntityBullet, this.pos.x, this.pos.y, {flip:this.flip} );
}
As you can see, we are going to look for the shoot event, which we bound to the C key in our main class. This should be very
straightforward—we tell ig.game that we
are going to spawn a new entity. The spawnEntity() method needs a reference to the
class we want to create and its starting x,y position, along with any additional settings
we want to pass to the new entity. Notice here that we create a generic
object with a property called flip with
the player’s flip value. This is what tells the bullet which direction it
should be fired.
At this point, we can test that our gun works by refreshing the game
in the browser and hitting C. So, now
you should be able to fire your weapon and kill the monsters.
At this point, the monsters will die after a few shots. If you
change the monsters’ life property to something lower, it will take less
shots to kill them. This is because on every collision the bullet detects
with an enemy, it calls receivedDamage() and passes in 3 as the value. Likewise, you can make the
bullets stronger by changing the amount of damage they apply.
Right now, our gun is kind of boring. Let’s add another weapon to the mix and see what happens.
Add Multiple Weapons
So, we built a basic gun that fires bullets, but what about adding
something a little more exciting? How about a grenade that bounces and
explodes when it hits stuff? We can easily add in new types of weapons
just like we did with our bullet. Let’s set up the beginning of our
grenade class after our EntityBullet.
Add the following inner class to your player.js module:
EntityGrenade = ig.Entity.extend({

});
Just like with our bullet, we are ready to customize the grenade’s properties. We will need to give it a graphic and set the size and offset:
size: {x: 4, y: 4},
offset: {x: 2, y: 2},
animSheet: new ig.AnimationSheet( 'media/grenade.png', 8, 8 ),
Now let’s set up our collision detection:
type: ig.Entity.TYPE.NONE,
checkAgainst: ig.Entity.TYPE.BOTH,
collides: ig.Entity.COLLIDES.PASSIVE,
Pay special attention to the fact that we are setting checkAgainst to TYPE.BOTH. What this means is that our grenade
can collide with our zombie and our player. You’ll see how this works when
we are ready to test our grenade later on. However, in order for our
grenade to move and bounce, we will need to add a few additional
properties. Add the following to your grenade class:
maxVel: {x: 200, y: 200},
bounciness: 0.6,
bounceCounter: 0,
Here, we are setting our grenade’s maximum velocity. Also, we are going to keep track of how many times it will bounce before blowing up, as well as its bounciness value. You can tweak these values once we enable the player to actually fire the grenade, so you can test what effect the bounciness value will have.
Let’s override the init() method
with the following code:
init: function( x, y, settings ) {
    this.parent( x + (settings.flip ? −4 : 7), y, settings );
    this.vel.x = (settings.flip ? -this.maxVel.x : this.maxVel.x);
    this.vel.y = -(50 + (Math.random()*100));
    this.addAnim( 'idle', 0.2, [0,1] );
},
Here, we are going to determine the beginning x velocity based on a flip parameter that will
be passed in via the settings object. Just like with our bullet, when the
player fires the grenade we will set the player’s own flip value into a
property of the settings object so that we know what direction to fire the
grenade. It’s also incredibly important that we get the start x,y position offset correct. Since the grenade
can collide with the player, we wouldn’t want it to fire the weapon and
instantly blow up.
Next, we offset the y velocity by
negative 50 plus a random number that ranges from 0 to 100, which will
help add an arc to the grenade when it gets fired. The randomness makes
sure that the player throws the grenade slightly differently each time.
This, along with the fact that the grenade can also kill the player, will
help balance the fact that this is a more powerful weapon. After that, we
just set the idle animation to display sprites 0 and 1, which will loop
through images of the grenade rotating as it flies through the air.
We are getting very close to testing out our grenade, but before we
do, we’ll have to override the handleMovementTrace() method and write some
logic to handle collisions, track the number of bounces, and remove the
grenade from the display if it bounces too many times:
handleMovementTrace: function( res ) {
    this.parent( res );
    if( res.collision.x || res.collision.y ) {
          // only bounce 3 times
          this.bounceCounter++;
          if( this.bounceCounter > 3 ) {
               this.kill();
          }
    }
},
This works exactly like our bullet, except that when a collision is
detected, we increment the .bounceCounter by 1. If the .bounceCounter is greater than 3, we kill the
grenade. We will talk more about the entity’s kill() method later.
Now that we can handle tracking bounces, let’s add logic when the
grenade collides with an enemy. Like we did before in the EntityBullet class, we are going to override the
check function, which gets called when a .checkAgainst group has been detected. Add the
following function to your grenade class:
check: function( other ) {
    other.receiveDamage( 10, this );
    this.kill();
}
Finally, we have increased the damage of the grenade so that it
kills anything in a single hit. Now, all we need to do in order to have
the player toggle between weapons is bind a new key to toggle between the
weapons and then have the player swap between the correct one. Let’s add
the following bind logic into our main.js
init() function:
ig.input.bind( ig.KEY.TAB, 'switch' );
Now, if we go back into our player class, we will need a way to keep
track of the current weapon. Add the following property to the beginning
of our EntityPlayer class in the
player.js file:
weapon: 0,
totalWeapons: 2,
From there, we can add a simple test to see when the player presses
the weapon toggle button, so we can toggle the weapon property. Add the following code below
where we test if the shoot button was
pressed in the PlayerEntity update()
method:
if( ig.input.pressed('switch') ) {
    this.weapon ++;
    if(this.weapon >= this.totalWeapons)
          this.weapon = 0;
    switch(this.weapon){          case(0):
               this.activeWeapon = "EntityBullet";
               break;
          case(1):
               this.activeWeapon = "EntityGrenade";
          break;
    }
}
Now, when we go to spawn our weapon instance, we can simply check to see which weapon is set in the weapon property and spawn the correct instance.
We will also need to add a new property called this.activeWeapon to the top of our
class:
activeWeapon: "EntityBullet",
Notice how we have to set the value to a string instead of a reference to the class itself? This will be evaluated correctly when the player class gets created. If we don’t make the default value a string, it will break the player class when it tries to load.
The last thing we need to do is update our shoot code in the player class with the following:
if( ig.input.pressed('shoot') ) {
    ig.game.spawnEntity( this.activeWeapon, this.pos.x, this.pos.y,
        {flip:this.flip} );
}
This simply spawns a new instance of
any class you have set as the this.activeWeapon value. Now you are ready to test out
your new grenade and switch between the two weapons.
You may have noticed that the player still looks like he has a gun
in his hand and that there really aren’t any visual changes when you
switch weapons. We can quickly fix this by modifying how we set up our
player’s animations in the init()
method. Go ahead and delete the four lines of code where we set up the
idle, run, jump,
and fall animations. Then add the
following in its place:
this.setupAnimation(this.weapon);
Now we will create a new method called setupAnimation(), which takes our current weapon
ID as an offset. Here is the code to add below the init() method:
setupAnimation: function(offset){
  offset = offset * 10;
  this.addAnim('idle', 1, [0+offset]);
  this.addAnim('run', .07, [0+offset,1+offset,2+offset,3+offset,4+offset,
      5+offset]);
  this.addAnim('jump', 1, [9+offset]);
  this.addAnim('fall', 0.4, [6+offset,7+offset]);
},
This is just like our original animation setup, except we now take the weapon ID (which becomes an offset), multiply it by the total number of player frames with a weapon, and add it to each animation. Let’s look at the player sprite sheet so you can see what’s going on.
As you can see, we have 10 sprites holding a gun and 10 sprites
without the gun. By offsetting the animation by 10 frames, we can easily
switch between the different sets of sprites. This is a common trick, and
one we will use later on when we add death animations. For now, we just
need to add one last line of code to help update the player graphics when
we switch weapons. Add a call to this.setupAnimation() at the end of where we
test for the weapon switch key press:
switch(this.weapon){
case(0):
this.activeWeapon = "EntityBullet";
break;
case(1):
this.activeWeapon = "EntityGrenade";
break;
}
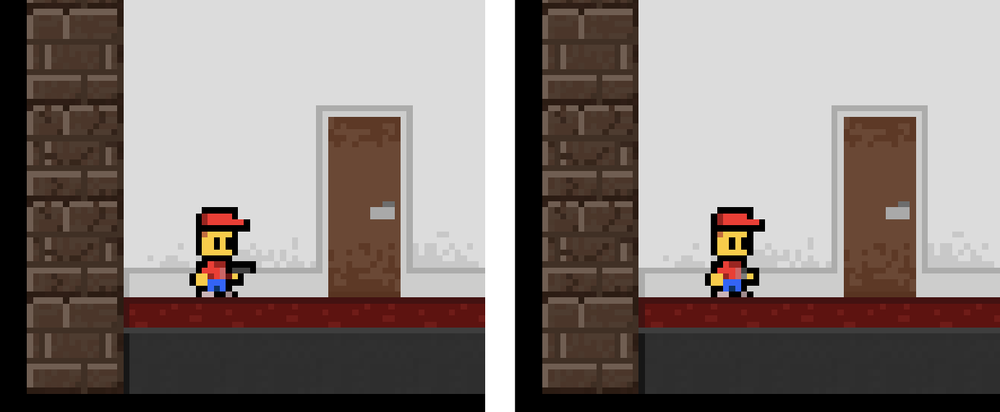
this.setupAnimation(this.weapon);Now when you test and hit the Tab key, you should see the player’s animation change based on the weapon he is using (Figure 4-24).
From here, you should be able to add even more weapons to your game by simply using the above pattern and building upon it.
Killing Entities
You may have noticed while we set up our weapons that we called a
built-in method called kill(). While
reducing an entity’s life will destroy it and automatically call
kill() for you, there are times when you may need to do
this manually—like when the grenade collides with an enemy or it bounces
too much. This method actually completely removes the entity from the
render list, so it is a helpful way to permanently remove entities from
the game. If you do not call kill() on
anything you need to remove from the game, things will start to slow down
considerably, so make sure you take advantage of the kill() method.
Respawning the Player
Since the player dies as soon as he collides with an enemy, we
should add some logic to respawn the player. The easiest way to do this is
to save out the start position of the player when he gets created so we
can restore him to the same position when he dies. Let’s add the following
property to our PlayerEntity
class:
startPosition: null,
Then, we can store the initial position of the player by adding the
following to the init() method above
the call to this.parent():
this.startPosition = {x:x,y:y};What this does is save a generic object with the x,y position that gets passed into the
constructor of our player class. Now, we just need to override the
kill() method to this:
kill: function(){
    this.parent();
    ig.game.spawnEntity( EntityPlayer, this.startPosition.x,
        this.startPosition.y );
}
So, what will happen is that when kill() gets called after the player collides
with a monster, we call this.parent(),
which will properly remove the player instance from the game. Then, we
immediately spawn a new player at the saved startPosition. Right now, it is a little
jarring, but you could easily add a delay and then respawn after
displaying some message to the user.
Another really cool trick about this approach is that since we saved
the initial x,y position of the player
in the startPosition property, we could
easily update this value if the player walks through a checkpoint. This
means that we don’t need any complex logic to continually respawn the
player throughout the level. All the logic is contained inside the player
instance itself.
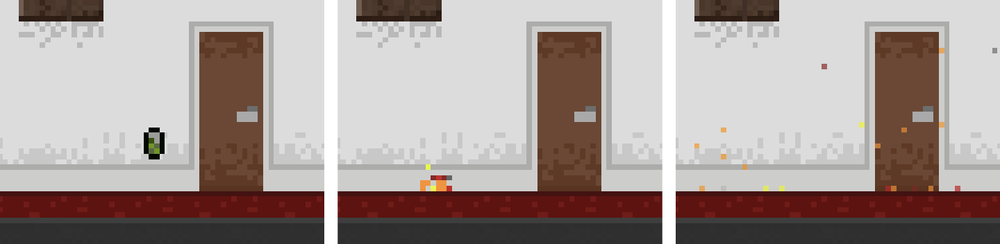
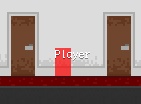
One thing you should pay special attention to is when a monster is on top of the respawn position. Since we don’t reset the level, there is a chance that we could lock up the game if the monster kills the player as soon as he respawns, as shown in Figure 4-25.
The same thing can happen if there are a lot of grenades bouncing
around where the player respawns. Usually, games offer some sort of
invincibility mode when the player restarts. Here is a quick example of
how to do that. Start by adding the following two properties to our
EntityPlayer class:
invincible: true,
invincibleDelay: 2,
invincibleTimer:null,
This will allow us to tell if the player is invincible, and also for how long. Next, we will need to add the following method to handle toggling the invincibility:
makeInvincible: function(){
    this.invincible = true;
    this.invincibleTimer.reset();
},
This will allow us to call makeInvincible() on the player at any time, and
we can reset the invincibleTimer as
well as toggle the invincible flag. Now we are going to have to override
our receiveDamage() and draw() methods:
receiveDamage: function(amount, from){
    if(this.invincible)
        return;
    this.parent(amount, from);
},
draw: function(){
    if(this.invincible)
        this.currentAnim.alpha =
            this.invincibleTimer.delta()/this.invincibleDelay * 1 ;
    this.parent();
}
In the receiveDamage() method, we
are using a guard clause to test if invincibility has been toggled and, if
so, we just exit the method and don’t apply any damage. In the draw
method, we also test for invincibility and, if it is activated, we are
going to set the alpha value of the
sprite to reflect how much longer they are invincible. We start at
0 and they will slowly fade into the
game. Alpha in Impact is a value between 0 and 1. We
can easily find a percentage of that value by dividing the invincibleTimer’s delta by the invincibleDelay. By multiplying it by 1, the total value of alpha, we get a percentage
that we can use to make the player fade in.
Before we can test this, we need to do two more things. First, we
need to add the following to our init()
method:
this.invincibleTimer = new ig.Timer();
this.makeInvincible();
Next, we need to add the following code to our update() method just before our call to this.parent():
if( this.invincibleTimer.delta() > this.invincibleDelay ) {
    this.invincible = false;
    this.currentAnim.alpha = 1;
}
This basically tests to see if our timer is greater than the delay
we defined. Once that happens, we disable invincibility by setting
invincible to false and forcing the
alpha to be 1. If you refresh, you should now see the player
fade in when he is created and after you respawn.

This should fix the issue we had before (when the player respawns on
top of a monster or grenade) so that we don’t lock up the game. Also,
because of the way this was set up, you can now call makeInvincible() at any time if you wanted to
give the player a power-up or show that the player has taken damage
without actually respawning him.
Create Death Animations
One of the easiest ways to show a death animation is to create a
small particle explosion where the player is killed. Not only does this
cut down on the amount of animations you have to create but you can also
use the same technique to show damage taken by a projectile weapon. In
order to do this, we will need to create two new entities, one for the
explosion and the other for the actual particles. Let’s add the following
inner class to our player.js
module:
EntityDeathExplosion = ig.Entity.extend({
    lifetime: 1,
    callBack: null,
    particles: 25,
    init: function( x, y, settings ) {
          this.parent( x, y, settings );
          for(var i = 0; i < this.particles; i++)
               ig.game.spawnEntity(EntityDeathExplosionParticle, x, y,
               {colorOffset: settings.colorOffset ? settings.colorOffset : 0});
               this.idleTimer = new ig.Timer();
    },
    update: function() {
          if( this.idleTimer.delta() > this.lifetime ) {
               this.kill();
               if(this.callBack)
                     this.callBack();
               return;
          }
    }
});
This is a very simple class. It handles spawning particle entities,
which we will create next, and also has a timer, which we use to call a
callback() method that is supplied by
the setting property. Pay special attention to this.idleTimer and the new ig.Timer(). We use these to keep track of how
much time has elapsed since its instantiation, just like we did when we
added invincibility to the player.
There is also something else going on here. You may have noticed
that when we spawn our EntityDeathExplosionParticle, we are passing in
a color offset value. If you take a look at the blood sprite, you will see
that we have colored sprites for the player in red and for the zombie in
green.

This is a neat trick and one that is used in a lot of sprite
sheet-based games. Our blood particles are going to be 2×2 pixels in size.
That means we have eight sprites for each color. When we set up our
particle, we will apply the color offset to the graphic we display. So if
the player is hit, we will add 0 to the
offset, which will generate a random
red color. For zombies we will add 1 to
the offset, which will multiply by the
base number of possible sprites and move the randomly selected sprite into
the green zone. Let’s take a look at our particle class to see this in
action. Create a new inner class with the following code:
EntityDeathExplosionParticle = ig.Entity.extend({
    size: {x: 2, y: 2},
    maxVel: {x: 160, y: 200},
    lifetime: 2,
    fadetime: 1,
    bounciness: 0,
    vel: {x: 100, y: 30},
    friction: {x:100, y: 0},
    collides: ig.Entity.COLLIDES.LITE,
    colorOffset: 0,
    totalColors: 7,
    animSheet: new ig.AnimationSheet( 'media/blood.png', 2, 2 ),
    init: function( x, y, settings ) {
        this.parent( x, y, settings );
        var frameID = Math.round(Math.random()*this.totalColors) +
        (this.colorOffset * (this.totalColors+1));
        this.addAnim( 'idle', 0.2, [frameID] );
        this.vel.x = (Math.random() * 2 - 1) * this.vel.x;
        this.vel.y = (Math.random() * 2 - 1) * this.vel.y;
        this.idleTimer = new ig.Timer();
    },
    update: function() {
        if( this.idleTimer.delta() > this.lifetime ) {
            this.kill();
            return;
        }
        this.currentAnim.alpha = this.idleTimer.delta().map(
            this.lifetime - this.fadetime, this.lifetime,
            1, 0
        );
        this.parent();
    }
});
As you can see, the particle has a few properties such as its
maximum velocity, how long before it fades away, bounciness, and initial
velocity. Most of this should look very familiar from what we did with our
grenade class. As you can see in the init() method, we assign a random value to the
particle’s vel.x and vel.y values, which sends each one off in
different directions. Since this is blood and we don’t want it bouncing
around like the grenade, the bounciness property is set to 0. We take advantage of this.currentAnim.alpha value, which assigns a
new alpha value after each update, and eventually the particle disappears.
Once it fades away, we call kill() to
remove it from the display.
Now that we have our particle emitter and our particle, we can
extend the player’s kill() method to
spawn our EntityDeathExplosion where
the player was killed and watch it spawn random particles as if the player
exploded. Here is the modified EntityPlayer kill() method:
kill: function(){
    this.parent();
    var x = this.startPosition.x;
    var y = this.startPosition.y;
    ig.game.spawnEntity(EntityDeathExplosion, this.pos.x, this.pos.y,
    {callBack:function(){ig.game.spawnEntity( EntityPlayer, x, y)}} );
}
Since we are passing a function into the settings object, we will need to re-scope the start position of the player. If you refresh your browser and run the player into the monster, you will now see him explode into tiny pieces that bounce and fade away.
As I mentioned before, this is also a great effect for us to show
when an entity has been hit. Let’s override the zombie.js receiveDamage() method with the
following:
receiveDamage: function(value){
    this.parent(value);
    if(this.health > 0)
          ig.game.spawnEntity(EntityDeathExplosion, this.pos.x, this.pos.y,
          {particles: 2, colorOffset: 1});
},
We can actually use the same death explosion class in our zombie
entity, even though it is an inner class of player. This is a neat little
hack thanks to the fact that JS’s scope is global and, when any entity
gets defined in Impact, it is available throughout the game engine. So, in
the EntityZombie class, we simply spawn
a new death explosion just like we did in the player class, but pass in a
smaller number of particles to be emitted. We also pass in the colorOffset so that we can display green blood
instead of red. Now when a bullet hits the zombie, little particles will
shoot off of it. Also, don’t forget to use the same death animation
technique we used on the player by overriding the zombie.js kill() method with the
following:
kill: function(){
    this.parent();
    ig.game.spawnEntity(EntityDeathExplosion, this.pos.x, this.pos.y,
    {colorOffset: 1});
}
And there you go; you have just created a nice-looking dynamic death animation for your player and monster. We can also apply the same technique to our grenades and make their explosions more visually appealing, so let’s take a look.
Adding Grenade Explosions
Now that we have seen how to add death animations to our player and
zombie, let’s look at how to make our grenades explode. Let’s add the
following particle to our player.js
module:
EntityGrenadeParticle = ig.Entity.extend({
    size: {x: 1, y: 1},
    maxVel: {x: 160, y: 200},
    lifetime: 1,
    fadetime: 1,
    bounciness: 0.3,
    vel: {x: 40, y: 50},
    friction: {x:20, y: 20},
    checkAgainst: ig.Entity.TYPE.B,
    collides: ig.Entity.COLLIDES.LITE,
    animSheet: new ig.AnimationSheet( 'media/explosion.png', 1, 1 ),
    init: function( x, y, settings ) {
        this.parent( x, y, settings );
        this.vel.x = (Math.random() * 4 - 1) * this.vel.x;
        this.vel.y = (Math.random() * 10 - 1) * this.vel.y;
        this.idleTimer = new ig.Timer();
        var frameID = Math.round(Math.random()*7);
        this.addAnim( 'idle', 0.2, [frameID] );
    },
    update: function() {
        if( this.idleTimer.delta() > this.lifetime ) {
            this.kill();
            return;
        }
        this.currentAnim.alpha = this.idleTimer.delta().map(
            this.lifetime - this.fadetime, this.lifetime,
            1, 0
        );
        this.parent();
    }
});
At this point, everything should look very familiar. We probably
could have even extended our EntityDeathExplosionParticle but, to keep things
simple, I just copied over the code and changed a few properties. Now we
just need to spawn a few particles once the grenade explodes. Override the
EntityGrenade kill() method with this
code:
kill: function(){
    for(var i = 0; i < 20; i++)
        ig.game.spawnEntity(EntityGrenadeParticle, this.pos.x, this.pos.y);
    this.parent();
}
Refresh the game and fire a grenade. You should see a nice little particle explosion when it collides with anything or bounces too many times.
Customizing the Camera
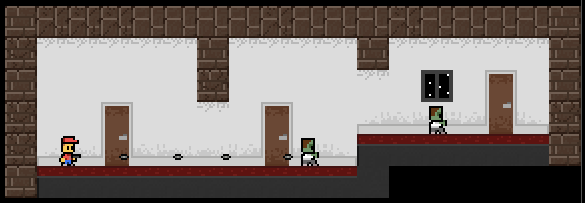
Right now, our level is really boring. Impact was designed for side-scrolling games, so let’s go back into our map editor and extend out the level so the player has some room to run around. Create an opening in the far right wall and add another room to the map. Make sure that you increase the size of the main layer and the collision layer as well.
Once you have extended the level, save and try to play it. You may notice something isn’t quite right (Figure 4-31).
Did you see that the game’s camera is not following the player? We
will need to set this up manually in the main.js class. Open it up and we will override
the update function with the following code:
update: function() {
    // screen follows the player
    var player = this.getEntitiesByType( EntityPlayer )[0];
    if( player ) {
          this.screen.x = player.pos.x - ig.system.width/2;
          this.screen.y = player.pos.y - ig.system.height/2;
    }
    // Update all entities and BackgroundMaps
    this.parent();
},
The way that this code works is that we take advantage of a method
of the game class called getEntitiesByType(). This is a very important
API when it comes to finding instances of entities in your game. Because
we know that there is only a single instance of our player, we can
explicitly look for it. There are better ways of getting a reference to
the player, but for now we will just use this technique to keep things
simple.
After we see if the player exists, we can get the screen resolution
and player position to center the screen’s x,y values. By setting the screen.x and screen.y values, the renderer will automatically
adjust the camera to that position. You can also do a lot of cool tricks
with this, like easing the camera movement or limiting it so it doesn’t
scroll offscreen.
Now, refresh the game and you should see that the camera now follows our player as it moves through the level.
So, now that we have added the ability to move our camera around the level, it’s time to allow the player to exit this level.
Loading New Levels
It looks like we are ready to load our next level. Loading levels in Impact is incredibly easy; we actually did it as one of the first steps in setting up this game. In this section, I will talk about building something we call a trigger, which is an invisible area of the map that executes an activity when the player enters it. In this case, we will be building a level exit.
Let’s start by creating a new entity file called levelexit.js and add the following code to
it:
12    ig.module(
13        'game.entities.levelexit'
14    )
15    .requires(
16        'impact.entity'
17    )
18    .defines(function(){
19        EntityLevelexit = ig.Entity.extend({
20
21        });
22    });
Since our exit doesn’t have any graphics, we still need something to display in Weltmeister. Let’s add the following properties to our class:
_wmDrawBox: true,
_wmBoxColor: 'rgba(0, 0, 255, 0.7)',
size: {x: 8, y: 8},
These two properties with the _wm
prefix tell Weltmeister how to render the object in the edit view, even
though it doesn’t have an actual graphic in the game. So, Weltmeister will
draw an 8×8 pixel blue box.
Now, we need a way to store the name of the next level we should load when the player collides with the level exit entity. Add the following property, which will be automatically set during our entity’s construction by the settings parameter we will pass in from the level data:
level: null,
Next, we just need to add some collision code. Let’s have our level
exit check against any TYPE.A entities
by adding the following property to the top of your class:
checkAgainst: ig.Entity.TYPE.A,
Now, we will override update()
and remove its call to this.parent() so
we are not spending render cycles trying to draw an entity with no
graphics. This is a great technique for any kind of triggers you may build
for your map that aren’t required to be updated visually on every
frame:
update: function(){},Finally, we will also override the check() method to handle the collision:
check: function( other ) {
    if(other instanceof EntityPlayer){
          if( this.level ) {
               var levelName = this.level.replace(/^(Level)?(\w)(\w*)/,
                   function( m, l, a, b ) {
               return a.toUpperCase() + b;
          });
               ig.game.loadLevelDeferred( ig.global['Level'+levelName] );
          }
    }
}
As you can see, we simply test that the instance of other (which is passed into the method during a
collision) is an instance of the player’s class. This helps avoid any
other entity of TYPE.A you may have
accidentally triggered in the level exit.
The last part of the code simply does a regex cleanup of the exit’s
level property to make sure it is
capitalized correctly before calling ig.game.loadLevelDeferred(). This method is very
important. You may remember that in our main class, it simply called
loadLevel(). Well, loadLevelDeferred() waits until the main game’s
update loop is completed before loading the level. This will help avoid
any sudden redraw errors that may happen when trying to exit in the middle
of the render loop.
Once we have our new EntityLevelexit, we can open up Weltmeister and
create a small exit to place our entity in.
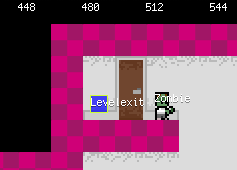
When you add the level exit, you will need to tell it what level to
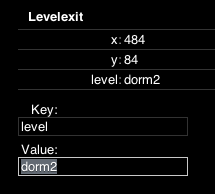
load. Click on it and go to the layer area just under where it says Entity
Settings. You should see all the properties of your entity instance. For
the Key, put level and in Value, put dorm2.
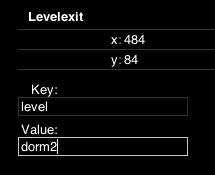
It is very important that you hit Enter/Return after adding a value
to an entity’s Key, or it will not be saved. You will know it has been
saved when you see the new Key/Value listed under the entity’s name and
its x,y values, which are set up by
default. You can modify any Key by clicking on it.
Now that our entity is configured, we need to create a new level.
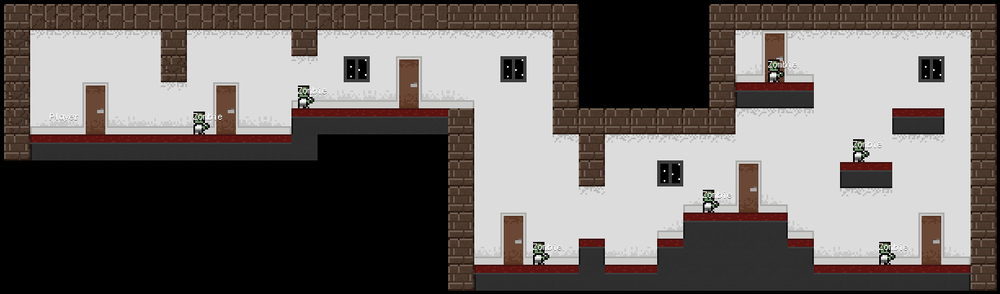
Name your level dorm2 and design it as
shown in Figure 4-36.
As you build out your new level you may notice that the player
graphic is missing in the editor. This happens because now our player is
set to invincible when he is created, so he is invisible. If this is an
issue, you can add the following two properties to your player.js class:
_wmDrawBox: true,
_wmBoxColor: 'rgba(255, 0, 0, 0.7)',
This will render out a red box for the player when in the editor, just like we did with our level edit.
The last thing you need to do is add the level and the level exit to
the main.js requires block:
'game.levels.dorm2,
Once you have done this, refresh your game and you should be able to exit the level and go into the second level.
You may notice that the transition is a little jarring. There are a few things you can do to make sure that doesn’t happen, such as matching the level exit and spawn points up, or building a quick transition before exiting the level. Usually, games have an end-of-level summary screen that gets displayed, so that when the next level loads up the player doesn’t notice the transition as much. We’ll talk more about this later in the book.
Get Building HTML5 Games with ImpactJS now with the O’Reilly learning platform.
O’Reilly members experience books, live events, courses curated by job role, and more from O’Reilly and nearly 200 top publishers.

