Whether you want to just work with XML and XSL files or you are a hardcore Java or PL/SQL developer, you’ll find that JDeveloper 3.1 has lots of features to make your life easier. A few of the features that I personally use every single day of my life are:
Color-coded syntax highlighting for XML/XSLT editing
Auto-indenting and block indent/unindent to keep XML looking nice
Built-in XML syntax checking
Native support for running XSQL pages
Ability to browse all Oracle8i schema objects, including Java classes
Context-sensitive help as you type for methods and arguments
Fast jumping to source and JavaDoc for any class that pops into your head
Robust remote debugging support for Apache JServ, Tomcat, and others
Robust remote “in-the-database” debugging support for JServer
We’ll cover what you need to know to exploit these JDeveloper 3.1 features in this chapter.
Tip
JDeveloper 3.1 ships with a number of helpful XML samples. These
include sample XSQL pages, Java programs, and servlets to help you
make sure your environment is properly set up to run all the examples
in this book. Open the JDeveloperXMLExamples.jws
workspace in the .\samples\xmlsamples
subdirectory of your JDeveloper installation home directory to take a
look.
This section describes the many ways JDeveloper helps you work with XML, XSQL and JavaServer Pages.
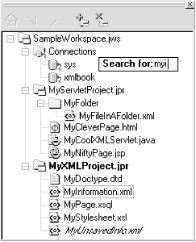
JDeveloper allows you to create
workspaces to facilitate working on many different projects at once.
The contents of all the projects in your current workspace are always
visible and organized in alphabetical order in the project navigator,
as shown in Figure 4.1. At any time, you can click
your mouse in the project navigator and begin typing the initial
letters of a file you are looking for—for example, the letters
myi—and a Search for
pop-up appears. JDeveloper incrementally jumps you to the first file
matching the letters you’ve typed in so far, as illustrated in
the figure, so typically only a few letters are required to jump to
the file you want.
By selecting a project in the navigator and choosing Add Folder... from the right mouse button menu, you can create additional folders to further organize your files within a project.
To add new or existing files to a project, select the target project to make it active (displayed in bold in the navigator). Then click the Add File icon—the folder with a plus sign—at the top of the navigator pane. The File Open/Create dialog appears. Select an existing file or type the name of a new file you want to create, and click the Open button to dismiss the file dialog and add the file to your project.
Tip
If you select an existing file in your project before clicking the Add File icon, the file dialog will use the existing file’s directory as the current directory for the File Open/Create dialog. This is handy if you’ll be adding a file from the same directory as another file in your project.
To delete a file from your project, select the file in the project navigator. Then click the Delete File icon—the folder with a minus sign—at the top of the navigator pane. Confirm the Save changes to file? alert box, if appropriate.
Files that have been edited show up with italic names in the navigator. You can save the current file with Ctrl-S, or use the menu or toolbar to Save All files.
JDeveloper 3.1 supports the editing of any XML-based file with color-coded syntax highlighting and automatic indenting assistance to make it easier to work with XML and HTML source code. Table 4.1 shows the list of file types and extensions that JDeveloper 3.1 recognizes by default as XML/HTML file formats.
Table 4-1. Default File Extensions for Syntax Highlighting
|
File Extension |
Description |
|---|---|
|
|
XML files |
|
|
XSLT stylesheets |
|
|
XSQL pages |
|
|
Document type definitions |
|
|
XML schema definitions |
|
|
HTML files |
|
|
JavaServer pages |
Figure 4.2 illustrates the different XML editing syntax constructs that the JDeveloper 3.1 code editor recognizes.
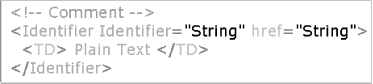
You can change the syntax highlighting colors for any of these constructs by following these steps:
Select Tools → IDE Options... from the JDeveloper 3.1 menu.
Select the Fonts tab in the IDE Options dialog that appears.
From the Fonts tab, you can set the color, font, foreground color, and background color of any syntactic element by selecting its name in the Element list and:
Clicking the left mouse button in a colored square to set the foreground (FG) color
Clicking the right mouse button in a colored square to set the background (BG) color
Checking the Foreground or Background checkbox in the Use defaults for group to reset the respective color to the default setting
In addition, as shown in Figure 4.3, you can set the font name, size, and style for any syntax element.

Table 4.2 describes the correspondence between the name of the syntactic element in the Element list and the context it affects for XML editing.
Table 4-2. Syntax Elements and the Contexts They Affect
|
Syntax Element Name |
Controls Color For |
|---|---|
|
Space between elements and attributes | |
|
XML comments | |
|
Names of recognized names of HTML elements and attributes | |
|
XML element and attribute names | |
|
| |
|
Attribute values | |
|
Text content of elements |
Changes you make to colors for the code editor take effect immediately and can be changed at any time.
If you work with other XML-based file types and would like JDeveloper
to syntax-highlight these files as well, you can teach the product
about your new files. For example, if you want files with an
*.xyz extension to be syntax-highlighted, then
do the following:
Add
*.xyzas a file extension that JDeveloper should treat as a text file, as follows:Select the Tools → Treat as text... menu option.
Type in
*.xyzin the File pattern to be treated as text field, and click the Add button.Dismiss the Treat as text... dialog by pressing the OK button.
Add
xyzto the list of file extensions that should be syntax-highlighted like HTML/XML files, as follows:Select the Tools → IDE Options... menu option.
Click on the Editor tab of the IDE Options dialog.
Choose “Cursor/Search/Display options” from the Settings for: pop-up list.
In the Display Options frame, add
xyzto the end of the current list of file extensions displayed in the HTML File Extensions field, separated by a semicolon.Click the OK button to dismiss the IDE Options dialog.
Make sure to see the instructions in the next section for enabling
XML syntax checking on your *.xyz file
extension, if this is desirable. The next time you open your
workspace or restart the JDeveloper product, these new settings will
be in effect.
You’ll find that JDeveloper’s automatic indenting helps a lot in keeping your XML elements nicely aligned. If you add elements or remove elements, however, often you’d like to quickly fix the indenting for whole blocks of elements at a time to make the file look nice again. In these cases, you will find that JDeveloper’s block indent and block unindent support come in handy over and over again. To indent a block of text by two spaces, select the desired lines and type Ctrl-Shift-I. To unindent a block of text by two spaces, select the desired lines and type Ctrl-Shift-U.
To change the number of spaces used for each block indent, choose the Tools → IDE Options... menu, select the Editor tab in the IDE Options dialog, and set the value of Block Indent to the value you prefer.
In addition to XML syntax highlighting, JDeveloper 3.1 supports XML syntax checking of any file in your project that is not read-only and that has one of the file extensions listed in Table 4.3.
At any time, you can select the Check XML Syntax... option from the right mouse button menu after selecting the desired file to check in the project navigator. JDeveloper checks the syntax of the file based on the current state of its editor buffer, even if you have pending changes that have not been saved to disk. If any XML well-formedness errors are detected, appropriate error messages appear in the XML Errors tab of the Message View and your cursor is brought to the position of the first error in your file, as Figure 4.4 illustrates.

Tip
To quickly jump to a line by number in the current buffer, type Ctrl-O+Ctrl-G and type in the line number you want to jump to in the Go to Line Number dialog that appears.
Note that the Check XML Syntax... menu option
does just that: it checks syntax. It does not perform validation of
the XML file against its associated DTD. As we saw in Chapter 2, you can use the oraxml
command-line tool with the -v flag to perform DTD
validation of an XML file.
Note, however, that JDeveloper 3.1’s Check XML Syntax... feature still must read the DTD if your XML file has an associated <!DOCTYPE>, even though it does not perform full DTD validation. Be aware that if you work on a computer that is behind a firewall, and if the XML file you are attempting to syntax-check uses an external DTD with an HTTP-based URL, as in the following example:
<?xml version="1.0" encoding="iso-8859-1"?>
<!DOCTYPE moreovernews SYSTEM "http://w.moreover.com/xml/moreovernews.dtd">
<moreovernews>
<article id="_6721342">
<url>http://c.moreover.com/click/here.pl?x6721341</url>
<headline_text>U.S. Officers Seize Cuban Boy, Reunite Him With Father
</headline_text>
<source>New York Times</source>
<media_type>text</media_type>
<cluster>Top stories</cluster>
<tagline> </tagline>
<document_url>http://www.nytimes.com/yr/mo/day/front/</document_url>
<harvest_time>Apr 23 2000 2:19AM</harvest_time>
<access_registration>http://www.nytimes.com/auth/login?Tag=/&Url=
</access_registration>
<access_status>reg</access_status>
</article>
</moreovernews>then you may experience a hanging problem as JDeveloper tries to access the DTD over the Web. The solution is to teach JDeveloper the name of your proxy server machine so that it may properly retrieve the DTD from outside the firewall. To set the name of the proxy server for the XML syntax-checking feature, do the following:
Exit JDeveloper. You should not edit the configuration file we’re about to edit while the product is running, since changes you make may be overridden when the product saves out its configuration information on shutdown.
After making a backup copy, use a convenient text editor to edit the
jdeveloper.propertiesconfiguration file. This file resides in the./libsubdirectory under your JDeveloper installation home directory.Search for the string
HttpProxyHost, which you’ll find in the lines:# # Check XML Syntax... Addin # jdeveloper.xml.XmlFileParserAddin.XmlFileExtensions=xml,xsl,xsql,xsd jdeveloper.xml.XmlFileParserAddin.HttpProxyHost= jdeveloper.xml.XmlFileParserAddin.HttpProxyPort=
Type the name and port number of your proxy server after the equals sign on the appropriate line as shown here:
#
# Check XML Syntax... Addin
#
jdeveloper.xml.XmlFileParserAddin.XmlFileExtensions=xml,xsl,xsql,xsd
jdeveloper.xml.XmlFileParserAddin.HttpProxyHost=yourproxyserver.you.com
jdeveloper.xml.XmlFileParserAddin.HttpProxyPort=80
Save the file and restart JDeveloper.
Now you should be able to syntax-check any XML file without incident.
If you work with other XML-based file types and would like JDeveloper
to syntax-check these additional file types as XML, you can teach the
product about your new XML-based files. For example, if you want
files with an *.xyz extension to allow XML
syntax checking, do the following:
First, make sure you’ve followed the instructions in the previous section, Section 4.1.2, to register files with extension
*.xyzto be treated as text files and optionally registered as files to syntax-color as XML.Exit JDeveloper. You should not edit the configuration file we’re about to edit while the product is running, since changes you make may be overridden when the product saves out its configuration information on shutdown.
After making a backup copy, edit the
jdeveloper.propertiesfile found in the./libsubdirectory of your JDeveloper installation home directory.Search for the line:
jdeveloper.xml.XmlFileParserAddin.XmlFileExtensions=xml,xsl,xsql,xsd
Add
xyzto the end of the list of file extensions, separated by a comma.
The next time you start JDeveloper the Check XML
Syntax... menu item should appear for the
*.xyz files in the project.
JDeveloper has built-in support for working with both JavaServer Pages and Oracle XSQL Pages. While editing JSP and XSQL pages, you get color-coded syntax highlighting as we’ve described in the previous section. In addition, since XSQL pages are XML-based templates, they also benefit from the Check XML Syntax... feature. At any time during development, you can test a JSP or XSQL page in your browser by running it directly from your project. To run either a JSP or XSQL page, do the following:
Select
YourFile.xsqlorYourFile.jspin the project navigator.Select Run from the right mouse button menu.
Tip
If the Run item in the right mouse button menu is disabled, make sure that your project is set up to debug files as a “Normal Java Class” and not as “Remote Debugging”. To verify this, select the Project → Project Properties... menu, click on the Run/Debug tab, and look at the value of the Debug Files as pop-up list. This value needs to be set to “Normal Java Class”—the default—to run JSP or XSQL pages.
In order to run JSP or XSQL pages from your project, you must include the appropriate JSP and/or XSQL Runtime libraries in your project’s library list. To check the contents of your project’s library list, select Project → Project Properties... from the main menu and click on the Libraries tab of the Project Properties dialog. You’ll see something like the display shown in Figure 4.5.
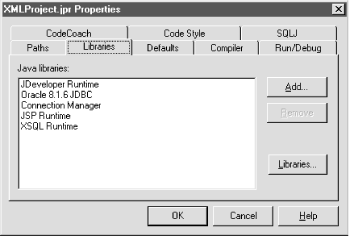
To properly run XSQL pages from the JDeveloper environment, you need the XSQL Runtime library in your library list. For JSP pages, you need the JSP Runtime library. If the appropriate library is not in the list for your current project, click the Add... button and select it from the list of defined libraries. Note that each project in a workspace has its own project property settings, so you might have to perform this operation for each project.
When you run a JSP or XSQL page from your project, JDeveloper does the following for you:
Starts—or automatically restarts—the Oracle JSP Runner or the Oracle XSQL Servlet as appropriate using the Oracle Web-to-go web server on port 7070
Sets the web server’s virtual filesystem to map onto your project’s HTML path
Launches your default browser if one is not currently running
Requests the page you’re running in your browser using the URL http://yourmachine:7070/YourCurrentProject/YourFile.xsql
While you are running your XSQL or JSP page from your project, you can make edits to:
XSQL pages, to change any aspect of their functionality
XSLT stylesheets being used by your XSQL pages
JSP page source
You can see the effects of your changes instantaneously by refreshing your browser. Before refreshing your browser, you should use the Check XML Syntax... feature on your edited files and make sure your XSQL pages and XSLT stylesheets are well-formed to avoid getting an error from the XSQL Servlet complaining about their syntax. Note that the JSP pages you’ve edited while running require on-the-fly recompilation. This is handled automatically by the Oracle JSP Runner but may cause a noticeable delay on the first request of the changed JSP page. Since XSQL pages and associated XSLT stylesheets are templates and not compiled Java classes, no recompilation delay for edited XSLT stylesheets or XSQL pages is necessary.
Tip
If after editing your XSQL, XSLT, or JSP files you refresh your browser and do not see the changes you are expecting, typically it is because you have forgotten to save the edited files to disk in JDeveloper. If you notice that their names are italicized in the project navigator, just select File → Save All... from the menu and try refreshing your browser again.
Note that for JSP pages, it is also possible to select the Debug menu from a page’s right mouse button menu in the project navigator to debug the JSP page locally. This means that as you request pages through your web server, you can hit breakpoints and step through the Java code in your JSP pages.
When running XSQL pages from within the JDeveloper 3.1 environment,
the XSQL Servlet picks up its configuration information from the
XSQLConfig.xml
file in the
.\lib subdirectory of your JDeveloper installation home.
To add or change the properties related to the named database
connection definitions used by the XSQL page processor, edit this
file and modify the <connectiondefs> section as indicated by
the comments in the file.
If you receive an error message like:
J:\myprojects\MyPage.xsql must reside in the
HTML root directory or a subdirectory beneath it.
when you attempt to run an XSQL or JSP page, this means your page’s source file is not located under the HTML root directory defined for the project. All of your project’s path settings are visible on the Paths tab of the Project Properties dialog as shown in Figure 4.6.
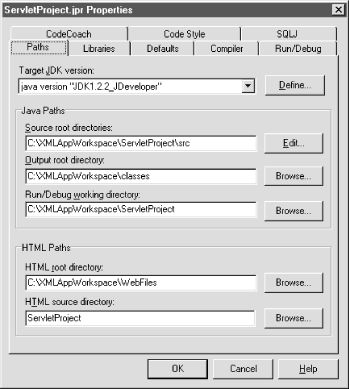
To allow for multiple projects in a workspace to share the same virtual root directory when running JSP or XSQL files, each JDeveloper project has the following two HTML-related path settings:
- HTML root directory
This is the physical directory to use as the Web-to-go server’s “virtual root” while running JSP or XSQL pages in your project. While running pages inside the JDeveloper environment, this directory corresponds to the URL:
http://
yourmachine:7070/- HTML source directory
This is a physical subdirectory of the directory. It contains the current project’s web-related files:
.jsp,.xsql,.html,.gif, etc. While running pages inside the JDeveloper environment, this directory corresponds to the URL:http://
yourmachine:7070/HTMLSourceDirectoryName/
By setting the HTML root directory to the same physical directory for
multiple projects in the workspace, you can refer to web-related
files across projects while running a page from
any one of them. So if you have a workspace with projects named
ServletProject and XMLProject,
and you have their respective HTML paths set like this:
then while running any XSQL or JSP page from
ServletProject using the URL:
http://yourmachine:7070/ServletProject/SomePage.xsql
you can refer to files from the XMLProject using a
URL like:
http://yourmachine:7070/XMLProject/AnotherPage.xsql
without restarting the web server.
In addition to the HTML path settings, each project also has Java-related path settings for:
Figure 4.7 shows the filesystem structure of a typical JDeveloper workspace with multiple projects related to XML application development.
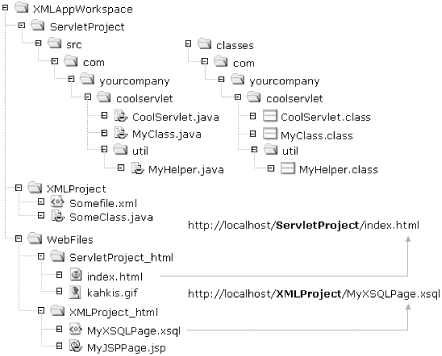
Source code root directories for the
ServletProject and XMLProject
can be organized under a single physical directory or not, as you
wish. However, it is important that both
ServletProject and XMLProject
have the same directory path settings for the
following directories:
- HTML root directory
So their web-related files can be cross-referenced while running pages in the JDeveloper environment
- Output root directory
So any classes that they share at runtime will be found in the CLASSPATH
Following these suggestions should further simplify your Java/XML-related development using JDeveloper 3.1.
Get Building Oracle XML Applications now with the O’Reilly learning platform.
O’Reilly members experience books, live events, courses curated by job role, and more from O’Reilly and nearly 200 top publishers.

