Oracle’s XML Developer’s Kit (XDK) includes many of the enabling XML technologies that we’ll be using in the rest of this book. Among other components, it contains Java and PL/SQL versions of the following:
In addition, it includes an Oracle XSQL Servlet that comes with a Java API for adding your own so-called action handlers and programmatically processing XSQL Pages templates. In the following sections, we’ll discuss the basics of setting up JDeveloper to work with these Oracle XDK components in Java. While JDeveloper 3.1 does offer color-coded syntax editing of PL/SQL and the ability to browse stored procedures and run the SQL scripts against a named database connection, most of the true developer productivity features in the product target Java development (as you’d assume from the “J” in JDeveloper).
To dramatically simplify working with libraries of Java code in your projects, JDeveloper 3.1 has a facility called named libraries . Each library consists of:
A user-friendly library name like “Oracle XML Parser 2.0.”
A Class path comprising one or more
.jarfiles,.zipfiles, or directories separated by semicolons, containing the executable classes to support the library; for example,J:\lib\xmlparserv2.jar.An optional Source path comprising one or more
.jarfiles,.zipfiles, or directories containing the Java source code for the library.An optional Doc path comprising one or more
.jarfiles,.zipfiles, or directories containing the JavaDoc HTML files for the library.
To use the functionality provided by a library in your project, do the following:
Select Project → Project Properties... from the main menu.
Click on the Libraries tab in the Project Properties dialog.
Click on the Add... button on the Libraries tab to select a library to add to your project’s library list.
Select a library to add from the list that appears.
Click OK.
In the Libraries tab of the Project
Properties dialog, notice the Java
libraries
list. This is an ordered list of the
libraries your project depends on. The order of the library names in
this list is very significant because their order directly controls
the order of the .jar files,
.zip files, and directories in the Java
CLASSPATH of the compilation and runtime environment for the current
project. You can use drag-and-drop to rearrange the order of the
libraries in the library list.
So, rather than fighting with CLASSPATH settings—one of the biggest frustrations of Java developers the world over—you simply pick the libraries you need and they, in turn, are used by JDeveloper to control the CLASSPATH.
JDeveloper 3.1 comes preconfigured with Java libraries to work with the principal Oracle XML Developer’s Kit components: Java SDKs and JDBC libraries. This means that building custom XML applications in Java using the Oracle XDK is a matter of simply picking the library you want to work with and adding it to your project’s library list. Table 4.4 shows the most common tasks you might want to perform and which built-in named libraries you add to your project to accomplish them.
Table 4-4. Built-in Libraries for XML Application Development
|
If you want to do this |
Add this library to your project |
|---|---|
|
Connect to an Oracle database |
Oracle 8.1.6 JDBC |
|
Produce XML from SQL queries |
Oracle XML SQL Utility |
|
Save XML documents into tables/views |
Oracle XML SQL Utility |
|
Parse XML documents using DOM or SAX |
Oracle XML Parser 2.0 |
|
Transform XML documents using XSLT |
Oracle XML Parser 2.0 |
|
Searching XML documents using XPath |
Oracle XML Parser 2.0 |
|
Construct XML documents using DOM |
Oracle XML Parser 2.0 |
|
Build servlets to process or return XML |
Servlet SDK |
|
Run XSQL Pages |
XSQL Runtime |
|
Build custom XSQL action handlers |
XSQL Runtime |
|
Process XSQL pages programmatically |
XSQL Runtime |
|
Compile/run JSP from your project |
JSP Runtime |
You can use JDeveloper’s library facility to create your own libraries as well to complement the built-in library names. To create your own library to manage code you frequently need to use in other projects, do the following:
Select Project → Project Properties... from the main menu.
Click on the Libraries tab in the Project Properties dialog.
Click on the Libraries... button on the right edge of the Libraries tab to call up the Available Java Libraries dialog.
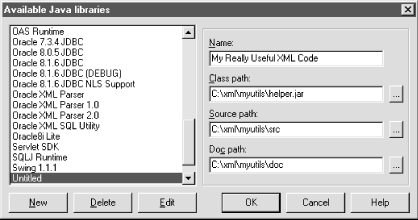
Click on the New button.
An Untitled library entry appears, as shown in Figure 4.11, and you can enter the new library Name, Class path, and optional Source and Doc paths, then click OK.
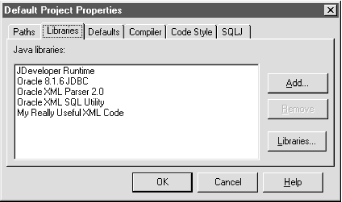
If you find yourself using a library in almost every project you create, you can add the library to the Default Project Properties library list so that every new project will contain that library upon creation. For example, to add your new “My Really Useful XML Code” library to the Default Project Properties library list, follow these steps:
Select Tools → Default Project Properties... from the main menu.
Select the Libraries tab.
Click on the Add... button to add your library to the list, as shown in Figure 4.12.
Now any subsequently created projects will have your library by default. You can add built-in libraries as well as any libraries you create yourself to this list.
Updated versions of the Oracle XDK Components for Java are released frequently on the Oracle Technology Network (OTN) web site. As a result of this rapid release pace, it is very possible that the version of the XDK libraries that ships with the JDeveloper 3.1 release on the accompanying CD-ROM is no longer the most current version available. You should check the XML home page at OTN at the following URL:
| http://technet.oracle.com/tech/xml |
to see if more recent versions are available for any of the Oracle XDK Java components. If you find that a new version is available, simply do the following:
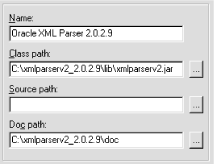
Download the latest release of the XDK component from OTN. Let’s say, for example, that you discover that a new version 2.0.2.9 of the Oracle XML Parser for Java is now available.
Extract the
.tar.gzor.zipfile for the distribution into a convenient directory; for example, intoC:\xmlparserv2_2.0.2.9.Create a new library in JDeveloper to work with it; for example, we’d set up the new library settings as shown in Figure 4.13.
Then we can add the new “Oracle XML Parser 2.0.2.9” library to any project where we want to use it.
JDeveloper 3.1 offers a number of coding productivity features to make building your XML application code in Java easier. Here we cover the key features to which you will quickly become addicted.
While you are typing code, JDeveloper’s Code Insight feature watches what you are doing and is ready to help simplify the task of remembering method names and method arguments for any class you work with. Any time you type a dot between an object and a method name, JDeveloper pops up a context-sensitive list of the methods that are relevant to call on the object, as shown in Figure 4.14.
After typing just enough of the leading letters of the method name you want—or alternatively, using the up/down arrow keys—you can hit Return and JDeveloper fills in the rest of the method name for you. As soon as you type the opening parenthesis to pass the arguments to the method, the Code Insight feature pops up another context-sensitive list of all overloadings, arguments, and their datatypes that are relevant as shown in Figure 4.15.
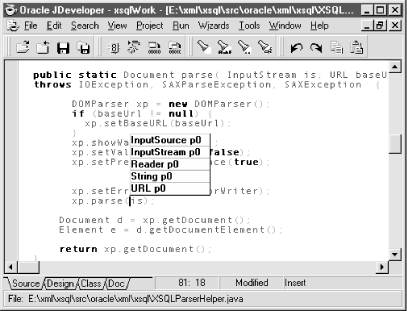
If there are multiple arguments, Code Insight will step through the arguments in the pop-up help, keeping the current argument required and its datatype in bold.
If you find that the Code Insight feature is not working for you, it’s probably for one of the following reasons:
JDeveloper cannot deduce what type your object is because of a typo or because your code has not yet declared the object. To resolve this, check for typos and/or define the variable properly in your code.
You’re using a class that you have not imported. To resolve this, add an appropriate
importstatement to the top of your class.You’ve forgotten to add the appropriate library to your project’s library list that contains the current class. To resolve this, add the appropriate library to your project’s library list.
Your code contains some horrible syntax error and JDeveloper’s Code Insight parser gets confused by it. To resolve this, try compiling your class to find the culprit.
To browse the source code of any class you have two choices:
If it’s the class for an object your code is currently working with, click the right mouse button over the class or variable in your code and select Browse Symbol at Cursor.
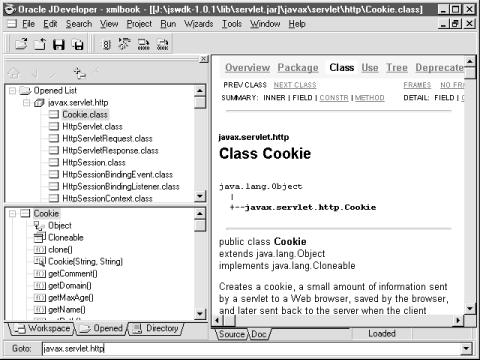
If it’s a class that just pops into your head, press Ctrl-/ and a Goto: box appears in the status line at the very bottom of the JDeveloper window. Then:
If you remember the fully qualified name of the class, type it in and press Enter.
Otherwise, type in the name of the package that class is in and press Enter.
Figure 4.16 shows an example of typing Ctrl-/
followed by the package name javax.servlet.http,
followed by Enter. The package appears for browsing in the
Opened tab of the project navigator, showing all
of the classes in the package. Single-clicking on any of the classes
in the package shows a structural breakdown of all of its members in
the “Structure Pane” located below the project navigator.
Double-clicking on any class summons up one of the following:
The class’s source code in a code editor, if it is a class in the current project or if it is a class in a library on your project’s library path and that library defines a “Source path” so JDeveloper can find the source.
A decompiled version of the source which is good enough to see the methods and arguments.
Clicking on the Doc tab of any code editor causes one of two things to occur:
The class’s JavaDoc appears if it is a class in a library on your project’s library path and that library defines a “Doc path” so JDeveloper can find the JavaDoc.
Otherwise, JDeveloper shows a blank page with “No JavaDoc found”.
So you can very quickly refer to the structure, source, and JavaDoc for any class in any library you use. Each of these features is small in and of itself, but put together they “nickel and dime” their way to saving you lots and lots of time.
I’ll close this chapter with a few final observations:
Don’t underestimate the power of the Oracle Technology Network web site. If you do nothing else, try searching its online “Documentation” archive. This archive has every manual of every product Oracle has shipped in the last ten years indexed using Oracle and interMedia for fast searching and fewer dead trees. Reference information right at your fingertips!
The OTN site offers an XML Discussion Forum where Oracle experts hang out and answer questions. It’s a great resource.
Don’t fret if you were waiting for details in this chapter about remote debugging using JDeveloper for Apache and JServer. We’ll cover those topics as we need them in Chapter 6.
Get Building Oracle XML Applications now with the O’Reilly learning platform.
O’Reilly members experience books, live events, courses curated by job role, and more from O’Reilly and nearly 200 top publishers.

