The most important thing in science is not so much to obtain new facts as to discover new ways of thinking about them.
If you’re like me, it takes very little for you to recall your first experience with a computer. In fact, the act of reading that last sentence probably took you back in your mind’s eye to whenever that time was.
I first touched a computer in 1985 when my parents brought home an IBM PC. It was decked out with two 5×7-inch floppy disk drives and a lovely green-screen monitor. I was instantly intrigued and quickly started diving into the several instruction binders that came with this mystical machine so that I could learn the magic that would allow me to harness its power. A few successful lines of BASICA later and I was hooked.
While massive advancements have been made in the area of computers, many of the core concepts have remained the same. These advancements were often made by discovering new ways to think about existing facts. Without these new ways of thinking, we would certainly not be where we are today.
New ways of thinking continue to be developed daily and the constant advances in technology reflect this. Many of these advances have had a positive side effect of causing more and more people to have access to the Internet than ever before. These users of the Web expect sites that are highly responsive and that work with a variety of modern devices. Other advances have shifted the access of the Internet from the traditional stationary locations to mobility. In fact, the CTIA Wireless Association has indicated that there are more wireless subscriber connections in the United States and its territories than people, according to a CNET News article.
In order to provide responsive and adaptive solutions that scale to the number of users that are now required, we too must discover new ways to think about various technologies and approaches. I’ve already shown several ways to help your solutions meet increasing speed and scalability needs. This chapter provides additional approaches and F# examples to further this knowledge.
Web Sockets has been getting a lot of press recently. This highly publicized feature is part of the in-progress HTML5 specification. Though the spec is still in-progress, this hasn’t stopped many of the major players from building HTML5 features into their browsers. The feature known as Web Sockets is no exception.
Web Sockets provides a mechanism for two-way communication between the client and the server. This makes your site faster and more scalable by reducing the number of requests and shrinking the payload size of any sent packets. Additionally, the full-duplex communication channel that a web socket provides allows the information on a page to update in near−real time. You can find more information about the benefits of Web Sockets here.
Note
While Web Sockets can certainly improve the performance and scalability of your site, you should use it responsibly. More information can be found here.
You may be wondering what areas of your solution or types of solution would best benefit from the use of Web Sockets. The typical response would be “anything that needs to be updated in real time,” but that seems a bit too generic. Here are a few specific ideas that seem to be a great fit: real-time site usage statistics and reporting, stock ticker displays, the canonical chat example, real-time games, a Kanban board, and user alerts and notifications. In practice, you will need to evaluate your solution to determine which pieces require the advantages that Web Sockets provides, and utilize them only in these areas.
There are a few options when it comes to building web socket servers. Versions of IIS earlier than IIS 8 do not support Web Sockets. So if you want to host your web socket in IIS, you’ll have to use IIS 8 and .NET 4.5. Paul Batum talks more about this and shows a C# example in his blog. The F# example that follows takes a similar approach as defined in Paul’s post.
Note
There is an unsupported prototype for Web Sockets that will work in theory in earlier versions of IIS.
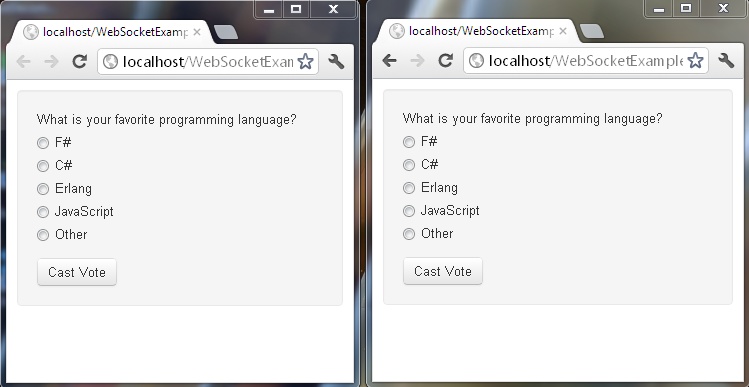
Let’s build a simple survey that will provide a charted view of the responses in real time via a web socket. The survey will provide a single question that asks, “What is your favorite programming language?” Possible answers include F#, C#, Erlang, JavaScript, and Other. With a tiny bit of help from the Twitter Bootstrap CSS, the web version of the question aspect of our survey appears as shown in Figure 4-1. The image shows two instances of Chrome side by side, with our survey loaded in each. This will make it easy for us to see how responsive our website becomes when using Web Sockets.
Note
You will need to run Visual Studio in administrator mode to execute this example.
The view that displays after you have submitted the answer to the survey question shows a chart that represents all responses to the survey. This is the view we want to update in real time. We’ll use a JavaScript charting library called D3. Since it’s not directly related to the web socket aspects of this example, I won’t show the D3-related code. However, you can find it in the mainModule.js file in the WebSocketIIS8Example project.
After enabling web sockets in IIS 8, we create a new ASP.NET MVC 4
application and make sure all projects are set to use .NET 4.5. We can
now install the Microsoft.WebSockets
NuGet package. We can also add a new .ashx file to the C# project and a few
supporting .fs files to the F#
WebApp project.
The first .fs file in this
example is named ChartWebSocket.ashx.fs and it’s similar in
concept to the code-behind .cs file
that is often created when an .ashx
item is created in a C# project. The code in this file creates a class
that implements IHttpHandler. When a
web socket request is processed, a new instance of a WebSocketChartHandler class is instantiated.
The code looks like this:
namespaceFsWebopenSystemopenSystem.WebopenMicrosoft.Web.WebSocketsopenWebSocketServertypeChartWebSocket()=interfaceIHttpHandlerwithmemberx.ProcessRequestcontext=ifcontext.IsWebSocketRequestthencontext.AcceptWebSocketRequest(newWebSocketChartHandler())memberx.IsReusable=true
The WebSocketChartHandler.fs
file is composed of a few different pieces. First a WebSocketCollection is created to keep track
of all the clients. Second, a VoteCounts record is defined. This will be
used as the container that later gets serialized to JSON and sent to
each web socket client. These two pieces of code look like the
following:
letmutableclients=WebSocketCollection()typeVoteCounts={language:string;count:int}
To help us out, a MailboxProcessor is used to keep a running
total of the votes that have been cast for each programming language.
This example could easily be extended to store the survey results in a
database, but for the sake of simplicity we will be storing the
responses in memory. The MailboxProcessor implementation looks like
this:
typeMessage=|Voteofstring*AsyncReplyChannel<seq<string*int>>letvotesAgent=MailboxProcessor.Start(funinbox->letrecloopvotes=async{let!message=inbox.Receive()matchmessagewith|Vote(language,replyChannel)->let newVotes = language::votes newVotes |> Seq.countBy(fun lang -> lang) |> replyChannel.Replydo!loop(newVotes)do!loopvotes}loopList.empty)
The MailboxProcessor
implementation isn’t all that different from the one shown in Chapter 1,
so I will only spend time explaining the code that is emphasized.
When a Vote message is received
from the virtual queue, it’s added to an F# list. F# lists are
singly linked list data structures, which allow
them to perform well while remaining immutable. This list performs well
because a copy of the list isn’t created each and every time a new value
is added. Instead, the new value is added to a new address space and a
reference is used to point to the rest of the list. We use the
cons operator (::) to make this happen. After the operation
is complete the new survey result will effectively be at the front of
the list.
The votes are then counted for each language and a sequence of
string * int is returned. For
example, if three votes for F# have been cast, along with one for C# and
two for JavaScript, the result of pushing a new vote for F# into the
MailboxProcessor would be a sequence
that conceptually contains F#, 4; C#, 1;
JavaScript, 2.
The last bit of code contained in the
WebSocketChartHandler.fs file is
the WebSocketChartHandler
class definition. This class inherits WebSocketHandler and overrides three
of the methods it contains. The code looks like this:
typeWebSocketChartHandler()=inheritWebSocketHandler()overridex.OnOpen()=clients.Addxoverridex.OnMessage(language:string)=votesAgent.PostAndReply(fun reply -> Message.Vote(language, reply)) |> Seq.map(fun v -> { language = fst v; count = snd v } ) |> JsonConvert.SerializeObject |> clients.Broadcastoverridex.OnClose()=clients.Removex|>ignore
Each method is pretty self-explanatory, so I’ll concentrate on the
emphasized code in the OnMessage
method. The first line sends the vote to the MailboxProcessor and waits for the reply. The
result of that call is passed to Seq.map to be projected into a sequence of the
VoteCounts record that was shown
previously. This sequence of VoteCounts is then serialized to JSON using
Json.NET. Lastly, the result is broadcast to all clients of the web
socket.
The following is an abbreviated version of the JavaScript that connects to the web socket server:
$(function(){varuri,updateChart,$pages=$(".page");$pages.hide();$pages.first().toggle();updateChart=function(data){/* Removed for brevity */};uri="ws://localhost/WebSocketExample/ChartWebSocket.ashx";websocket=newWebSocket(uri);websocket.onopen=function(){$("#vote").click(function(event){varvote=$("input:radio[name=langOption]:checked");if(vote.length){websocket.send(vote.val());};$pages.hide();$("#results").toggle();event.preventDefault();});};websocket.onmessage=function(event){updateChart($.parseJSON(event.data));};});
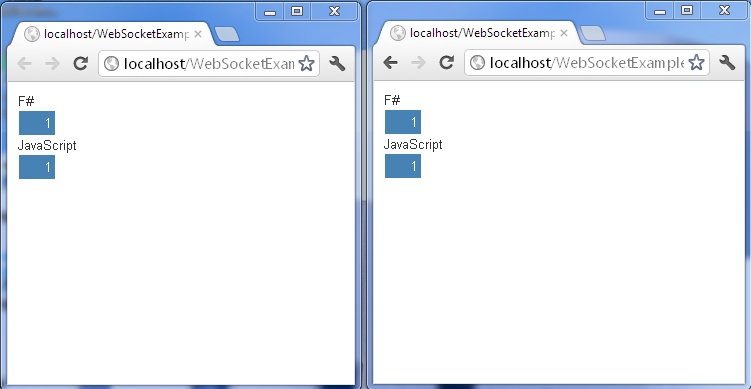
You can see this in action by opening two browser instances as shown in Figure 4-1 and casting votes for your favorite language(s). Each browser will show a bar chart that contains the total votes cast for each language that has at least one vote. Additionally, the bar chart on each browser will update to display the latest totals almost immediately after clicking the Cast Vote button from any of the clients. Figure 4-2 shows an example of this.
Although the example I just showed works well, what do we do when
we don’t have IIS 8, don’t want to
upgrade to .NET 4.5, or want to host the web socket outside of IIS?
Luckily, there are several options available to us. My favorite is a
library called Fleck. To get started with Fleck, install the Fleck NuGet package. You can then use code
such as the following to stand up a self-hosted web socket
server:
moduleFsFleckServeropenSystemopenSystem.Collections.GenericopenFleckopenNewtonsoft.JsontypeVoteCounts={language:string;count:int}typeMessage=|Voteofstring*AsyncReplyChannel<seq<string*int>>letvotesAgent=MailboxProcessor.Start(funinbox->letrecloopvotes=async{let!message=inbox.Receive()matchmessagewith|Vote(language,replyChannel)->letnewVotes=language::votesnewVotes|>Seq.countBy(funlang->lang)|>replyChannel.Replydo!loop(newVotes)do!loopvotes}loopList.empty)letmain()=FleckLog.Level<-LogLevel.Debugletclients=List<IWebSocketConnection>()use server = new WebSocketServer "ws://localhost:8181" let socketOnOpen socket = clients.Add socket let socketOnClose socket = clients.Remove socket |> ignore let socketOnMessage language = let results = votesAgent.PostAndReply(fun reply -> Message.Vote(language, reply)) |> Seq.map(fun v -> { language = fst v; count = snd v } ) |> JsonConvert.SerializeObject clients |> Seq.iter(fun c -> c.Send results) server.Start(fun socket -> socket.OnOpen <- fun () -> socketOnOpen socket socket.OnClose <- fun () -> socketOnClose socket socket.OnMessage <- fun message -> socketOnMessage message)Console.ReadLine()|>ignoremain()
The two type definitions and the defined agent are exactly the
same as what we had in the IIS 8 example. The emphasized code
instantiates a WebSocketServer;
defines three methods to handle socket open events, socket close events,
and messaging events, respectively; and starts up the server.
To use it, all you have to do is change the JavaScript uri assignment in the previously shown
JavaScript code to point at the URL of the Fleck server and clear your
browser cache. In the end, the application works exactly as it did in
the IIS 8 example.
I think we all will agree that Web Sockets is pretty cool. The type of bidirectional communication it affords opens up a world of opportunity. Unfortunately, support for Web Sockets is still spotty. So, while Web Sockets is certainly a glimpse of the future, it may not seem like a viable option for the systems you are building today. If only we had some way to take advantage of Web Sockets when it is available, but fall back to other options when it isn’t.
As I’m sure you have guessed, this is certainly achievable, and one option for doing so is built into a set of libraries named SignalR. SignalR is something that two Microsoft employees started as an open source project that was later adopted by Microsoft as an officially sponsored project. SignalR makes it easy to build real-time solutions using asynchronous signaling approaches. SignalR makes it possible for us to build modern solutions today that will automatically take advantage of Web Sockets when available.
So what does SignalR do when Web Sockets support isn’t available? It checks for a few different options, and uses the one that is best suited to the task at hand. Web Sockets is checked first. If that isn’t supported then Server-Sent Events, Forever Frame, and Long Polling are checked.
Note
SignalR isn’t the only game in town when it comes to falling back to other techniques such as Forever Frame and Long Polling. Socket.IO and NowJS are a few options that do this as well. However, SignalR goes about it in an easier way and is specifically designed to play well with ASP.NET.
Two primary options are available for building the SignalR server-side aspects. The first is a persistent connection and the second is a hub. The persistent connection option is pretty similar to what we’ve seen in the Fleck and IIS 8 web socket server implementations provided in this chapter.
As you’ll see, it doesn’t take much code to get this set up. You
start by installing the SignalR NuGet
package. After that, it’s a simple matter of adding a custom route map
and implementing a class that derives from PersistentConnection. A snippet from a Global.fs file with the new code
emphasized is shown in the following example:
typeGlobal()=inheritSystem.Web.HttpApplication()staticmemberRegisterRoutes(routes:RouteCollection)=routes.IgnoreRoute("{resource}.axd/{*pathInfo}")routes.MapRoute("Default","{controller}/{action}/{id}",{controller="Home";action="Index"id=UrlParameter.Optional})memberthis.Start()=RouteTable.Routes .MapConnection<ChartServer>("chartserver", "chartserver/{*operation}") |> ignoreAreaRegistration.RegisterAllAreas()Global.RegisterRoutes(RouteTable.Routes)
The new class that inherits PersistentConnection is shown in the next
example. As I mentioned, it’s not that much different from the
previously shown IIS 8 web socket server examples. Here we’re simply
overriding the OnReceivedAsync method
rather than the OnMessage
method:
moduleSignalRExampleopenSystemopenSignalRopenNewtonsoft.Json// Code from previous examples removed for brevitytypeChartServer()=inheritPersistentConnection()overridex.OnReceivedAsync(request,connectionId,data)=votesAgent.PostAndReply(funreply->Message.Vote(data,reply))|>Seq.map(funv->{language=fstv;count=sndv})|>JsonConvert.SerializeObject|>base.Connection.Broadcast
The client-side aspects of SignalR change slightly depending on
whether the client is using JavaScript or F# as well as whether the
server is using PersistentConnection
or Hub. Additionally, the JavaScript
option is a little bit different from the previously seen web socket
client-related JavaScript. This difference is partially due to the
jQuery plug-in that helps SignalR do its
magic. Here is a JavaScript example for the PersistentConnection that
we built in the earlier example:
/* Some code removed for brevity */varconnection=$.connection("/chartserver");connection.received(function(data){updateChart($.parseJSON(data));});$('#vote').click(function(event){varvote=$('input:radio[name=langOption]:checked');if(vote.length){connection.send(vote.val());};$pages.hide();$("#results").toggle();event.preventDefault();});connection.start();
Using the client and server together results in the same effect we achieved in the previous web socket examples. The output looks just like Figure 4-2.
What if you want to connect to a SignalR server from F# instead of JavaScript? That’s no problem at all. The next example shows an F# console application that can cast a vote for a favorite programming language.
To build this, create a new F# console application, install the
SignalR.Client NuGet package, and add
code such as the following:
moduleSignalRExampleopenSystemopenSignalR.Clientletconnection=Connection"http://localhost:2920/chartserver"connection.Start().Wait()connection.Send"F#"|>Async.AwaitIAsyncResult|>Async.Ignore|>ignoreconnection.Stop()|>ignoreprintfn"Vote cast for F#"Console.ReadLine()|>ignore
As I mentioned previously, SignalR provides another option, which
is known as a Hub. This option
provides a higher-level abstraction over PersistentConnection. This abstraction makes
it possible for the server to call named JavaScript functions. Let’s
look at an example.
The next example provides a self-hosted SignalR Hub. It’s an F# console application that has
had the SignalR.Hosting.Self
package installed. To set up the hub, you create a class that inherits
from Hub. You then add the methods
you wish to be available for calls from clients. To call functions
declared in JavaScript, you can use the Clients dynamic object followed by the name
of the desired function. This code is emphasized in the following
example:
// Code from previous examples removed for brevitytypeChartHub()=inheritHub()memberx.Send(data:string)=letresult=votesAgent.PostAndReply(funreply->Message.Vote(data,reply))|>Seq.map(funv->{language=fstv;count=sndv})trybase.Clients?updateChart(result)with|ex->printfn"%s"ex.Messageletserver=Server"http://*:8181/"server.MapHubs()|>ignoreserver.Start()printfn"Now listening on port 8181"Console.ReadLine()|>ignore
One thing you may have noticed in the preceding example is the
use of the ? operator when working
with the dynamic Clients object. F#
doesn’t provide the exact same dynamic object option that is provided
in C#. Instead, it provides a more powerful option that allows you to
implement whatever dynamic functionality you require. This option is
provided in the form of dynamic lookup
operators.
Dynamic lookup operators can provide the same functionality as
what is offered in C#, though they’re not restricted to that
functionality only. You can customize the implementation of dynamic
lookup operators in whatever way you see fit, allowing power beyond
that of its cousin language. One implementation that has gained
popularity is available via the ImpromptuInterface.FSharp library, which can
be installed with a NuGet package ID of the same name. The Hub example uses this library.
The JavaScript code changes slightly when using a Hub as well. Here’s the example we have been
reviewing, with the changes that are required to interact with a
Hub emphasized:
$.connection.hub.url = 'http://localhost:8181/signalr' var chartHub = $.connection.chartHub; chartHub.updateChart=function(data){updateChart(data);};$('#vote').click(function(event){varvote=$('input:radio[name=langOption]:checked');if(vote.length){chartHub.send(vote.val())}$pages.hide();$("#results").toggle();event.preventDefault();});$.connection.hub.start();
One other key thing we have to do to make this work is to add a few script references such as the following:
<scriptsrc="@Url.Content("~/Scripts/jquery.signalR-0.5.2.min.js")"></script><scriptsrc="http://localhost:8181/signalr/hubs"type="text/javascript"></script>
Adding support for mobile devices that also interact with SignalR is pretty easy now that we have the basics built. In this section I’ll show a few different approaches for extending the simple survey application to mobile devices. The first uses jQuery Mobile. The second is a native Windows Phone 7 application.
I’ve shown several examples throughout this book that use jQuery Mobile and I mentioned briefly how you can quickly configure ASP.NET MVC 4 to react differently for different devices. However, I haven’t actually shown an example of this in action. Since we already have a web version of the survey application in place, this is a perfect opportunity to quickly walk through what is needed to switch out the views in an ASP.NET MVC 4 web application when a page is accessed by a mobile device.
You first need to add a new _Layout.cshtml file named _Layout.mobile.cshtml. The typical jQuery
Mobile references are then added to this new _Layout file along with the same SignalR, D3,
and mainModule JavaScript references
that were included in the original _Layout file.
All we need to do now is to make a few adjustments to the HTML in the existing Index.cshtml file. With these changes, the one Index.cshtml file can be reused for both views. The markup, with changes emphasized, is as follows:
<divid="survey"class="page"data-role="page" ><divclass="row"data-role="content"><formclass="well"><fieldsetdata-role="controlgroup"><legend>What is your favorite programming language?</legend><divclass="controls"><labelclass="radio"><inputtype="radio"name="langOption"id="fsharp"value="F#"/>F#</label><labelclass="radio"><inputtype="radio"name="langOption"id="csharp"value="C#"/>C#</label><labelclass="radio"><inputtype="radio"name="langOption"id="erlang"value="Erlang"/>Erlang</label><labelclass="radio"><inputtype="radio"name="langOption"id="javascript"value="JavaScript"/>JavaScript</label><labelclass="radio"><inputtype="radio"name="langOption"id="other"value="Other"/>Other</label></div></fieldset><divclass="buttonContainer"><buttonid="vote"class="btn"/>Cast Vote</div></form></div></div><divid="results"class="page"data-role="page" ><divid="barChart"class="barChart"data-role="content" ></div></div>
Note
Instead of using the same Index.cshtml for both views, we could have created a new ASP.NET MVC view named Index.mobile.cshtml to house mobile-specific markup. This is a workable approach if we need to have completely different markup for specific device types; however, I believe it is best to try to keep the markup the same for both views and use media types and other adaptive and/or responsive design techniques to tailor the experience appropriately.
We can verify that things are working by switching out the user agent in a browser such as Chrome. Additionally, we can use emulators and/or simulators such as TestiPhone to see how things will look when displayed on screens of different sizes. The new look with an iPhone 5 user agent on a simulator is shown in Figure 4-3.
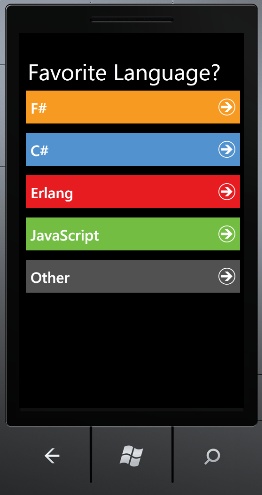
While the jQuery Mobile approach will work for all the major mobile players, we may wish to develop specific native apps that also take advantage of SignalR. As an example, perhaps we wish to take our simple survey application and create a native Windows Phone 7 version. The resultant visual aspects of the app are shown in Figure 4-4.

A deep dive into how to create Windows Phone 7 applications in F# could easily fill another book. However, you don’t need to read a whole other book to quickly get a simple Windows Phone 7 app with F# up and running. Simply install the Windows Phone SDK, then install one of the F# and C# Windows Phone project templates from Visual Studio Gallery, such as the one here.
I won’t spend a lot of time going into the details of the non-SignalR aspects of this example. You can find the full source at the GitHub website. One other thing to point out is that this example uses a self-hosted, persistent connection SignalR server. The code for this is available here.
Note
At the time of this writing, the Windows Phone 7 development tools are not yet supported in Visual Studio 2012. Because of this, the example provided in this section uses Visual Studio 2010.
After creating a new F# Windows Phone 7 project, we can add the
desired XAML to
make things appear as shown in Figure 4-4. Next, we need to install the
SignalR.Client NuGet package in both the App and
AppHost projects. We’re now ready to modify the AppLogic.fs file so that it interacts with
the SignalR server.
To get started, we’ll first create a record that will act as a
Model as well as a class to act as a
ViewModel. To keep things simple,
I’ve hardcoded the language choices and associated box color. Each of
these is shown in the following example:
typeLanguageChoice={Language:string;BoxColor:string}typeLanguageChoiceViewModel()=memberx.LanguageChoices=letresult=List<LanguageChoice>()result.Add{Language="F#";BoxColor="#F29925"}result.Add{Language="C#";BoxColor="#5492CD"}result.Add{Language="Erlang";BoxColor="#E41F26"}result.Add{Language="JavaScript";BoxColor="#70BE46"}result.Add{Language="Other";BoxColor="#535353"}result
Note
Model-View-ViewModel (MVVM) is a common design pattern that is often used when building XAML-based solutions. You can find more information about MVVM on John Gossman’s blog. It should be noted that the example provided in this section does not follow MVVM fully. Instead, the example is optimized for simplicity and set up to show different approaches.
Now that the Model and ViewModel are created, we can modify the
MainPage class to include the logic
needed to send the selected vote information to the SignalR server. The
code to accomplish this is shown in the next example and I’ll point out
various interesting aspects in the next several paragraphs:
typeMainPage()asthis=inheritPhoneApplicationPage()dothis.DataContext<-LanguageChoiceViewModel()doApplication.LoadComponent(this,newSystem.Uri("/WindowsPhoneApp;component/MainPage.xaml",System.UriKind.Relative))let confirmationLabel : TextBlock = this?Confirmationmemberthis.AnswerButton_Click(sender:obj,e:RoutedEventArgs)=letanswerButton=sender:?>ButtonSignalR.connection.Send(answerButton.Tag) .Start(TaskScheduler.FromCurrentSynchronizationContext())confirmationLabel.Text<-"Thanks for Voting!"
The first few lines of code in this class are wiring up the class
to the XAML. The class inherits PhoneApplicationPage, sets our ViewModel as the DataContext, and finally associates MainPage.xaml to the class.
The next line locates the TextBlock with a name of Confirmation in the XAML and binds it to a
value named confirmationLabel. This
shows a little bit of the power of the dynamic lookup operator that I
talked about previously in this chapter. In the default output of this
Windows Phone 7 project template, an implementation of the dynamic
lookup operator is provided with the
primary goal of locating resources in a ResourceDictionary or
finding controls in XAML.
The AnswerButton_Click member
shows a traditional code-behind type of click event handler. This is
where we see the first mention of anything related to SignalR. Within
this event handler, we determine which button was pressed and send the
information to the SignalR server by starting the task from the current
synchronization context. Lastly, the text of a label is set to a desired
confirmation message.
The only other thing to discuss is how the SignalR server
connection information is determined. In this example, this is
accomplished by defining a module with a function named startConnection. This function is called
whenever the application launches. Conversely, the connection is stopped
whenever the application is closed. Here is the code for defining the
module with the startConnection
function:
moduleSignalR=letconnection=Connection"http://localhost:8081/chartserver"letstartConnection()=ifconnection.State=ConnectionState.Disconnectedthenconnection.Start().Start(TaskScheduler.FromCurrentSynchronizationContext())
NoSQL data storage options have been gaining in popularity over the past few years. This class of data store breaks away from the traditional RDBMS databases that have ruled for so long. NoSQL databases generally store data in unstructured or semi-structured formats rather than with the strict schemas used in relational databases. This approach makes it easier to scale horizontally, support redundancy, and handle massive amounts of data while making insertion and retrieval of that data amazingly fast. If you want to achieve faster and more scalable F# solutions that work well for both mobile and web applications, you’ll definitely want to learn about NoSQL databases and how to interact with them through F#.
In this section, I’ll show you how to use F# to interact with a few document-oriented NoSQL options. I’ll use a simple example of a basic grid that lists a minimal amount of information (first name, last name, and phone number) for a contact list. Additionally, a simple form for creating new contacts is provided. Since the primary focus is to show methods for getting started with inserting and retrieving records from these databases, I won’t spend much time on the UI aspects. You can see the full examples here.
MongoDB is one of the most popular NoSQL options in the .NET space. Like the other NoSQL databases discussed in this section, MongoDB is a document-oriented database. This means information pushed in the database is stored with a key and an associated document. When a document is later requested by the key, retrieval is exceptionally fast. Instructions on setting up MongoDB on Windows are available here.
Once you follow the steps for getting MongoDB up and running, the
next step is to create a client to interact with that instance. The
easiest way to get up and running with MongoDB and F# is to install the
NuGet package with ID MongoFs into a
project. This will pull the official C# MongoDB client as well as a
simple F# wrapper that helps make interaction with the C# MongoDB client
API from F# a little nicer.
As I mentioned previously, I will be showing a simple example for
each of the three document-oriented data stores discussed in this
section. Each example is an ASP.NET MVC 4 project that was set up with
the C#/F# ASP.NET MVC 4 template that we discussed in Chapter 1.
The example uses a record called Contact, as shown here:
namespaceFsWeb.ModelsopenMongoDB.BsonopenSystem.ComponentModel.DataAnnotations[<CLIMutable>]typeContact={_id:ObjectId[<Required>]FirstName:string[<Required>]LastName:string[<Required>]Phone:string}
There are two aspects of this code that probably need a little
explanation. The first is the ObjectId type. ObjectId is a 12-byte binary type provided by
MongoDB. This type is commonly used as the unique ID for
documents.
The second aspect is the CLIMutable attribute, which I briefly
mentioned in all of the chapters up to this point. This attribute is a
lesser-known feature of F# 3.0 that has tremendous value when working
with records that need to be serialized or deserialized, such as when
going to or from a document data store. When the F# compiler sees the
attribute it automatically adds a parameterless constructor as well as
getters and setters for the properties. This one little attribute opens
the door for records to be used in places that were previously more
difficult, such as in the controllers of an ASP.NET MVC
application.
The code needed to retrieve all the stored contacts from MongoDB, as well as create new contacts, is shown in the following example:
namespaceFsWeb.ControllersopenSystem.LinqopenSystem.WebopenSystem.Web.MvcopenFsWeb.Models[<HandleError>]typeHomeController()=inheritController()let contacts = createLocalMongoServer() |> getMongoDatabase "contactDb" |> getMongoCollection "contacts"memberthis.Index()=contacts.FindAll().ToList()|>this.View[<HttpGet>]memberthis.Create()=this.View()[<HttpPost>]memberthis.Create(contact:Contact)=ifbase.ModelState.IsValidthencontact |> contacts.Insert |> ignorethis.RedirectToAction("Index"):>ActionResultelsethis.View():>ActionResult
The emphasized code shows how little is needed to interact with
MongoDB from F# when using MongoFs.
The first four emphasized lines identify the MongoDB instance, database,
and collection with which you wish to interact. Additionally, if the
database or collection doesn’t already exist, it will be created. The
pipelining approach used to accomplish these tasks is provided by the
MongoFs library. The one line
required for retrieving all records as well as the one line needed to
insert a contact are achieved solely by the great syntax of F# combined
with the API of the official C# MongoDB client.
One other thing you may have noticed is that I never open the
MongoFs module in this example. This
is due to another feature of F#, called the AutoOpen attribute. When the AutoOpen attribute is added to a module, that
module will not need to be explicitly opened or referenced. Here’s an
example of the AutoOpen attribute in
use:
[<AutoOpen>]ModuleMongoFs// Code removed for brevity
RavenDB is another document-oriented database that has been taking the world by storm. A few of the big benefits of RavenDB include support for transactions, full-text search via Lucene, a “safe by default” core principle, and ease of embedding the DB when desired.
For the example that follows, download and extract the latest build of
RavenDB. You can then launch the RavenDB server. Once that is
complete, you should be able to run the
example. The example was built by installing version 1.0.960 of
the RavenDB.Client.FSharp NuGet package into an F#/C#
ASP.NET MVC solution. The code needed to get our contacts list
up and running is shown in the following example:
namespaceFsWeb.ControllersopenSystem.LinqopenSystem.WebopenSystem.Web.MvcopenFsWeb.Modelsopen Raven.Client.Document[<HandleError>]typeHomeController()=inheritController()let ravenUrl = "http://localhost:8080/" let executeRavenAction action = use store = new DocumentStore() store.Url <- ravenUrl store.Initialize() |> ignore use session = store.OpenSession() action sessionmemberthis.Index()=executeRavenAction <| fun session -> session.Query<Contact>().ToList()|>this.View[<HttpGet>]memberthis.Create()=this.View()[<HttpPost>]memberthis.Create(contact:Contact)=ifbase.ModelState.IsValidthenexecuteRavenAction <| fun session -> session.Store contact session.SaveChanges()this.RedirectToAction("Index"):>ActionResultelsethis.View():>ActionResult
While the code is a bit more verbose than the MongoDB example, you
get a few key benefits such as inherent usage of the Unit of Work
pattern. In addition to showing the RavenDB F#
client API in use, the preceding code also showcases a
higher-order function named executeRavenAction that abstracts away the
common code that is used for the majority of interactions with
RavenDB.
The last NoSQL option that I will showcase is CouchDB. Built with Erlang, CouchDB is one of the most fault-tolerant NoSQL options available. It’s also easy to distribute and fast. You can find out more about CouchDB here.
Note
The creator of CouchDB is now primarily focusing on a project called Couchbase, which has a different API and a number of additional features. I have chosen to only show CouchDB in this book; however, I recommend checking out Couchbase to see if it is right for you. A comparison of CouchDB and Couchbase is available here.
There are a number of client options for interacting with CouchDB.
One of these options is one that I created, called FSharpCouch. To use
it, install the FSharpCouch NuGet
package in the desired project and use any of the functions described
here. Here’s a
quick example using the same contacts list application that was shown in
the examples for the other two NoSQL options:
namespaceFsWeb.ControllersopenSystem.LinqopenSystem.WebopenSystem.Web.MvcopenFsWeb.Modelsopen FSharpCouch[<HandleError>]typeHomeController()=inheritController()let couchUrl = "http://localhost:5984" let dbName = "people"memberthis.Index()=getAllDocuments<Contact> couchUrl dbName |> Seq.map(fun c -> c.body)|>this.View[<HttpGet>]memberthis.Create()=this.View()[<HttpPost>]memberthis.Create(contact:Contact)=ifbase.ModelState.IsValidthencontact |> createDocument couchUrl dbName |> ignorethis.RedirectToAction("Index"):>ActionResultelsethis.View():>ActionResult
One interesting aspect of this implementation is that F# records
are used without any mutation required. The Contact record used for the create request
only includes the things directly related, such as first name, last
name, and phone. However, the entity or entities that are returned from
a create or from either of the get options will return a record that
includes an ID and a revision. This is made possible by returning the
record shown in the following, with body set to a populated instance of a record
that matches what was originally added (this is the main reason for the
Seq.map call in the Index method of the previous example):
typeCouchDocument<'a>={id:stringrev:stringbody:'a}
This chapter covered a few additional approaches that can help you build faster and more scalable web and mobile solutions with F# and other technologies. You learned a few different ways to create and consume Web Sockets as well as various options for interacting with a few common document-oriented data stores. Throughout the chapter, I introduced and explained a handful of features of F# of which you may not have previously been aware.
In the next chapter, I’ll show you a few options for creating frontend code with the beauty and elegance of a functional style. The options discussed in the next chapter will allow you to build full stacks using functional concepts and will open your eyes to new thoughts and ideas. You won’t want to miss it!
Get Building Web, Cloud, and Mobile Solutions with F# now with the O’Reilly learning platform.
O’Reilly members experience books, live events, courses curated by job role, and more from O’Reilly and nearly 200 top publishers.

