If you have built Access applications in the past, you know that forms in Access have a nice record navigation box at the bottom (if you don’t shut it off) and that navigation box holds controls that allow you to move between records, add records, delete records, etc. If you have been using this, the inconvenience of not having that built-in functionality in form design will definitely be felt when developing in .NET. But the good news is that using the built-in navigation controls in C# is much easier than what you built in Chapter 4. Also, you will have the same type of control over the data as you had in the last chapter.
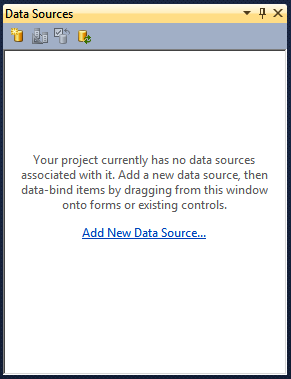
To get started, go into Visual Studio and create a new Windows Forms Application. I called mine UsingDataControls. Given the data that you will be working with, stretch the form to be a little wider and taller. Next, go to the top menus and select Data→Show Data Sources (or press Shift+Alt+D). You will see the box shown in Figure 4-1.
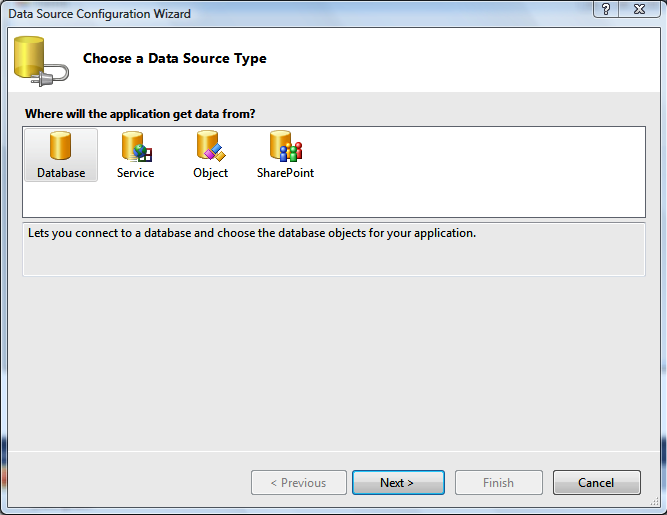
Click on the hyperlink that reads Add New Data Source... and you will see the dialog shown in Figure 4-2. You will have several options depending on what you have available with your configuration of Visual Studio. In this case, the choices were Database, Service, Object, and SharePoint. You will be using a database here, so select Database and click Next.
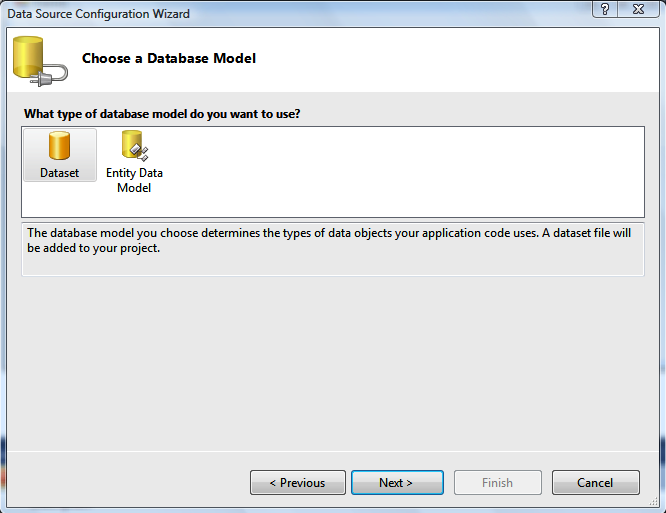
The next screen, Figure 4-3, allows you to choose the database model that you want to use. Your choices are Dataset and Entity Data Model. There are a lot of nice things that you can do with the Entity Data Model, particularly on large projects where you have a set of developers writing application code and another set working on the database storage schema. With the Entity Data Model, you can write code to access data without having to worry about how it is stored. That said, this example is going to use the Dataset because the Entity Data Model is outside the scope of this introduction. So, select Dataset and click Next.
The next screen is going to ask you to select your data connection. Click on the drop-down box and if you don’t see the file Northwind 2007.accdb, click on New Connection and browse to that file and select it. Then hit Next. On the next screen, make sure the box is checked to save the connection string and click Next again.
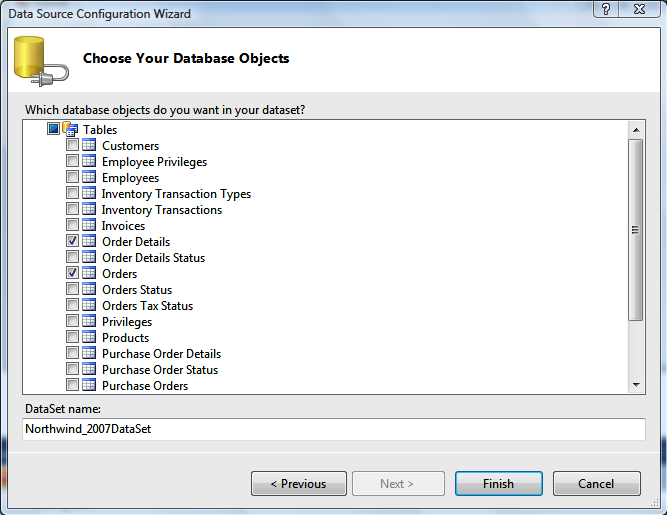
The next screen you see is shown in Figure 4-4. Click on the triangle to the left of Tables and then check the boxes for Orders and Order Details. Then click Finish.
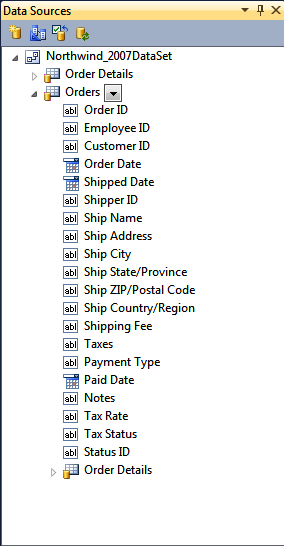
Your Data Sources box will now show the table information. If you expand the Orders table, you will see what I described in Chapter 3 and what is shown in Figure 4-5—the Order Details table also shows up as part of Orders. This is because there is a relationship setup in the database already that links Order Details to the Orders table, and it has Order Details as a child table. Now, you will see how easy it is to build a form. Just drag the fields that you want onto the form. Just make sure when you drag the fields from Order Details that you drag them from the child table and not from the main Order Details table on that form.
For this example, you should show the following fields: Order ID, Order Date, and Ship Date from the Orders Table; and ID, Order ID, Quantity, Unit Price, and Discount. While I realize that you would never do this without all the data, we are just trying to build something conceptual. If you want to drag more fields on, everything will still work.
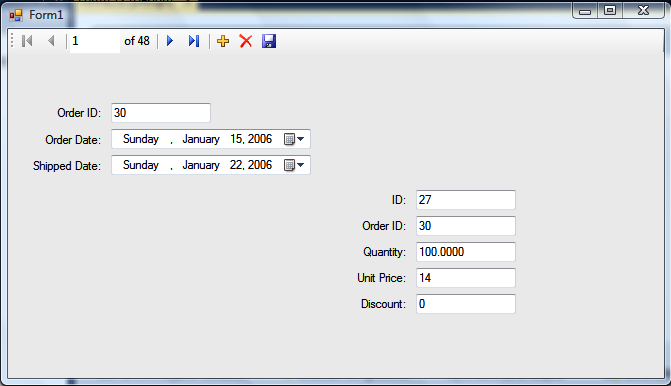
When you drag the first control on the form, you will see that Visual Studio automatically adds the data navigation control. You should also take note that there is a default control that Visual Studio uses based on the data. But you can click the drop-down box and choose a different control if you would like. Once you drag the controls on, you should see something like Figure 4-6 if you press F5 to launch the form.
You will quickly notice that the navigation controls only control the
parent data. If you go back into design view, you can add a second
navigation control. Go to the Toolbox and scroll to the data section and
select BindingNavigator and drag it onto
your form. When you first drag it on, you will notice that you cannot move
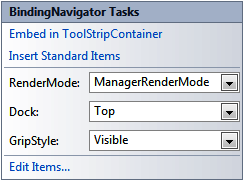
it. If you click on the triangle on the top right of the navigator, you will
see the box shown in Figure 4-7. Check the Dock
option to None. Then move the navigator above the Order Details controls.
From there, right-click on the navigator and go to Properties. Find the
BindingSource
property and select order_DetailsBindingSource. If you press F5 and
launch the form, you will notice that the data appears to work. If you were
to go to the Order Details section and click Delete, the record appears to
be deleted, but when you close and reopen, you will see that it didn’t
delete the data.
So, we are going to make some more changes. Some of the changes are
for real functionality and some are just for show. Either way, they are all
useful to learn. Click on the navigator on the top of the page and you will
see a drop-down box appear. Click on that and select ProgressBar. Then right-click on the form and hit
View Code, and from there you will write code to handle your updates,
advance the progress bar, etc.
There is already some code there for you, so you will just be adding
some additional lines. In the Form1_Load
procedure, you will add the two lines to set up the ProgressBar. See below:
private void Form1_Load(object sender, EventArgs e)
        {
            // TODO: This line of code loads data into the 'northwind_2007DataSet.Order_Details' table. You can move, or remove it, as needed.
            this.order_DetailsTableAdapter.Fill(this.northwind_2007DataSet.Order_Details);
            // TODO: This line of code loads data into the 'northwind_2007DataSet.Orders' table. You can move, or remove it, as needed.
            this.ordersTableAdapter.Fill(this.northwind_2007DataSet.Orders);
            this.toolStripProgressBar1.Value = this.ordersBindingSource.Position + 1;
            this.toolStripProgressBar1.Maximum = this.ordersBindingSource.Count;

        }
Note that the comments were added automatically by the controls. The
last two lines in this are setting the position to the current position plus
one. You need to add the plus one because position is zero-based. Then, you
need to set the maximum value of the ProgressBar to the count of records in the DataSet
(you are using a property of the binding source).
Next, go back to design view and double-click on the Save icon, which will bring you back to the code screen to write some code for save. You will see the following code already written there:
private void ordersBindingNavigatorSaveItem_Click(object sender, EventArgs e)
        {
            this.Validate();
            this.ordersBindingSource.EndEdit();
            this.tableAdapterManager.UpdateAll(this.northwind_2007DataSet);

        }
That code appears to work, and if you delete a record in the Order
Details records and then click Save, it does indeed make that change in the
database. However, if you edit a record in the details section and then
click Save, it doesn’t pass that along. This is because the EndEdit method is only being called for the
parent. So, you just need to add the following line of code right before the
UpdateAll method is called:
this.order_DetailsBindingSource.EndEdit();
While this works, you might decide to put a Save button on both navigators. That is entirely up to you. You might want to add code to check if data changed or add a confirming message when data is saved. We covered those items in the last chapter and the same concepts apply.
What isn’t working right now is the progress bar. You could write code
on every navigation button to add or subtract from the value to move the
progress bar. But instead you can just apply something that you used in the
last chapter. Add the following line as the last line in the Form1_Load procedure:
this.ordersBindingSource.PositionChanged += new EventHandler(ordersBindingSource_PositionChanged);
This will add an event handler, and then you add one line of code into that, as shown below:
void ordersBindingSource_PositionChanged(object sender, EventArgs e)
        {
            this.toolStripProgressBar1.Value = this.ordersBindingSource.Position + 1;
        }
I hope you can see how using an event handler there is much better than trying to write code to catch actions by the users. Next, I want to draw your attention to the bottom of the form in design view.
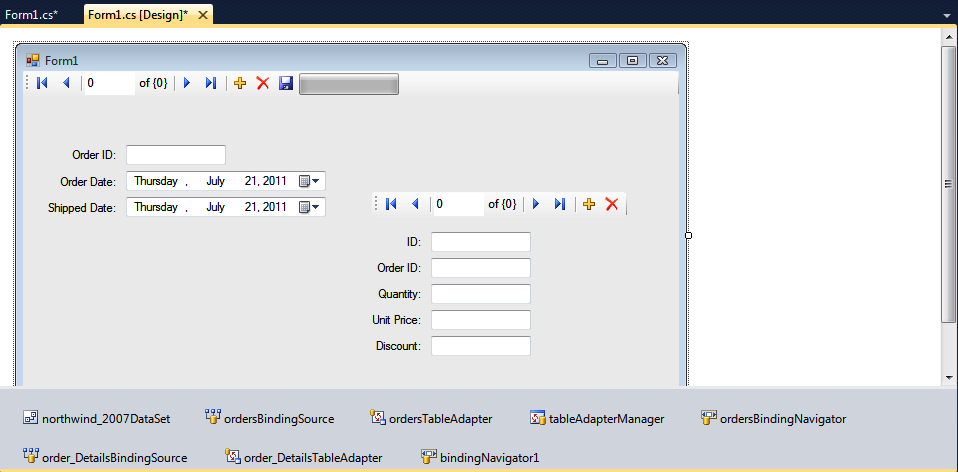
In Figure 4-8, take a look at
the objects below the form. You should notice that you have a DataSet, BindingSources, and TableAdapters. These are the same items you wrote
with code in the previous chapter. The main difference is that you didn’t
need to write a ton of code to use these items. Visual Studio is handling
all of that for you.
The next thing to try is editing the DataSet with Designer. On the Data Sources box at
the very top, the second icon in looks like a triangle with two rectangles.
If you hover over it, it should say “Edit DataSet with Designer.” If you
click on that, you will see a new tab open called
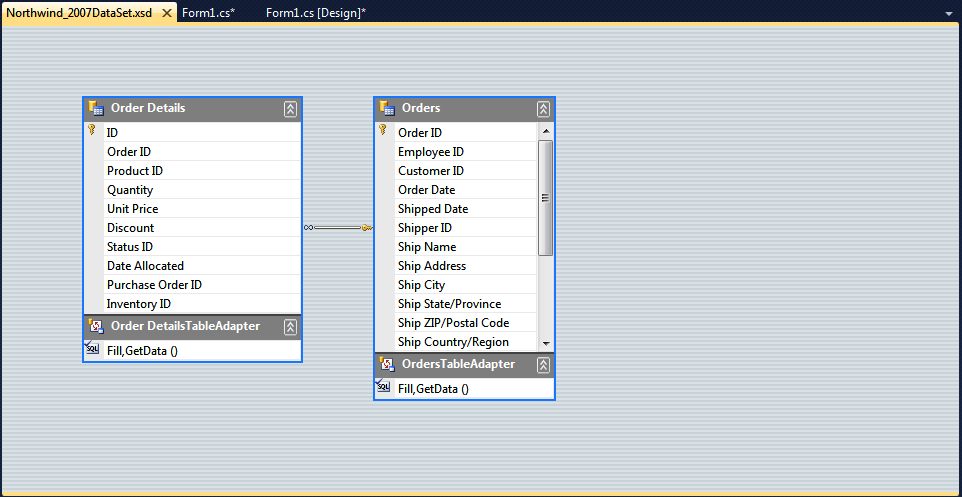
Northwind_2001DataSet.xsd. See Figure 4-9.
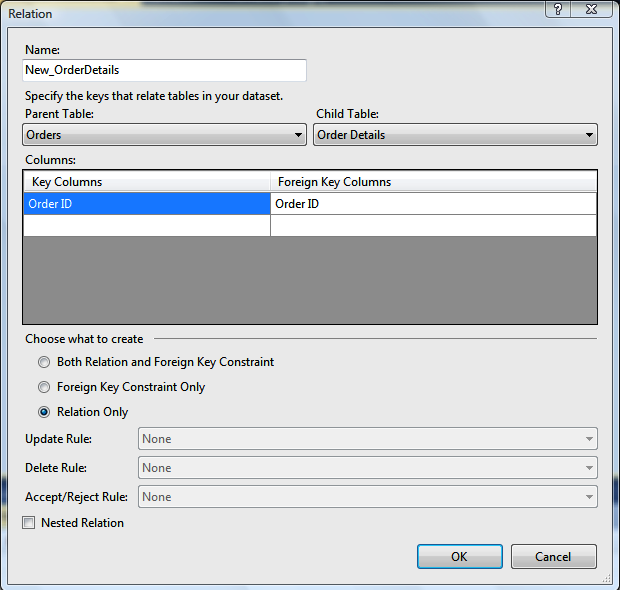
If you right-click on the line between the two tables and click Edit Relation, the screen in Figure 4-10 will open up.
The Northwind Database already had relationships built. However, you can’t always count on that happening with all databases. So, if you ever want to relate two tables that don’t have a built-in relationship, you can do that here. You may also notice that at the bottom of the form, you can choose what to create. If you pick “Both Relation and Foreign Key Constraint,” you have the ability to cascade updates and deletes to the child records. So, you could set it such that when you delete a parent row, it won’t leave orphaned records in the child table. Whether you choose to do that is entirely up to you; I just wanted you to see where to do these things. Typically, you will be picking “Relation Only.”
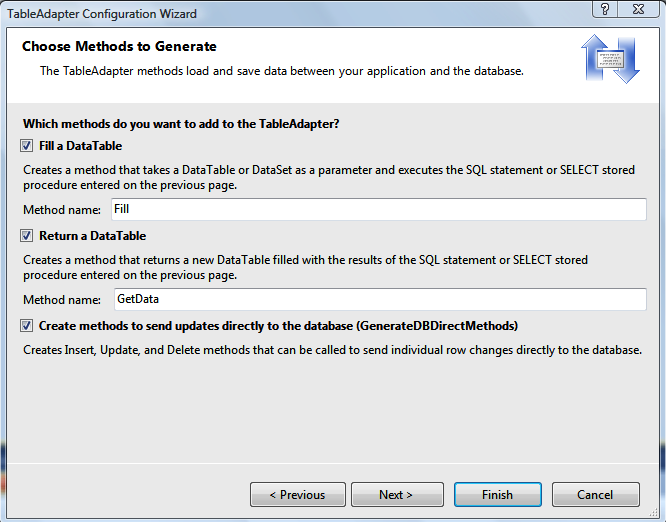
In addition to this, if you right-click on a table, you can choose Configure. This brings up a screen where you can edit the query used to get the data. When you click Next, you can also choose what methods are built to deal with the data. If you take a look at the screen in Figure 4-11, you can see that you can uncheck the box to create the update methods. This can be useful if you want to create read-only access to the data. This way, you don’t end up with a line of code that inadvertently updates or deletes data.
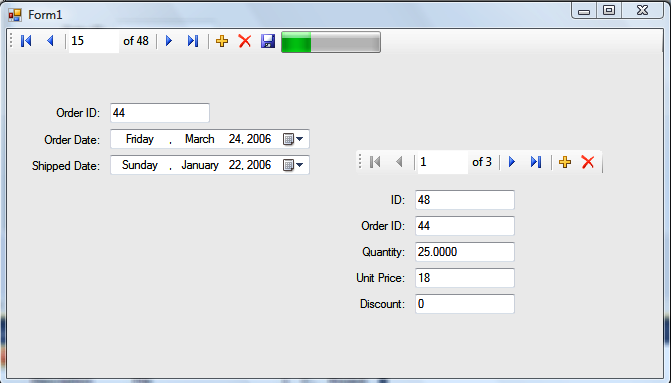
In Figure 4-12, you can see the completed form with the progress bar. I moved it part-way through the data set so that you could see how the progress bar advanced. It is also worth noting that on the navigation bar, you can type in a record number that you want to go to, press Enter, and it will take you to that record.
The full code listing follows here. Note that there is much less code in this one than in the previous samples. That is because most of the work is being done by the GUI, but you should have noticed that many more screen shots were used to demonstrate.
using System;
using System.Collections.Generic;
using System.ComponentModel;
using System.Data;
using System.Drawing;
using System.Linq;
using System.Text;
using System.Windows.Forms;

namespace UsingDataControls
{
    public partial class Form1 : Form
    {
        public Form1()
        {
            InitializeComponent();
        }

        private void ordersBindingNavigatorSaveItem_Click(object sender, EventArgs e)
        {
            this.Validate();
            this.ordersBindingSource.EndEdit();
            this.order_DetailsBindingSource.EndEdit();
            this.tableAdapterManager.UpdateAll(this.northwind_2007DataSet);

        }

        private void Form1_Load(object sender, EventArgs e)
        {
            // TODO: This line of code loads data into the 'northwind_2007DataSet.Order_Details' table. You can move, or remove it, as needed.
            this.order_DetailsTableAdapter.Fill(this.northwind_2007DataSet.Order_Details);
            // TODO: This line of code loads data into the 'northwind_2007DataSet.Orders' table. You can move, or remove it, as needed.
            this.ordersTableAdapter.Fill(this.northwind_2007DataSet.Orders);
            this.toolStripProgressBar1.Value = this.ordersBindingSource.Position + 1;
            this.toolStripProgressBar1.Maximum = this.ordersBindingSource.Count;
            this.ordersBindingSource.PositionChanged += new EventHandler(ordersBindingSource_PositionChanged);

        }

        void ordersBindingSource_PositionChanged(object sender, EventArgs e)
        {
            this.toolStripProgressBar1.Value = this.ordersBindingSource.Position + 1;
        }
    }
}
The next chapter returns to SQL Server. There, you will be creating a web service and taking a parameter and returning a list. You don’t need a hosting company to do the test, as an ASP.NET development server comes with Visual Studio. But if you wanted to, there are a couple of sites that will let you build a free test site with ASP.NET. You’ll want to know the similarities and differences in data access between the desktop applications and web applications.
Get C# Database Basics now with the O’Reilly learning platform.
O’Reilly members experience books, live events, courses curated by job role, and more from O’Reilly and nearly 200 top publishers.
