Since the journey of 1,000 lines of code begins with the first keystroke, it’s probably best to learn a little bit about the award-winning company responsible for the inspiration of this book.
Coda was created by Panic, a small company that hails from Portland, Oregon. Its founders are Cabel Sasser and Steven Frank, who started the company in 1997.
Panic makes a handful of apps in addition to Coda, all of which run exclusively on the Mac:
- Transmit
- A top-notch file transfer application that works with FTP, SFTP, and Amazon’s S3 service
- Unison
- A client for Usenet, the oldest internet messaging board
The company also has gotten into developing for iOS in the last few years:
- Prompt
- An SSH client
- Diet Coda
- A stripped down but powerful little brother to Coda 2
There are also “retired apps,” which include Stattoo, a kind of dashboard on the desktop, Desktastic, a fun little app for drawing on your desktop, and Candy Bar, a utility for changing and organizing icons across your system. In addition, there is Transmit 1.7 for Mac OS 9 and Audion 3, one of the first MP3 players. For a cool story about Audion and its history with iTunes, read The True Story of Audion. You can download older versions of Panic’s apps here.
A fully-functional, seven-day trial version of Coda is available from Panic’s website. To clarify, if you launched Coda on a Monday, quit the app, then launched it on Wednesday, that would only count as two days of the trial.
The download instructions are pretty straightforward if you’re familiar with a Mac, but we’ll review them here for good measure.Visit the Panic website and go to the Coda page. From here, you have two options: purchase it through Apple’s Mac App Store, or purchase the app directly from Panic.
After downloading Coda, simply drag the Coda 2 application to your Applications folder to install it. To start Coda, just navigate to the Applications folder and double-click on the Coda 2 icon (but don’t do this yet).
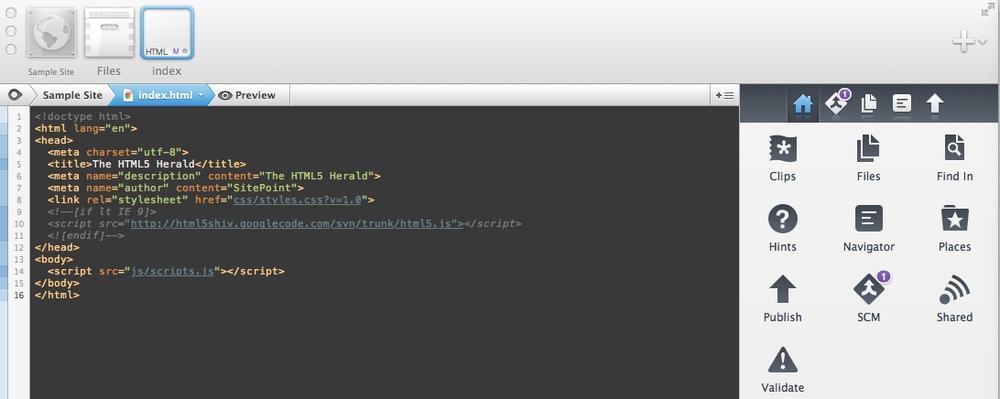
Now that we’ve got Coda installed, let’s get familiar with its interface (Figure 1-1).
Before we get too deep into this, we’ll take a look around some of the basics of Coda so we’re on the same page with our terminology.
Across the top of the app is the tab bar. This lets the coder know which tabs are open, and a blue border highlights which tab is currently active. Tabs can include a document, a terminal shell, a book (Coda ships with built-in references for many languages), or a MySQL editor.
Tabs can be easily closed by hovering over them until an X appears and is clicked. Also, the tab bar can be resized by dragging the bottom of the tab bar up. Drag up all the way, and the tabs disappear, leaving only a text reference of your open tabs.
The first two tabs will always be the Site you are working from and the file browser tab, respectively.
Just underneath the tab bar lies the path bar, which shows the drilled-down path to the file you are editing. If you’re working on an index.html file in a directory called awesomesauce in your Mac user’s Sites folder, the path to that file would be [Username]/Sites/awesomesauce/index.html. The path bar serves as a visual reminder of where you are in relation to your project.
But more than that, if you click on any of the individual path items (such as “awesomesauce”) at the moment, a box will pop up and list all the files in a miniature file browser. This makes for a very easy way to open files from all sorts of locations within your project while taking advantage of the editing window.
The sidebar is a bit of a Swiss Army knife of different views and actions for your projects. For example, there’s a files view that has a file browser available, then you can switch to the Source Control Management view for managing your code in a version control system, such as Git. We’ll get into the different types of views as we go along.
By default the sidebar sits to the right, but can be changed in Coda’s preferences. And the top of the sidebar is a dock, where you can drag and drop your most-used views for easy access while you work.
One of the final views to discuss is Sites, the core of your project, which we’ll go deeper into in the next chapter.
Get Coding with Coda now with the O’Reilly learning platform.
O’Reilly members experience books, live events, courses curated by job role, and more from O’Reilly and nearly 200 top publishers.


