In the last chapter, you learned about the memory layout of VB COM
objects. In particular, you learned how VB allocates memory for
objects with multiple interfaces. You also learned how VB enables you
to request different portions of this memory using the
QueryInterface method of the
IUnknown interface (henceforth referred to as
QI ).
Most important was the idea that all
interfaces are created equal. In other words, the memory layout of an
interface in any language is basically the same—it is a virtual
table pointer (vptr) pointing to a virtual table (vtable). A vtable
is nothing more than an array of pointers to the addresses of
functions in memory. COM rules state that the first three functions
in the vtable of a COM interface must be the methods of
IUnknown: QueryInterface,
AddRef, and Release. You
learned from Chapter 3 that Visual Basic built a
little object to manage the IUnknown
implementation for the entire object. You also learned some of the
COM rules for allocating memory in the last chapter. One rule
discussed in the chapter was that memory for COM objects must be
allocated by the server code. You also learned that the server
provides the definitions of its COM objects for the client through a
file called a type library.
In this chapter, you will learn the whole story of activation for ActiveX DLLs. The term activation refers to the process that occurs at the API level from the time the client requests a new server object to the time it can use this object. For example, consider the following code:
Dim Account As IAccount
Set Account = New CChecking
Call Account.MakeDeposit(5000)
In this chapter, we are going to focus on what happens in the second
line of code: Set Account = New CChecking.
However, before we go into too much detail on the activation process,
let’s see how it is that COM components are packaged and used
from a client application at a high level.
To many of you, this will be review. Nonetheless, let’s take a minute for a high-level examination of the process of building a COM server and using it from a client program at a high level.
Using the same classes as in the last chapter, let’s build a COM server and use it from the client. The first step in building the server is to decide on the packaging. The packaging comes in three flavors: ActiveX EXE, ActiveX DLL, and ActiveX OCX. This book does not discuss ActiveX OCXs, although for all practical purposes they are the same as ActiveX DLLs except that the COM components they export can be inserted into ActiveX containers (such as the VB Form object). In this chapter, we will focus on the ActiveX DLLs. You will learn about ActiveX EXEs and the COM remoting architecture in the next chapter.
If you have not already done so, start Visual Basic 6. When you see
the New Project dialog box, double-click on the ActiveX DLL entry.
You should now have a project called Project1 with a single class
module called Class1. Change the name of the class module to
IAccount, and add the following code:
Option Explicit
Public Property Get Balance(  ) As Currency
End Property
Public Sub MakeDeposit(ByVal Amount As Currency)
End Sub
You may recall from Chapter 2 that this class
serves as an interface definition. Because it is meant to be an
interface and not a standalone class, change the
Instancing property to 2 - PublicNotCreatable. Add a second class module to your
project using the Project → Add Class Module menu option. Change
the name of the class to CChecking and enter the following code in
the module:
Option Explicit
Implements IAccount

Private m_balance As Currency

Private Property Get IAccount_Balance(  ) As Currency
    IAccount_Balance = m_balance
End Property

Private Sub IAccount_MakeDeposit(ByVal Amount As Currency)
    m_balance = m_balance + Amount
End Sub
If you are unsure why there is a line that reads Implements IAccount, refer back to Chapter 2. The
preceding class definition comes straight from Chapter 2. CChecking is a class that implements the
IAccount interface.
Change the name of the project to BankServer. Then choose File → Make BankServer.dll to compile your project. You have just built a full COM server with one COM class, CChecking. To use the CChecking class, you must build a client program.
Choose File → New Project to begin a new project and double-click on the Standard EXE icon. You should have a project with a single Form module. Change the name of the Form to frmClient. Then change the name of the project to BankClient. Add a CommandButton control to the form, change its name to cmdCreate, and change its caption to “&Create Account”.
The first step in using the server components is to tell VB to read the definition of the CChecking class from an external file. Without reading this external file, VB knows nothing of the CChecking class. This external file is called a type library. You learned a little about type libraries in Chapter 3. Later on in this chapter, you will learn more about them. The type library contains the definitions of the classes and interfaces that a server exports. To tell VB to read a type library file, choose Project → References from the IDE. You will see the References dialog box as depicted in Figure 4-1.
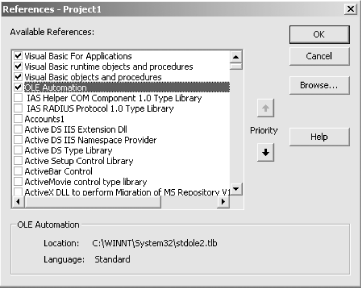
Select the entry that reads BankServer and click OK. You may now enter code in the cmdCreate button to create an instance of the CChecking class and use it. Double-click on the cmdCreate button and enter the following code in the code window:
Private Sub cmdCreate_Click(  )
    Dim Acct As IAccount
    Set Acct = New CChecking
    Call Acct.MakeDeposit(5000)
    MsgBox Acct.Balance
End Sub
Notice that the code makes use of the IAccount
interface. The alternative would have been to use Dim Acct As CChecking, but that would not work because the default
interface for the class, the _CChecking interface,
does not have any public members—all the functionality comes
from the implementation of the IAccount interface.
After declaring the Acct variable, the code then creates an instance
of CChecking and calls the MakeDeposit method. Finally, it displays
the balance by reading the Balance property.
Run your application from within the IDE. Then, click the Create Account button to make sure all is well. You should see a message box with the number 5000.
As you can see, it is fairly easy to create and use COM components in Visual Basic. All you need to do is create an ActiveX DLL project and add class modules to it. Then you build the DLL. To use it, you create a Standard EXE project and add a reference to the server project using the References dialog box. After adding the reference to the server project, you can create instances of the exported classes and use them as you have done in the previous code.
It is now time to turn our attention to what is happening underneath to make the mechanism work.
Get COM+ Programming with Visual Basic now with the O’Reilly learning platform.
O’Reilly members experience books, live events, courses curated by job role, and more from O’Reilly and nearly 200 top publishers.

