16.1 Background to CVA Hedging
16.1.1 Aim of CVA Hedging
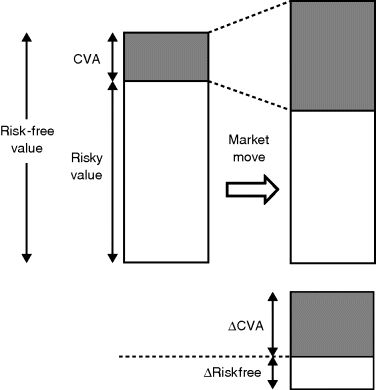
A key aspect of CVA, as discussed in Chapter 12, is the ability to separate the risk-free and risky value of a derivative (or set of netted derivatives). This extends to hedging where the risk-free value1 and CVA can be hedged separately. A simple example of the aim of CVA hedging is given in Table 16.1, which shows the impact of a market move on the risky and risk-free value, which is also illustrated in Figure 16.1. In this example, the market move causes the risk-free value to increase but the risky value to decrease (due to an increasing CVA). Without hedging the CVA, there would be a net loss on the risky position.

Figure 16.1 Illustration of the ideal hedging of a risky derivatives position via the risk-free and CVA components. The market move causes an increase in the risk-free value that creates a loss on the corresponding hedging instrument. The CVA, however, increases and therefore the associated hedge produces a gain. Overall, the risky value decreases, which is hedged via an overall gain on the CVA versus a loss on the risk-free hedge.
The above approach implies that different trading desks can be responsible for ...
Get Counterparty Credit Risk and Credit Value Adjustment: A Continuing Challenge for Global Financial Markets, 2nd Edition now with the O’Reilly learning platform.
O’Reilly members experience books, live events, courses curated by job role, and more from O’Reilly and nearly 200 top publishers.

