Chapter 1. Introducing Kivy
Kivy is a modern graphical user interface toolkit. It allows you to easily develop natural interfaces for a wide selection of devices. It is attractive to a variety of developers for a few key reasons:
- Kivy has elegant built-in support for multitouch devices.
- Kivy is the only viable way to code in Python on mobile devices.
- Kivy replaces the horrible APIs of earlier graphical interfaces like HTML and CSS.
- Kivy allows you to maintain a single application for numerous operating systems.
Whatever your reasons for studying Kivy, I’m glad you found this book. You’ll be going step by step through Kivy basics to create and deploy a fully functional application. Each chapter presents a working program that you will expand on in subsequent chapters. I’ve chosen to develop a weather application with you, partially because it’s at the right complexity level, but mostly because there aren’t any decent open source weather applications in the F-Droid open source Android market!
While I hope this book appeals to a diverspe array of developers, I have a specific audience in mind as I write it. As with any job description, you don’t have to completely fit this profile, but it will help you to understand who I’m thinking about and how you might differ. My intended audience:
- Has beginner to intermediate programming skills and has read the Python tutorial
- Is not intimately acquainted with advanced Python concepts, but is eager to learn
- Wants to learn about programming workflow, not just Kivy
- Has a good sense of humor
- Owns an Android or iOS device
Regardless of who you are, if you’re interested in creating a working application in Kivy, you’re in the right place! I’ll be showing you how to develop a weather application step by step. You’ll start with setting up a Kivy development environment and end up with an application running on your Android device or iPhone.
Dependencies: The Hard Part
It’s an unfortunate truth in the programming world that the fun part has to come after a lot of work. Getting Kivy up and running is not a terribly complicated process, but I wouldn’t call it enjoyable. “I got a programming library installed after half an hour of effort” just doesn’t have the same ring as, “I made a program window pop up after 20 seconds!” So, to boost your excitement, let me tell you that 20 seconds after you get all these dependencies set up, you’ll have written and run a small Kivy application. Ready? Let’s go!
Frankly, writing about dependency setup is frustrating for me as well. I don’t know what operating system you’re using. I don’t know what libraries you already have installed or how they conflict with each other. I can’t predict the myriad ways that things might go wrong for you.
Luckily, Kivy has great installers for most operating systems. You can use these to get up and running quickly. Quick installers have their downsides, though. A major one is that you, as the developer, don’t know exactly what they are doing. This can cause headaches later when things break and you don’t know what’s going on. However, Kivy takes good care of its users, so it will probably be quite a long time before you have to work out the details.
While I use and recommend the Linux operating system (all the code in this book was first written and tested on Linux), I don’t provide Linux installation instructions. Installing dependencies in Linux tends to be much more straightforward than on other operating systems. However, the instructions for doing so vary completely depending on which Linux distribution you are using, and as a Linux user, you probably know better than I how to go about getting them for your distribution of choice (unless you use Arch Linux, for which I’ve written a ton of documentation). Kivy has terrific instructions for most popular Linux distributions on its downloads page.
Installing on Mac OS
You can download an all-inclusive .dmg file that includes a compiled version of Kivy, all the libraries it depends on, a shell command to run it from a terminal window (this is necessary to see debugging output), and all the examples that Kivy supplies in case you get stuck.
To install it, simply download the latest (version 1.8 or higher) .dmg file from Kivy’s download page. Double-click the file in your downloads folder or stack to open it. Then drag and drop the Kivy.app file into the Applications folder shortcut inside the volume.
Before you close the .dmg volume, also double-click the Make Symlinks file. This will allow you to run Kivy as a script on the terminal. This script is kind of a wrapper for the Python executable. After you’ve run Make Symlinks, you can open a terminal and type kivy. You’ll be presented with a standard Python prompt as if you had run the python command directly.
Tip
In Mac OS Mavericks (10.9), Apple introduced a new antideveloper feature to prevent running “unlicensed” programs. It will pop up a warning that you can’t run the script downloaded from the Internet and doesn’t provide an obvious way for you to get in on the debate.
There is a hidden workaround, though (I guess Apple just wants you to prove you know what you are doing). In Finder, open the folder containing the script. Then Control-click the icon and click Open in the shortcut menu. This will override the security settings and allow the script to run.
This prompt is your system Python with some paths modified to ensure that all the libraries it requires are installed. If you’re an experienced Python coder, you’re likely wondering why you wouldn’t just use a virtualenv. Virtual environments are great when your dependencies are Python libraries that you can install from pypi or Git repositories. However, many of Kivy’s dependencies are C libraries that have complicated interdependencies. These have been bundled into Kivy.app as a bunch of dynamic libraries that are loaded when you run the kivy script.
Note that Kivy.app uses the default Python that comes with Mac OS. That means you’ll be using Python 2 instead of Python 3. You will have to adapt a couple of the examples in this book to make them work, but I’ve highlighted those so you won’t have any trouble.
For the most part, you will be using Kivy from the terminal in this book. Your file will be named main.py. I may tell you to run python main.py, but if you’re using the Mac OS Kivy.app, you’ll want to run kivy main.py instead.
Installing on Windows
Windows can be pretty quirky for software development. It doesn’t have a terrific command-line interface, and there can be bizarre conflicts between software libraries or software and the heterogeneous collection of hardware that Windows supports.
That said, the Kivy developers have done a great job of bundling the dependencies into a single ZIP file. The archive contains the minimum dependencies you need to run Kivy. This portable package should integrate well with the operating system and isolate you from conflicting libraries on the same system.
Download the Kivy for Windows ZIP file from Kivy’s download page. Extract (right-click the file and click “Extract all”) the ZIP file to a known directory on your system; I recommend the folder C:\utils\kivy.
Now you can open a Windows command prompt. Type the command cd C:\utils\kivy and then just kivy. This will activate the Kivy environment, which includes the libraries you need. It also bundles a Python executable (you can choose between Python 2 and Python 3 from the downloads page). You will have to perform this activation step each time you open a new terminal.
Note that you can also install msysgit to get a programmer-friendly command-line interface (the same command shell used by default on Linux and Mac OS). If you are using this package, you’ll need to run source kivyenv.sh instead of the kivy script. I recommend using this installer, as you will also have access to the Git version control system to manage your source code, and it will install some of the dependencies you’ll need in Chapter 9.
Writing Code: The Easy Part
Now create a directory somewhere to host your project and open a new file called main.py in your preferred text editor.
The starting Python module for all Kivy applications should be named main.py, as the build tools you’ll use later to automate deployment to mobile devices will look for that file. Now add a couple of lines of code to this new file, as shown in Example 1-1.
That is it: the most basic Kivy code you could possibly write. It imports an App class, instantiates it, and then calls the run method. Run this code by activating your Kivy environment in a terminal and typing python main.py (or kivy main.py on Mac OS). It will pop up a blank window with a black background. Close it.
The Kivy App object does an impressive amount of work on your behalf. That is the beauty of object-oriented programming. This object does something, and all you have to do is tell it to do its job by invoking the run method. It takes care of all sorts of stuff: interacting with the screen hardware; talking to input devices such as multitouch displays, keyboards, and accelerometers; scheduling tasks; and more. We’ll get into some of that later, but for now, just know that if you don’t have an App object, you don’t get a window.
If you aren’t familiar with the basics of object-oriented programming, you might want to review the relevant section of the Python Tutorial. If you’d like in-depth coverage of the topic, see my book Python 3 Object Oriented Programming (Packt, 2010).
In Kivy, your use of object-oriented principles is largely to extend Kivy’s built-in objects through inheritance. This is a fairly easy paradigm to understand, so you don’t need to be well versed in classes to get there.
If a blank window with a black background is exactly the kind of application you were looking to write, then you’re done! Congratulations. Perhaps you can skip to the chapter on deploying so you can get that black background onto your mobile device (or just use the power button; black goes with anything).
Personally, I’d like something a little more interesting. So let’s try again. Edit the file to look like Example 1-2.
fromkivy.appimportAppclassWeatherApp(App):passif__name__=='__main__':WeatherApp().run()
This version uses inheritance to create a new subclass of App called WeatherApp. This is the application you’ll be developing in this book. You didn’t actually add anything to the new class, so it behaves exactly the same as the previous version. However, you’ll be extending it a lot in subsequent chapters. It also wraps the call to App.run in an if statement to make sure that this file can be imported from inside other files later in the book. More importantly, you can now use the KV language to add some real user interface elements to that black window.
Introducing the KV Language
The KV language, often referred to as kvlang, is a simple markup syntax that I think of as “what HTML would look like if HTML looked like Python.” It’s a very clean syntax and makes Kivy interface design much more enjoyable than any other toolkit I’ve worked with, including the Web.,
You’ll be creating a new file to store the KV language in. Call it weather.kv and save it in the same directory as main.py. Your .kv file should always have the same name as your app class, but with the word App stripped from the end, and converted to lowercase. Thus, WeatherApp will always look for its layout information in a file called weather.kv.
I’ll be explaining more about the KV language throughout the book. Start by putting Example 1-3 in your weather.kv file.
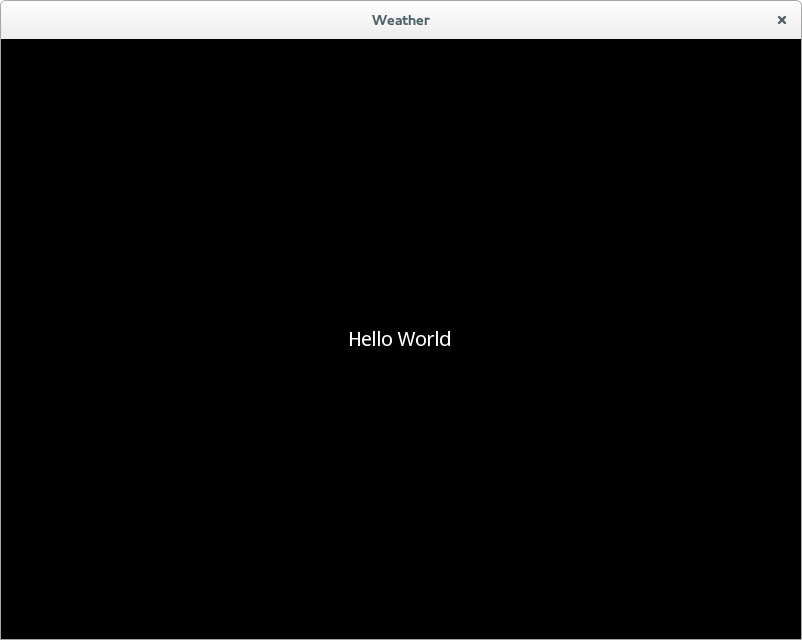
This is a very simple KV language file that creates a new Label object and sets its text to the infamous Hello World string. If you now run the python main.py command, you will see the window pop up, still with a black background, but also with the text displayed in its center, as shown in Figure 1-1.
User Interface Design
Each chapter in this book builds on the results of the chapter preceding it. At the end of the book, you will have created a weather application that runs on your desktop computer, Android, and iOS. It’s a good idea, before you write an application, to know what kind of application you want to write. Therefore, let’s spend a few minutes discussing what features the app will support and how it will look.
Weather apps tend to have the same set of features. Here are some capabilities I want to cover in this project:
- Render weather for multiple locations, with a selector to switch between them.
-
Store the list of locations between
Appinvocations so they don’t have to be searched again. - Switch between current conditions and long-term forecast.
- Include settings for users to choose metric or imperial units.
- Incorporate gestures for users to switch between screens.
Given these features, it’s fairly easy to imagine the set of views the application will require:
- A form for adding new locations
- A list of previously searched locations
- The current conditions screen
- The forecast screen
- The settings screen
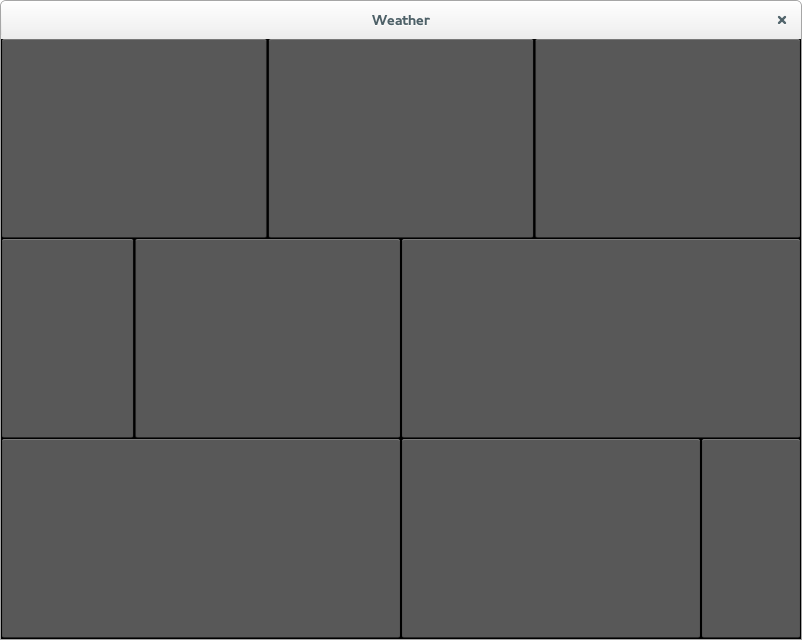
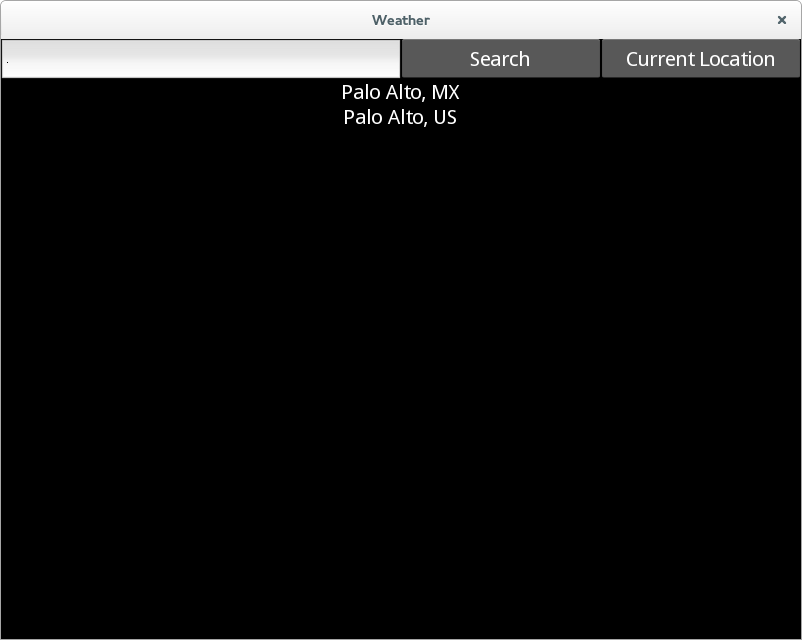
These will, of course, be composed of other interface components. I’ll introduce the widgets you require as they come up. The remainder of this chapter will focus on the form for adding a new location. This form is pretty simple, requiring only a text entry field in which to type a city name, and a button to search for that location (see Figure 1-2 for a mockup).
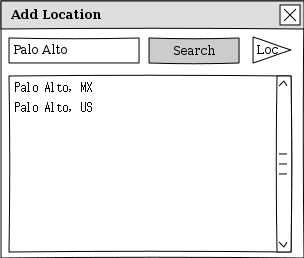
I’ll also add a button to search for the current location, assuming the device has a GPS. Finally, there needs to be a list of results so users can choose which of multiple matching cities is the one they want.
Widgets
Kivy uses the word widget to describe any user interface element. Just a few examples of widgets include:
- The label you rendered in Example 1-3
- The text input field and buttons you’ll render shortly
- Layout classes that comprise other widgets and determine where they should be displayed
- Complicated tree views such as file pickers
- Movie and photo renderers
- Tabbed boxes that display different widgets depending on the selected tab
I find it convenient to think of a widget as a sort of box that has behaviors and can contain other boxes. The Widget class is the most basic such box. It is empty. However, all other widgets extend this class in a beautiful inheritance hierarchy. The Label widget is a very simple widget that displays text. The Button widget is more interactive and responds to touch or click events. The TextInput widget knows how to deal with keyboard events.
The more advanced widgets, such as TabbedPanel or FileChooser, are composed of multiple other widgets. There is really no conceptual difference between an advanced and a primitive widget other than the difficulty of drawing them on the screen. Advanced widgets are normally composed of Layout widgets, which are essentially boxes that know enough about the widgets inside them to determine how they should be sized and positioned relative to one another. There are several different Layout subclasses. I personally use BoxLayout unless I have very specific needs that require a GridLayout or FloatLayout. BoxLayout, which renders widgets in a vertical or horizontal line, tends to be better suited to adapting its size to the display on which it is currently rendering.
Finally, you can make custom widgets of your own by extending the Widget class (or, often, a Layout subclass) and applying KV language rules to describe how the widget should look. There are two ways to do this. One is to create custom drawing commands to render graphics directly to the widget canvas. The other is to compose multiple primitive widgets into something more complicated; that’s what you’ll be doing in this chapter.
The KV Language Root Widget
The KV language is a special domain-specific language that is ideal for laying out user interfaces. It has a Pythonesque syntax and borrows heavily from Python’s notions of simplicity and elegance. The KV language file uses indentation to indicate which “boxes” go inside other boxes.
The outermost box in a KV language file is called the root widget. There can only be one root widget per KV language file. In Example 1-3, there was only one widget, a Label, and it is the root widget. You can tell it is the root widget because it is the leftmost indented line, and doesn’t have any funny brackets or angle brackets around it to indicate that it is something else.
There is an indented block below the root widget’s Label: specifier. Inside this block, you can define other child widgets (except Label doesn’t typically have children), and you can specify properties about that widget. I’ll tell you more about properties in Chapter 2, including how to create your own custom properties on custom widgets. For now, understand that the Label widget has a text property. That property takes a string value. Like a string value in Python, it is embedded in quotes. A colon separates the property name from the value, much like a key/value specifier in a Python dictionary.
You’ve probably guessed that the root widget is attached directly to the Kivy window and rendered. If it were a container widget that held multiple child widgets, it would render them as well. Try changing your weather.kv file to look like Example 1-4.
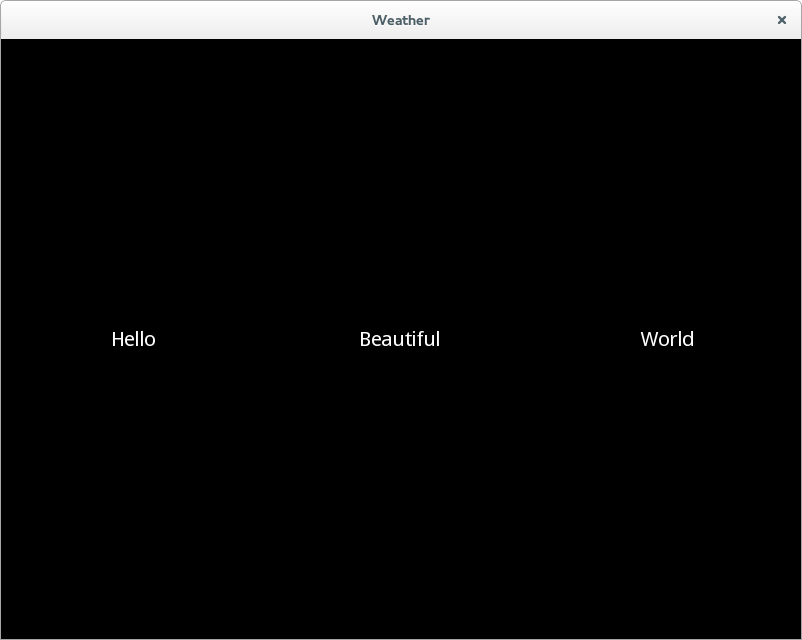
BoxLayout:Label:text:"Hello"Label:text:"Beautiful"Label:text:"World"
The root widget, in this case, is a BoxLayout object. As I mentioned before, Layout widgets are essentially containers that know how to hold other widgets and position them in some way. There are three labels supplied, indented, as children of the BoxLayout. Each of these Labels has an indented block of its own where that widget’s properties are configured; in this example, a different value for text is supplied for each.
By default, the BoxLayout places each of its child widgets side by side, from left to right, giving each one an equal amount of space. Since you haven’t done anything to change the defaults, this is what happens when you render the KV file. If you now run python main.py, it will render three labels, as shown in Figure 1-3.
Creating a Custom Widget
It would not be difficult to change the labels in the root widget to some buttons and text boxes to create the Add Location form I have in mind. But that would make things rather complicated later, when you need to remove all those widgets from the view to put other data (for example, a forecast) on display. Further, if the user later wanted to add another location, it would be tricky to restore all the Add Location widgets.
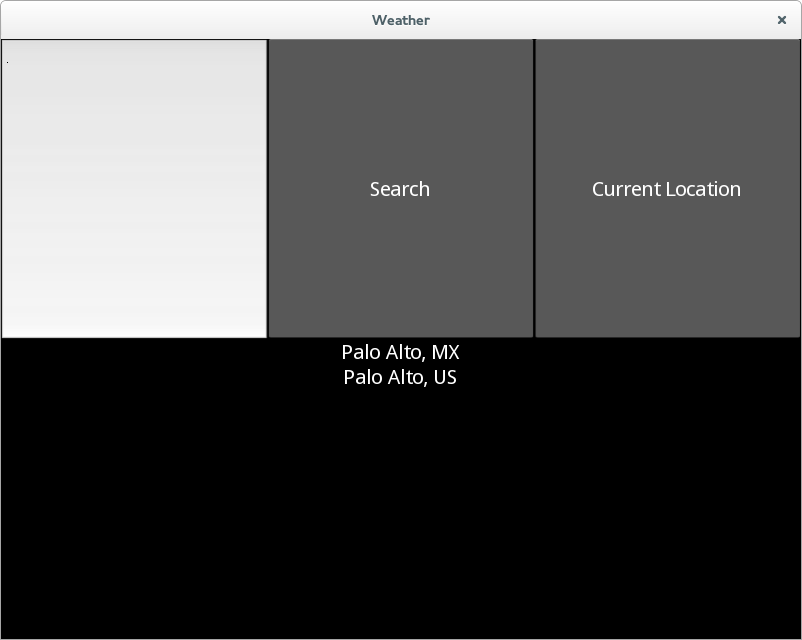
Instead, create a custom AddLocationForm widget that encapsulates the text entry, search button, location button, and search results into a single widget. Then set the root widget to be an instance of that custom widget instead. Example 1-5 does all of this.

The root widget is now a custom widget named
AddLocationForm. It doesn’t have an indented block below it, so there are no properties or child widgets defined.
The new custom class is defined here. The
@symbol in the KV language indicates that the class is extendingBoxLayoutusing inheritance. This means that the new widget is aBoxLayoutand can do all the things aBoxLayoutcan do, such as lay out its children. The angle brackets tell the KV language that this is a new class rule, not a root widget.
AddLocationFormis aBoxLayoutlike in the previous example, but you are setting itsorientationproperty to vertical. This will force its child elements to appear one above the other. The child elements in this case are anotherBoxLayout(this one is horizontal), and aListView.
I’ll tell you a lot more about the
ListViewwidget later. For now, because search isn’t implemented yet, just hardcode a couple of values so you can see what the renderedListViewlooks like.
The rendering of this code is shown in Figure 1-4. It’s already looking a lot like I want it to look, but the widget proportions are all wonky.
Adjusting Widget Size
There are a couple of proportion problems with the rendering in Figure 1-4. First, the text box and two buttons are way too tall. And second, the text box doesn’t take enough of the available width. This is fairly easy to take care of in terms of lines of code. However, I find setting proportions on Kivy widgets to be confusing. I hope to spare you that frustration by giving a thorough explanation in this section!
It is up to the Layout object to determine what size its child widgets should be. It is allowed to take two types of advice from its children, should the children choose to provide it, but it is also free to ignore that advice. For example, a horizontal BoxLayout will always make its children the same height as itself, no matter what the child requests (this can cause extensive problems if the child widget is in its teens).
The two types of advice the child can give its parent layout are size hints and absolute sizes. For each type of advice, the child widget can set properties in the x dimension (horizontally) and the y dimension (vertically). In addition, it is possible to combine the horizontal and vertical settings in the case where you need to explicitly set both of them. This is unecessary with BoxLayout, since it always uses maximum space in one direction, but can be useful with other layouts. Thus, there are technically six different proportion advice properties that you can set on any given widget class:
-
size_hint_x -
size_hint_y -
size_hint(tuple ofsize_hint_x,size_hint_y) -
width -
height -
size(tuple ofwidth,height)
Of course, if you use the tuple version, you shouldn’t use the individual dimension version.
Size hint advice
The size_hint is a proportional measure. If three widgets have the same size_hint (and the layout chooses not to ignore that information), they will all be the same size. If one widget’s size_hint is twice as big as another widget’s, then it will be rendered at double the size.
The main thing to bear in mind is that the size of a widget is calculated based on the sum of the size_hint values for all the widgets. A single widget having a size_hint of 1 has no meaning unless you also know that its sibling widget has a size_hint of 2 (the first widget will be smaller than the second) or 0.5 (the first widget will be larger). Have a look at Example 1-6, rendered in Figure 1-5.
BoxLayout:orientation:"vertical"BoxLayout:Button:size_hint_x:1Button:size_hint_x:1Button:size_hint_x:1BoxLayout:Button:size_hint_x:1Button:size_hint_x:2Button:size_hint_x:3BoxLayout:Button:size_hint_x:1Button:size_hint_x:0.75Button:size_hint_x:0.25
The first button in each row has a size_hint_x value of 1. However, its size is different in each row because the sibling buttons in each row have size_hint_x values that are bigger or smaller.
Size advice
Sometimes having widget sizes calculated relative to the sizes of other widgets is exactly what you need. Other times, you need to control the size in one or both dimensions a little more accurately. This is where the width and height properties come in.
Tip
One of the most frustrating layout issues for Kivy newbies is that size properties (including width and height) are ignored unless the relevant size_hint properties are set to None. The default value for a size_hint is 1.0.
Thus, as a rule of thumb, any time you choose to set a height on a widget, you must also set size_hint_y to None. Similarly, any time you set a width, you must set size_hint_x to None if you want to get the expected results. And, of course, if you set the size property instead, you should set size_hint to (None, None).
The width and height values themselves are pretty easy to interpret. They can be integer values, in which case they refer to the pixel size of the widget on the screen. However, you can also pass string values such as "1cm", "0.75in", or "100dp" to render the widget relative to the resolution of the display. This is almost always a good idea, because modern devices can have an extremely wide variety of pixel densities. A pixel on a cheap laptop might be three times the size of a pixel on a high-end smartphone, and the disparity is even larger for so-called retina displays.
Personally, unless I have a good reason to do otherwise, I always use Kivy’s concept of display pixels by passing a suffix of dp to my height and width properties. A display pixel is a resolution-independent value that roughly maps to “the size of a pixel on a typical laptop at 72 dots per inch.” On a lower-end screen, 1 display pixel is equivalent to 1 pixel. On top-end displays, a display pixel might be 3 or 4 real pixels wide. The display pixel will be roughly the same size on all the devices; it’s the pixels themselves that are smaller. It’s not guaranteed, but I find that a display pixel on mobile devices is a bit bigger than on desktops and laptops. This is useful, since touch interfaces need to provide a bit more room for widgets to accommodate the clumsy size of the human finger.
Remember that a given layout is free to ignore the width and height properties if it so chooses. Also remember that most Layouts will ignore those properties no matter what, if the size_hint has not been set to None in that dimension. Keep this knowledge close to hand, and you should (I hope) never have to go through the trauma that I did to figure out Kivy sizing! It’s really quite elegant; I don’t know why I once found it so difficult.
See it in action
After all that reading, you’re probably eager to see some KV language code. Hopefully Example 1-7 will satisfy you.
-
Pay close attention to the indentation so you can tell what size property has been set on which widget. Remember, there are two
BoxLayoutobjects. The outerAddLocationForm, a type ofBoxLayout, is vertical. You are setting the inner (by default, horizontal)BoxLayoutto have an explicit height of 40 display pixels. This means theTextInputand two button widgets inside will be constrained to that height, since they expand to fill the full height of the parent. Note the explicit setting ofsize_hint_ytoNone!-
The
TextInputis given asize_hint_xof50to make it take up half the width of the window, since the parent widget takes up the full window size.-
The two
Buttonobjects are assigned asize_hint_xof25so they each take up a quarter of the width. Thesize_hint_xvalues for the three widgets total100, making it easy for us to think of them as percentages.
The
ListViewhas not been given any additional size information. Itssize_hintdefaults to(1, 1). It’s in a verticalBoxLayout, so its width will be the full width of the parent. The only other widget in thatBoxLayouthas asize_hint_yofNone, so theListViewwill take up all remaining vertical space after the40dpfor the otherBoxLayoutis deducted.
The result is rendered in Figure 1-6. It was clearly coded by a programmer, not a user interaction designer, but it does the job and beautifully illustrates the concepts you’ve learned in this chapter.
File It All Away
Programming is a task that is best learned by doing, not reading, studying, watching, or listening. Take some time to try things and mess up. I close each chapter with a set of explorations you can use to guide your study. Don’t think of them as exercises. Think of them as topics. Programming is best facilitated by a sense of wonder. Never be afraid to ask, “What happens if I do this?” (unless you are testing on live code deployed to a nuclear facility, moving vehicle, or my personal mobile phone). Here are a few ideas to get you started:
-
Check out Kivy’s extensive API documentation, focusing on the
kivy.uixmodules, which describe the widgets shipped with Kivy. Pay special attention to the different types ofLayoutclasses.BoxLayoutis usually the best choice unless you’re doing something specific. - Clone the Kivy repository and check out the examples directory. Pay particular attention to the showcase and kivycatalog examples in the demo folder. The latter even allows you to interactively change KV language code to see what happens. It’s pretty awesome (I wrote it).
-
Try coming up with several toy layout projects using the widgets you encountered in this chapter and any others that tickle your fancy. If you’re having trouble coming up with ideas, try a basic login form (
TextInputhas a Booleanpasswordproperty) or a web browser toolbar. -
Experiment a lot with different
size_hintandsizecombinations on aBoxLayoutuntil you understand what works and what doesn’t. -
Experiment with the other built-in
Layoutclasses that come with Kivy.FloatLayoutandGridLayoutare popular for certain specific tasks.AnchorLayoutandStackLayouthave, in my opinion, less common utility. Figure out how each interpretssize_hintandsize.
Get Creating Apps in Kivy now with the O’Reilly learning platform.
O’Reilly members experience books, live events, courses curated by job role, and more from O’Reilly and nearly 200 top publishers.

