Chapter 4. Managing Starts and Stops
In the previous chapter, you created the first version of the process diagram, matching the basic flow that was described in the requirements.
This chapter considers the overall structure of the Tahiti application, and how the processes within the application start and stop. Helen’s description of the vacation management application that she wants is broken down into a user experience description of the visible elements application, including the usage pattern of each element (what, who, how). This is then used to define the components of the application, how they are related, and how they are started and stopped. At the end of the chapter, you will update the diagram to include more process components.
User Experience Description
This section contains the application description broken down into a set of descriptions of the visible parts of the application, with details of the usage pattern of each one, and an extract of the requirement from Helen.
Application Page with Vacation Statement
What: A summary of days available, booked, and taken, then a table showing requests. Team information for managers. Button to modify or cancel pending vacation requests. Button to cancel an approved vacation request. Button to open a form to create a new request. This is what Helen asked for:
...display the number of days I have available to book, and the number of days booked but not yet taken. This is a kind of “vacation statement,” like a bank statement but for my vacation days! From this page, I want to click a button and fill in a form to request vacation.
Who: All users.
How: Log in to the application, and this is what you see.
Vacation Modification Option
What: A form to modify a previously submitted vacation request, for vacation that has not been approved. Has the details of the original request pre-filled.
Who: All users
How: Select vacation request in vacation statement and click a button to see a modification form, which is added to the application page.
Vacation Cancellation Option
What: A button in the vacation statement, used to cancel or request cancellation of previously booked vacation.
Who: All users.
How: Select vacation request in vacation statement and click a button. If the request is pending, it is just cancelled. If it is already approved, the cancellation request is sent to the manager for approval.
Notification for Manager of Pending Request
What: An automatic notification sent by email to the manager of someone who submits a vacation request, requesting review and approval. Helen was not specific about how the manager should be informed that there is a request to review:
The request is sent to my manager, who reviews it and approves or refuses it.
Who: All managers.
How: Email is sent automatically.
Vacation Request Review Form
What: The form that a manager uses to review a vacation request and decide whether to approve or refuse it. Similar forms are used for new requests and for cancellation. This is what Helen asked for:
As a manager, when I get a request to review, I need to be able to check at a glance that the requester is using up vacation sensibly so that there isn’t a big backlog at the end of the year.
Who: All managers.
How: In the vacation statement for a manager, select a pending request and click the button to open the review form.
Team Vacation Statement for Manager
What: A list of all the members of a team and the number of vacation days that they have available. This is what Helen asked for:
I need some kind of a vacation statement for the whole team, just available to the manager.
Who: All managers.
How: If you are a manager, your vacation statement includes your team vacation information as well as your own.
Calendar Interaction
What: In the team calendar, everyone can see when a team member has booked vacation. This was Helen’s description of what she needs:
I need approved vacation to be added automatically to the team calendar, so that the whole team can see at a glance who is in work on any date. It would be useful if requested vacation could be in the calendar too, but marked as provisional. That way when I review a request, I can check that there are not too many people absent at the same time.
Who: All users.
How: Calendar is updated automatically when a request is submitted, approved, refused, modified, or cancelled.
HR Tracking of Refusals
What: Some way of tracking requests that are refused. This is what Helen needs for the HR team:
I need a way to check refusals in case an employee complains that a refusal was unfair... We need some kind of tracking of refused requests with the reason for the refusal.
Who: HR.
How: When a manager refuses a vacation request, email is sent to HR. The email notification of refusal has a defined format of subject. Configure your email system to detect this and automatically file the messages.
Component Definitions
Now that we have described the elements of the Tahiti application from the users’ point of view, we need to create a high-level specification for each component, including how they are related. Most of the elements that users see are web pages and forms, but there are processes and other components that connect them together logically or in code, and other components that generate the information that is displayed. This is the set of components that you will create using this book, for the first implementation of the Tahiti application.
Home Page
The key page in the application is the vacation statement. You have already created a prototype for this. “Update the Vacation Statement” explains how to convert this prototype into the page that will be the Tahiti application home page.
There are also the forms used in the processes. Chapter 7 explains how to create forms for the processes.
Vacation statement
This is the landing page that a user sees after login. You created a prototype in “Create the Application Prototype”. It shows vacation requests that are pending and approved. It has buttons to start a new request, and to request modification or cancellation of a pending or approved request.
For a manager, the vacation statement is extended to include information about vacation available and pending requests for team members.
Vacation Request Process
In this chapter, you will consider only the default paths of a new vacation request.
The request process contains these elements:
- A human task with a form for creating the new vacation request
- A human task with a form for the manager review of the request
- An email notification of approval sent to the requester
- An email notification of refusal sent to the requester
- An email notification of refusal sent to HR
In the next section, you will update the diagram to show these elements, first updating the tasks and then adding the tasks where email notifications are sent.
In the final Tahiti application, there will also be processes to handle modification and cancellation of a vacation request, and a process to initialize the data used. You will add these in later chapters, after you have created the basic process for submitting and reviewing a request.
Updating the Process Diagram
You need to update the diagram to modify the task at the start of the process, and to add the notification tasks.
Updating the Human Tasks
The diagram already shows the two tasks, Submit vacation request for a user creating a new vacation request, and Review request for the manager reviewing the request.
When a user submits a new vacation request, this creates a process instance. This instance continues to exist until the manager approves or refuses the vacation request and the process reaches one of the ends you defined in the diagram. Submitting a new vacation request is the process instantiation action, so it is defined at the pool level, not in a human task. The process instance does not exist until the vacation request is submitted. Update the diagram as follows:
- Remove the human task called Submit vacation request by selecting it and choosing Delete from the right-mouse-button menu (or pressing the Delete key).
- Connect the Start icon to the Review request task.
- There is no task icon for the process instantiation action, so we recommend you add a text annotation to indicate that the form is needed. To add a text annotation, drag the icon from the palette and drop it on the whiteboard before the Start icon. You can put whatever text you want in a text annotation. In this case, add a note that the vacation request form is used for process instantiation.
The Review request task does not need to be changed, but you can add a text annotation here also, indicating that a form is needed. In this case, add a link from the text annotation to the human task to show they are connected. To do this, select the annotation and drag the arrow to the task.
Your diagram should now look like Figure 4-1:
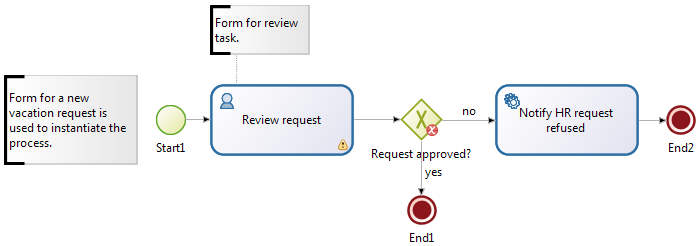
Figure 4-1. Text annotations for forms
Adding Notification Tasks
A notification task is a service task. You need to add service tasks after the Request approved? gateway:
- To inform the user that the request is approved, add a task called Notify employee request approved to the yes branch.
- To inform the user that the request is refused, add a task called Notify employee request refused to the no branch.
You have already created the Notify HR request refused task on the no branch.
Add each missing service task as follows:
- Drag the service task icon from the palette and drop it on the relevant link out of the gateway. This inserts the task in the middle of the link.
- Optionally, rearrange the diagram to make the layout less crowded.
- Change the task name to describe the notification.
- Add a text annotation for the task with a note that the task will send an email message automatically. To do this, click the task to display the context palette, and then drag and drop the Text annotation widget. This creates a text annotation that is linked to the task. Enter the text you want in the annotation. You can enlarge the annotation box so that all the text is visible in the diagram.
Your diagram should now look like Figure 4-2:
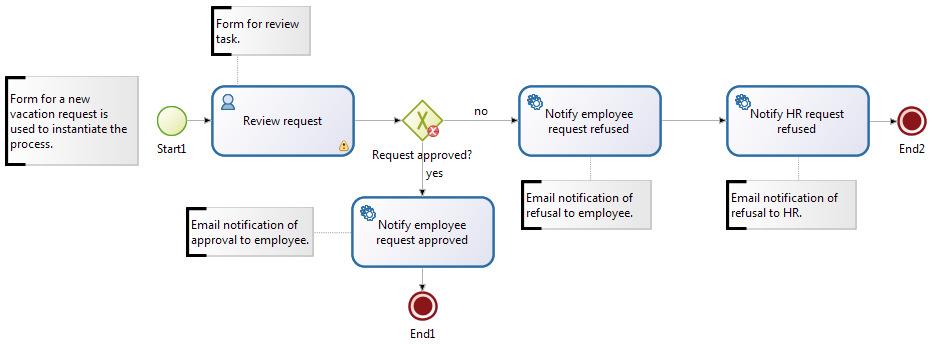
Figure 4-2. Text annotations for email notifications
Chapter 12 explains how to configure a service task to send an email message.
Summary
In this chapter, you have added more items to the diagram, and used text annotations to mark the places where you need to add a form or configure a service task to send an email message.
The next chapter explains how to define who carries out the activities in the process.
Get Designing Efficient BPM Applications now with the O’Reilly learning platform.
O’Reilly members experience books, live events, courses curated by job role, and more from O’Reilly and nearly 200 top publishers.

